
Ionic Succinctly®

CHAPTER 3
Starting the App
Quick intro
We’ve managed to cover a bit of ground—we’ve gotten Ionic up and running, and also explored the project structure that the Ionic CLI created for us.
However, in order to be able to expand our application and give it the functionality we want to achieve, we’ll need to understand how Ionic’s navigation system works. This will be the focus of this chapter. With this said, let’s jump right in and begin exploring Ionic’s fascinating and well-designed navigation system.
Overview
Navigation in Ionic-Angular is completely different from how it was in Ionic 1, as it has been rewritten from the ground up.
In Ionic-Angular, the foundation of the navigation system is known as the navigation stack—which is what we’ll need to understand first. Understanding how the navigation stack works will help us modify our app and put the necessary views in place that our application will eventually use.
Like with any navigation system, we’ll also explore how to pass parameters between views.
Navigation stack
As the name implies, Ionic’s navigation system is based on the concept of a stack, which means that views are mounted one on top of the other.
This stack provides an API for navigation that Ionic-Angular apps use; however, Ionic is doing a bit more than just providing us a stack to mount our app’s views. Behind the scenes, Ionic helps improve our app’s performance for us by caching pages in the DOM.
When a user triggers an action on our app that opens a view, a new page is pushed onto the stack in forward navigation, and then popped off the stack when navigating backward. In essence, this is the typical mechanism of how a navigation stack works.
Nowadays, many applications will use just a single navigation stack, known as the root stack. Nevertheless, Ionic supports multiple navigation stacks—a tabbed layout contains its own navigation stack, which is totally independent of the root stack.
Figure 3-a is an illustration of how a typical navigation stack would look to the naked eye, if we could actually see how views are internally organized.
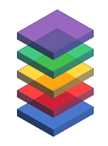
Figure 3-a: A Typical Navigation Stack
Notice how pages stack up one on top of the other. The most recent page (in purple) sits at the top, while the first one opened by the user (in blue) is right at the bottom of the stack.
Main difference from Ionic for AngularJS
In Ionic 1 (with AngularJS), the navigation system was based on the UI Router component, which revolved around the usage of URLs for navigation. Despite URLs not being fully required in Ionic 1’s navigation system, as named routes could also be used, Ionic-Angular completely departed from this. The navigation works based on a stack, so URLs don’t matter at all any more, at least for basic navigation.
Ionic-Angular still supports URLs, but for deep linking, which is the capability of allowing a user to jump straight into a view contained deeper inside the app, such as one that could be launched from a web browser.
App navigation overview
In order to better understand the navigation system of the app we will be building, it’s best to sketch it out in a simple diagram.
In Figure 3-b, the app’s main page will consist of a list of the books present in the Succinctly series. From there, there will be two possible routes to navigate—either to the overview of a specific book (and its details), or to the learning path associated to that book, which will include a list of related books.
From the list of related books, it will be also possible to navigate directly to the overview of a specific book and to its details.
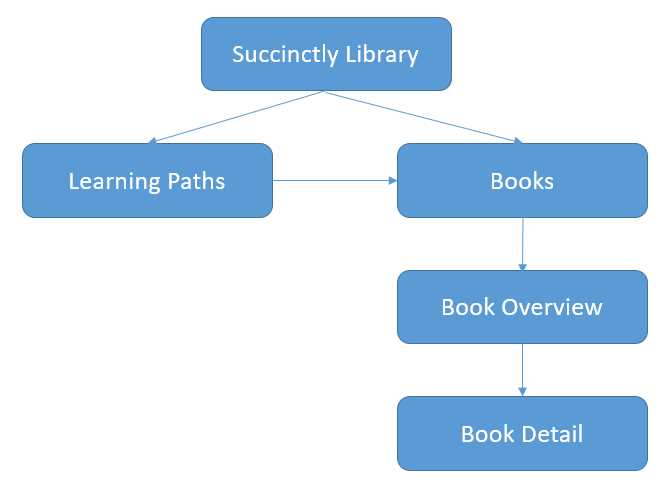
Figure 3-b: Our App’s Pages
Before we even start to implement this navigation system, we first need to generate several pages for these screens.
Let’s start with the library page, since this is going to serve as the home page of our app.
Creating the app’s main page
From here on, we’ll start to write code. I usually prefer to use lighter themes when writing code (rather than darker ones)—that’s just a personal preference, so I’ll change my Visual Studio Code theme to a lighter one, which you’ll notice on the screen shots that will follow.
To create the app’s main page, navigate in Visual Studio Code to the \src\pages folder and create a new folder under it, called library.
This will be the main page for our application, which corresponds to the Succinctly Library page from Figure 3-b.
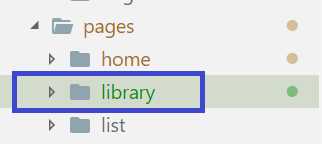
Figure 3-c: The “library” Folder
With this folder created, let’s create a TypeScript file in the new directory that is going to serve as our component. We’ll call this file library.ts.
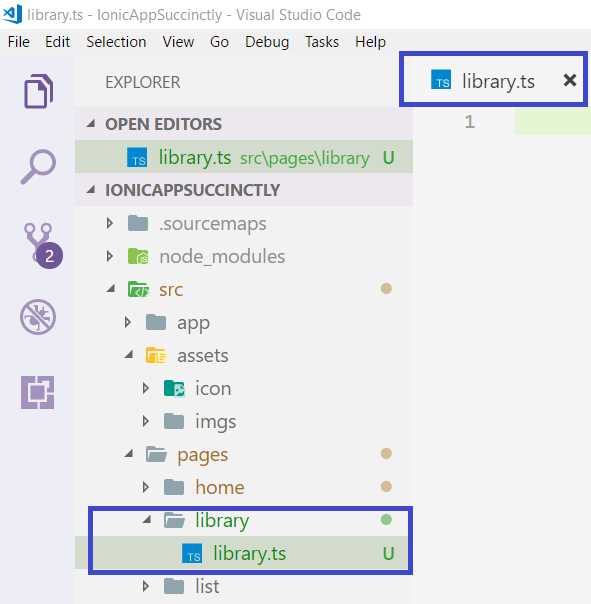
Figure 3-d: The library.ts File
After creating this file, let’s go ahead and add the following boilerplate code. This will be the base for this component.
Code Listing 3-a: Boilerplate Code for library.ts
import { Component } from '@angular/core'; import { IonicPage, NavController, NavParams } from 'ionic-angular'; @IonicPage() @Component({ templateUrl: 'library.html', }) export class LibraryPage { constructor(public navCtrl: NavController, public navParams: NavParams) { } ionViewDidLoad() { console.log('ionViewDidLoad LibraryPage'); } } |
This code simply creates a TypeScript Angular component that references an HTML file, which will contain the layout for this page. We’ll add extra features as we go.
Creating this component also requires we create the corresponding HTML file for it, which we’ll call library.html. We can create this file in the same \library folder.
Once you have created this file, please add the following boilerplate code to it.
Code Listing 3-b: Boilerplate Code for library.html
<ion-header> <ion-nav-bar> <ion-title>Succinctly Library</ion-title> </ion-nav-bar> </ion-header> <ion-content padding> </ion-content> |
Looking at this code, we can see that we have an ion-header with an ion-nav-bar component, in which we have placed the page’s title.
It is suggested that Ionic-Angular pages have a corresponding NgModule. This means we should manually also create a library.module.ts file; however, using the syntax described in Code Listing 2-e eliminates the need to have a .module.ts file for every page.
There’s a way to automatically generate a .module.ts file (and all the files corresponding to a new page). This can be achieved by running the ionic generate page »page name» command.
For now, let’s manually create a library.module.ts file in the \library folder with the following boilerplate code.
Code Listing 3-c: Boilerplate Code for library.module.ts
import { NgModule } from '@angular/core'; import { IonicPageModule } from 'ionic-angular'; import { LibraryPage } from './library'; @NgModule({ declarations: [ LibraryPage, ], imports: [ IonicPageModule.forChild(LibraryPage), ], }) export class LibraryPageModule {} |
We’ve now created the basic code templates for our main page. Before we create other pages, let’s quickly have a look at how to make our Ionic-Angular development life easier.
Visual Studio Code Ionic plugins
Visual Studio Code is a great development environment, and as such, it has a vast ecosystem of third-party plugins that make a developer’s life much easier.
To make my Ionic-Angular development easier, I’ve installed some plugins through the Extension option by typing in ionic or ionic2, as seen in the following figure.
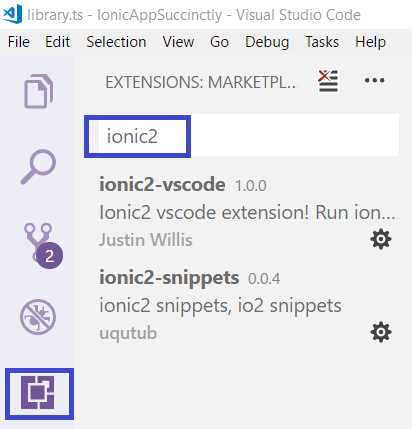
Figure 3-e: Ionic Extensions for Visual Studio Code
Once the plugins are installed, you’ll see a small button next to each of the ones you installed with a request to Reload Visual Studio Code.
To work with the plugins, click any of the Reload buttons—this will close the current running instance of Visual Studio Code and open up a new one.
We now have some cool Ionic plugins installed that we can work with.
Creating pages with the CLI
I’m a bit of an old-school person, which means I like to actually write code from scratch. Nowadays, however, many tools—including the Ionic CLI—are able to generate boilerplate code by simply running a command. Let me show you how you can do this with Ionic-Angular.
I’ll open the command prompt and navigate to the folder where I have the code for the app we are building. All I need to do in order to generate a new page is enter the following command.
Code Listing 3-d: Ionic Generate Page Command
ionic generate page paths |
The keyword paths is the actual name of the directory that will be generated by the Ionic CLI. Once the command has successfully executed, we’ll see an output similar to this.
![]()
Figure 3-f: Ionic CLI Command Successfully Executed
How cool is that? If we now inspect the folder structure within Visual Studio Code, we can see that the following files were added.
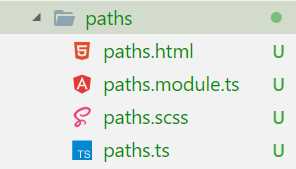
Figure 3-g: The “Paths” Page Files
The paths files correspond to the Learning Paths page from Figure 3-b. With this one out of the way, let’s create the remaining pages for our app with the Ionic CLI.
Let’s create the Books page—we can do this by executing the following command.
Code Listing 3-e: Generate the Books Page
ionic generate page books |
The next one is the Book Overview page. We can generate it by running the following command.
Code Listing 3-f: Generate the Book Overview Page
ionic generate page bookoverview |
The last page we need to generate for our app is the Book Detail page. So let’s create it with the following command.
Code Listing 3-g: Generate the Book Details Page
ionic generate page bookdetail |
If you like, you can also automatically generate the Library page files by running the following command. But before you do that, remove the library.* files you created previously.
Code Listing 3-h: Generate the Library Page
ionic generate page library |
All the pages that our application will use have now been generated. We can inspect their files by going into their respective folders in Visual Studio Code.
Wiring up the new pages
Now that we have all the pages our app will need, we need to remove the references to the two pages that came out of the box, and that the CLI generated for us when the application was created: Home and List.
In order to do this, open the app.component.ts file under the \src\app folder, remove the references to the home and list pages, and add the references to some of the pages we’ve created, such as: Library, Paths, and Books.
We also need to point the rootPage variable to LibraryPage instead of HomePage. Furthermore, this.pages (which is used for the side menu) has also been updated.
The updated app.component.ts file should now look as follows.
Code Listing 3-i: The Updated app.component.ts File
import { Component, ViewChild } from '@angular/core'; import { Nav, Platform } from 'ionic-angular'; import { StatusBar } from '@ionic-native/status-bar'; import { SplashScreen } from '@ionic-native/splash-screen'; import { LibraryPage } from '../pages/library/library'; import { PathsPage } from '../pages/paths/paths'; import { BooksPage } from '../pages/books/books'; @Component({ templateUrl: 'app.html' }) export class MyApp { @ViewChild(Nav) nav: Nav; rootPage: any = LibraryPage; pages: Array<{title: string, component: any}>; constructor(public platform: Platform, public statusBar: StatusBar, public splashScreen: SplashScreen) { this.initializeApp(); this.pages = [ { title: 'Paths', component: PathsPage }, { title: 'Books', component: BooksPage } ]; } initializeApp() { this.platform.ready().then(() => { this.statusBar.styleDefault(); this.splashScreen.hide(); }); } openPage(page) { this.nav.setRoot(page.component); } } |
Now, run the ionic serve command and open your browser to see how it looks. In my case, I see the following.
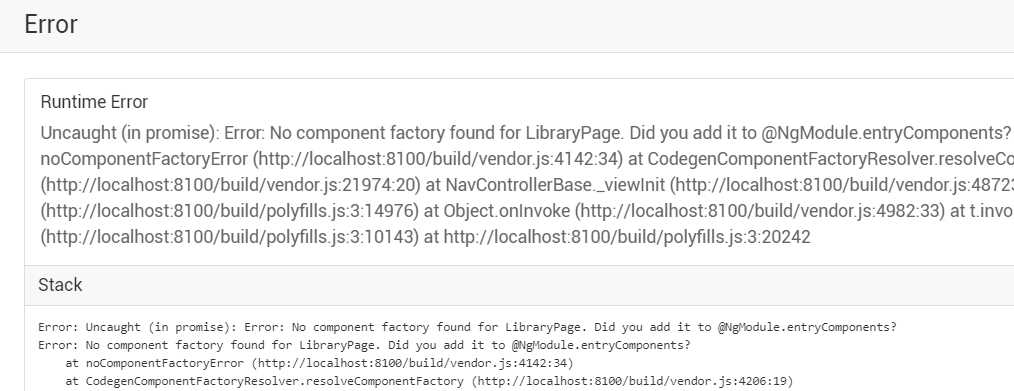
Figure 3-h: A Runtime Error
Oops! Wait, what happened here?
We are getting this error because we also need to edit the app.module.ts file, remove the old references to the Home and List pages, and add the references to the Library page.
Here’s what the updated app.module.ts file looks like.
Code Listing 3-j: The Updated app.module.ts File
import { BrowserModule } from '@angular/platform-browser'; import { ErrorHandler, NgModule } from '@angular/core'; import { IonicApp, IonicErrorHandler, IonicModule } from 'ionic-angular'; import { MyApp } from './app.component'; import { LibraryPage } from '../pages/library/library'; import { StatusBar } from '@ionic-native/status-bar'; import { SplashScreen } from '@ionic-native/splash-screen'; @NgModule({ declarations: [ MyApp, LibraryPage ], imports: [ BrowserModule, IonicModule.forRoot(MyApp), ], bootstrap: [IonicApp], entryComponents: [ MyApp, LibraryPage ], providers: [ StatusBar, SplashScreen, {provide: ErrorHandler, useClass: IonicErrorHandler} ] }) export class AppModule {} |
What I’ve done is update the NgModules declarations and entryComponents arrays with the Library page name.
Because we are running the ionic serve command, it is performing live, reloading when any changes take place. Let’s now have a look at the browser.
![]()
Figure 3-i: The App’s Updated UI (1)
The Library page is now set as our app’s home page, based on the changes we’ve recently made.
However, as you can appreciate, there’s not much of a user interface yet. To speed things up a bit, simply open up the home.html file, copy its content, and replace the content of library.html with the content you copied.
Have a look at your browser—now the UI should look as follows.
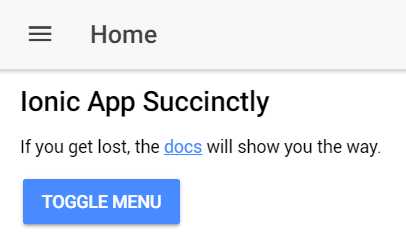
Figure 3-i: The App’s Updated UI (2)
Given that we previously updated this.pages on app.component.ts with the names of the main pages we created with the CLI—specifically, Paths and Books—the side menu should now look as follows.

Figure 3-j: The Updated Side Menu
We now have all our new pages wired up to the original scaffolded project we created using the CLI.
Summary
In this chapter, we’ve quickly looked at how the navigation stack in Ionic-Angular works and started off our project by adding the pages we’ll need in order to build our app.
We also wired these pages up to the project that was originally scaffolded by adding the necessary references to the app.component.ts and app.module.ts files.
We are now ready to actually build our app—this is what we’ll do in the next chapter. Let’s get our hands dirty.
- 1800+ high-performance UI components.
- Includes popular controls such as Grid, Chart, Scheduler, and more.
- 24x5 unlimited support by developers.