
Ionic Succinctly®

CHAPTER 5
Further Resources
Quick intro
There’s so much more to the Ionic framework that I’d probably need at least two or three more books to cover it all, and who knows—I might write a follow-up on this topic in the future. But for now, I think we’ve managed to achieve the goal of covering how to get started and build something without adding unnecessary complexity.
In any case, I’d like to quickly go over some extra Ionic framework resources and details that might come in handy while you keep exploring this fascinating ecosystem on your own.
Exploring the documentation
Needless to say, the Ionic documentation is the definitive resource from all points of view. It is organized into various sections that make it incredibly easy for anyone to find relevant information.
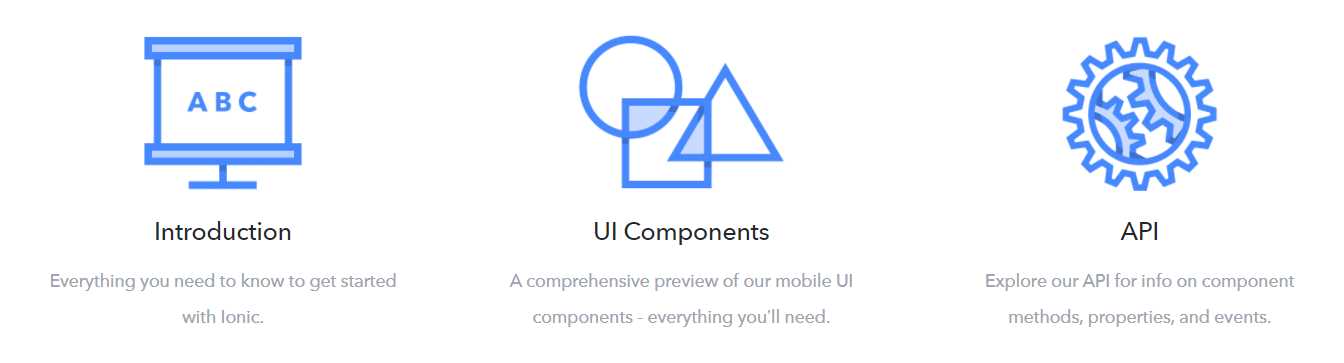
Figure 5-a: Screenshot of the Ionic Documentation Site
Here are the main sections the documentation covers:
- Introduction: Getting started with the framework.
- UI Components: Reference guide for all the available components.
- API Reference: Up-to-date details of all the methods, properties, and events.
- Ionic Native: How to integrate native functionalities and use plugins.
- Theming: How to change the look and feel of your app.
- Ionicons (Icons): Extensive information on all Ionic custom-designed icon resources.
- CLI: Complete information on how to use the Command Line Interface.
Beyond these topics, the documentation site also provides an extensive FAQ and hosts a forum where users ask all sort of questions of the Ionic technical team and get feedback on their queries.
Overall, the documentation is an invaluable resource.
Native plugins
An Ionic app running on a browser will not have access to the hardware on the device. A great thing about Ionic is that it has plugins to get around these limitations.
These plugins are usually referred to as native plugins because they give you access to the hardware present on the device.
![]()
Figure 5-b: A “Plugin” Icon
As time has passed, these plugins have expanded beyond offering only access to the hardware, by also providing many different features that you would expect from a mobile app.
Many of these plugins can only be tested directly on a device, and may fail while being tested on a browser. The reason is that many of these plugins might be looking for a hardware functionality that only exists on the device itself.
One of the most well-known or often-used plugins is the one that provides access to the device’s camera. Although we won’t be adding any further code to our application to make use of the camera, it’s useful to know which commands you may use in case you feel like playing around with it.
Code Listing 5-a: Commands to Install the Camera Plugin
ionic cordova plugin add cordova-plugin-camera npm install --save @ionic-native/camera |
The execution of these commands lets us install the necessary Cordova plugin that gives us access to our device’s camera, allowing us to capture still images and video.
Once installed, you can use the following code in order to import the plugin and inject the Camera object—this is done within a TypeScript file.
Code Listing 5-b: Importing the Camera Plugin
import { Camera, CameraOptions } from '@ionic-native/camera'; export class SomeClass { constructor(private camera: Camera) { } } |
The example that follows illustrates how we can supply the camera options to the getPicture method.
Code Listing 5-c: Supplying the Camera Options to the getPicture Method
const options = CameraOptions = { destinationType: this.camera.DestinationType.DATA_URL, mediaType: this.camera.MediaType.PICTURE }; this.camera.getPicture(options).then((imageData) => { let base64Image = 'data:image/jpeg;base64,' + imageData }, (err) => { }); |
The camera options allow us to control such things as the image or the video, instead.
There are many other plugins as well—a common one is the push plugin. The use of plugins within Ionic is done with the Ionic Native library.
Ionic Native is a TypeScript wrapper for Cordova/PhoneGap plugins that make it easy to add any native functionality you need to your Ionic mobile app.
I highly encourage you to investigate all the possibilities of using native plugins by checking out the official Ionic Native documentation.
Search bar
Something we can potentially add to our application is a search bar, which has become an expected component in most apps these days.
If we look at the app’s main screen, it’s not easy to find any of the books that are listed within the library quickly.
In order to find a book, we have to either browse through the Paths or Books pages—which is great, but if we had to browse through 100 or more books, it would be a bit tedious.
To make it easier to search for a specific book, let’s add the search bar to the Library page of the app—this will allow us to navigate to the Book Overview page of that book directly.
Here’s how an Ionic search bar looks within the markup code.
Code Listing 5-d: An Ionic Search Bar
<ion-searchbar placeholder="Search titles, press enter" [(ngModel)]="queryText" (search)="updateBooks()"> </ion-searchbar> |
As we can see, the search bar has some attributes: the placeholder, the ngModel query text, and the search, which is the method that will get executed when Enter is pressed.
Before we actually add any functionality, let’s see how it looks on the screen. We can do this by adding that code to the library.html file as follows, and then running the ionic serve command.
Code Listing 5-e: The Updated library.html File
<ion-header> <ion-navbar> <button ion-button menuToggle> <ion-icon name="menu"></ion-icon> </button> <ion-title>Succinctly Library</ion-title> </ion-navbar> </ion-header> <ion-content padding> <ion-searchbar placeholder="Search titles, press enter " [(ngModel)]="queryText" (search)="updateBooks()"> </ion-searchbar> <ion-list *ngFor="let card of cardData" no-padding> <ion-card> <ion-item> <h2>{{card.header}}</h2> <p>{{card.short}}</p> </ion-item> <img src="{{card.img}}" /> <ion-card-content> <ion-card-title> {{card.title}} </ion-card-title> <p>{{card.description}}</p> </ion-card-content> <ion-row center> <ion-col text-center> <button ion-button [navPush]=card.pushPage> {{card.buttontxt}} </button> </ion-col> </ion-row> </ion-card> </ion-list> </ion-content> |
The following screenshot shows how the Library page now looks.
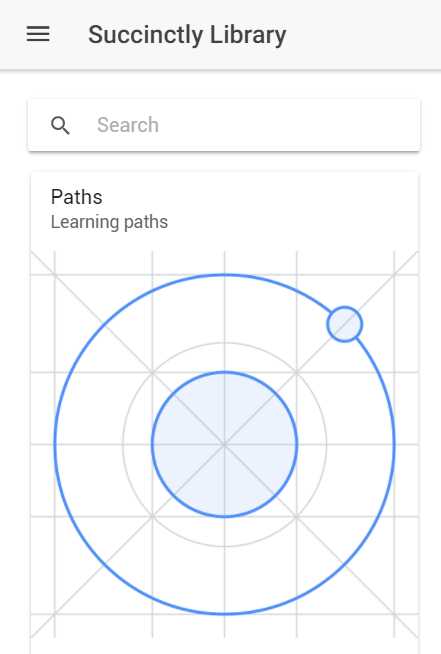
Figure 5-c: The Library Page with a Search Bar
We now have a nice-looking search bar, but it doesn’t do anything yet. Next, we’ll add the actual search functionality to it.
Adding the search functionality
With the library.html file updated, the next thing we have to do is add the logic for our search functionality.
This means we’ll have to update the library.ts file first, and then also update books.ts, as well. Let’s first define the logic behind the updateBooks method, as follows.
Code Listing 5-f: The updateBooks Method
existsIn(str) { let res = false; for (var i = 0; i < this.booksData.length; i++) { if (this.booksData[i].title.toLowerCase(). indexOf(str.toLowerCase()) >= 0) { res = true; break; } } return res; }
itemExists(haystack, needle) { for (var i = 0; i < haystack.length; i++) { if (haystack[i].title.toLowerCase(). indexOf(needle.toLowerCase()) >= 0) { if (!this.existsIn(haystack[i].title)) { this.booksData.push(haystack[i]); } } } } updateBooks() { this.booksData = []; if (this.queryText !== undefined) { let qry = this.queryText.toLowerCase(); this.itemExists(BooksData, qry); if (this.booksData.length > 0) { this.navCtrl.push(BooksPage, this.booksData); } } } |
The updateBooks method basically checks if this.queryText exists as one of the book titles. This is done by the itemExists method, which essentially loops through all the elements of the BooksData array and verifies which of those titles contains this.queryText.
If the itemExists method is able to find a match, then it verifies that the matching element of BooksData doesn’t exist yet within this.booksData—so that no repeated elements are added to this.booksData.
The this.booksData array is what will be passed on as navParams to the Books page when Enter is pressed.
As you can see, all this logic is pretty straightforward and uncomplicated. Now that this has been explained, let’s have a look at the updated library.ts file.
Code Listing 5-g: The Updated library.ts File
import { Component } from '@angular/core'; import { IonicPage, NavController, NavParams } from 'ionic-angular'; import { PathsPage } from '../../pages/paths/paths'; import { BooksPage, BooksData } from '../../pages/books/books'; @IonicPage() @Component({ selector: 'page-library', templateUrl: 'library.html', }) export class LibraryPage { queryText: string; booksData = []; cardData = [ { img: '../../assets/imgs/logo.png', header: 'Paths', short: 'Learning paths', title: '', description: 'Paths are books organized by related topics', buttontxt: 'Explore Paths', pushPage: 'PathsPage' }, { img: '../../assets/imgs/azure.jpg', header: 'Books', short: 'Books to read', title: '', description: 'Over 130 books on technologies that matter', buttontxt: 'Browse Books', pushPage: 'BooksPage' } ]; existsIn(str) { let res = false; for (var i = 0; i < this.booksData.length; i++) { if (this.booksData[i].title.toLowerCase(). indexOf(str.toLowerCase()) >= 0) { res = true; break; } } return res; }
itemExists(haystack, needle) { for (var i = 0; i < haystack.length; i++) { if (haystack[i].title.toLowerCase(). indexOf(needle.toLowerCase()) >= 0) { if (!this.existsIn(haystack[i].title)) { this.booksData.push(haystack[i]); } } } } updateBooks() { this.booksData = []; if (this.queryText !== undefined) { let qry = this.queryText.toLowerCase(); this.itemExists(BooksData, qry); if (this.booksData.length > 0) { this.navCtrl.push(BooksPage, this.booksData); } } } constructor(public navCtrl: NavController, public navParams: NavParams) { } ionViewDidLoad() { console.log('ionViewDidLoad LibraryPage'); } } |
As we can see, besides the updateBooks method-related modifications, the only other changes within the library.ts file are that we imported the original BooksData array from the Books page, declared queryText, and initialized this.booksData.
In order for this to actually work, we need to make the Books page aware that it may receive data from the Library page through the search bar.
So on the constructor of the books.ts file, we need to add some code in order to verify whether the navParams.data is actually not empty.
By default, the Books page displays all the books in the library, so when it is invoked from the Library page with the BROWSE BOOKS button, all the elements of the BooksData array are displayed. This means that, in this case, navParams.data is empty.
However, when the Books page is invoked from the search bar on the Library page, only a subset of the BooksData array is passed on to the Books page as navParams—which means that navParams.data is not empty.
Therefore, the constructor needs to be modified to handle this new scenario, as follows.
Code Listing 5-h: The Updated Constructor of books.ts
constructor(public navCtrl: NavController, public navParams: NavParams) { this.booksData = !this.isEmpty(navParams.data) ? navParams.data : BooksData; } |
To check whether navParams.data is empty, we’ll need to invoke another method, called isEmpty, which is coded as follows.
Code Listing 5-i: The isEmpty Method
isEmpty(obj) { for (var key in obj) { if (obj.hasOwnProperty(key)) return false; } return true; } |
This method simply loops through each of the key-value pairs of the object and checks whether a key has a corresponding value—hasOwnProperty.
With this additional logic, the updated books.ts file now looks as follows.
Code Listing 5-j: The Updated books.ts File
import { Component } from '@angular/core'; import { IonicPage, NavController, NavParams } from 'ionic-angular'; export let BooksData = [ { title: 'Force.com Succinctly', page: 'BookoverviewPage', overview: { author: 'Ed Freitas', numpages: 100, published: 'December 08, 2017', details: { page: 'BookdetailPage', pic: 'https://cdn.syncfusion.com/content/images/downloads/ebook/ebook-cover/forcedotcomsuccinctly.jpg?v=09012018021233', url: 'https://www.syncfusion.com/ebooks/forcedotcomsuccinctly' } } }, { title: 'Azure Cosmos DB and DocumentDB Succinctly', page: 'BookoverviewPage', overview: { author: 'Ed Freitas', numpages: 103, published: 'May 23, 2017', details: { page: 'BookdetailPage', pic: 'https://cdn.syncfusion.com/content/images/downloads/ebook/ebook-cover/Azure_Cosmos_DB_and_DocumentDB_Succinctly.jpg?v=09012018021233', url: 'https://www.syncfusion.com/ebooks/azure_cosmos_db_and_documentdb_succinctly' } } }, { title: 'Microsoft Bot Framework Succinctly', page: 'BookoverviewPage', overview: { author: 'Ed Freitas', numpages: 109, published: 'May 02, 2017', details: { page: 'BookdetailPage', pic: 'https://cdn.syncfusion.com/content/images/downloads/ebook/ebook-cover/Microsoft_Bot_Framework_Succinctly.jpg?v=09012018021233', url: 'https://www.syncfusion.com/ebooks/azure_cosmos_db_and_documentdb_succinctly' } } }, { title: 'Twilio with C# Succinctly', page: 'BookoverviewPage', overview: { author: 'Ed Freitas', numpages: 107, published: 'April 03, 2017', details: { page: 'BookdetailPage', pic: 'https://cdn.syncfusion.com/content/images/downloads/ebook/ebook-cover/Twilio_with_C_sharp_Succinctly.jpg?v=09012018021233', url: 'https://www.syncfusion.com/ebooks/twilio_with_c_sharp_succinctly' } } }, { title: 'Customer Success for C# Developers Succinctly', page: 'BookoverviewPage', overview: { author: 'Ed Freitas', numpages: 97, published: 'October 03, 2016', details: { page: 'BookdetailPage', pic: 'https://cdn.syncfusion.com/content/images/downloads/ebook/ebook-cover/Customer_Success_Succicntly.jpg?v=09012018021233', url: 'https://www.syncfusion.com/ebooks/customer_success_for_c_sharp_developers'} } }, { title: 'Data Capture and Extraction with C# Succinctly', page: 'BookoverviewPage', overview: { author: 'Ed Freitas', numpages: 85, published: 'September 19, 2016', details: { page: 'BookdetailPage', pic: 'https://cdn.syncfusion.com/content/images/downloads/ebook/ebook-cover/Data_Capture_And_Extraction_Succinctly.jpg?v=09012018021233', url: 'https://www.syncfusion.com/ebooks/data_capture_and_extraction_with_c_sharp_succinctly' } } } ]; @IonicPage() @Component({ selector: 'page-books', templateUrl: 'books.html', }) export class BooksPage { booksData = BooksData; isEmpty(obj) { for (var key in obj) { if (obj.hasOwnProperty(key)) return false; } return true; } constructor(public navCtrl: NavController, public navParams: NavParams) { this.booksData = !this.isEmpty(navParams.data) ? navParams.data : BooksData; } ionViewDidLoad() { console.log('ionViewDidLoad BooksPage'); } } |
We are done making all the changes needed to have our search bar ready. Let’s now run the ionic serve command and check out our search bar’s functionality.
In order to test things properly, I’ll type in C# and press Enter. I should expect to get three results—let’s see if that’s the case.
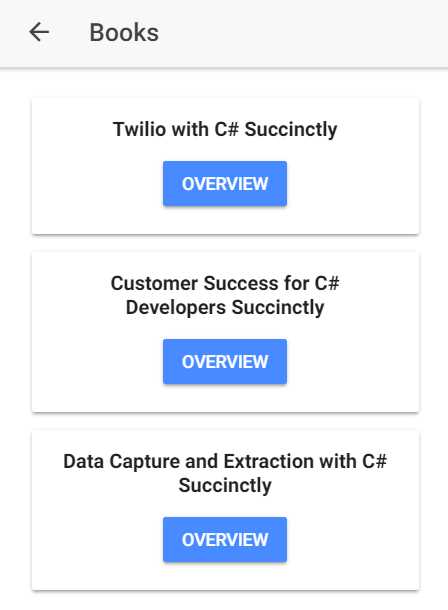
Figure 5-d: The Search Bar Results
Great—it works as expected. By simply adding an extra bit of functionality and reusing the code we already had, we were able to add a really cool and useful feature to our application.
Full, updated source code
The full, updated source code of our application, including the most recent changes with the search bar, can be downloaded here.
Other topics to explore
Although we’ve covered quite a lot of ground, there’s still a lot to explore and learn about the amazing Ionic ecosystem.
The following is a list of items I suggest you look at and investigate on your own time. Although the list is far from being conclusive, it includes some nice aspects that, in my opinion, are worth delving into:
- Geolocation with Ionic Native.
- Vibration and motion detection with Ionic Native.
- Barcode scanning using Ionic Native.
- Notifications with Ionic Native.
- Integrating SQLite into your app.
- Deployment and testing on native platforms: iOS and Android.
Summary
Ionic is a mature, solid, easy-to-learn, and state-of-the-art development framework for mobile and Progressive Web Apps. What can be done with this framework with a few lines of code is remarkable.
The goal of this book was to walk you through a simple but interesting example on how to build a useful application with Ionic, without requiring any previous knowledge of Ionic 1 or Angular. I think we achieved this objective and had some fun along the way.
This book is by no means an Ionic “bible,” as the length, depth, and extension of the framework would require many more pages than what we could cover at this point in time—but we did manage to introduce and show what you can do with this framework with a few simple steps.
I really hope you enjoyed reading this book as much as I enjoyed writing it, and I hope this serves as a source of inspiration for you to keep exploring this fascinating technology.
Thank you, and until next time, all the best.
- 1800+ high-performance UI components.
- Includes popular controls such as Grid, Chart, Scheduler, and more.
- 24x5 unlimited support by developers.