
Ionic 4 Succinctly®

CHAPTER 5
Building the PWA
Quick intro
We’ve now reached (in my opinion) the most fun part of the book—which is to add the remaining logic that will make our application a true PWA. Behind us are all the tedious and required configuration settings that helped us get to this stage. Now, let’s dive into the code.
Final main.js file
As its name implies, main.js is the app’s main code entry point, which gets injected into index.html at build time by webpack. Let’s have a look at this file’s final code.
Code Listing 5-a: The Final main.js File
import Vue from 'vue' import App from './App.vue' import router from './router' import Ionic from '@ionic/vue' import '@ionic/core/css/ionic.bundle.css' import './registerServiceWorker' Vue.use(Ionic) Vue.config.productionTip = true new Vue({ router, render: h => h(App) }).$mount('#app') |
It is essentially the same main.js that we previously wrote, except for one additional, but very important, line that we were not able to previously add, which is:
import './registerServiceWorker'
This line references the registerServiceWorker.js file, which is responsible for registering the service worker when the application runs.
It’s a small, but significant change, as it’s a requirement for any PWA to register the service worker when it runs.
Final App.vue file
The App.vue file is the app’s main HTML markup file, and the only thing it does is contain a reference to the ion-vue-router component—which we can see as follows.
Code Listing 5-b: The App.vue File
<template> <div id="app"> <ion-app> <ion-vue-router/> </ion-app> </div> </template> |
Given the App.vue file references the ion-vue-router component, the next thing we need to do is look at the router.js file.
Final router.js file
As its name implies, the router.js file handles the application’s routing, which in the case of this PWA, is limited to Home.vue. Let’s have a look at the final code for router.js.
Code Listing 5-c: The router.js File
import Vue from 'vue' import { IonicVueRouter } from '@ionic/vue' import Home from './views/Home.vue' Vue.use(IonicVueRouter) export default new IonicVueRouter({ mode: 'history', base: process.env.BASE_URL, routes: [ { path: '/', name: 'home', component: Home } ] }) |
No changes here—all this file does is reference Home.vue, which is where the most interesting code of the application resides.
Final Home.vue file
The Home.vue functional component is not only responsible for rendering most of the app’s UI, but also calling the API and parsing and displaying the results. Essentially, it is the heart and soul of our PWA. Let’s have a look at the code.
Code Listing 5-d: The Home.vue File
<template> <div class="ion-page"> <ion-header translucent> <ion-toolbar> <ion-title> Flight Info </ion-title> </ion-toolbar> </ion-header> <ion-content fullscreen class="ion-text-center ion-padding"> <Search v-on:flight="flightDetails"/> <ion-spinner v-if="!info && fn != null" name="dots" color="tertiary"> </ion-spinner> <Info v-bind:fn="fn" v-bind:info="info" /> <Clear v-bind:info="info" v-on:clear="clear" /> </ion-content> </div> </template> <script> import Search from '../components/Search' import Info from '../components/Info' import Clear from '../components/Clear' export default { name: 'home', components: { Search, Info, Clear }, data() { return { info: null, fn: null } }, methods: { getJson(flight) { const proxy = 'https://cors-anywhere.herokuapp.com/' const site = 'https://us-central1-flight-json.cloudfunctions.net/app/api/' fetch(`${proxy}${site}${flight}`) .then(r => r.json()) .then(d => { this.info = d }) .catch(err => console.log('HTTP-Error: ' + err)) }, async flightDetails(flight) { this.fn = flight await this.getJson(flight) if (this.info != null && this.info.length == 0) { this.info = null return this.$ionic.alertController.create({ header: 'Flight', message: 'Flight ' + this.fn + ' not found.', buttons: ['OK'] }).then(r => r.present()) } }, clear() { this.info = null this.fn = null } } } </script> |
To understand what is going on, let’s first focus on the markup and then the code. So, let’s revise each part separately and divided into smaller chunks—this way it will be easier to understand.
Code Listing 5-e: The Home.vue File (Markup Only)
<template> <div class="ion-page"> <ion-header translucent> <ion-toolbar> <ion-title> Flight Info </ion-title> </ion-toolbar> </ion-header> <ion-content fullscreen class="ion-text-center ion-padding"> <Search v-on:flight="flightDetails"/> <ion-spinner v-if="!info && fn != null" name="dots" color="tertiary"> </ion-spinner> <Info v-bind:fn="fn" v-bind:info="info" /> <Clear v-bind:info="info" v-on:clear="clear" /> </ion-content> </div> </template> |
The markup is made up of two main sections—a header (ion-header) and content. The header is made of an ion-title component embedded within an ion-toolbar component. It simply displays the application title.
The content part is more interesting—this is wrapped within an ion-content component. Within it, there is a Search, an ion-spinner (which by default is not visible), an Info, and a Clear component.
To get a better sense of how this markup relates to the finished UI, let’s have a look at the following diagram.
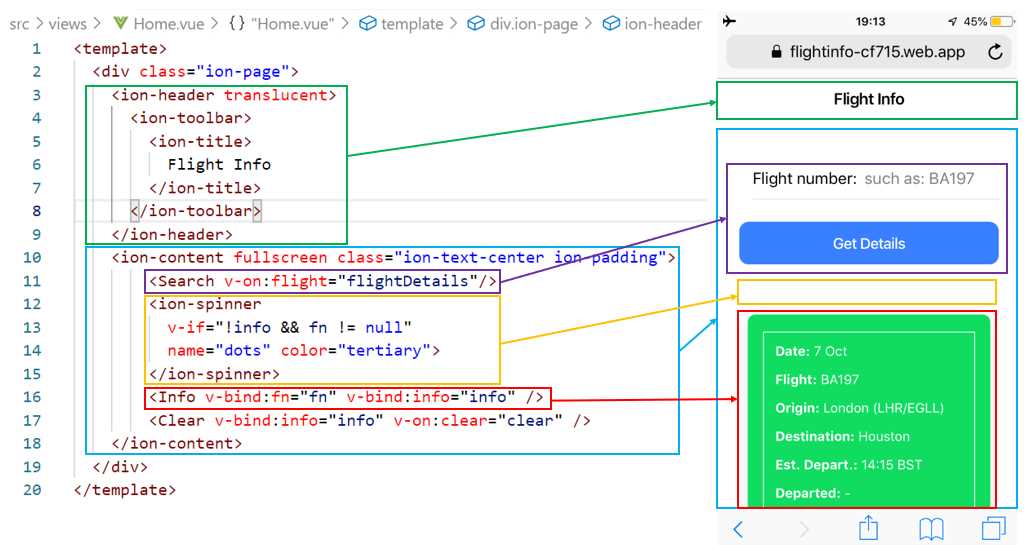
Figure 5-a: Relationship Between the Home.vue HTML and the App’s UI
When the Search component emits the flight event, the flightDetails method is executed. This is what will make the call to the API and retrieve the flight details that are passed to the Info component using the info object (which contains the flight details retrieved from the API). The flight number (fn) is also passed to the Info component.
The ion-spinner component is only displayed when the flight number (fn) has been entered by the user, and the info object doesn’t contain any data—which means that the app still needs to retrieve the flight data from the API. This what the ion-spinner object looks like.

Figure 5-b: The ion-spinner Component (During the Flight Details Search)
The Clear component, which is essentially a button that is shown below the search results, is only displayed when the info object contains data and is rendered as follows. The Clear component emits a clear event that triggers the execution of the clear method, which clears the search results retrieved from the API from the screen.
![]()
Figure 5-c: The Clear Component
Now that we understand how the UI works, let’s explore the code of Home.vue to understand how the data is retrieved from the API and passed to the Search component.
Code Listing 5-f: The Home.vue File (Code Only)
<script> import Search from '../components/Search' import Info from '../components/Info' import Clear from '../components/Clear' export default { name: 'home', components: { Search, Info, Clear }, data() { return { info: null, fn: null } }, methods: { getJson(flight) { const proxy = 'https://cors-anywhere.herokuapp.com/' const site = 'https://us-central1-flight-json.cloudfunctions.net/app/api/' fetch(`${proxy}${site}${flight}`) .then(r => r.json()) .then(d => { this.info = d }) .catch(err => console.log('HTTP-Error: ' + err)) }, async flightDetails(flight) { this.fn = flight await this.getJson(flight) if (this.info != null && this.info.length == 0) { this.info = null return this.$ionic.alertController.create({ header: 'Flight', message: 'Flight ' + this.fn + ' not found.', buttons: ['OK'] }).then(r => r.present()) } }, clear() { this.info = null this.fn = null } } } </script> |
Let’s revise this code from top to bottom to understand what each part does. The first three lines import the Search, Info, and Clear components so they can be referenced and used both in the HTML markup and within the code.
import Search from '../components/Search'
import Info from '../components/Info'
import Clear from '../components/Clear'
Then, these components are referenced within the components object—this way, they become available within the code.
Next, we have the data function, which returns an object that contains the info and fn properties. The info property will be used to store the flight data retrieved from the API, and the fn property is used to keep the flight number for which the information is retrieved.
Within the methods object, there are three methods defined that make the core logic of the application. The main method is flightDetails, which is asynchronous. The flightDetails method calls the getJson method, which is the one that executes the call to the API.
The Clear method is invoked when the Clear button is clicked—all it does is initialize the values of the info and fn properties, so a new search can take place.
The implementation of the flightDetails method is very straightforward. As you can see, it makes a call to the getJson method by passing the flight and awaits its response—the result that the API returns.
If no data is returned by the API (when the this.info != null && this.info.length == 0 condition evaluates to true), then a dialog message is displayed, which is done by calling the following code.
this.$ionic.alertController.create({ header: 'Flight', message: 'Flight ' + this.fn + ' not found.', buttons: ['OK']}).then(r => r.present())
The getJson method is where the magic happens. By using the CORS proxy server, a call to the API is made through the browser’s Fetch API, which in the code is done by calling fetch.
When the Fetch API returns a response, the code contained within the first promise (first then statement) is executed (r => r.json()), which returns the API’s response as a JSON object.
When that occurs, the second promise is executed (the second then statement). That JSON response (represented by the variable d, which stands for data) is assigned to the info property.
If there’s an error during the execution of any of the code contained within fetch, then an exception is raised and caught by the following code: err => console.log('HTTP-Error: ' + err), which simply outputs the error to the console.
That’s it—this is the main logic of our application. As you have seen, it wasn’t difficult at all. Now let’s have a look at the Info and Clear components.
Final Search.vue file
The Search component is another fundamental part of the application, and it is quite straightforward, as well. Let’s have a look.
Code Listing 5-g: The Search.vue File
<template> <ion-grid> <form @submit="onSubmit"> <ion-col> <ion-item> <ion-label>Flight number: </ion-label> <ion-input :value="flight" @input="flight = $event.target.value" placeholder="such as: BA197" name="flight"></ion-input> </ion-item> </ion-col> <ion-col> <ion-button id="btn" type="submit" color="primary" expand="block"> Get Details </ion-button> </ion-col> </form> </ion-grid> </template> <script> export default { name: 'Search', data() { return { flight: '' } }, methods: { onSubmit(e) { e.preventDefault() if (this.flight != '') { this.$emit('flight', this.flight) this.flight = '' } else { this.displayAlert() this.flight = '' } }, displayAlert() { return this.$ionic.alertController.create( { header: 'Flight', message: 'Enter a flight number.', buttons: ['OK'] } ).then(r => r.present()) } } } </script> |
Just like we did with Home.vue, let’s split the logic into two parts to understand it better: the HTML markup that defines the UI and the code. Let’s check out the markup first.
Code Listing 5-h: The Search.vue File (Markup Only)
<template> <ion-grid> <form @submit="onSubmit"> <ion-col> <ion-item> <ion-label>Flight number: </ion-label> <ion-input :value="flight" @input="flight = $event.target.value" placeholder="such as: BA197" name="flight"></ion-input> </ion-item> </ion-col> <ion-col> <ion-button id="btn" type="submit" color="primary" expand="block"> Get Details </ion-button> </ion-col> </form> </ion-grid> </template> |
The following diagram illustrates how this markup relates to the UI elements that make the Search component.
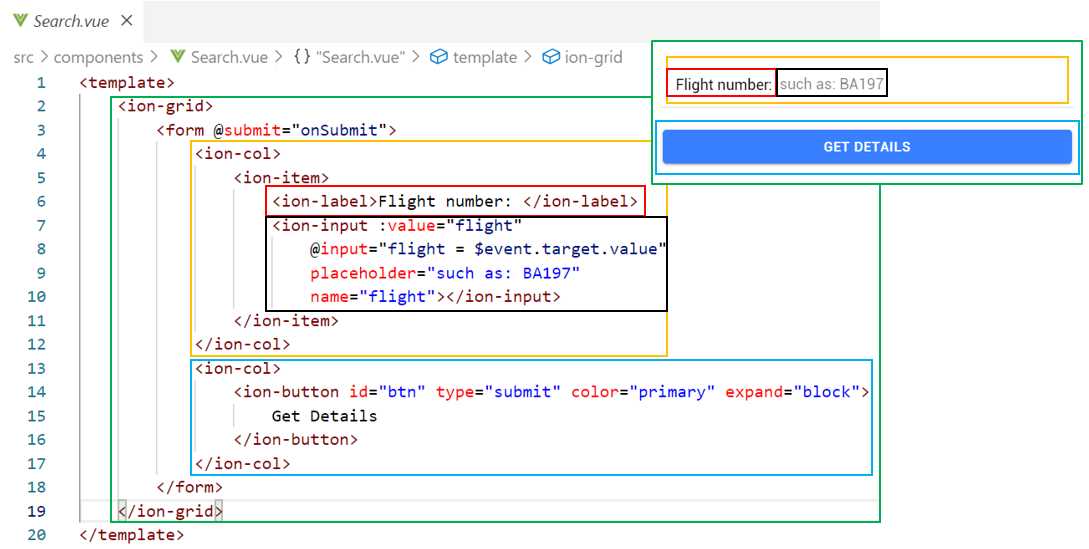
Figure 5-d: Relationship Between the Search.vue HTML and the Search Component UI
The core of the Search UI is composed by a form, which is embedded within an ion-grid component. When it is submitted, this form (which occurs when the Get details button is clicked) triggers the execution of the submit event, which invokes the onSubmit method.
The ion-input component, which is contained within an ion-item and ion-col component, captures the flight number entered by the user, and this value is assigned to the flight variable.
Finally, the ion-button component, contained within an ion-col, can trigger the submit event of the parent form, because its type is set to submit. Let’s have a look at the code.
Code Listing 5-i: The Search.vue File (Code Only)
<script> export default { name: 'Search', data() { return { flight: '' } }, methods: { onSubmit(e) { e.preventDefault() if (this.flight != '') { this.$emit('flight', this.flight) this.flight = '' } else { this.displayAlert() this.flight = '' } }, displayAlert() { return this.$ionic.alertController.create( { header: 'Flight', message: 'Enter a flight number.', buttons: ['OK'] } ).then(r => r.present()) } } } </script> |
The data function returns an object that has a single property called flight, which represents the flight number.
Within the methods object, we have the onSubmit method, which emits the flight event that is intercepted within Home.vue to make the call to the API when the flight number has been entered by the user. If not, then a message dialog is displayed via the displayAlert method.
Final Info.vue file
The Info component is responsible for displaying the flight details retrieved through the API. Following is the full code of this component.
Code Listing 5-j: The Info.vue File
<template> <div> <ion-card color="success" padding="true" v-if="info != null"> <table> <thead> <tr> <th>Date</th> <th>Flight</th> <th>Origin</th> <th>Destination</th> <th>Est. Depart.</th> <th>Departed</th> <th>Est. Arrival</th> <th>Status</th> <th>Aircraft</th> </tr> </thead> <tbody> <tr v-for="(itm, idx) in info.data.flights" v-bind:key="itm.date + '-' + itm.flight + '-' + idx"> <td>{{itm.date}}</td> <td>{{itm.flight}}</td> <td>{{itm.departure}}</td> <td>{{itm.arrival}}</td> <td>{{itm.std}}</td> <td>{{itm.atd}}</td> <td>{{itm.sta}}</td> <td>{{itm.status}}</td> <td>{{itm.aircraft}}</td> <td></td> </tr> </tbody> </table> </ion-card> </div> </template> <script> export default { name: 'Info', props: ['info', 'fn'] } </script> <style scoped> /* Generic styling, for desktops/laptops */ table { width: 100%; border-collapse: collapse; text-align: center; } th { color: white; font-weight: bold; text-align: center; } td, th { padding: 6px; text-align: center; } /* Max width before this PARTICULAR table gets nasty. This query will take effect for any screen smaller than 760px and also iPads specifically. */ @media only screen and (max-width: 760px), (min-device-width: 768px) and (max-device-width: 1024px) { /* Force table to not be like tables anymore */ table, thead, tbody, th, td, tr { display: block; text-align: left; } /* Hide table headers (but not display: none; for accessibility) */ thead tr { position: absolute; top: -9999px; left: -9999px; text-align: left; } tr { border: 1px solid #fff; margin-bottom: 1%; margin-top: 1%; padding-top: 2%; padding-bottom: 2%; text-align: left; } td { /* Behave like a "row" */ border: none; border-bottom: 0px solid #fff; position: relative; /* padding-left: 50%; */ text-align: left; } td:before { /* Now like a table header */ position: relative; /* Top/left values mimic padding */ top: 0px; left: 6px; /* width: 45%; */ padding-right: 10px; white-space: nowrap; font-weight: bold; text-align: left; } /* Label the data */ td:nth-of-type(1):before { content: "Date:"; } td:nth-of-type(2):before { content: "Flight:"; } td:nth-of-type(3):before { content: "Origin:"; } td:nth-of-type(4):before { content: "Destination:"; } td:nth-of-type(5):before { content: "Est. Depart.:"; } td:nth-of-type(6):before { content: "Departed:"; } td:nth-of-type(7):before { content: "Est. Arrival:"; } td:nth-of-type(8):before { content: "Status:"; } td:nth-of-type(9):before { content: "Aircraft:"; } } /* Smartphones (portrait and landscape) ----------- */ @media only screen and (min-device-width : 320px) and (max-device-width : 480px) { body { padding: 0; margin: 0; width: 320px; } } /* iPads (portrait and landscape) ----------- */ @media only screen and (min-device-width: 768px) and (max-device-width: 1024px) { body { width: 495px; } } </style> |
As you have seen, most of the file content is HTML markup and CSS with very little code, except for the definition of the info and fn properties, which contain the flight details and flight number, respectively.
Let’s now explore how the data is displayed, which can be better understood with the following diagram.
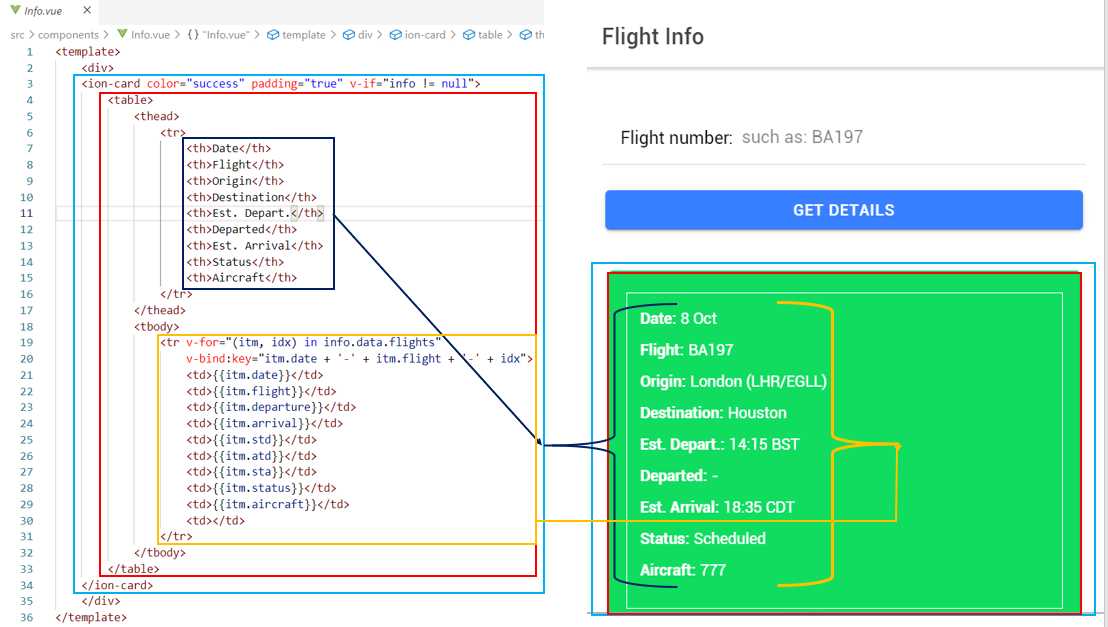
Figure 5-e: Relationship Between the Info.vue HTML and the Info Component UI
The table that displays the flight data retrieved from the API through the info property is contained within an ion-card component. Let’s explore the HTML markup in more detail.
Code Listing 5-k: The Info.vue File (Markup Only)
<template> <div> <ion-card color="success" padding="true" v-if="info != null"> <table> <thead> <tr> <th>Date</th> <th>Flight</th> <th>Origin</th> <th>Destination</th> <th>Est. Depart.</th> <th>Departed</th> <th>Est. Arrival</th> <th>Status</th> <th>Aircraft</th> </tr> </thead> <tbody> <tr v-for="(itm, idx) in info.data.flights" v-bind:key="itm.date + '-' + itm.flight + '-' + idx"> <td>{{itm.date}}</td> <td>{{itm.flight}}</td> <td>{{itm.departure}}</td> <td>{{itm.arrival}}</td> <td>{{itm.std}}</td> <td>{{itm.atd}}</td> <td>{{itm.sta}}</td> <td>{{itm.status}}</td> <td>{{itm.aircraft}}</td> <td></td> </tr> </tbody> </table> </ion-card> </div> </template> |
We can see that the first part of the table (thead) defines the table’s header, which essentially is the name of the fields to display.
Then within tbody, we loop through each itm (which corresponds to a data row) for all the flight details contained within info.data.flights, which represents the object structure of the API’s JSON response.
Notice how for every data row (itm), we are also getting an index (idx), which we combine with itm.date and itm.flight to create a unique key for every row within the table. Each field value is then displayed, such as {{itm.departure}}.
The CSS styling is designed to work and be totally responsive in both desktop and mobile modes. Code Listing 5-l shows the CSS classes and properties that apply for desktop mode. I’ve added some comments to the code that make it easier to understand. Let’s have a look.
Code Listing 5-l: The Info.vue File (Desktop Mode CSS Only)
/* Generic styling, for desktops/laptops */ table { width: 100%; border-collapse: collapse; text-align: center; } th { color: white; font-weight: bold; text-align: center; } td, th { padding: 6px; text-align: center; } |
This styling is quite simple, but the idea is to align the table content centered, and the table can adjust to various desktop resolutions. We can see an example of a desktop resolution in Figure 5-f.
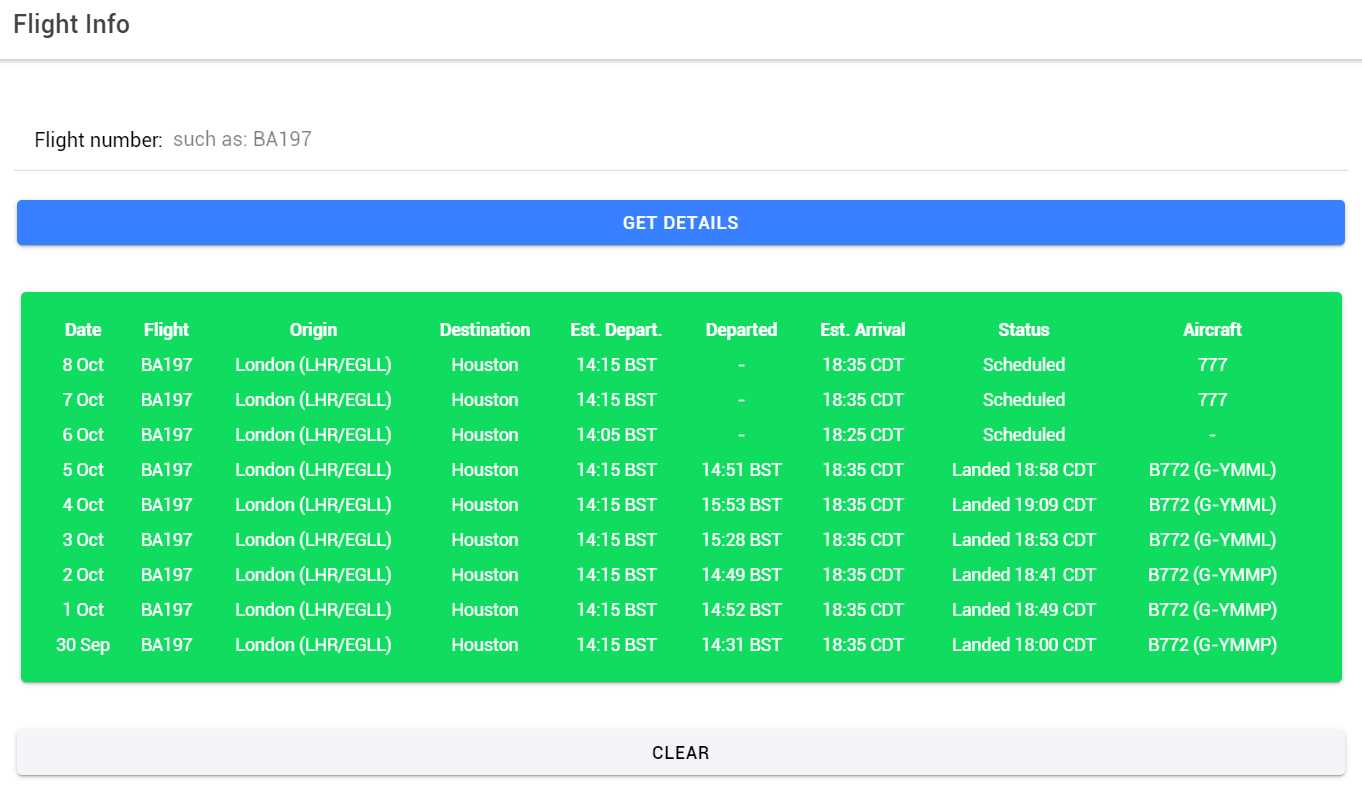
Figure 5-f: App with Desktop Display Mode
Notice how the table’s content can adjust responsively to the screen’s resolution, without any issues.
The nondesktop CSS is slightly more complex, so that the table can be displayed for any mobile device resolution.
Code Listing 5-m: The Info.vue File (Mobile Mode CSS Only)
/* Max width before this PARTICULAR table gets nasty. This query will take effect for any screen smaller than 760px and also iPads specifically. */ @media only screen and (max-width: 760px), (min-device-width: 768px) and (max-device-width: 1024px) { /* Force table to not be like tables anymore */ table, thead, tbody, th, td, tr { display: block; text-align: left; } /* Hide table headers (but not display: none; for accessibility) */ thead tr { position: absolute; top: -9999px; left: -9999px; text-align: left; } tr { border: 1px solid #fff; margin-bottom: 1%; margin-top: 1%; padding-top: 2%; padding-bottom: 2%; text-align: left; } td { /* Behave like a "row" */ border: none; border-bottom: 0px solid #fff; position: relative; /* padding-left: 50%; */ text-align: left; } td:before { /* Now like a table header */ position: relative; /* Top/left values mimic padding */ top: 0px; left: 6px; /* width: 45%; */ padding-right: 10px; white-space: nowrap; font-weight: bold; text-align: left; } /* Label the data */ td:nth-of-type(1):before { content: "Date:"; } td:nth-of-type(2):before { content: "Flight:"; } td:nth-of-type(3):before { content: "Origin:"; } td:nth-of-type(4):before { content: "Destination:"; } td:nth-of-type(5):before { content: "Est. Depart.:"; } td:nth-of-type(6):before { content: "Departed:"; } td:nth-of-type(7):before { content: "Est. Arrival:"; } td:nth-of-type(8):before { content: "Status:"; } td:nth-of-type(9):before { content: "Aircraft:"; } } /* Smartphones (portrait and landscape) ----------- */ @media only screen and (min-device-width : 320px) and (max-device-width : 480px) { body { padding: 0; margin: 0; width: 320px; } } /* iPads (portrait and landscape) ----------- */ @media only screen and (min-device-width: 768px) and (max-device-width: 1024px) { body { width: 495px; } } |
Figure 5-g shows an example of how the app displays the data using a mobile responsive resolution. Notice how the table data changes from a tabular to a columnar layout, where each record becomes a card.
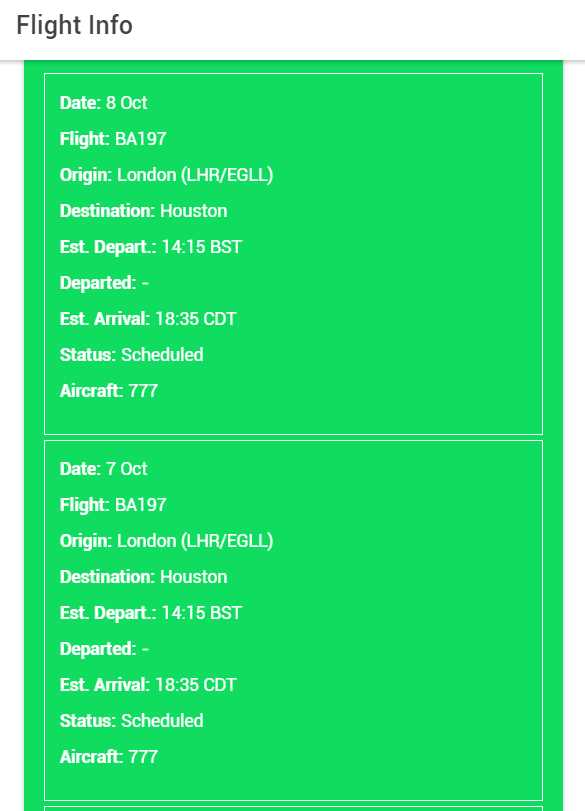
Figure 5-g: App with Mobile Mode Display
Let’s see how each card corresponds to a table row when we switch from one device resolution to another.
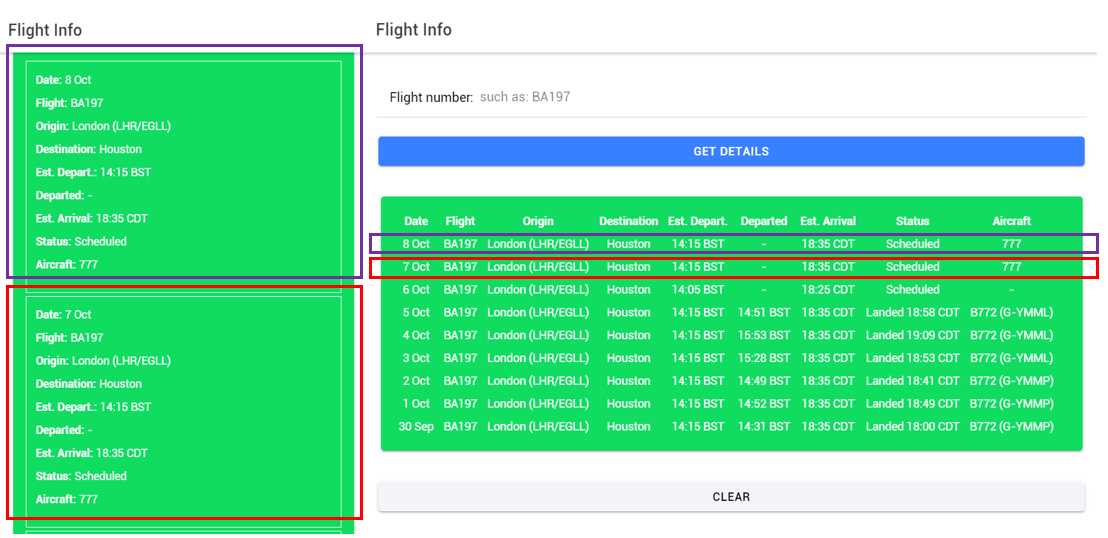
Figure 5-h: Match Between the Data in Both Views (Mobile and Desktop)
This CSS styling gives the app an edge—it can display the flight data in any resolution, on any device. The styling is totally responsive and flexible.
Final Clear.vue file
We’re now on the last component of our application: Clear.vue, which simply contains a button that removes the flight data displayed. Let’s have a quick look at it.
Code Listing 5-n: The Clear.vue File
<template> <ion-grid> <ion-col> <ion-button color="light" expand="block" v-if="info != null" @click="$emit('clear')" >Clear</ion-button> </ion-col> </ion-grid> </template> <script> export default { name: 'Clear', props: ['info'] } </script> |
The code is very simple. The ion-button component is embedded within an ion-col and ion-grid component, so that the button aligns perfectly with the Search and info components.
The button is only displayed when the info property that contains the flight data is not empty (null). This button emits a clear event when it is clicked—this event is intercepted within Home.vue, and the data is cleared there.
Summary
That’s it—our PWA is ready from a code perspective, and we can run it locally by running the npm run serve command. However, we still have one final step remaining before we can deploy it to Firebase: get the Firebase tools installed. This is what we’ll do in the next chapter.
- 1800+ high-performance UI components.
- Includes popular controls such as Grid, Chart, Scheduler, and more.
- 24x5 unlimited support by developers.