
Ionic 4 Succinctly®

CHAPTER 2
Basic App and API Logic
Quick intro
With the development environment set up, and application fundamentals covered, it’s now time to create the rest of the app’s functional components and all the corresponding logic for each one of them—this is what we’ll do throughout this chapter.
Search.vue validation
Now that we have the UI aspect of Search.vue covered, let’s add some logic to it. Note that if you click the Search button, nothing happens.
We need to add logic that validates that the flight number being submitted is not an empty string, and that it is also a valid flight number. This needs to be done before the form is submitted, so that the flight number can be validated before calling the API that will return the flight data.
Let’s start by adding some logic that validates the format of the flight number before it is submitted to the flight tracking API. We can do this by using a regular expression.
Essentially, the Search.vue code remains the same; however, there is extra logic that has been added to perform the flight number validation. These changes have been highlighted in bold in Code Listing 2-a.
Code Listing 2-a: Search.vue—Flight Number Validation
<template> <ion-grid> <form @submit="onSubmit"> <ion-col> <ion-item> <ion-label>Flight number: </ion-label> <ion-input :value="flight" @input="flight = $event.target.value" placeholder="such as: BA197" name="flight"></ion-input> </ion-item> </ion-col> <ion-col> <ion-button type="submit" color="primary" expand="block"> Get Details </ion-button> </ion-col> </form> </ion-grid> </template> <script> export default { name: 'Search', data() { return { flight: '' } }, methods: { onSubmit(e) { e.preventDefault() const isvf = /^(([A-Za-z]{2,3})|([A-Za-z]\d)|(\d[A-Za-z]))(\d{1,})([A-Za-z]?)$/ .test(this.flight) if (isvf) { console.log('Valid flight number...') } else { this.displayAlert() } }, displayAlert() { return this.$ionic.alertController.create( { header: 'Flight', message: 'Enter a valid flight number.', buttons: ['OK'] } ).then(r => r.present()) } } } </script> |
The first change that we’ve made is to add the submit event to form, which is going to execute the onSubmit method when the form gets submitted. This occurs when ion-button is clicked (type="submit" triggers the submission of the form).
The next change to note is with the ion-input component. If this were a regular Vue application, we would use the v-model directive to bind the variable flight to the value of ion-input. By using the v-model directive, we can achieve two-way data binding in Vue.
Since this is not a regular Vue application, but instead we are using Ionic, we cannot use the v-model directive, so we assign the value of the flight variable to the value of ion-input. So far, we have only achieved one-way data binding.
To achieve the other part of two-way data binding, on the input event of the ion-input component, the entered value through ion-input ($event.target.value) is assigned to the flight variable.
The next change to note is the data function, which returns an object with the flight variable as an empty string. This is how the flight variable is initialized.
Then, we have the methods object, which is used to specify the methods that run the component’s logic and validation. Within the methods object, we have the onSubmit method, which contains the main validation logic.
The first thing that is done within the onSubmit method is to invoke e.preventDefault(), which tells the browser that if the event does not get explicitly handled, its default action should not be taken as it normally would be—thus the event continues to propagate with further actions.
Next, within the onSubmit method, the regular expression that checks if the entered flight number is valid is invoked by calling the test method. If the result of that test—which is the value of the isvf variable—is true, then it is a valid flight number. Otherwise an alert is displayed; this is done my calling the displayAlert method.
The logic within the displayAlert method is very easy to understand. The create method from alertController is invoked by specifying the header, message, and buttons properties.
The create method returns a promise that triggers the display of the alert message by invoking the present method from the promise’s response (r).
Now that we know how to validate the flight number, we need to be able to emit it upwards, so the app can process it in Home.vue, and from there, run a function to make a request to a flight-tracking API. Let’s see how we can do this.
Emitting the flight number
We can emit the flight number upwards by calling the $emit method. Let’s modify the onSubmit method within Search.vue to do this.
Code Listing 2-b: Search.vue—Updated onSubmit Method
onSubmit(e) { e.preventDefault() const isvf = /^(([A-Za-z]{2,3})|([A-Za-z]\d)|(\d[A-Za-z]))(\d{1,})([A-Za-z]?)$/ .test(this.flight) if (isvf) { this.$emit('flight', this.flight) this.flight = '' } else { this.displayAlert() this.flight = '' } } |
The changes to the code are highlighted in bold in Code Listing 2-b. The emit gets done by invoking $emit('flight', this.flight).
Once that is done, the value of the flight variable is cleared: this.flight = ''. To be on the safe side, let’s also clear the value of this variable after invoking the displayAlert method. This way, we can prevent emitting a previous or incorrect flight number.
Following is the updated Search.vue code, with the latest changes.
Code Listing 2-c: Search.vue—Updated Code
<template> <ion-grid> <form @submit="onSubmit"> <ion-col> <ion-item> <ion-label>Flight number: </ion-label> <ion-input :value="flight" @input="flight = $event.target.value" placeholder="such as: BA197" name="flight"></ion-input> </ion-item> </ion-col> <ion-col> <ion-button type="submit" color="primary" expand="block"> Get Details </ion-button> </ion-col> </form> </ion-grid> </template> <script> export default { name: 'Search', data() { return { flight: '' } }, methods: { onSubmit(e) { e.preventDefault() const isvf = /^(([A-Za-z]{2,3})|([A-Za-z]\d)|(\d[A-Za-z]))(\d{1,})([A-Za-z]?)$/ .test(this.flight) if (isvf) { this.$emit('flight', this.flight) this.flight = '' } else { this.displayAlert() this.flight = '' } }, displayAlert() { return this.$ionic.alertController.create( { header: 'Flight', message: 'Enter a valid flight number.', buttons: ['OK'] } ).then(r => r.present()) } } } </script> |
Receiving the flight number
Now that we’ve emitted the flight number from Search.vue, it’s time to receive and process it within Home.vue. This is what we’ll do next.
Code Listing 2-d: Home.vue—Updated Code
<template> <div class="ion-page"> <ion-header> <ion-toolbar> <ion-title> Flight Info </ion-title> </ion-toolbar> </ion-header> <ion-content class="ion-padding"> <Search v-on:flight="flightDetails"/> </ion-content> </div> </template> <script> import Search from '../components/Search' export default { name: 'home', components: { Search }, methods: { flightDetails(flight) { console.log('Flight details...') } } } </script> |
I’ve highlighted the code changes in bold in Code Listing 2-d. All we do within the markup is include the Search component with the v-on directive, so that when the flight event is triggered, the flightDetails method can be executed.
Then, within the methods object, in the header of the flightDetails method, flight is passed as a variable. This is because in Search.vue, this.flight was passed when the flight event was emitted: this.$emit('flight', this.flight).
For now, within the implementation of the flightDetails method, all we do is output to the Developer Tools console when the method executes.
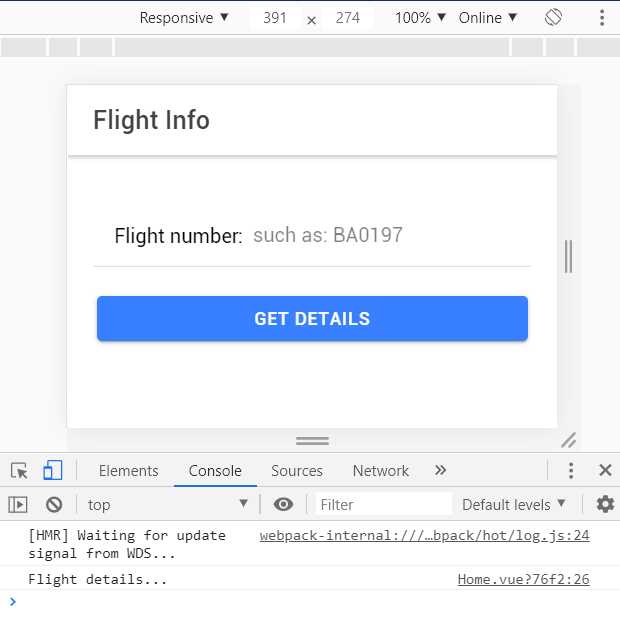
Figure 2-a: The App Running (Console Output)
Now that we know how to emit the flight number from Search.vue and receive it within Home.vue, we can focus on calling the flight tracking API and retrieving flight information.
Flight information APIs
There are many websites that provide real-time flight tracking information, such as: Flightradar24, FlightAware, and FlightStats.
In general (unlike most other APIs), flight tracking APIs are quite expensive to start with and require an upfront investment, which usually means signing up for a business account—thus being out of the reach of most independent software developers or enthusiasts.
Sites like Flightradar24 show flights all over the world in real time So, with the flight number, it’s possible to know important information such as the flight date, origin, destination, departure time, estimated arrival time, the type of aircraft, flight status, and the flight route followed by the aircraft.
Essentially, it’s very useful information to have about any given flight. These sites gather the information by using a combination of sources, such as data obtained from the airlines; data from transmitting stations (radar sources); and data supplied by air traffic controllers, regulators, and government organizations responsible for aviation and safety, like the Federal Aviation Administration.
If you have a look at the Flightradar24 website, you’ll see a world map with an impressive number of airplanes being tracked on the map—each corresponding to a plane flying in real time.

Figure 2-b: Flightradar24 Website
Given that working with sites like these is technically challenging, and that accessing this data usually requires signing up for a business account and paying high API usage fees, we won’t be using any of these sites. Instead, we’ll use a small API that I created, which sources the information from other highly reliable and free alternative sources, such as OpenFlights.
For creating our PWA and testing it, the small Flight API I’ve written uses Firebase, which contains a very small data set of flights that should be enough for testing the PWA. Although the data set is quite small, the information is accurate and fully up to date, in real time.
The way my flight API works is that the data is retrieved, curated, and verified from various sources as it is being requested—therefore, it is as accurate as the data provided by top sites like Flightradar24 and others.
Creating this API was quite a technical challenge, and something I really enjoyed as a side project for this book. However, I won’t cover the steps involved to create it, but will provide it as an alternative to signing up for a business account on any of the paid sites. This way we can focus on the logic of the PWA itself, which is within the scope of this book.
It’s also possible to add further data to the API by running an HTTPS request, which enables the API service to retrieve the most recent flight data for a given flight.
The API I created contains two parts. The first part consists of a service that retrieves the most recent flight data for a specific flight number, through an HTTPS call—this runs on Firebase Hosting and stores the information within Cloud Firestore.
The second part is a Firebase function invokable through an HTTPS request that queries the Cloud Firestore database and returns a JSON response containing the flight data for a specific flight number.
I won’t cover how the first part of the API was developed, as it goes beyond the scope of this book, but I do provide the source code of the Firebase function that returns the JSON response from the API, for educational purposes.
You might be asking yourself why I created this API instead of using another API for a much simpler use case than searching for flight data.
The answer is that PWAs are about consuming APIs, and what makes a PWA interesting and attractive is what data it can provide to its users—near real-time flight information is something cool and very useful for this connected world we live in.
Ed’s real-time flight data
The real-time flight information retrieval API I created fetches flight data from nonproprietary sources, and then it curates and validates the accuracy of the data. The data is then stored within Cloud Firestore. This is how the site looks.
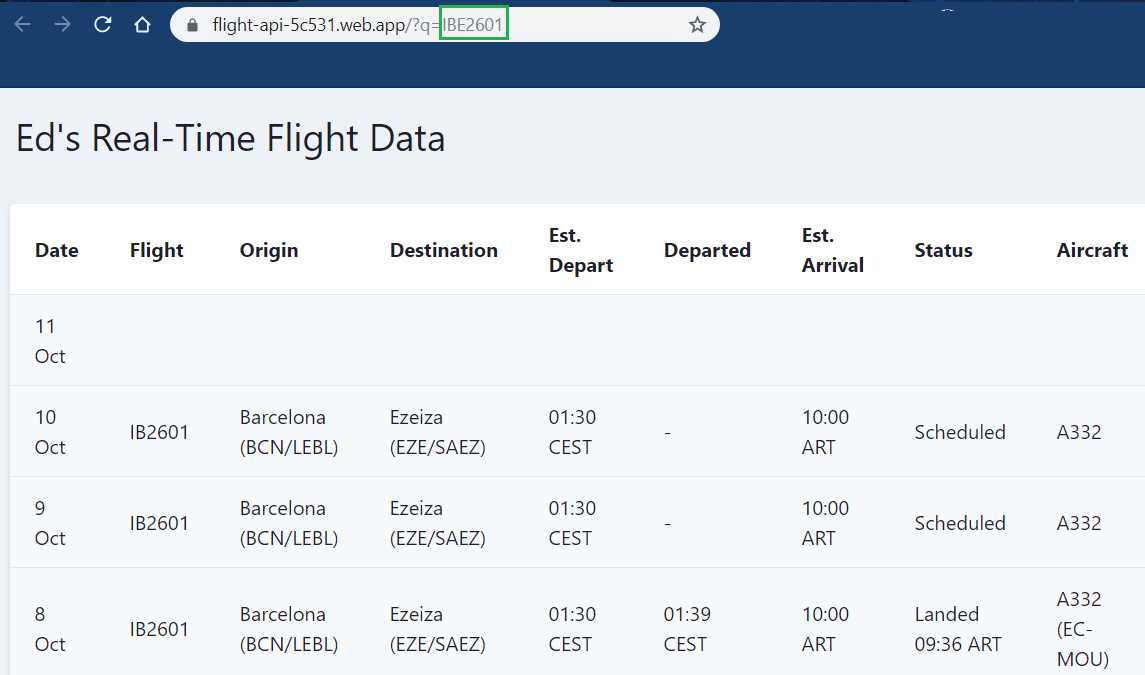
Figure 2-c: Ed’s Real-Time Flight Data (First Part of the API—Data Retrieval and Validation)
The flight information is displayed as a table—there are no little airplanes on a map. However, the data is up to date and accurate. It is retrieved, curated, and verified when the query is executed.
The data might take a few seconds before it is displayed, but generally the process is quite fast, and the data is as up to date and accurate as it would be from any of the paid sites.
This data is retrieved from the API by passing a flight number, highlighted in green in Figure 2-c. This is what I call the first part of the API, which is responsible for data retrieval and validation.
Once the data is retrieved and verified, it is stored as JSON objects within Cloud Firestore so that it can be queried by the PWA. This is what I call the second part of the API, which is what the PWA will invoke and consume. The flight number is also passed as a query, as can be seen in Figure 2-d.
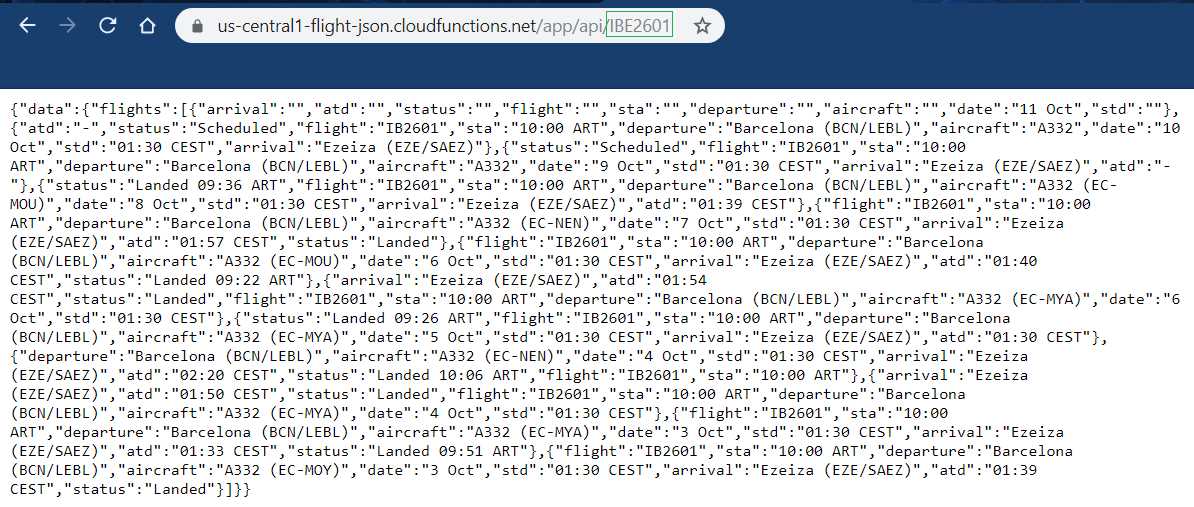
Figure 2-d: Ed’s Real-Time Flight Data (Second Part of the API—Data Consumption)
The data consumption part of the API is actually very simple, and Code Listing 2-e shows all the code required for it (this is not the case for the data retrieval and validation part, which we won’t cover).
The code for the second part is basically a Node Express application that is executed by a Firebase function. The steps necessary to build it aren’t covered as part of the scope of this book, but Code Listing 2-e shows the code for educational purposes.
Code Listing 2-e: Data Consumption API Logic (Node / Express Firebase Function – index.js)
var functions = require('firebase-functions') const admin = require('firebase-admin') const express = require('express') const cors = require('cors') const app = express() var serviceAccount = require("./serviceAccountKey.json"); admin.initializeApp({ credential: admin.credential.cert(serviceAccount), databaseURL: "https://flight-api-5c531.firebaseio.com" }); const db = admin.firestore() app.use(cors({ origin: true })) app.get('/api/:fn', (req, res) => { (async () => { try { if (req.params.fn !== '') { let fn = req.params.fn.toLowerCase() const document = db.collection('flights').doc(fn) let item = await document.get() let response = item.data() return res.status(200).send(response) } else { return res.status(200).send('N/A') } } catch (error) { return res.status(500).send(error) } })() }) exports.app = functions.https.onRequest(app) |
If you’ve done Node development before, notice how small this code is—that’s all it takes to get the JSON data stored within Cloud Firestore that was retrieved, curated, and validated by the initial part of the API.
API execution workflow
The PWAs we are building will only invoke the second part of the API, which returns a JSON response that the app can consume.
Essentially, the PWA will execute a query like the following one, which retrieves the information for a given flight number from Cloud Firestore using a Firebase function:
https://us-central1-flight-json.cloudfunctions.net/app/api/IBE2601
The last part of the query (highlighted in green) corresponds to the flight number that the PWA will retrieve details about.
The flight information (which the PWA will query using the second part of the API) stored within Cloud Firestore is not much, and it is limited to only a few flight numbers, such as: ibe2601, ar1140, ba197, bel245, glo7730, hc404, hv6148, hv6150, kqa564, sas4424, ux193, vy1374, and vy1375.
Flight numbers are treated as case-insensitive by both parts of the API, and internally they are stored in lowercase within Cloud Firestore. So, flight numbers can be written in uppercase or lowercase.
However, if you would like to get details for other flights and expand the flight data that the PWA can query, for your own testing, you’ll need to follow these next steps.
First, check out the Flightradar24 website, choose one of the planes, and then copy the flight number, which in the following example is RAM505.

Figure 2-e: Manually Getting a Flight Number from Flight Radar 24
Then, once copied, open the first part of the API that gathers, curates, and validates the flight data, and enter the flight number (highlighted in green) as part of URL query parameter. In this case it would be:
https://flight-api-5c531.web.app/?q=RAM505
The API will gather all the flight details for that flight number, validate and cross-check its accuracy, and then store the information within Cloud Firestore.
By taking this step, you’ll be able to add more flight details to the Cloud Firestore database that the API uses, which means that the PWA will have some more flight records to retrieve and display.
Note: If you call the first part of the API (the URL listed previously) and pass it an existing (stored) flight number (also shown previously), then the existing flight data will be refreshed with the most recent and up-to-date information for that particular flight number, and updated within Cloud Firestore.
The flight details for flight number RAM505 can be later retrieved (either manually or by the PWA) using the following URL: https://us-central1-flight-json.cloudfunctions.net/app/api/RAM505.
Note: The API is running on Firebase’s Spark (free) plan, which means that it is limited on resources, for both usage and storage. So, please only add one or two extra flight numbers at max while you are building your own version of the PWA. It is also possible that I will (from time to time) delete the flight data stored within Cloud Firestore to keep the API operational and not incur unexpected costs.
Note: It is also possible that eventually, I might shut down the API completely, several months after the book has been published. If the API is no longer active by then, you may contact me directly, and I can provide insights or consultancy on how you may set up your own.
Summary
Now that we have explored how the API works and how it can be used to retrieve flight information, we need to expand the application’s logic to be able to make calls to the second part of the API and display the results—which means that we’ll also have to add some extra UI logic and functionality.
Before we do that, let’s explore in more detail the requirements for building a PWA, and the essential characteristics that make an app a PWA. This is what we’ll do in the next chapter.
- 1800+ high-performance UI components.
- Includes popular controls such as Grid, Chart, Scheduler, and more.
- 24x5 unlimited support by developers.