
Intelligent Mobile Apps with .NET MAUI Succinctly®

CHAPTER 5
Natural Language Processing and Chatbots
Natural language processing (NLP) focuses on the interaction between computers and humans through natural language. NLP analyzes text or speech data, enabling applications to support language translation, sentiment analysis, chatbots, speech recognition, and text summarization. In this chapter, you will learn how to integrate the Azure AI NLP services into a .NET MAUI project to analyze text sentiment, translate text, and implement a basic conversational UI based on a ChatGPT model.
Setting up the Azure AI services
In this chapter, you will use three AI services: Azure AI Language (formerly Text Analytics) to analyze text sentiment; Azure Translator to implement translation services; and Azure OpenAI to build a chatbot based on one of the available ChatGPT models. Each of these services must be set up in the Azure Portal.
Setting up the Azure AI Language service
To set up the Azure AI Language service and implement text sentiment analysis, follow these steps, similar to what you have done previously for other services:
- Locate the Language Service on the Azure AI services page (see Figure 20).
- Click Create on the service’s card.
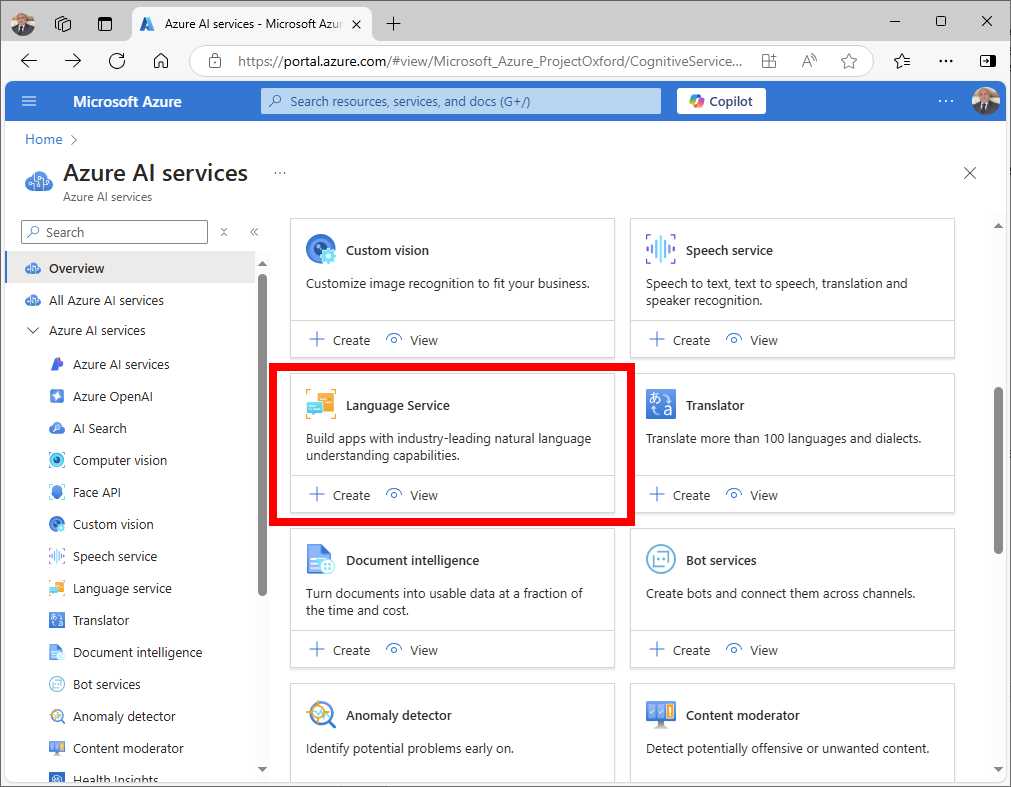
Figure 20: The Language Service on the Azure AI services page
- Choose a Subscription and Resource Group.
- Select the closest Region and the free Pricing Tier.
- Assign languagesuccinctly as the service name.
- Review and accept the Responsible AI Notice.
- Click Review + Create and then Create.
During the service setup, you will have options to configure custom features in addition to the preconfigured ones, as shown in Figure 21.
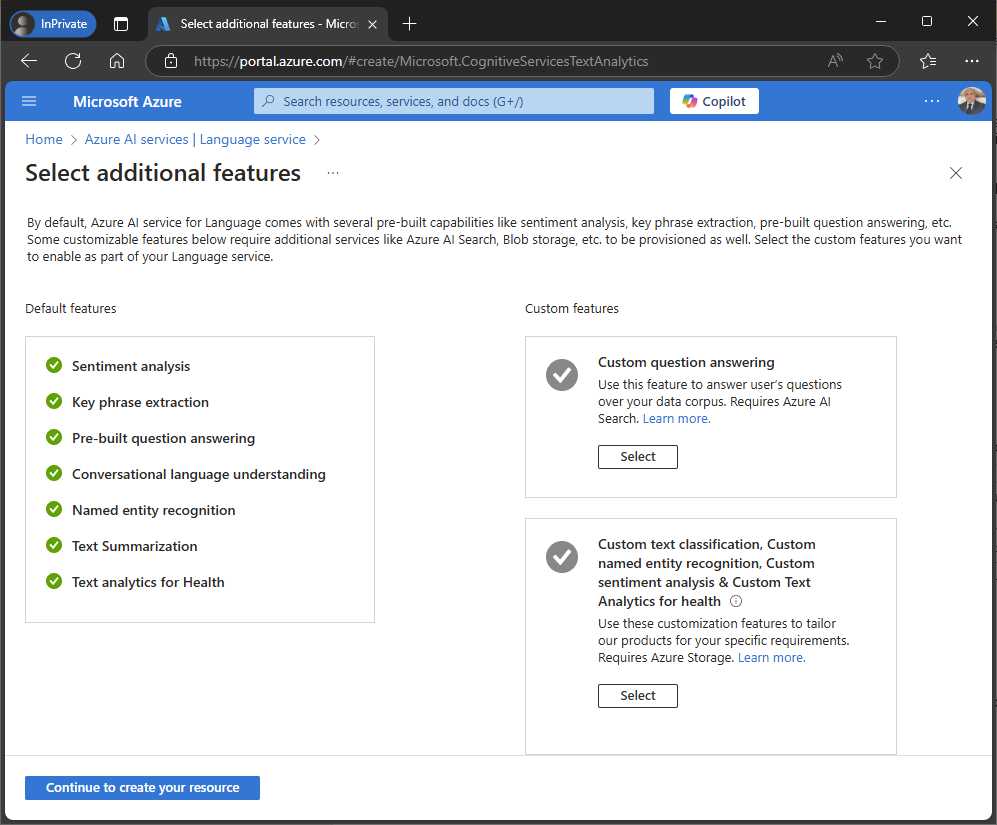
Figure 21: Options to add custom features to the AI Language service
These are not covered in this ebook and can be skipped, so click Continue to create your resource. When the service is ready, follow the lessons learned in the previous chapters to retrieve and store the API key and the endpoint URL for the service.
Setting up the Azure Translator service
Setting up the Azure Translator service is very easy, and involves the steps that you have followed so far in the Azure Portal:
- Locate the Translator service in the Azure AI services page. If you look at Figure 20, it is located to the right of the Language Service.
- Click Create on the service’s card.
- Choose a Subscription and Resource Group.
- Select the closest Region and the free Pricing Tier.
- Assign translatorsuccinctly as the service name.
- Click Review + Create and then Confirm.
When the service is ready, go to the new resource page and retrieve the API key and endpoint URL, exactly as you did previously. The resource page also provides a playground with a nice user interface that you can use to see how the translator works.
Setting up the Azure OpenAI service
Note: Azure OpenAI services are offered with a pay-as-you-go model. This means that every transaction is charged, depending on your plan, and that no free plan is available. Make sure to set a spending limit in your Azure subscription to avoid extra costs, especially at development time, and don’t forget to completely delete resources that you no longer use.
Creating the Azure OpenAI service to provide basic chatbot capabilities via one of the available ChatGPT models involves different steps. You need to open the Azure AI Foundry website and log in with the same Microsoft account that you use for the Azure subscription. Azure AI Foundry is a platform that allows you to build and deploy generative AI services, simplifying the entire process by leveraging existing, popular models instead of customizing your own. The list of existing models is very long and includes AI models from other vendors, such as the popular DeepSeek and Nvidia NIM. Once you log in, you will see a welcome page with a button labeled Create project that you have to click. In the Create a project page (see Figure 22), you will create a hub, which is a collaboration environment for your team. The portal automatically generates a name for the hub, which you can change if you want. Leave the proposed one and take note of it because it will be used shortly in the code. You will then need to specify the Azure subscription, the resource group, and the service location. An Azure OpenAI service will also be generated with the same name as the hub. When ready, click Create.
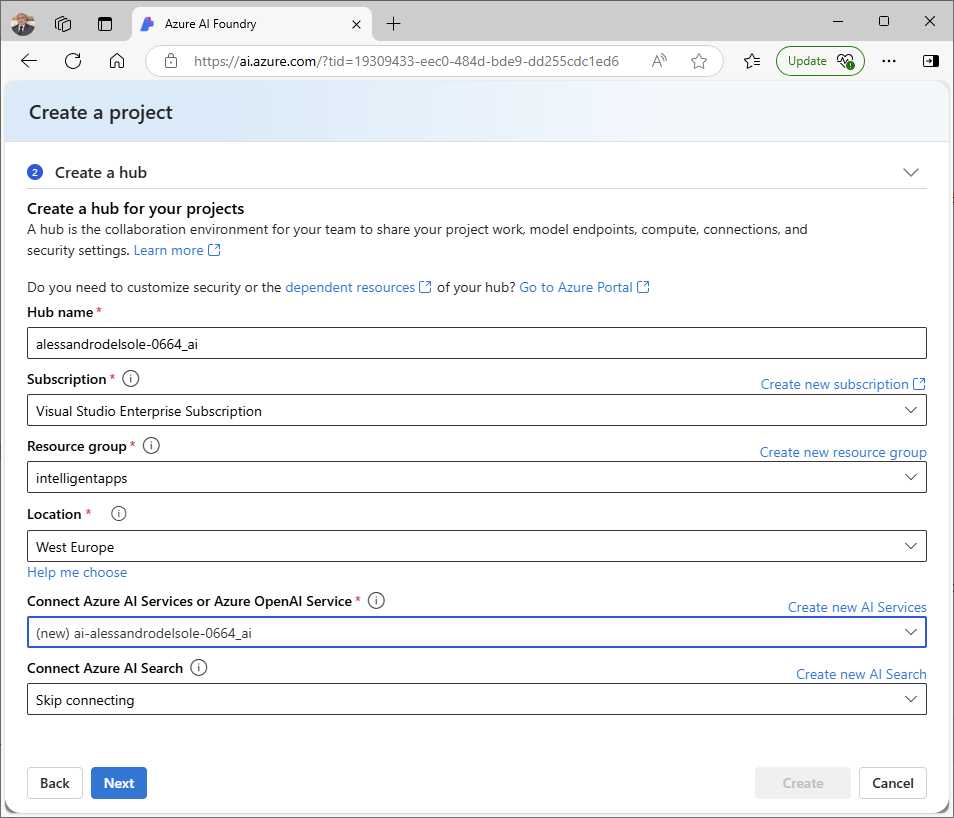
Figure 22: Creating a new AI Foundry project
After a few seconds, the new service will be provisioned, and the portal will generate an identifier that is visible at the top of the page (see Figure 23). In this summary page, you will also see the API key and the service endpoint URL. Take note of both.
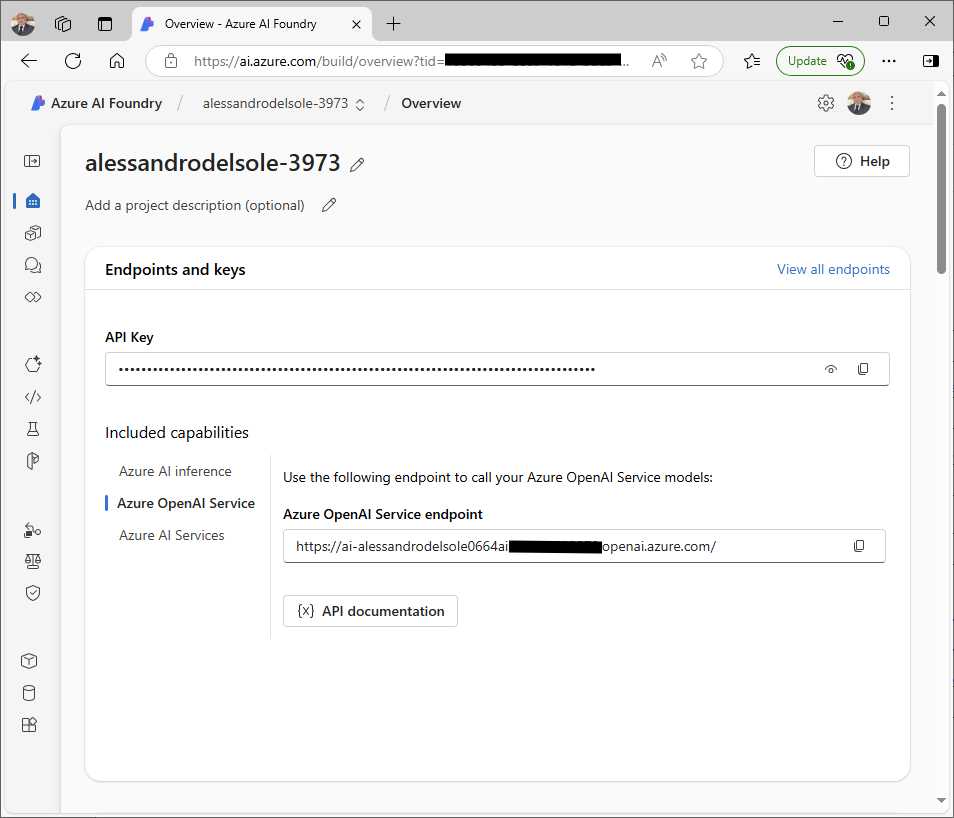
Figure 23: The details required to consume the service
The next step is to deploy an AI model to the service that satisfies the requirement to implement a chatbot that processes natural language and returns responses in the same way. In order to make the navigation simpler, open the Management center page. Select the newly created hub, and in the details page, click the Models + endpoints shortcut in the sidebar (see Figure 24). This will open the Model deployments page, where you have to click Deploy model. You will be prompted with two options: Deploy base model or Deploy fine-tuned model.
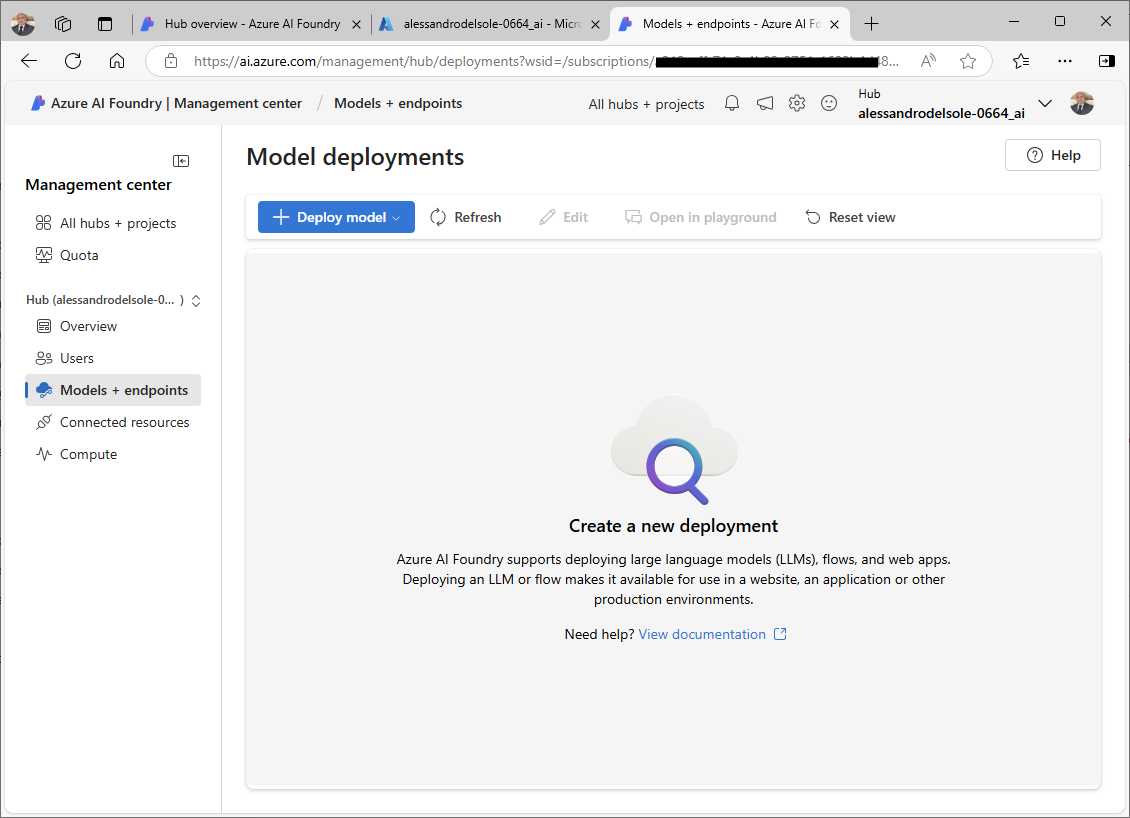
Figure 24: Creating a model deployment
Select Deploy base model. As you can see in Figure 25, you will be able to select from a list of OpenAI models that you can use to implement a natural language chatbot. You can read the description of each model by clicking its name. The availability depends on the service plan that you chose. For example, gpt-4 models are not available under the Standard plan. However, you can select the gpt-35-turbo model, as shown in Figure 25; that is enough to implement a basic ChatGPT conversational user experience in the sample app.
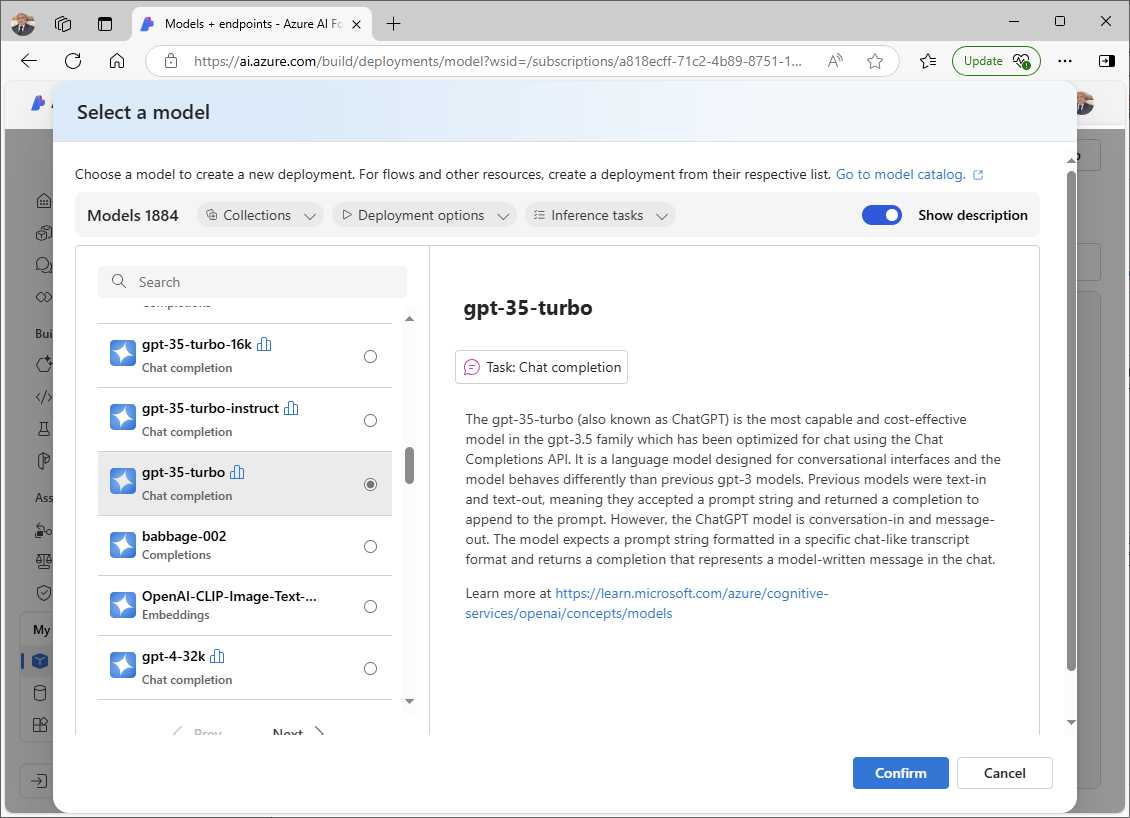
Figure 25: Selecting a pretrained AI model
Note: Available models change over time. New models can be released, and older models can be retired. This could have happened between the time of writing this ebook and its publication. For this reason, it is not guaranteed that the model used in this chapter will be available at the time of your reading. If this is the case, select a different model that satisfies your needs and that fits into your service quota (an error message appears if it does not fit).
Click Confirm and wait for the completion page to appear. At this point, you are ready to install the necessary NuGet packages in the project.
Installing NuGet packages
You will need the following NuGet packages to proceed with the upcoming examples:
· Azure.AI.TextAnalytics: This provides the .NET client library for implementing sentiment analysis.
· Azure.AI.Translation.Text: This provides the .NET client library that you use to deliver AI-powered real-time translations.
· Azure.AI.OpenAI: This provides the .NET client library that makes it easier to send messages and receive responses from the selected OpenAI model.
The simplest way to install these in Visual Studio 2022 is to use the NuGet Package Manager user interface, so that you can install them quickly by just searching for their names.
Analyzing text sentiment
Sentiment analysis is the process of using NLP techniques to analyze textual data and determine the emotional tone or sentiment expressed in it, for example, positive, negative, or neutral. Possible applications include gauging customer opinions, social media attitudes, and general market research. In a mobile application like the sample travel companion app, it could be useful to understand the user’s perception of a place they visited, like a restaurant. For the sake of simplicity, this example allows the user to enter some text and then the app analyzes its sentiment. Make sure you add a new page called NaturalLanguagePage to the project and then add the XAML shown in Code Listing 4.
Code Listing 4
<?xml version="1.0" encoding="utf-8" ?> <ContentPage xmlns="http://schemas.microsoft.com/dotnet/2021/maui" xmlns:x="http://schemas.microsoft.com/winfx/2009/xaml" x:Class="TravelCompanion.NaturalLanguagePage" Title="NaturalLanguagePage"> <Grid> <Grid.RowDefinitions> <RowDefinition /> <RowDefinition /> </Grid.RowDefinitions> <Grid RowDefinitions="Auto, Auto, *" Padding="10"> <Editor x:Name="SentimentInputText" FontSize="18" Placeholder="Enter text for sentiment analysis..." HeightRequest="100" Grid.Row="0"/> <Button Text="Analyze Sentiment" Clicked="OnAnalyzeSentimentClicked" Grid.Row="1"/> <Label x:Name="ResultLabel" TextColor="Black" FontSize="Medium" Grid.Row="2"/> </Grid> </ContentPage> |
The code is very simple, and the relevant points are the use of an Editor as the input view and a Button that triggers the analysis. With an approach similar to what you have done for the previous services, in the C# code for the page, you will need to declare variables that represent the API key, the endpoint, and the client. Code Listing 5 shows the full implementation for the page.
Code Listing 5
using Azure; using Azure.AI.TextAnalytics; namespace TravelCompanion;
public partial class NaturalLanguagePage : ContentPage { private const string AILanguageApiKey = "your-ai-language-api-key"; private const string AILanguageEndpoint = "your-ai-language-endpoint"; private readonly TextAnalyticsClient _languageClient; private async void OnAnalyzeSentimentClicked(object sender, EventArgs e) { try { var text = SentimentInputText.Text; if (string.IsNullOrWhiteSpace(text)) return; var result = _languageClient.AnalyzeSentiment(text); ResultLabel.Text = $"Sentiment: {result.Value.Sentiment}"; } catch (RequestFailedException ex) { await DisplayAlert("Error", ex.ErrorCode, "OK"); } catch (Exception ex) { await DisplayAlert("Error", ex.Message, "OK"); } }
public NaturalLanguagePage() { InitializeComponent(); _languageClient = new TextAnalyticsClient(new Uri(AILanguageEndpoint), new AzureKeyCredential(AILanguageApiKey)); } } |
The TextAnalyticsClient class is the client object that allows you to consume the service, and it is initialized by passing the service endpoint and the API key via the AzureKeyCredential class. The AnalyzeSentimentAsync method returns an object of type DocumentSentiment that represents the result of the sentiment analysis. It contains the Sentiment property, which indicates the overall sentiment of the text, and ConfidenceScores (not used here), which provides confidence levels for each sentiment category (positive, neutral, and negative).
Hints about more advanced text processing
As you learned previously, Text Analytics is part of the AI Language services, and it is much more than sentiment analysis. With AI Language, you can perform entity recognition, key-phrase extraction, text summarization, and language detection. Though these services are not described in this chapter, it is worth mentioning the .NET objects from the TextAnalyticsClient class that you can use to implement them:
· The RecognizeEntitiesAsync method detects categorized entities in text and returns the CategorizedEntityCollection object. This collection contains entities identified by categories, subcategories, and confidence scores for detailed analysis.
· The DetectLanguageAsync method determines the primary language of a document or set of documents and returns the DetectedLanguage object. This object includes properties like Name for the language name and ConfidenceScore for the detection accuracy.
· The ExtractiveSummarizeAsync method performs text summarization and can return results in various forms. It provides a collection of summarized results as an ExtractiveSummarizeResultCollection object, in which each result corresponds to a summarized document and can be accessed by index. For individual documents, it returns an ExtractiveSummarizeResult object, which contains a Sentences property (a collection of SummarySentence objects) and additional properties like HasError (for processing errors) and Id (to identify the document). Each sentence in the summary is represented by a SummarySentence object that includes properties such as Text, RankScore (relevance), Offset, and Length.
Further information and examples can be found in the official documentation and in the Azure AI Services Succinctly ebook.
Before running the example, the new page must be added to the app’s shell so that it is included in the navigation stack. To do so, add the following XAML code to the AppShell.xaml file:
<ShellContent Title="NLP" Icon="comments_solid.png"
ContentTemplate="{DataTemplate local:NaturalLanguagePage}" />
At this point you are ready to test your code.
Running the example
Press F5 to start debugging the application on your device of choice and tap the new page’s icon when the app is running. In the new page, enter the following sentence:
“We went for some snorkeling in the coral reef of the Red Sea. It was an incredible experience with a variety of beautiful fishes”
Then, click Analyze Sentiment. As you can see in Figure 26, the application detects a positive sentiment from the statement. You can definitely try writing different sentences—for example, some representing disappointment—and see how the result changes.
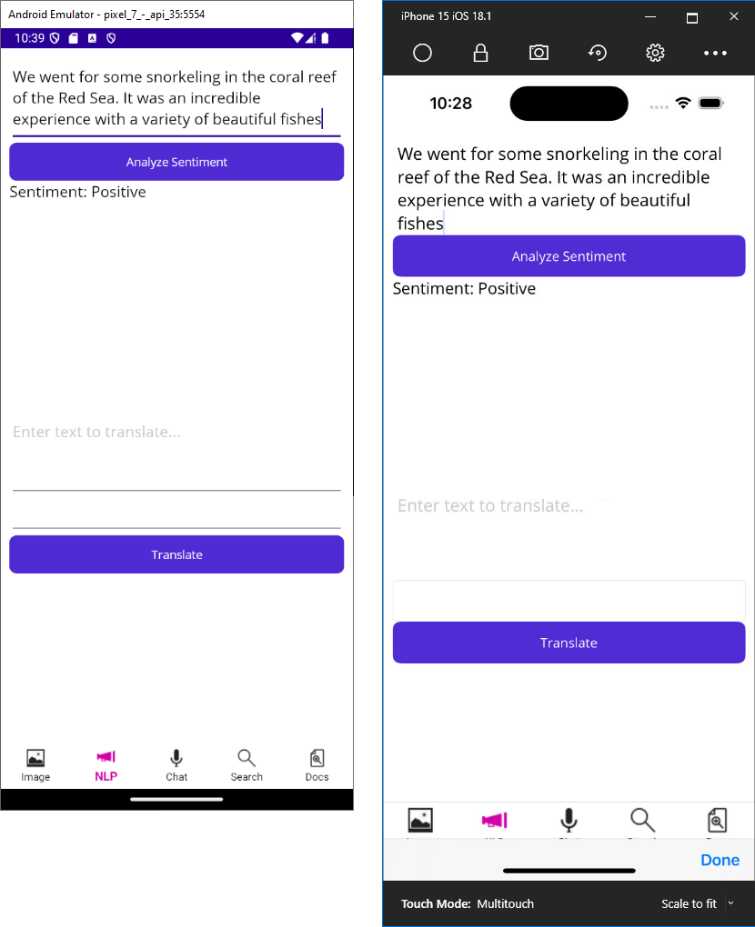
Figure 26: Detecting sentiment from text
You can run text sentiment analysis over full documents, or you could even implement speech recognition (as in Chapter 4) to run sentiment analysis over the string that is retrieved from spoken audio.
Executing AI-powered translations
The Azure Translator service offers a wide range of features for text and document translation in real-time or batch processes. It supports numerous languages and allows both general and specialized translation scenarios, such as translating conversational text, technical documents, or entire websites. For the current example, you will implement text translation. You can extend the code of the NaturalLanguagePage with the XAML shown in Code Listing 6.
Code Listing 6
<?xml version="1.0" encoding="utf-8" ?> <ContentPage xmlns="http://schemas.microsoft.com/dotnet/2021/maui" xmlns:x="http://schemas.microsoft.com/winfx/2009/xaml" x:Class="TravelCompanion.NaturalLanguagePage" Title="NaturalLanguagePage"> <Grid> <Grid.RowDefinitions> <RowDefinition /> <RowDefinition /> </Grid.RowDefinitions> <Grid RowDefinitions="Auto, Auto, *" Padding="10"> <Editor x:Name="SentimentInputText" Placeholder="Enter text for sentiment analysis..." HeightRequest="100" Grid.Row="0"/> <Button Text="Analyze Sentiment" Clicked="OnAnalyzeSentimentClicked" Grid.Row="1"/> <Label x:Name="ResultLabel" TextColor="Black" FontSize="Medium" Grid.Row="2"/> </Grid>
<Grid RowDefinitions="Auto, Auto, Auto, *" Padding="10" Grid.Row="1"> <Editor x:Name="TranslatorInputText" FontSize="18" Placeholder="Enter text to translate..." HeightRequest="100" Grid.Row="0"/> <Picker x:Name="LanguagePicker" Grid.Row="1"> <Picker.Items> <x:String>fr</x:String> <x:String>es</x:String> <x:String>de</x:String> </Picker.Items> </Picker> <Button Text="Translate" Clicked="OnTranslateClicked" Grid.Row="2"/> <Label x:Name="TranslatedTextLabel" TextColor="Black" FontSize="Medium" Grid.Row="3"/> </Grid> </Grid> </ContentPage> |
The code adds an Editor for text input, a Picker to select the target language, and a Button to trigger the translation. Notice that you do not need to specify the source language because it is automatically detected. Code Listing 7 shows how to extend the code-behind file with the translation logic.
Code Listing 7
using Azure; using Azure.AI.TextAnalytics; using Azure.AI.Translation.Text;
namespace TravelCompanion;
public partial class NaturalLanguagePage : ContentPage { private const string AILanguageApiKey = "your-ai-language-api-key"; private const string AILanguageEndpoint = "your-ai-language-endpoint"; private readonly TextAnalyticsClient _languageClient; private const string TranslatorApiKey = "your-ai-translator-api-key"; private const string TranslatorEndpoint = "your-ai-translator-endpoint"; private readonly TextTranslationClient _translatorClient;
private async void OnAnalyzeSentimentClicked(object sender, EventArgs e) { try { var text = SentimentInputText.Text; if (string.IsNullOrWhiteSpace(text)) return; var result = _languageClient.AnalyzeSentiment(text); ResultLabel.Text = $"Sentiment: {result.Value.Sentiment}"; } catch (RequestFailedException ex) { await DisplayAlert("Error", ex.ErrorCode, "OK"); } catch (Exception ex) { await DisplayAlert("Error", ex.Message, "OK"); } }
private async void OnTranslateClicked(object sender, EventArgs e) { try { var text = TranslatorInputText.Text; var targetLanguage = LanguagePicker.SelectedItem as string; if (string.IsNullOrWhiteSpace(text) || string.IsNullOrWhiteSpace(targetLanguage)) return; var response = await _translatorClient. TranslateAsync(targetLanguage, text); TranslatedTextLabel.Text = response.Value.FirstOrDefault()?.Translations. FirstOrDefault()?.Text ?? "Translation failed"; } catch (RequestFailedException ex) { await DisplayAlert("Error", ex.ErrorCode, "OK"); } catch (Exception ex) { await DisplayAlert("Error", ex.Message, "OK"); } }
public NaturalLanguagePage() { InitializeComponent(); _languageClient = new TextAnalyticsClient(new Uri(AILanguageEndpoint), new AzureKeyCredential(AILanguageApiKey)); _translatorClient = new TextTranslationClient( new AzureKeyCredential(TranslatorApiKey), new Uri(TranslatorEndpoint)); } } |
The TextTranslationClient class allows you to interact with Azure Translator's Text Translation API. You still pass an instance of the AzureKeyCredential class to provide authentication via the API key. The TranslateAsync method translates text from one language to another; the first argument is the target language, and the second argument is the input text. The return type is an object of type Response<IReadOnlyCollection<TranslatedTextItem>>, and the actual collection is stored inside the Value property. Each item in the collection is a TranslatedTextItem object, which exposes the Translations property. This is an IReadOnlyList<TranslationText> object, and the TranslationText class actually contains the translated text and the detected language with the level of confidence.
For simple translations like the current example, it is sufficient to retrieve the string contained in the Text property of the first element in the collection. It is worth mentioning that you are not limited to one language. In fact, the TranslateAsync method offers an overload that takes an object of type TextTranslationTranslateOptions as an argument and allows you to specify multiple languages and multiple strings to be translated. Further information on developing with the Azure Translator can be found in the official documentation.
Running the example
If you run the example now, you will discover the power of the Azure Translator service by writing any sentence. Figure 27 shows an example based on the user’s need to translate a sentence as a visitor from another country.
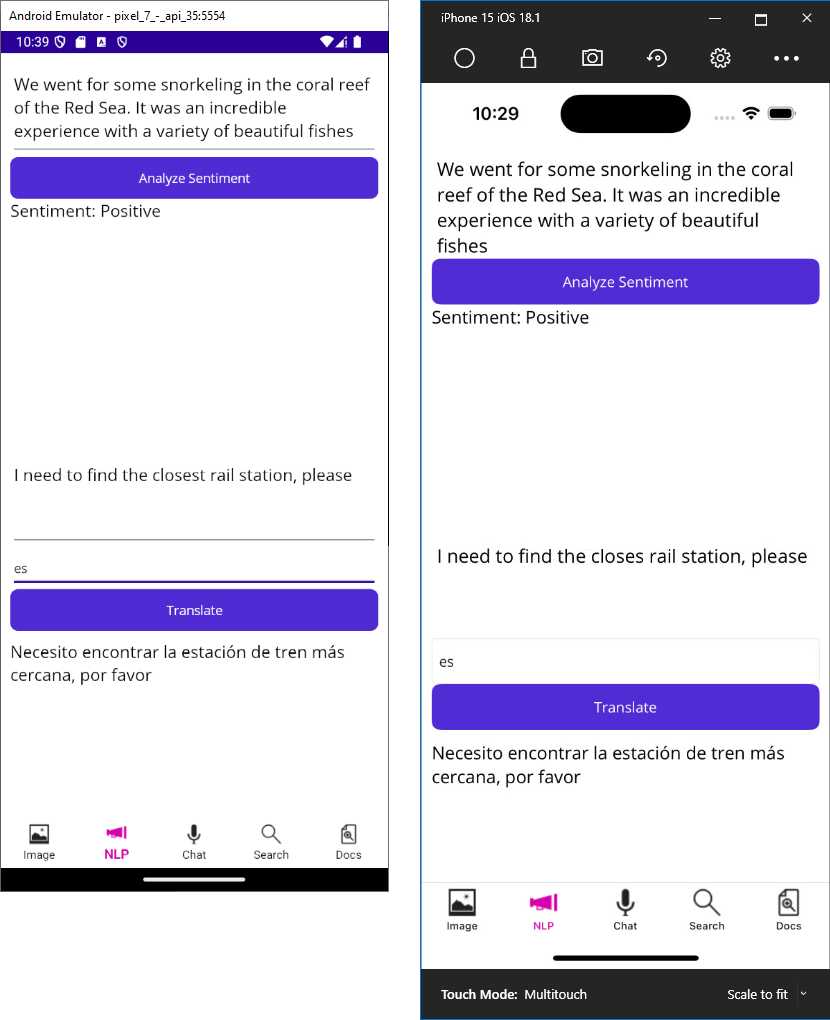
Figure 27: Translating text with the Azure Translator service
This is just one possible application of the translator, but it gives you an idea of its power.
Note: The Azure Translator service is capable of much more than this. It can translate entire documents while preserving the original format, and it can perform transliteration, the process of converting text from one script to another. Converting Arabic script to Latin script or Devanagari script to Latin script is an example of transliteration. This allows you to make content readable for people who understand the language but use a different script.
Implementing a basic ChatGPT user interface
Simple chatbots have existed for many years and have helped businesses solve a variety of customer issues, reducing the amount of human intervention. As AI advances, chatbots take advantage of more sophisticated NLP features. In this section, you will learn how to implement a basic chatbot that leverages one of the available ChatGPT models. Remember that the ChatGPT application and, more generally, OpenAI GPT models, are not simply chat engines; they are extremely sophisticated AI models that serve multiple purposes, and chat functionality is just one. With that in mind, add a new page called ChatbotPage.xaml to the project and define a simple user interface as shown in Code Listing 8.
Code Listing 8
<?xml version="1.0" encoding="utf-8" ?> <ContentPage xmlns="http://schemas.microsoft.com/dotnet/2021/maui" xmlns:x="http://schemas.microsoft.com/winfx/2009/xaml" x:Class="TravelCompanion.ChatbotPage" Title="ChatbotPage"> <Grid RowDefinitions="*, Auto" Padding="10"> <CollectionView x:Name="ChatMessages" ItemsSource="{Binding Messages}"> <CollectionView.ItemsLayout> <LinearItemsLayout Orientation="Vertical" ItemSpacing="10"/> </CollectionView.ItemsLayout> <CollectionView.ItemTemplate> <DataTemplate> <Label Text="{Binding}" FontAttributes="Bold" FontSize="Medium"/> </DataTemplate> </CollectionView.ItemTemplate> </CollectionView> <Grid RowDefinitions="Auto,Auto" RowSpacing="5" Grid.Row="1"> <Entry x:Name="MessageEntry" Placeholder="Type a message..."/> <Button Text="Send" Clicked="OnSendMessageClicked" Grid.Row="2"/> </Grid> </Grid> </ContentPage> |
This is really simple code. You are adding a CollectionView control to display the list of messages exchanged between the user and the AI assistant, and an Entry as the input view. A button is used to send the user’s message to the service. Obviously, the magic happens in the C# code, shown in Code Listing 9.
Code Listing 9
using Azure; using Azure.AI.OpenAI; using OpenAI.Chat; using System.Collections.ObjectModel;
namespace TravelCompanion;
public partial class ChatbotPage : ContentPage { private const string ApiKey = "your-api-key"; private readonly AzureOpenAIClient openAiClient; private ChatClient chatClient; public ObservableCollection<string> Messages { get; set; } = new();
public ChatbotPage() { InitializeComponent();
var endpoint = new Uri("your-service-endpoint"); var credential = new AzureKeyCredential(ApiKey);
openAiClient = new AzureOpenAIClient( endpoint, credential);
ChatMessages.ItemsSource = Messages; }
private async void OnSendMessageClicked(object sender, EventArgs e) { var userInput = MessageEntry.Text; if (string.IsNullOrWhiteSpace(userInput)) return;
Messages.Add($"You: {userInput}"); MessageEntry.Text = string.Empty; await GetChatResponseAsync(userInput); }
private async Task GetChatResponseAsync(string userInput) { try { chatClient = openAiClient.GetChatClient("gpt-35-turbo");
var message = new UserChatMessage(userInput);
var response = await chatClient.CompleteChatAsync(message); Messages.Add($"Assistant: {response.Value.Content[0].Text}"); } catch (Exception ex) { Messages.Add($"Bot: An error occurred - {ex.Message}"); } } } |
The AzureOpenAIClient class is used to authenticate and interact with the Azure OpenAI API, initialized with the specified service endpoint and API key. The Messages property is an ObservableCollection<string> that stores chat messages exchanged between the user and the assistant. This collection is bound to the CollectionView for real-time display, ensuring that updates are instantly reflected in the user interface. The constructor sets up the OpenAI client while binding the chat message collection to the interface.
When the user enters a message and clicks the Send button, the user input is added to the Messages collection. The asynchronous GetChatResponseAsync method creates an instance of the ChatClient class for the GPT model, sends the user input as a UserChatMessage, and awaits a response through the CompleteChatAsync method. This method returns a Response<ChatCompletions> object, which encapsulates both the content of the assistant's generated response and metadata related to the request.
Understanding completion responses
The core of the response is the ChatCompletions object, which represents the overall result of the chat completion operation. Within this object, the Choices property contains a collection of ChatChoice objects, each representing a possible reply generated by the GPT model. If multiple responses are requested, all of them will be included in this collection. Additionally, the ChatCompletions object includes an Id property to uniquely identify the chat completion request, a Model property specifying which GPT model was used, and a Usage property that details token usage for the request and response. The Usage information is particularly helpful for monitoring API consumption and associated costs. Before running the example, you must add the new page to the app shell so that it is included in the navigation stack. To do so, add the following XAML code to the AppShell.xaml file:
<ShellContent Title="Chat" Icon="microphone_solid.png"
ContentTemplate="{DataTemplate local:ChatbotPage}" />
Tip: You could extend this example further by implementing speech recognition and sending the spoken text to the OpenAI service. This is left to you as an exercise. If you implement this enhancement, remember to ask for microphone permissions.
Running the example
Press F5 to start debugging the application, and when ready, open the new page. Enter a question in a conversational way and the application will show the response coming from the selected GPT model. Figure 28 shows an example based on the following question:
“Can you summarize in a short paragraph the top 10 places to visit in Seattle?”
Note: The result returned by the AI service varies depending on the model that you selected, on the request that you enter, and on the way the service itself elaborates your request.
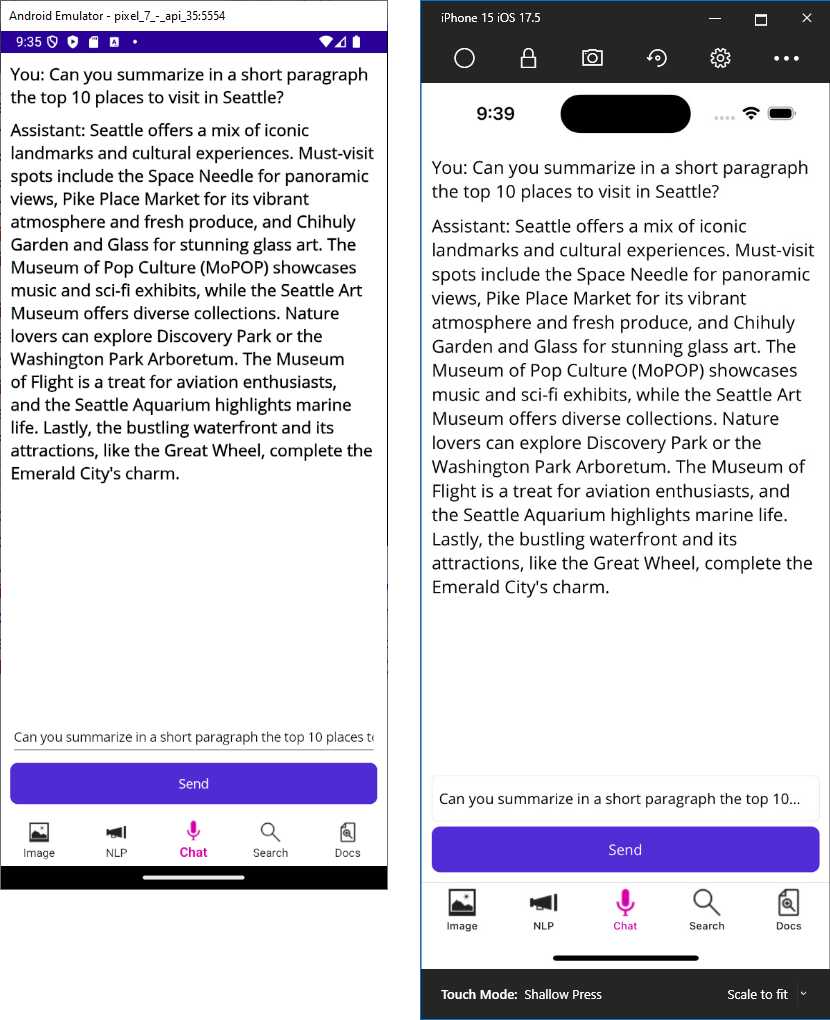
Figure 28: Implementing a conversational UI through a GPT model
Notice how the history of the conversation is added to the CollectionView. There are certainly many ways to improve this functionality, and most depend on the type of application that you are developing, but now you have a clear idea of how the Azure AI services can dramatically improve the user experience of a mobile app built with .NET MAUI, with limited effort.
Chapter summary
In this chapter, you explored three key NLP features: sentiment analysis, text translation, and chatbot functionality. You learned how to set up and configure Azure services, integrate them into a .NET MAUI app, and use the Azure.AI.TextAnalytics, Azure.AI.Translation.Text, and Azure.AI.OpenAI libraries. These features enhance the travel companion app by enabling language understanding and interaction capabilities. In the next chapter, you will learn how to implement AI-powered recommendations and personalization.
- An ever-growing .NET MAUI control suite with rich feature sets.
- DataGrid, Charts, ListView, Scheduler, and more.
- Active community and dedicated support.
- Phone, tablet, and desktop support.