
Intelligent Mobile Apps with .NET MAUI Succinctly®

CHAPTER 6
Implementing AI-Driven Recommendations
In this chapter, you will learn how to integrate Azure AI Search to enhance the user experience to find relevant recommendations efficiently. You will incorporate Azure AI recommendations to personalize results based on user preferences. You will also learn how to implement a search schema and how to upload data to a search index.
Setting up the Search service
Similar to what you have done in previous chapters, you need to set up the Azure AI Search service in the Azure Portal. Follow these steps:
- Go to the Azure Portal and sign in with your Azure account credentials.
- Click Azure AI Services.
- Click Create on the AI Search card (see Figure 29).
- In the Create a search service page, choose your Azure subscription and specify the resource group you created previously.
- Choose the Region closest to your location and enter a unique Name, such as searchsuccinctly.
- In the Pricing tier dropdown, click the Change Pricing Tier hyperlink and then select the Free plan. This is necessary because the standard plan is assigned by default.
- Click Review + Create and then Create.
When the summary page appears, take note of the service endpoint URL that will be used shortly and do not leave the page.
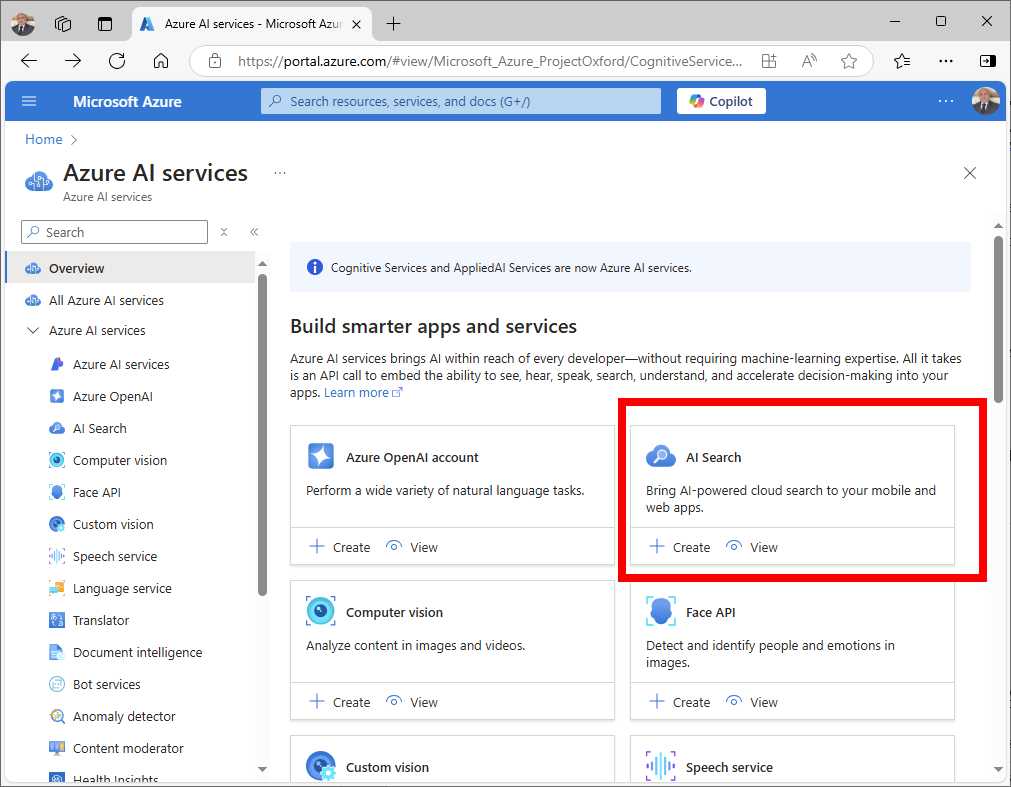
Figure 29: Locating the AI Search service
Defining a search schema
Before performing searches, you need to define a search schema that structures your data and defines how information will be indexed and searched. In the current example, the information will be travel destinations. Defining a search schema is done by creating indexes, and it is a crucial step in configuring Azure AI Search, as indexes determine how your data will be stored, searched, and retrieved. In Azure AI Search, an index is a collection of fields, each representing a piece of information within your searchable documents, such as titles, descriptions, or metadata. Each field has specific attributes, such as whether it is searchable, filterable, sortable, or facetable. In the toolbar at the top of the page, click Add index, and then Add index again. The Create index page appears and it looks like Figure 30.
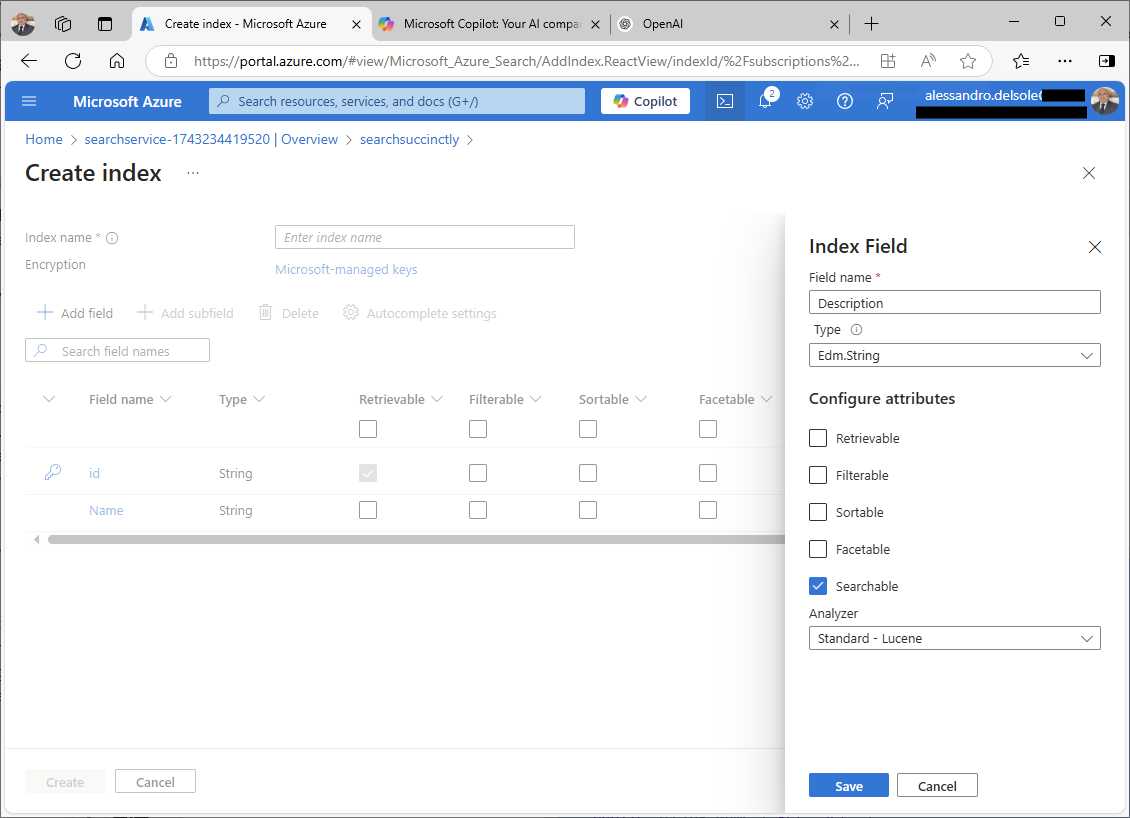
Figure 30: Creating a search index
Here, you have to define the index properties:
· Index name: A unique name for your index. This name will be used to reference the index in your queries, API calls, and C# code.
· Fields: The fields you define will represent the schema of your data within the index. Each field corresponds to a specific property or piece of information in your documents.
You add a new field by clicking Add field. The first piece of information you set for a field is the Field name, which represents the name of the field as it will appear in your index. Then you set the appropriate data type in the Type dropdown (see the right side of Figure 30), such as Edm.String for text, Edm.Int32 for integers, Edm.Double for floating-point numbers, or Edm.DateTimeOffset for dates. For collections, you can select a collection type such as Collection(Edm.String). You can also assign one or more of the following attributes:
· Searchable: Determines whether the field's content can be searched. Typically, you would enable this for text fields like Name or Description.
· Filterable: Allows filtering on the field’s content. For example, you might want to filter travel destinations by rating.
· Sortable: Allows the results to be sorted based on this field.
· Facetable: Enables faceting, which is useful for generating search facets or categories based on the values in this field, such as showing counts or ranges.
Notice that one field must be designated as the key field, which serves as the unique identifier for documents in your index. By default, Azure generates a field called id. Every time you add and assign a field, click Save. Repeat the steps to add fields for the Category and Price properties, to be set with Edm.String and Edm.Double types, respectively. When finished, click Save on the index page. Indexes are very flexible and allow you to implement complex operations, but these are beyond the scope of this ebook. For further information, you can read the Azure documentation about indexes. Supposing that you are implementing AI-driven search for recommended travel destinations, the sample schema consists of the following fields:
· Name: Of type string, this represents the destination name. Apply the Searchable attribute to this field so that users can search by destination name.
· Description: Of type string, this represents a brief description of the destination. Apply the Searchable and Retrievable attributes to this field. The Retrievable attribute ensures that the field is included in the returned search results.
· Rating: Of type double, this represents user ratings. Apply the Filterable and Sortable attributes to this field. These ensure that the user can filter and sort search results by ratings.
You will now retrieve the secret key required to connect your code to the search service.
Retrieving the admin key
Unlike other services where the API key is available in the service summary page, for the AI Search service, you need to expand the Settings node in the sidebar and then select Keys. In the AI Search service, the API keys are called admin keys, and you can copy them to the clipboard when the Keys page appears (see Figure 31).

Figure 31: Retrieving the admin keys
Now you have everything you need, and you can start writing code.
Implementing AI Search
Go to Visual Studio 2022 and install the Azure.Search.Documents NuGet package in the solution. This is required to use the client .NET library for AI Search services. Figure 32 shows how the package appears in the NuGet user interface.
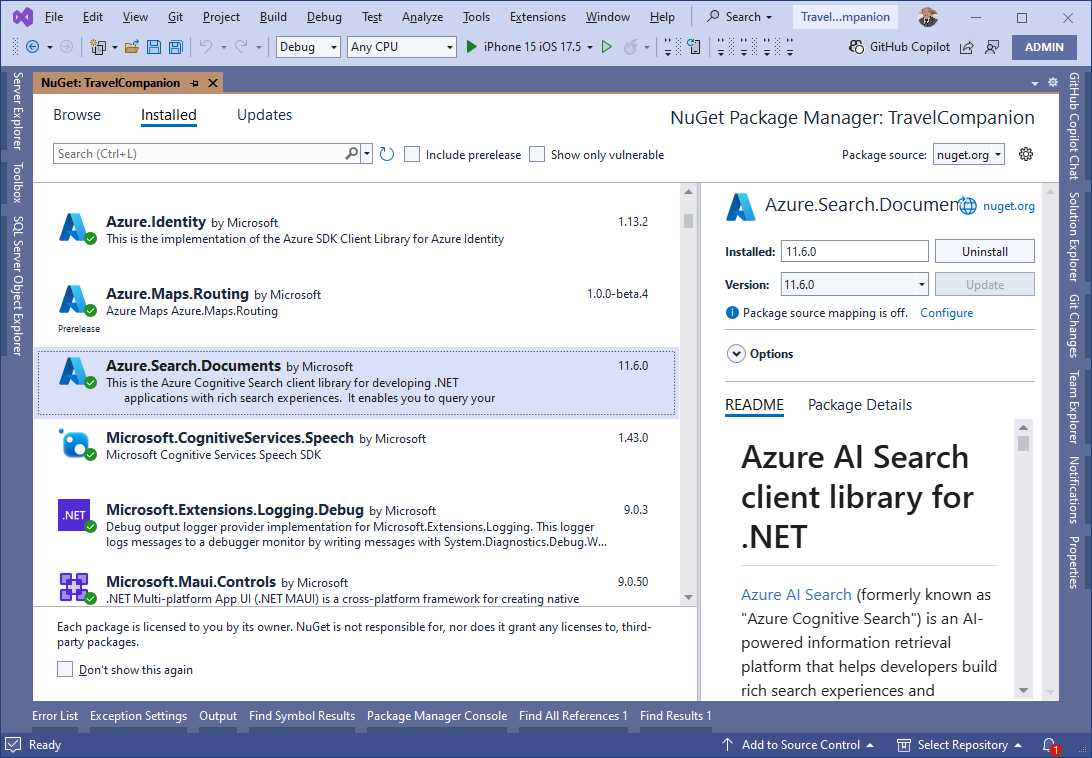
Figure 32: The AI Search NuGet package
When ready, add a new page named SearchPage.xaml, where you will define the user interface.
Defining the user interface
The user interface of the new page must include a search box, a button that launches the search operation, and a CollectionView that displays the search results in the form of a collection of travel destinations. In the SearchPage.xaml file, add the code shown in Code Listing 10.
Code Listing 10
<?xml version="1.0" encoding="utf-8" ?> <ContentPage xmlns="http://schemas.microsoft.com/dotnet/2021/maui" xmlns:x="http://schemas.microsoft.com/winfx/2009/xaml" x:Class="TravelCompanion.SearchPage" Title="SearchPage"> <Grid Padding="10" BindingContext="{Binding}"> <Grid.RowDefinitions> <RowDefinition Height="Auto"/> <RowDefinition Height="Auto"/> <RowDefinition /> </Grid.RowDefinitions> <Entry x:Name="SearchEntry" Placeholder="Search destinations..."/> <Button Text="Search" Clicked="OnSearchClicked" Grid.Row="1"/> <CollectionView x:Name="ResultsList" Grid.Row="2" ItemsSource="{Binding}"> <CollectionView.ItemTemplate> <DataTemplate> <VerticalStackLayout> <Label Text="{Binding Name}" FontSize="Medium" FontAttributes="Bold"/> <Label Text="{Binding Description}" FontSize="Medium" /> </VerticalStackLayout> </DataTemplate> </CollectionView.ItemTemplate> </CollectionView> </Grid> </ContentPage> |
The ItemTemplate of the CollectionView represents how each search result will be presented, binding the two Label views to the Name and Description fields of the index that you defined previously, and that in C# are represented by a class called TravelDestination, defined as shown in Code Listing 11.
Code Listing 11
using Azure.Search.Documents.Indexes; using System.ComponentModel; using System.Runtime.CompilerServices;
public class TravelDestination : INotifyPropertyChanged { private string _id; private string _name; private string _description; private double _rating;
[SearchableField(IsKey = true)] public string Id { get => _id; set { if (_id != value) { _id = value; OnPropertyChanged(); } } }
[SearchableField] public string Name { get => _name; set { if (_name != value) { _name = value; OnPropertyChanged(); } } }
[SearchableField] public string Description { get => _description; set { if (_description != value) { _description = value; OnPropertyChanged(); } } }
[SimpleField(IsFilterable = true, IsSortable = true)] public double Rating { get => _rating; set { if (_rating != value) { _rating = value; OnPropertyChanged(); } } }
public event PropertyChangedEventHandler? PropertyChanged;
protected virtual void OnPropertyChanged( [CallerMemberName] string propertyName = null) { PropertyChanged?.Invoke(this, new PropertyChangedEventArgs(propertyName)); } } |
The TravelDestination class represents an individual search result and is the .NET representation of the index created previously in the Azure Portal. It implements the INotifyPropertyChanged interface to raise a change notification so that the user interface can react to changes. Properties are decorated with attributes that represent the way you defined filters in the index. More specifically:
· [SearchableField(IsKey = true)] marks the Id field as the unique identifier.
· [SearchableField] allows the Name and Description fields to be searchable.
· [SimpleField(IsFilterable = true, IsSortable = true)] allows the Rating field to be filtered and sorted.
Now that you have a data model, you can implement the search logic.
Executing intelligent search in C#
The goal is to implement a search feature that allows users to look up destinations and retrieve recommendations based on their preferences. Code Listing 12 shows how to accomplish this, including how to upload sample data.
Code Listing 12
using Azure; using Azure.Search.Documents; using System.Collections.ObjectModel;
namespace TravelCompanion;
public partial class SearchPage : ContentPage { private const string AdminKey = "your-admin-key"; private const string Endpoint = "your-endpoint-url"; private const string IndexName = "travel-destinations";
private readonly SearchClient searchClient; public ObservableCollection<TravelDestination> SearchResults { get; set; } = new();
public SearchPage() { InitializeComponent(); var credential = new AzureKeyCredential(AdminKey); searchClient = new SearchClient(new Uri(Endpoint), IndexName, credential); this.BindingContext = SearchResults; }
protected override async void OnAppearing() { base.OnAppearing();
bool destinationsUploaded = Preferences.Get("destinations", false); if (!destinationsUploaded) await UploadSampleDataAsync(); }
private async void OnSearchClicked(object sender, EventArgs e) { var query = SearchEntry.Text; if (string.IsNullOrWhiteSpace(query)) return; await PerformSearch(query); }
private async Task PerformSearch(string query) { try { var options = new SearchOptions { IncludeTotalCount = true }; var response = await searchClient. SearchAsync<TravelDestination>(query, options);
await foreach (var result in response.Value.GetResultsAsync()) { SearchResults.Add(result.Document); } } catch (RequestFailedException ex) { await DisplayAlert("Error", ex.ErrorCode, "OK"); } catch (Exception ex) { await DisplayAlert("Error", ex.Message, "OK"); } }
public async Task UploadSampleDataAsync() { try { var destinations = new List<TravelDestination> { new TravelDestination { Id = "1", Name = "Paris", Description = "The city of love.", Rating = 4.8 }, new TravelDestination { Id = "2", Name = "Rome", Description = "The Eternal City.", Rating = 4.7 } };
await searchClient.UploadDocumentsAsync(destinations); Preferences.Set("destinations", true); } catch (RequestFailedException ex) { await DisplayAlert("Error", ex.ErrorCode, "OK"); } catch (Exception ex) { await DisplayAlert("Error", ex.Message, "OK"); } } } |
The following is an explanation of the .NET objects and members that are relevant to AI Search in the previous code:
· The SearchClient class provides a way to interact with a specific search index in Azure AI Search. It allows performing search queries and managing documents within that index. The SearchClient object is instantiated with the service endpoint (Uri), index name (string), and AzureKeyCredential for authentication. In the code, the UploadDocumentsAsync<T> method is used to asynchronously upload a batch of test travel destinations (in this case, TravelDestination objects) to the index, otherwise you would have no results. This method returns a Response<IndexDocumentsResult> object, which contains information about the indexing operation. The SearchAsync<T> method is used to execute search queries asynchronously, returning a SearchResults<T> object that contains the search results. Additionally, methods like MergeDocumentsAsync<T> and DeleteDocumentsAsync<T> allow updating and removing documents from the index, respectively, and could be useful for scenarios where you need to modify or delete indexed data.
· The SearchIndexClient class enables you to manage the structure of your search indexes. Although it is not heavily used in the code, this client is essential for creating, updating, and deleting indexes. The client is instantiated similarly to SearchClient, with the service endpoint and AzureKeyCredential. The CreateIndexAsync method can be used to programmatically create a new search index, while DeleteIndexAsync can be used to delete an existing index. The GetIndexAsync method retrieves the schema of an index, which can be useful for inspecting or modifying the structure.
· The SearchOptions class configures the behavior of search queries performed with the SearchClient. In the code, SearchOptions is used to specify that the total count of results should be included in the search response (IncludeTotalCount = true). Other available properties include Filter, which can be used to apply filters to the search query, and Facets, which allows you to specify fields for faceted navigation. Additionally, OrderBy can be set to control the sort order of the search results.
· The SearchResults<T> class represents the generic collection of search results returned by the SearchAsync<T> method. It includes properties such as TotalCount, which gives the total number of documents that match the search query, and Results, which contains a collection of SearchResult<T> objects. The GetResultsAsync method can be used to retrieve the collection of individual search results. This class encapsulates not only the results themselves but also metadata about the query, which can be useful for building pagination or providing more detailed insights into search performance.
· The SearchResult<T> class represents an individual document retrieved from the search index. Each SearchResult object includes properties like Score, which represents the relevance score assigned by the search engine, and Highlights, which contains the highlighted portions of the document that match the query, if highlighting is enabled. The Document property gives access to the actual document (in this case, a TravelDestination object) stored in the index. The SearchResult<T> class also exposes methods like GetDouble, GetString, and other type-specific accessors to retrieve individual fields from the result when working with dynamic schemas.
· The IndexDocumentsResult object is returned by document indexing methods like UploadDocumentsAsync<T> and MergeDocumentsAsync<T>. This object contains information about the result of the indexing operation, such as the status and number of documents successfully processed. It helps in verifying whether the documents were indexed properly and if there were any errors.
Tip: Uploading test data is necessary in a sample application, but in the real world, you will need to populate the index with your own data. There are different ways to do this; for example, you can upload JSON data directly to the Azure Portal.
The search functionality is triggered when the user clicks the Search button. The application retrieves the user's query from the Entry and sends it to Azure. Matching results are added to the SearchResults collection. Further information on developing with Azure AI Search can be found in the official documentation.
Running the application
Add the new page to the AppShell.xaml file as follows:
<ShellContent Title="Search" Icon="magnifying_glass_solid.png"
ContentTemplate="{DataTemplate local:SearchPage}" />
After doing this, press F5 to start debugging the app on your device of choice and open the Search page. Enter your query (e.g., Rome) and click Search. As shown in Figure 33, the application displays the search results.
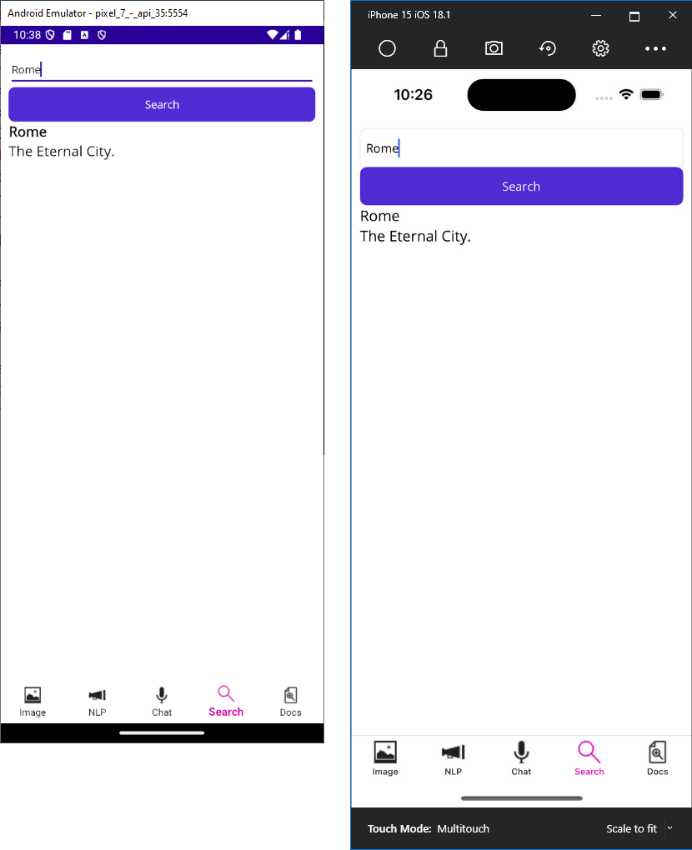
Figure 33: Retrieving items with intelligent search
This is obviously a simple example, but it should at least give you an idea of Azure AI Search’s powerful features.
Implementing recommendations
Azure AI Search can also return AI-generated recommendations. The following method finds highly rated destinations based on the filters applied to the index fields:
public async Task<List<TravelDestination>> GetRecommendedDestinationsAsync()
{
var options = new SearchOptions
{
Filter = "Rating ge 4.7",
OrderBy = { "Rating desc" }
};
var searchResults =
await searchClient.SearchAsync<TravelDestination>("", options);
var recommendedList =
new List<TravelDestination>();
await foreach (var result in
searchResults.Value.GetResultsAsync())
{
recommendedList.Add(result.Document);
}
return recommendedList;
}
You still invoke the SearchAsync method from the SearchClient class, but you configure the SearchOptions instance by setting the Filter and OrderBy properties.
Chapter summary
In this chapter, you integrated Azure AI Search to power search functionality in the travel companion app. You created a search index, implemented a search UI, and retrieved relevant destinations based on user queries. Additionally, you implemented ranking and filtering to personalize recommendations. The use of the SearchClient class and the SearchAsync method allowed the app to perform efficient searches. With this foundation, the app can now provide users with intelligent search and recommendation features. In the next chapter, you will focus on extracting data from documents using AI, enabling users to process text-based information effectively.
- An ever-growing .NET MAUI control suite with rich feature sets.
- DataGrid, Charts, ListView, Scheduler, and more.
- Active community and dedicated support.
- Phone, tablet, and desktop support.