
Intelligent Mobile Apps with .NET MAUI Succinctly®

CHAPTER 8
AI-Optimized Routes with Azure Maps Accounts
Azure Maps Accounts, or Azure Maps for short, is a comprehensive suite of geospatial services designed to empower developers and organizations to create intelligent, location-based applications. It allows the integration of maps, geocoding, routing, real-time traffic, weather data, and geospatial analytics into web and mobile solutions. In this chapter, you will discover how Azure Maps can improve the user experience by providing route optimization in mobile apps. You will implement real-time route data, such as traffic conditions, weather updates, and user preferences. These optimized routes are then displayed seamlessly on a map using .NET MAUI, providing a user-friendly interface.
Setting up the Azure Maps service
You will now follow steps similar to those in the previous chapters to set up the Azure Maps service:
- Open the Azure Portal.
- In the search box, type Azure Maps Accounts, as shown in Figure 37. This is required the first time, because this service might not be visible in the AI services list.
- Click the Create resource hyperlink.
- Choose a Subscription and Resource Group.
- Select a Region and Pricing tier (the Free F0 plan is recommended).
- Specify a name for the service, for example, mapssuccinctly.
- Click Review + Create and then Confirm.
- When the service has been created, click Go to resource and retrieve the API key. No endpoint is necessary with this service.
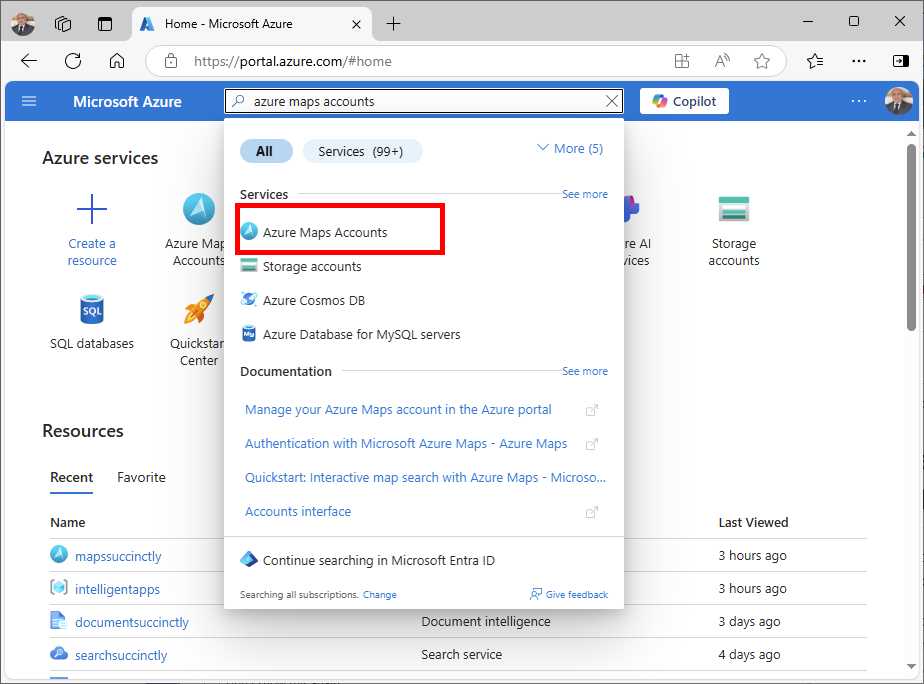
Figure 37: Locating the Azure Maps Accounts service
For iOS, this is enough. However, on Android, the .NET MAUI Map control relies on the native Google Maps component, so a few more steps are necessary.
Setting up the Google Maps SDK
Before you can use maps on Android, you need to register for an account on the Google Cloud Developer Console. There is a 90-day free trial that includes $300 in free credits and about 40,000 calls to the Maps service, which is absolutely enough for the purposes of the current example. So, you have all the time to decide and evaluate your needs. On the Developer Console home page, click Try for free. You will be asked to sign in with a Google account. Once signed in, you will be asked to:
- Specify your country.
- Select the service that you intend to use. Make sure you select Google Maps.
- Verify your identity by providing a credit card (see Figure 38). Do not worry, you will not be charged, and a transaction of $0 will be made only to avoid abuse. Charges start only when you decide to continue with a paid subscription.
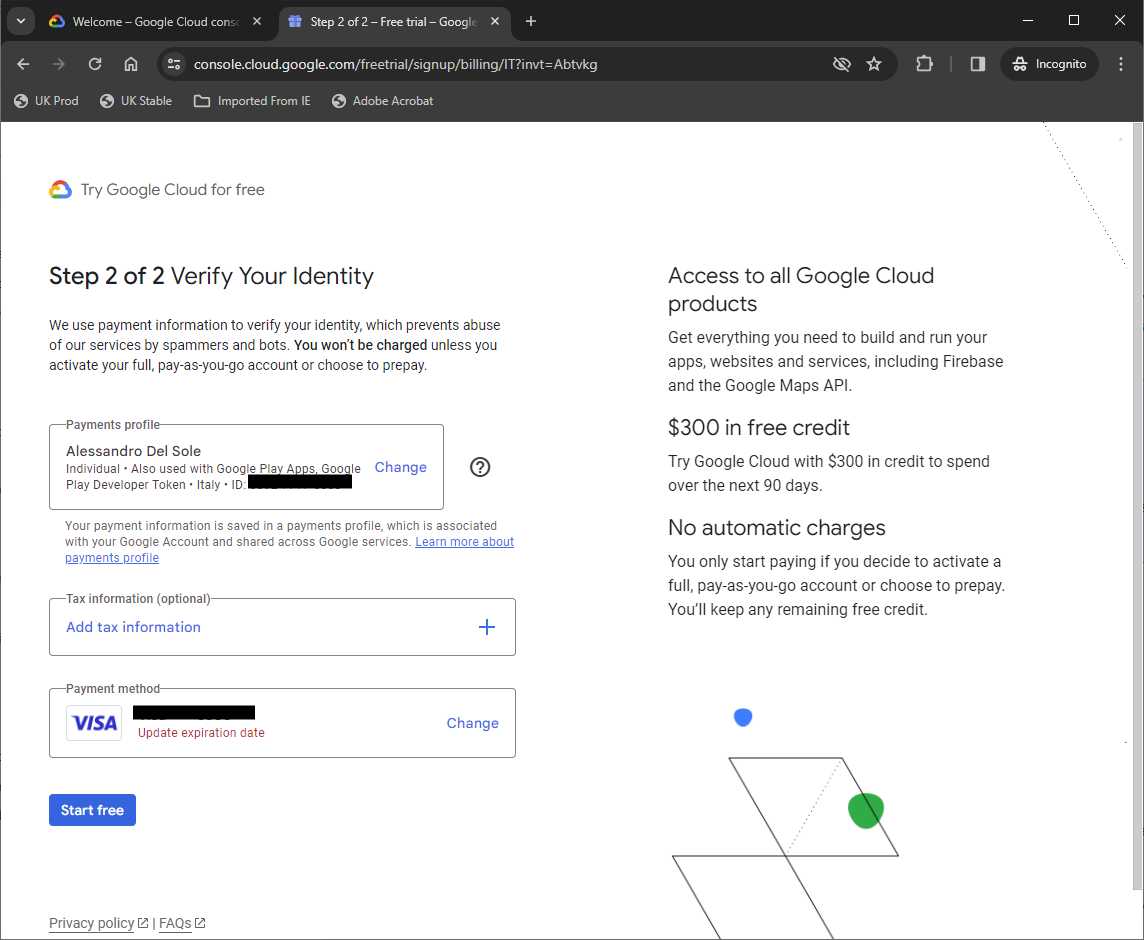
Figure 38: Verifying your identity in the Google Cloud Developer Console
When ready, click Start free. Since you previously specified Google Maps as the service that you want to use, the Google Cloud Developer Console will provide you with an API key on the next page, as shown in Figure 39.
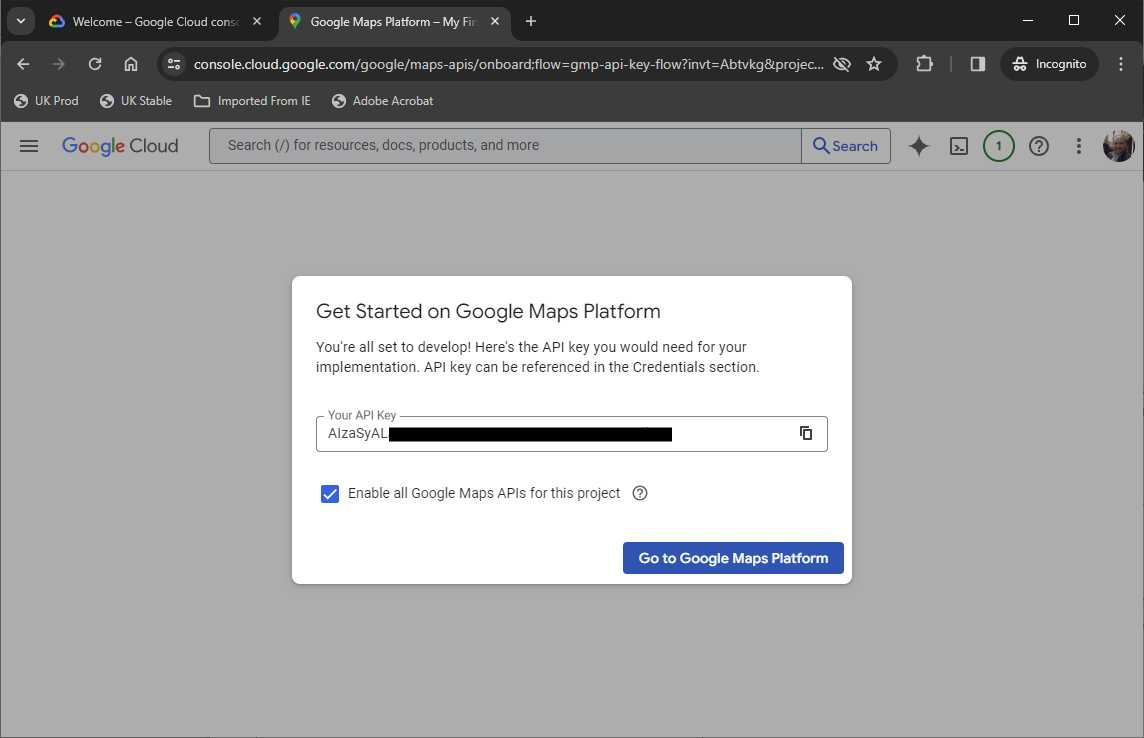
Figure 39: Obtaining a Google Maps API key
Now go to Visual Studio and open the AndroidManifest.xml file with the built-in XML editor, and then add the following line inside the <application> node:
<meta-data android:name="com.google.android.geo.API_KEY" android:value="your-google-maps-api-key" />
Enter the API key for Google Maps by replacing the content of the android:value tag. There is nothing else you have to do here, and you can ignore the Go to Google Maps Platform button in the Google Cloud Developer Console.
Implementing Maps
In Visual Studio, you need to install two NuGet packages:
· Microsoft.Maui.Controls.Map, which contains the Map control that you will use to display native maps.
· Azure.Maps.Routing, the client SDK library that allows interaction with the Azure Maps service from .NET. At the time of writing this ebook, the package is available as a prerelease version, so you need to select the Include prerelease option shown in Figure 40.
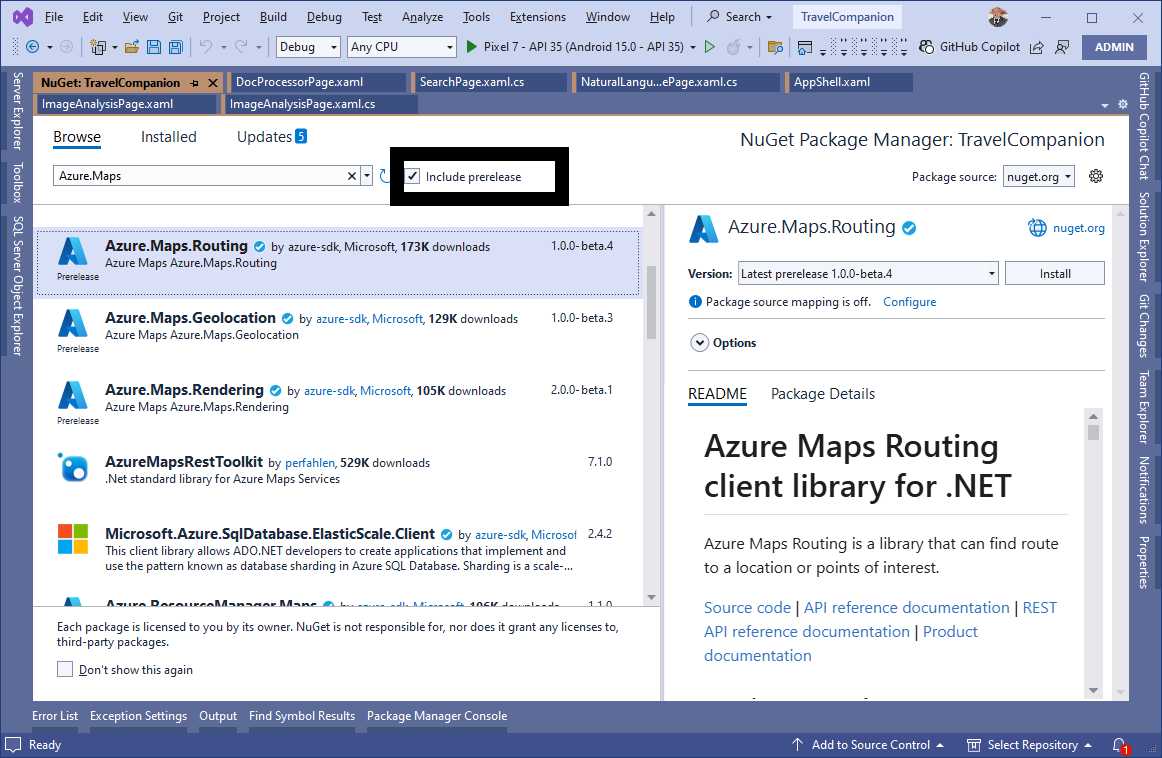
Figure 40: Installing the Azure.Maps.Routing NuGet package
Specifying permissions
Though displaying maps does not require user permissions, if you want to calculate a route from the user’s current location, you need access to the GPS sensor, so you must ask for location permissions. This involves requesting permission to use the location only when the app is in use or in the background (if you really plan to use the location constantly). On iOS, you need to add the following nodes to the Info.plist file:
<key>NSLocationWhenInUseUsageDescription</key>
<string>We need your location to calculate the best route.</string>
<key>NSLocationAlwaysUsageDescription</key>
<string>This app requires location access to function properly.</string>
This ensures that both scenarios, while the app is in use and in the background, are covered. On Android, you might want to edit the AndroidManifest.xml file manually instead of using the user interface, because you need to specify hardware interaction as follows:
<uses-permission android:name="android.permission.ACCESS_COARSE_LOCATION" />
<uses-permission android:name="android.permission.ACCESS_FINE_LOCATION" />
<uses-permission android:name="android.permission.ACCESS_BACKGROUND_LOCATION" />
<uses-feature android:name="android.hardware.location" android:required="true" />
<uses-feature android:name="android.hardware.location.gps" android:required="true" />
<uses-feature android:name="android.hardware.location.network" android:required="true" />
The first three lines ensure that the user grants permission to the app to use a low-accuracy location, a high-accuracy location, and the location while the app is in the background. The other lines specify which hardware features are required, namely the location service, the GPS sensor, and the location based on a network. For Android, there is an additional step; open the MainActivity.cs file in the Platforms\Android folder and add the following code:
protected override void OnCreate(Bundle? savedInstanceState)
{
base.OnCreate(savedInstanceState);
if (CheckSelfPermission(Manifest.Permission.AccessFineLocation)
!= Permission.Granted ||
CheckSelfPermission(Manifest.Permission.AccessCoarseLocation)
!= Permission.Granted)
{
RequestPermissions(new string[] {
Manifest.Permission.AccessFineLocation,
Manifest.Permission.AccessCoarseLocation }, 0);
}
}
When the main activity (that is, the main UI container of the app) is created, this code invokes the native CheckSelfPermission method to ensure that the user is prompted to grant location permissions.
Defining the user interface
Add a new page called MapsPage.xaml to the project. The flow of the user interface will be the following:
- The user selects a destination on the map with a touch gesture on the target location.
- The user then taps the only Button to enable the detection of the current location and to invoke the Azure Maps services to calculate an optimized route.
- The results, including the detailed directions, will be displayed in a Label.
Code Listing 14 declaratively defines this flow.
Code Listing 14
<?xml version="1.0" encoding="utf-8" ?> <ContentPage xmlns="http://schemas.microsoft.com/dotnet/2021/maui" xmlns:x="http://schemas.microsoft.com/winfx/2009/xaml" xmlns:maps="http://schemas.microsoft.com/dotnet/2021/maui/maps" x:Class="TravelCompanion.MapsPage" Title="MapsPage"> <Grid> <Grid.RowDefinitions> <RowDefinition Height="Auto"/> <RowDefinition Height="Auto"/> <RowDefinition Height="200" /> </Grid.RowDefinitions> <Button Text="Get Current Location and Plan Route" Margin="5" Clicked="OnGetRouteClicked"/> <maps:Map x:Name="mapControl" IsTrafficEnabled="True" Grid.Row="1" IsShowingUser="True" MapType="Street" Margin="5" HeightRequest="500" WidthRequest="400" MapClicked="OnMapClicked"/>
<ScrollView Grid.Row="2"> <Label x:Name="DirectionsLabel" Margin="5"/> </ScrollView> </Grid> </ContentPage> |
The XAML code declares a Grid layout with three rows. The first row contains a Button that triggers the OnGetRouteClicked event when pressed and that will be handled in the next section. The second row declares a Map control, configured with properties such as IsTrafficEnabled (to display traffic data), IsShowingUser (to show the user's current location), and MapType set to Street. Other supported values are Satellite, which displays satellite images for the area, and Hybrid, which combines satellite images with street images. When the user selects a destination on the map, the MapClicked event is fired (handled in the next section). The third row includes a scrollable view that displays route directions or other relevant information dynamically in a Label. Now it is time to write C# code that calculates the route.
Calculating routes
The goal of the C# code is to retrieve and display a route that is optimized based on the traffic conditions and user preferences. Code Listing 15 demonstrates this.
Tip: Notice how the code checks again for location permissions. Even if you implement a similar check at the Android app startup in the MainActivity.cs file, this is not redundant. Instead, it is best practice. If the user revokes permissions while the app is running but before using the location service, your code is still safe because of this double-check.
Code Listing 15
using Azure; using Microsoft.Maui.Controls.Maps;
namespace TravelCompanion;
public partial class MapsPage : ContentPage { public MapsPage() { InitializeComponent(); }
private Location selectedDestination;
private void OnMapClicked(object sender, MapClickedEventArgs e) { selectedDestination = new Location(e.Location.Latitude, e.Location.Longitude);
Pin destinationPin = new Pin { Label = "Destination", Type = PinType.Place, Location = new Location(selectedDestination.Latitude, selectedDestination.Longitude) }; mapControl.Pins.Clear(); mapControl.Pins.Add(destinationPin); }
private async void OnGetRouteClicked(object sender, EventArgs e) { if (selectedDestination != null) { CalculateRoute(selectedDestination.Latitude, selectedDestination.Longitude); } else { await DisplayAlert("Error", "Please select a destination on the map", "OK"); } }
private async Task<bool> RequestLocationPermissionsAsync() { var locationStatus = await Permissions. CheckStatusAsync<Permissions.LocationWhenInUse>(); if (locationStatus != PermissionStatus.Granted) { locationStatus = await Permissions. RequestAsync<Permissions.LocationWhenInUse>(); }
return locationStatus == PermissionStatus.Granted; }
public async void CalculateRoute(double destinationLat, double destinationLon) { bool permissions = await RequestLocationPermissionsAsync(); if (!permissions) return; try {
var routeService = new RouteService("api-key");
GeolocationRequest request = new GeolocationRequest(GeolocationAccuracy.Low, TimeSpan.FromSeconds(10));
var _cancelTokenSource = new CancellationTokenSource();
Location currentLocation = await Geolocation.Default. GetLocationAsync(request, _cancelTokenSource.Token);
if (currentLocation == null) { await DisplayAlert("Error", "Unable to get current location", "OK"); return; }
var route = await routeService.GetOptimizedRouteAsync( currentLocation.Latitude, currentLocation.Longitude, destinationLat, destinationLon );
if (route.Routes.Count > 0) { var singleRoute = route.Routes[0];
var polyline = new Polyline { StrokeColor = Colors.Blue, // Set polyline color StrokeWidth = 5 };
foreach (var point in singleRoute.Legs[0].Points) { polyline.Geopath.Add( new Location(point.Latitude, point.Longitude)); }
mapControl.MapElements.Clear(); mapControl.MapElements.Add(polyline);
var directions = singleRoute.Guidance. Instructions.Select(i => i.Message).ToList();
string formattedDirections = string.Join("\n", directions); DirectionsLabel.Text = formattedDirections; } } catch (RequestFailedException ex) { await DisplayAlert("Error", ex.ErrorCode, "OK"); } catch (Exception ex) { await DisplayAlert("Error", ex.Message, "OK"); } } } |
The following is an explanation of the flow and the relevant Azure Maps SDK objects used in the code. When the user clicks a location in the Map control, the app double-checks for location permissions and asks for them again if necessary. If permissions are granted (see the RequestLocationPermissionsAsync method), the current user location is retrieved via the GetLocationAsync method from the Geolocation class.
Tip: Make sure that the location sensor and services are enabled on the target device, otherwise the code will fail. In a real-world app, you should programmatically check if location is enabled and prompt the user accordingly.
The resulting Location instance represents the selected geographic coordinates. A pin, created using the Pin class, is placed at the selected point with properties like Label to name the destination and Type to specify its purpose as a place marker. The pin is added to the MapControl.Pins collection, ensuring it is dynamically displayed on the map. When the button is clicked, the OnGetRouteClicked method is invoked. If a destination is already selected, the CalculateRoute method retrieves the current location using geolocation APIs, ensuring location permissions are granted via the RequestLocationPermissionsAsync method.
The core routing logic relies on the RouteService class, which is initialized with an API key to authenticate with Azure Maps services. The GetOptimizedRouteAsync method is then called to fetch the most efficient route, taking the current and destination coordinates as parameters. The method returns a RouteResponse object containing route details, including a collection of route legs represented by the RouteLeg class. The route's path is visualized on the map using the Polyline class, which generates a collection of points. Properties like StrokeColor and StrokeWidth define the color and width of the polyline, respectively. Each point in the route leg's Points collection is added to the polyline's Geopath, representing the optimized route.
This polyline is then added to the MapControl.MapElements collection, ensuring it appears as an overlay on the map. Additionally, turn-by-turn instructions are extracted from the route's guidance messages using the GuidanceInstructions class and its Instructions property. These instructions are formatted into a readable string and displayed in the DirectionsLabel control, providing users with a clear set of navigation steps.
Adding the page to the navigation stack
In .NET MAUI, the TabBar of the shell can display up to five icons. This is to ensure consistent views across devices. Since you already have five icons, for the sake of simplicity, in the AppShell.xaml file, comment out the declaration of the DocProcessorPage.xaml and add the new page, as follows:
<!--<ShellContent Title="Docs" Icon="document.png"
ContentTemplate="{DataTemplate local:DocProcessorPage}" />-->
<ShellContent Title="Maps" Icon="map.png"
ContentTemplate="{DataTemplate local:MapsPage}" />
Once you have finished with this example, you can revert to the previous button implementation. You can also consider implementing a flyout menu, but this is not covered here.
Running the application
Press F5 to run the application. At startup, you will be asked to grant location permissions, so give your consent. Open the new page, select the target city, and see how a pin is added to the map. When ready, click the button. After a few seconds, the AI-optimized route will be displayed, as shown in Figure 41.
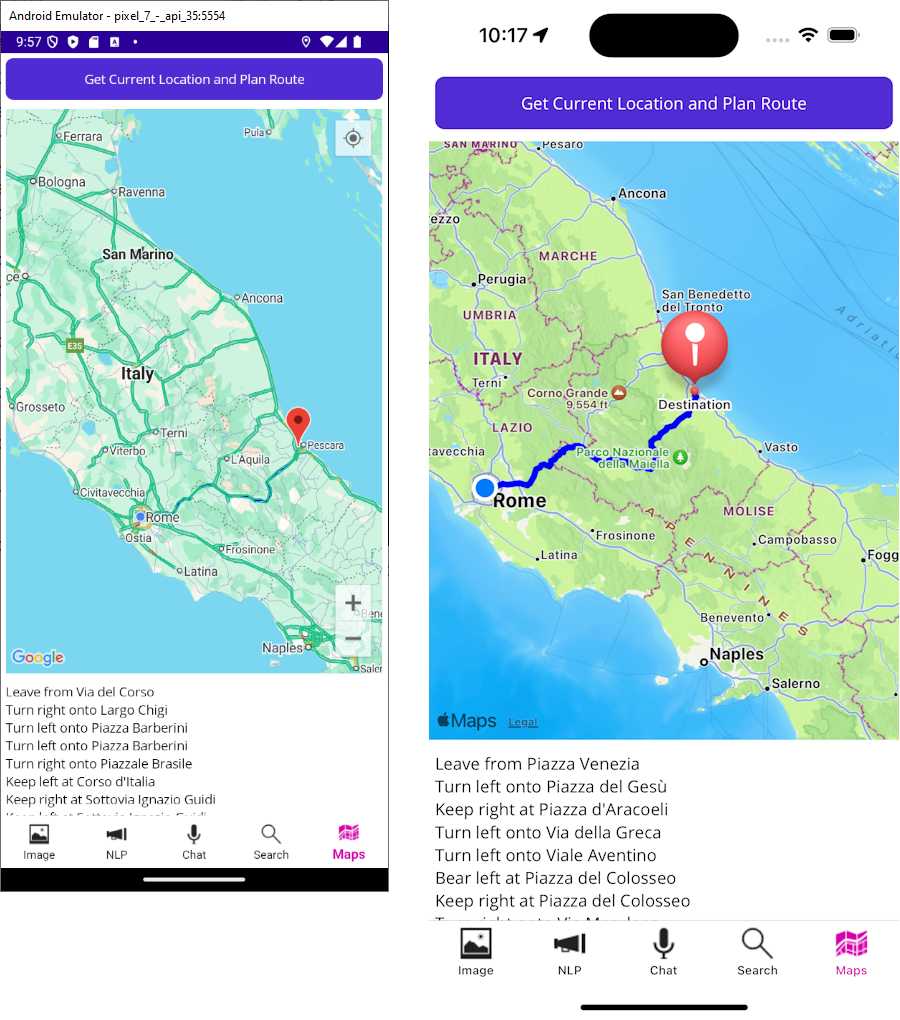
Figure 41: Calculating optimal routes with direction information
You can further refine the route optimization and also get the current location at startup, depending on your requirements.
Tip: On iOS, the native map view does not include zoom controls. If you use a simulator, it is recommended that you run it on the Mac, without remoting the simulator to Windows. In fact, on the Mac, you can press Option and click to zoom the map. On Windows, the Alt + click combination does not always work.
Chapter summary
In this chapter, you have seen how to leverage the Azure Maps service to provide route calculations that AI optimizes based on traffic and other conditions that can be relevant to the user of a mobile app. You have also seen how to set up a Google Maps account and how to implement permission requests.
- An ever-growing .NET MAUI control suite with rich feature sets.
- DataGrid, Charts, ListView, Scheduler, and more.
- Active community and dedicated support.
- Phone, tablet, and desktop support.