
HoloLens Succinctly®

CHAPTER 9
Testing HoloLens Experiences
A HoloLens experience is a software project, regardless of how cool the hardware is, and how incredible the spatial mapping is. In the end, you are creating an application that will run on someone’s machine that you don’t have control over. And just like any other piece of software, you need to test your work.
As you will see, testing HoloLens development work is very different from traditional software testing. You suddenly have real-world interaction you need to manage, as well as your scripts and performance. This, of course, requires a different approach.
Device Portal
Your best friend, and tool, when it comes to testing a HoloLens experience, is the Device Portal. You access it using a web browser pointed to the IP address the HoloLens is assigned to on the local network. The portal provides insight into a range of stats, real time monitoring, and tools you can use when developing your experience.
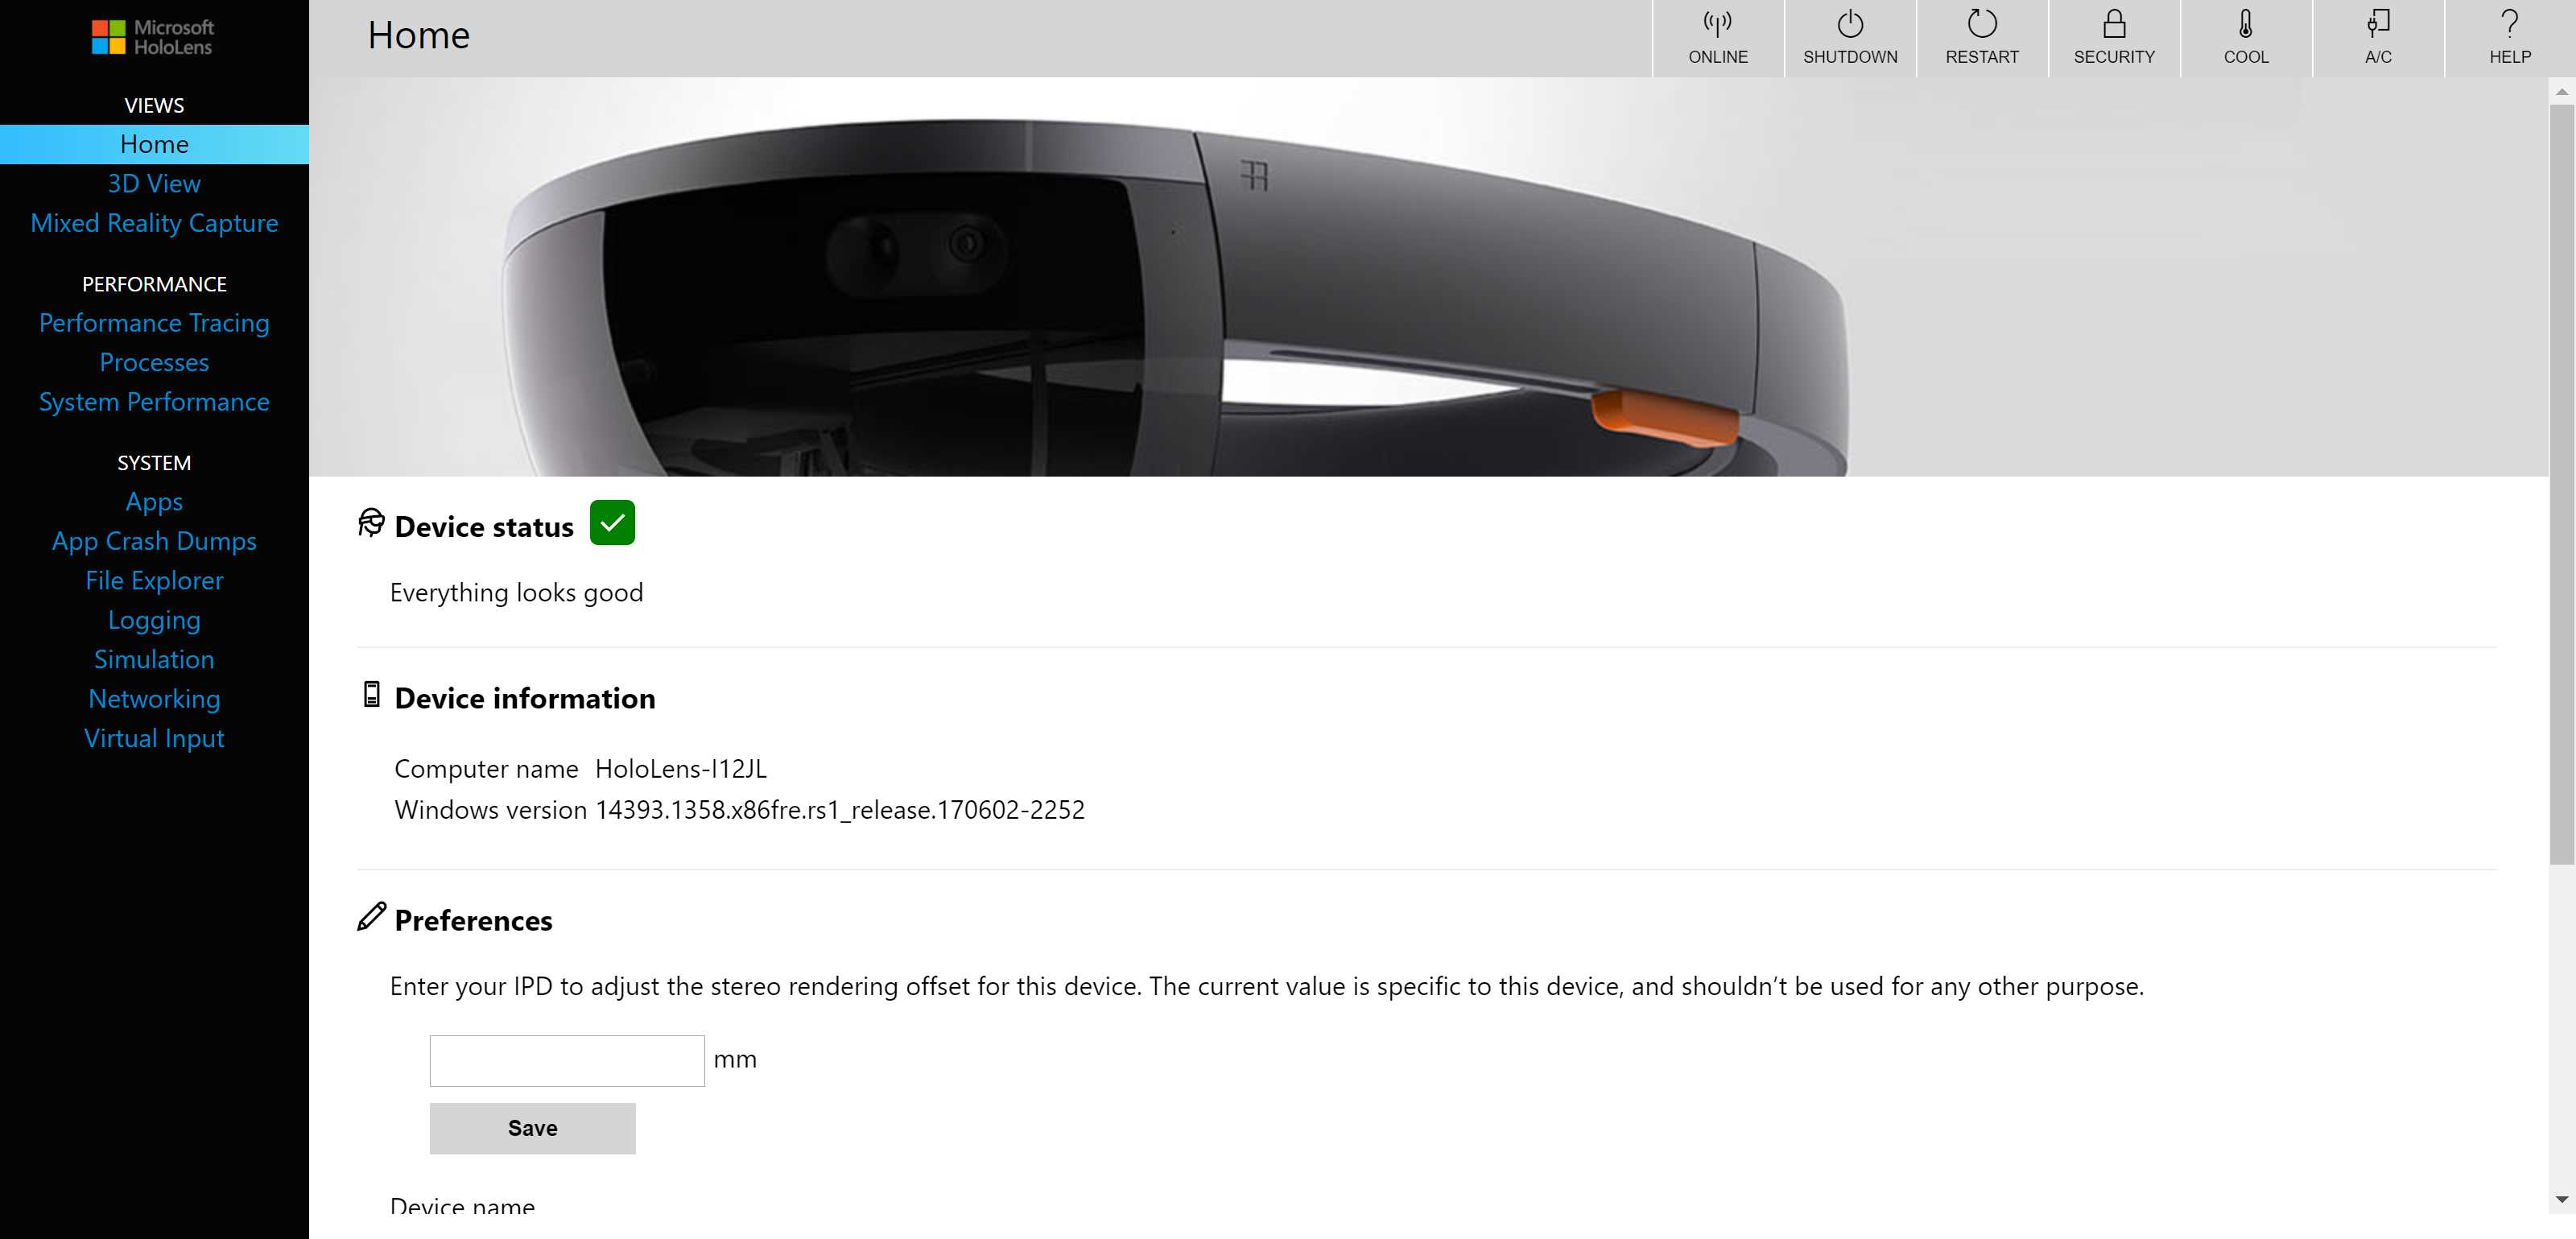
Figure 40: HoloLens Device Portal
Tip: The developer portal works on both the emulator and physical devices.
You will find that using the portal will speed up both your development and quality assurance phase, as it has tools aimed at both.
3D view
Because the Device Portal is running off the device (or emulator) itself, you also have direct access to the 3D information from the device. Open the 3D view, and you can see exactly where the device is in relation to the current spatial mapping. This is really cool, and a great way to visualize where the user goes in the experience.
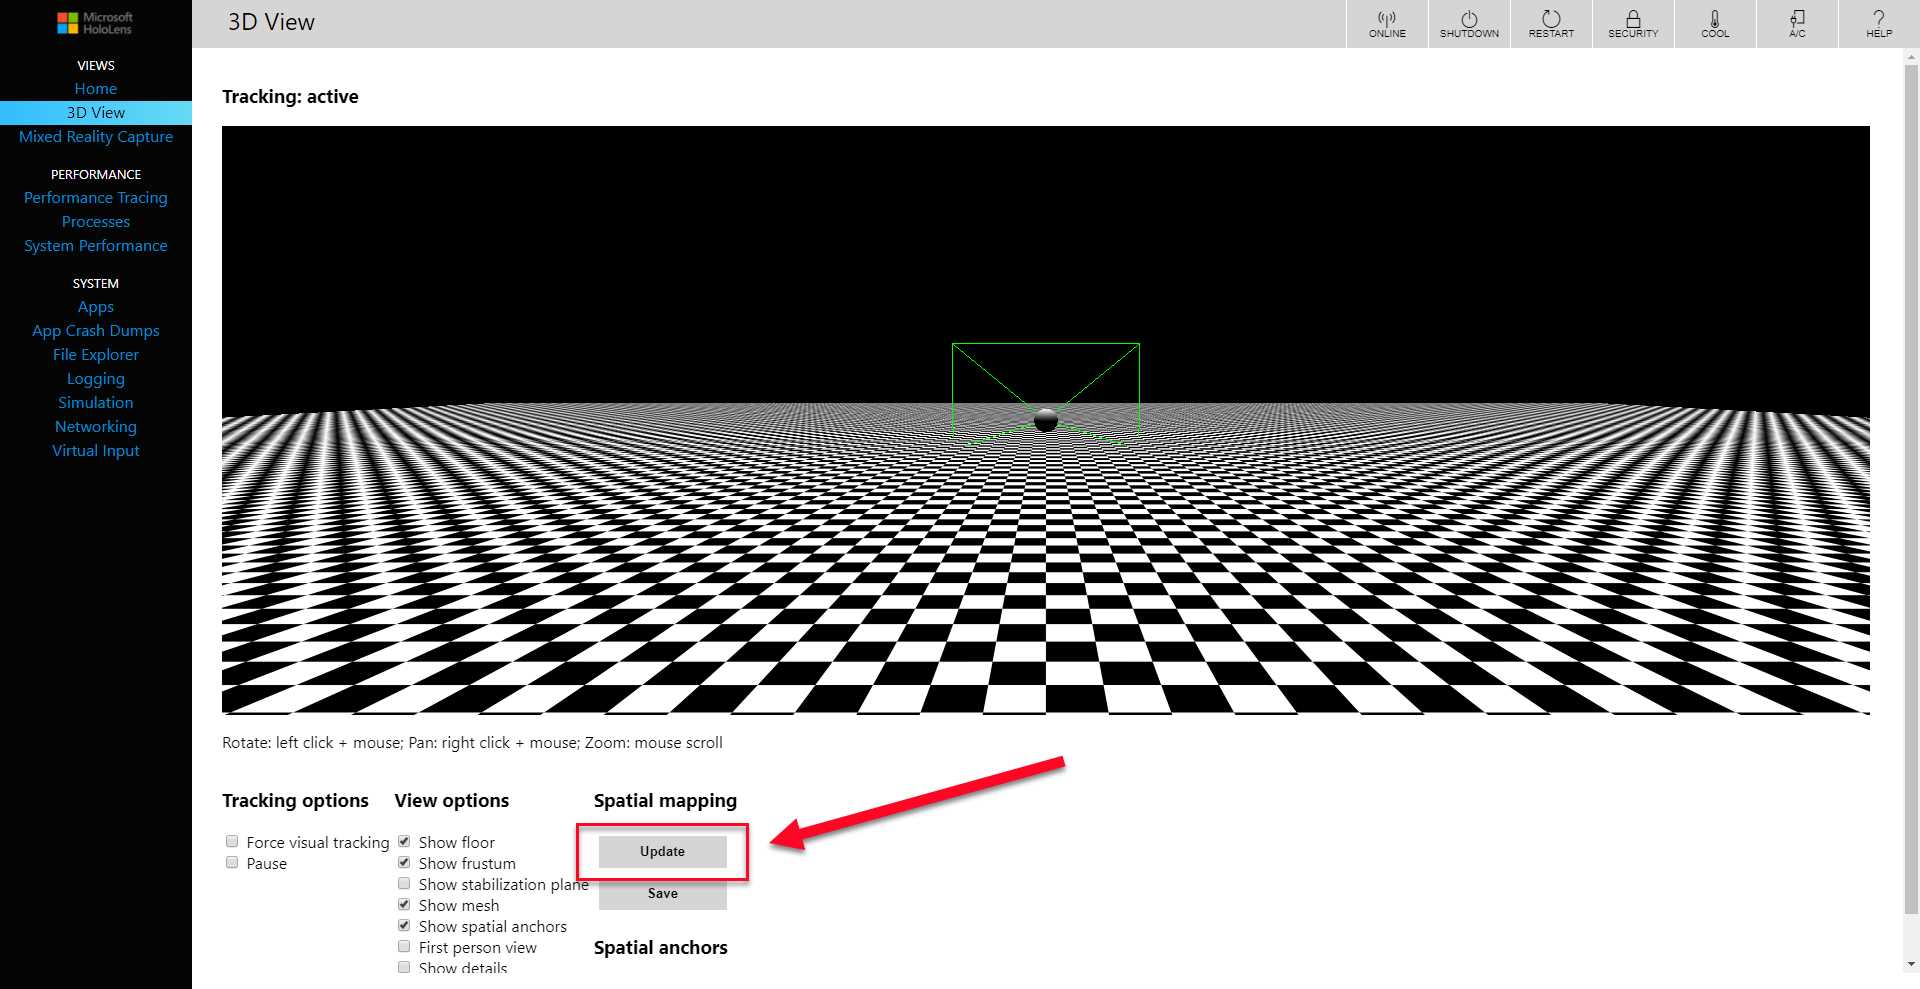
Figure 41: The Update Button
If you click the Update button on the 3D View screen, the spatial mapping will be drawn in 3D on the plane in relation to the user. This is a representation of the instantaneous 3D model as created by the device.
Note: If you are using an emulator, the spatial mapping of the room is preloaded and will not update in real time.
The 3D view has a few more features that also come in handy. You can view the position of the stabilization plane in real time, which will help debug any stabilization issues. There is a checkbox for showing spatial anchors, which is very useful if holograms start drifting or you have issues with recognizing the room features. If you really want to experience the impact of the spatial mapping, you can use first person view to see the 3D environmental model as the user will see it.
Tip: Use the 3D view to update the spatial model until it is detailed enough for your use, then save it to disk. Other team members can then load the same room in their emulator, making team testing much more accurate.
Mixed Reality Capture
While the 3D view can show the polygons of the spatial mapping, you can also capture the whole experience as seen by the user. The Mixed Reality Capture lets you choose which parts of the experience you want to capture, including the holograms, the camera on the device, microphone audio, and application audio. You can also select the quality you want the recording to be in. Generally, you’d want the quality set to High, but if the bandwidth on the local network (from which you are receiving the signal) isn’t great, it can work better at a lower resolution.
Being able to access the live feed of the mixed reality experience has a few benefits. You can record exactly what the user sees[7] in the experience, which can reveal any issues, such as drift and judder. Seeing exactly what the issue is makes debugging and performance improvements much easier. You can put your finger on exactly what the issue is and test a specific combination of inputs and movements, which are then recorded. You can share the recording with a team or developer that needs to analyze and resolve the error.
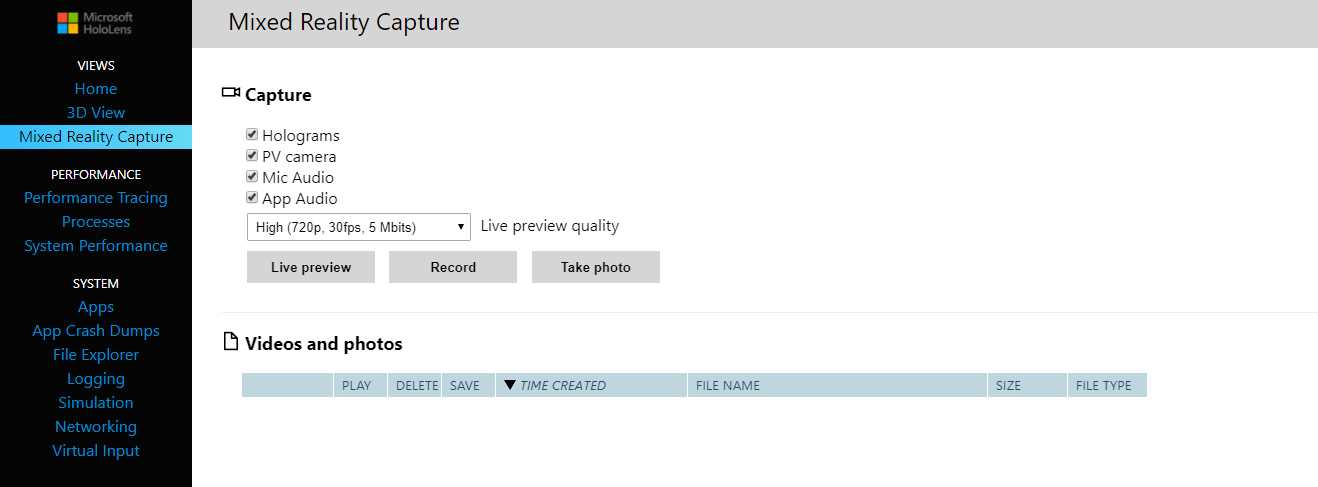
Figure 42: Mixed Reality Capture
The live preview is also very useful to show or reproduce a bug or symptom in real time for an audience. Being able to get input on actions and interactions to reproduce a particular scenario often results in a much more accurate approach.
Performance tracing
At times it can be difficult to pinpoint performance issues visually, and you might want more information for the investigation of the bug. The device portal has a very handy performance tracing function that can record a trace in an event trace log (ETL) file that holds a number of events.
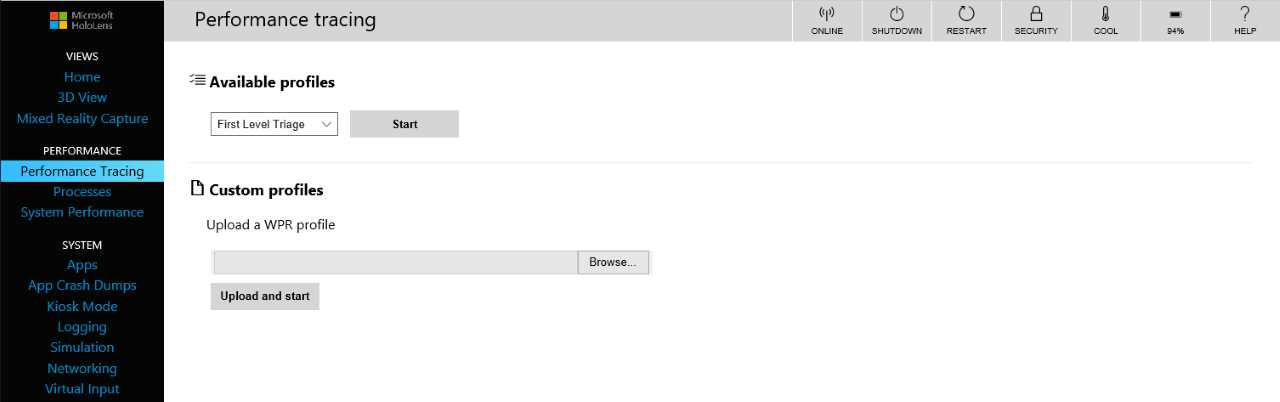
Figure 43: Performance Tracing
You can open this file in the Windows Performance Analyzer[8] tool, which draws graphs and creates data tables based on the performance trace events in the file. This will provide more insight into the performance challenges of the app, but it does require a fair amount of digging, and there is a learning curve.
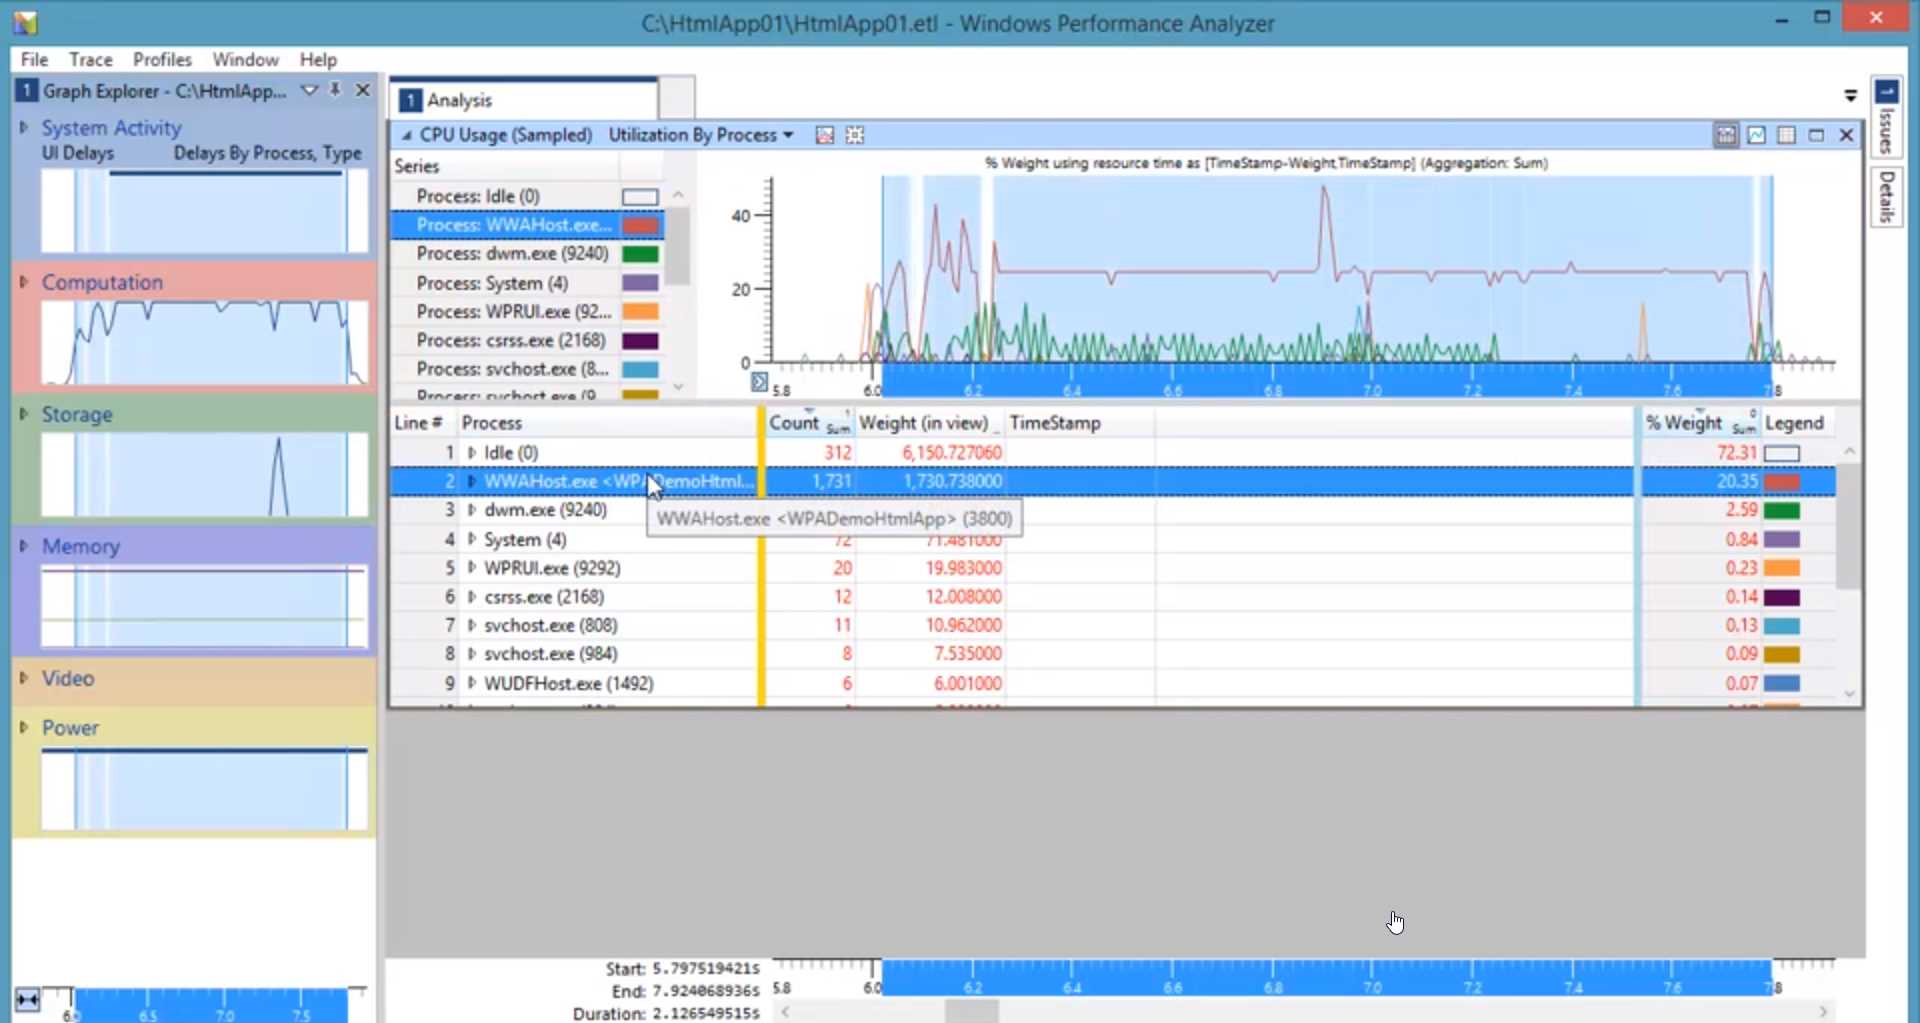
Figure 44: Windows Performance Analyzer
Tip: You will dramatically improve the success of your app if you become an expert in performance optimizing, as users respond extremely well to performing apps.
Processes
The Processes screen is the equivalent of the Task Manager on a standard Windows installation. It shows the current running processes and, more importantly, the current CPU and memory usage. If there are performance issues with your experience, you can monitor the CPU and memory in real time.
This can also be a great tool to confirm that your app is running as well as it can, when the system is slow for one reason or another. The Processes screen shows both system and user applications running, so you can rule out one or the other.

Figure 45: Processes in the HoloLens Device Portal
System performance
To get a real-time indication of how the device is performing, use the System Performance screen of the device portal. You can monitor the instantaneous system-on-chip (SoC) power utilization, averaged over one minute. If you have a drain on battery usage while using your app, this will most likely show up in the SoC metric or the overall system power consumption graph.
You can also monitor the live frame rate to understand if your app is either not delivering the necessary 60 frames per second or if the frame rate is fluctuating. As described in the section on Frame , not having a consistent frame rate can severely hinder the experience of the app and cause a bunch of issues.
You can also monitor GPU usage, CPU usage, I/O reads and writes, network usage, and memory used—all in real time. Having insight into the metrics, if there are issues with your app, is valuable. The system performance is part of your suite of tests for any HoloLens app.
In general, follow these basic steps:
- Create a test plan for your experience.
- At a minimum, run the test plan for every update to the app or new feature.
- Monitor system performance when testing on the device.
- Repeat.
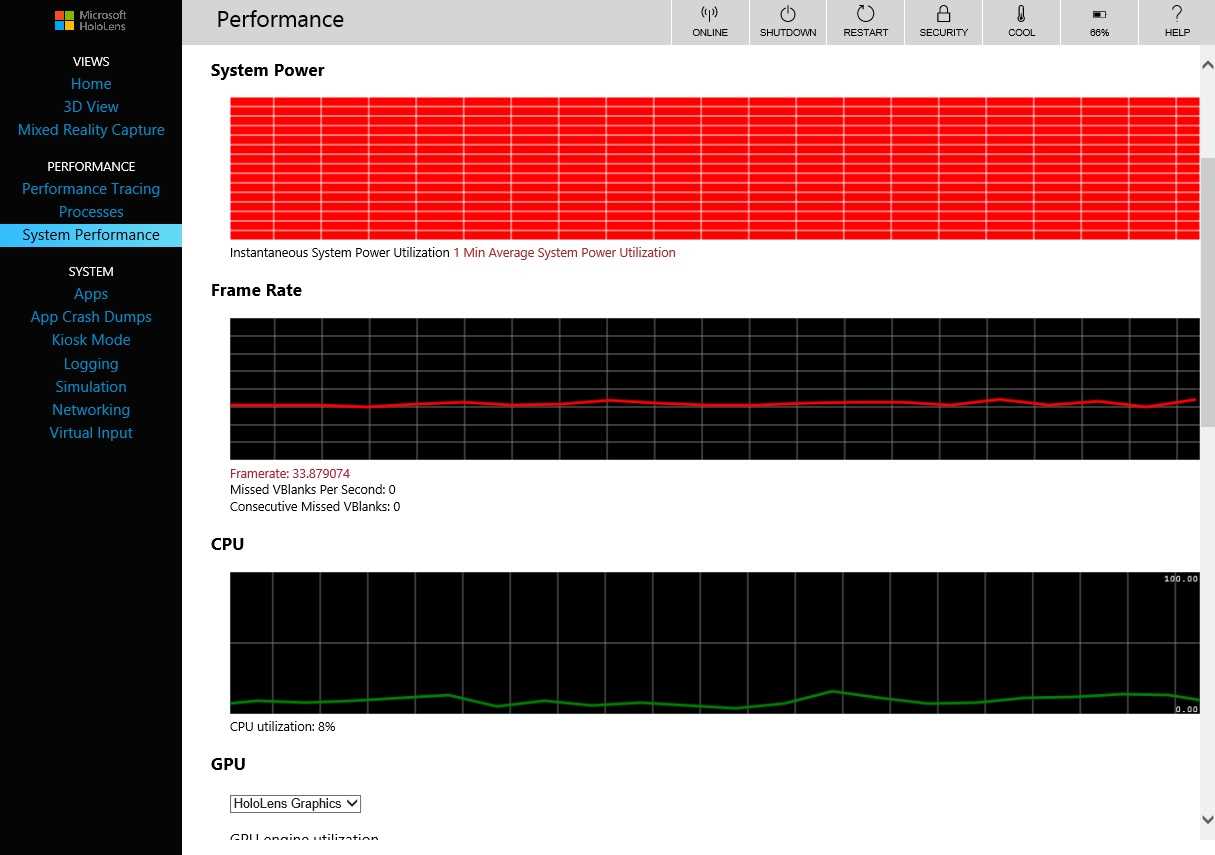
Figure 46: HoloLens System Performance Graphs
System tools
In addition to the specific tooling, there are also many extra system screens in the device portal. You can sideload[9] apps, get dumps for when apps crash (and they will), manage kiosk mode (which locks the device to a single app), set up logging integration with various frameworks, and monitor networking.
One cool feature is on the Simulation tab, on which you can capture the spatial mapping currently on the device. You can save this as a file that can then be reused by others on your team.
Performance
As we have seen, the most important performance measurement is making sure 60 frames are delivered to the operating system every second. This ensures that most of the symptoms described in Chapter 8 “Hologram Quality” don’t occur. To test frame rate performance for production, you need a real HoloLens device and the System Performance Tool. As good as the emulator is, system resources from other processes have an influence on the Hyper-V image that runs the emulator. The initial tests on the emulator are valuable to give an indication of performance, though.
Frame rate isn’t the only performance concern. If you have an excessive amount of processing to uphold the frame rate, then your power consumption is also going to go up. Use the System Performance tool in the developer portal to monitor power consumption.
The third major component in testing performance is memory usage. The HoloLens device only has 2 GB in total, so there isn’t a lot to use from the start. You will have to be smart about what you store in memory at any one time and take advantage of the hardware acceleration where possible.
Environmental testing
HoloLens apps are software applications written in familiar tools, using familiar approaches. What’s different is that they are running on a device that interacts with the physical environment surrounding the user. This is a whole new area of testing for traditional software developers.
Testing how a HoloLens application interacts with the physical environment is not done through unit or integration tests. You must get physical and put yourself in the shoes of your users.
Tip: Get both actual users and non-developers to test the experience. Tests with people who haven’t been part of the development process often result in more natural results.
Light
The HoloLens creates a spatial 3D model using infrared light, which in turn means that natural light can impact the mapping. When testing for light, these are some of the scenarios to check:
- Dimly lit: Turn off the light, either completely or mostly. The HoloLens sensors don’t work well in the dark, and it is worth knowing how your experience will react.
- Different color: Find various colors to test as light source. Red especially can be problematic.
- Dynamic light: Change the color source and intensity at various speeds. How does your app react in flashing light, for example?
- Digital light: If you have your own light source defined in your experience, how does that work with the real world? Does it look out of place? Is it too bright?
Sound
Spatial sound is a key part of the HoloLens experience, and it is easy to get it confused with real-world sound. After all, that’s the whole point! You want your digital sound to blend with the real world. What you don’t want is overwhelming or “dirty” sound. Some scenarios to test are:
- Ambient noise: Loud background noise such as traffic or music can diminish the effect of your designed audio. It can also make it harder to use voice commands.
- Conversation: Any background conversation can potentially be recognized as voice commands, or it may pollute the intended voice commands.
- Spatial audio: Ensure spatial audio attached to holograms perform as expected. Move around the hologram and check the sound is 100 percent accurate in the spatial model.
- Occlusion: As discussed in the “Sound ” section, in order to fully manifest the illusion of mixed reality, sound must behave naturally, including when it’s hidden behind physical and digital objects.
Movement
People are individually different, which means so are your users. They will be different heights, have different mannerisms, and move about the room in very different ways. You have to make sure that your experience works consistently for as many of those users as possible. Include these scenarios in your testing where possible:
- Head: Users always move their head in different ways. Some people have a unique way of moving their head when they walk, when they talk, etc. Test as many movements of your head as you can think of.
- Body: Everybody is different. Different heights. Different body shapes. Different postures. Test for as many as you can.
- Entry: How do holograms behave when users interact with them? What happens if someone steps into a hologram?
Environment
What sets the HoloLens apart is the physical environment around you. When you design and develop your app, there is no way you can anticipate all of the locations users will be using your app, but you can take steps to anticipate some of them. When you test the environment around you, keep the following in mind:
- Changes: The real world changes constantly. Doors open, chairs are moved, curtains are drawn, etc. Test what happens if you place a hologram on a surface that moves or disappears.
- Clutter: What happens if a room doesn’t have any empty or flat surfaces? If there are uneven objects everywhere, such as toys or boxes, will your app still function correctly?
- Missing mapping: The HoloLens will only map what it can see, so what happens if there are parts of the 3D model of the spatial mapping that is missing?
- Materials: Certain materials don’t work well with the infrared mapping of the device and will create unexpected effects. Glass will almost always be invisible, and a mirror is a magic portal into another dimension (not really, it just kind of is invisible).
Creating a testing environment
How do you go about testing the environment in practice? If you have a suitable space, it is worth setting up a dedicated test location. It must be representative of who the users of the app are and how they interact with your app. If you know certain equipment or furniture will be present where the users will be, create a mockup of the shape. Mimic the expected lighting and the shape of walls and doorways, and get background audio as well. It could be the murmur of a crowd, the hum of machinery, or whatever fits the intended environment.
The more accurate you can be in the test location, the better off you will be when it’s time to put it into production. For example, if you are designing and building an experience to help technicians fix an elevator, then set up the sections of the elevator that you can manage. This might just be the parts needing servicing, or if resources allow it, a more complete test location.
Perception Simulation
Automating testing for HoloLens is difficult because the real world changes all the time. Setting up a designated test location helps, but it doesn’t solve the need to carry out tests that can be repeated. A unique tool (for HoloLens only) is Perception Simulation.
You can simulate any movement that the user can perform, but in code. The library sends fake human and world input data to your app so you can automate your tests. It might be strange to use at first, as it takes over the real device or emulator and any “real” input is ignored. You can simulate both head movements and gestures as well as voice commands.
Perception Simulation bypasses the live sensors on a device and sends simulated input to applications running on the device. The applications receive all the simulated (fake) input events through the same APIs they always use, and they can't tell the difference between running with real sensors versus running with Perception Simulation.
Here’s how you set it up:
- Make sure you have installed the HoloLens emulator.[10]
- Add references to the following binaries:
- PerceptionSimulationManager.Interop.dll – Managed C# wrapper for Perception Simulation.
- PerceptionSimulationRest.dll – Library for setting up a web-socket communication channel to the HoloLens or emulator.
- SimulationStream.Interop.dll – Shared types for simulation.
- Add binary PerceptionSimulationManager.dll to your project.
Code Listing 10: Perception Simulation Example (based on sample from Microsoft)
RestSimulationStreamSink sink = await RestSimulationStreamSink.Create( // use the IP address for your device/emulator new Uri("http://169.254.94.136/"), // no credentials are needed for the emulator new System.Net.NetworkCredential("", ""), // normal priority true, // cancel token new System.Threading.CancellationToken()); IPerceptionSimulationManager manager = PerceptionSimulationManager.CreatePerceptionSimulationManager(sink); // Simulate Bloom gesture, which should cause Shell to disappear. manager.Human.RightHand.PerformGesture(SimulatedGesture.Home); Thread.Sleep(2000); // Simulate Bloom gesture again... this time, Shell should reappear. manager.Human.RightHand.PerformGesture(SimulatedGesture.Home); Thread.Sleep(2000); // Simulate a Head rotation down around the X axis. // This should cause gaze to aim about the center of the screen. manager.Human.Head.Rotate(new Rotation3(0.04f, 0.0f, 0.0f)); Thread.Sleep(300); // Simulate a finger press & release. manager.Human.RightHand.PerformGesture(SimulatedGesture.FingerPressed); Thread.Sleep(300); manager.Human.RightHand.PerformGesture(SimulatedGesture.FingerReleased); Thread.Sleep(2000); // Simulate a second finger press & release. manager.Human.RightHand.PerformGesture(SimulatedGesture.FingerPressed); Thread.Sleep(300); manager.Human.RightHand.PerformGesture(SimulatedGesture.FingerReleased); Thread.Sleep(5000); // Simulate a Head rotation towards the upper-right corner. manager.Human.Head.Rotate(new Rotation3(-0.14f, 0.17f, 0.0f)); Thread.Sleep(300); // Simulate a third finger press & release. manager.Human.RightHand.PerformGesture(SimulatedGesture.FingerPressed); Thread.Sleep(300); manager.Human.RightHand.PerformGesture(SimulatedGesture.FingerReleased); Thread.Sleep(2000); // Simulate Bloom gesture again... bringing the Shell back once more. manager.Human.RightHand.PerformGesture(SimulatedGesture.Home); Thread.Sleep(2000); |
Comfort
The issue of user comfort is up to you as a developer to deal with—there are no built-in API functions from Microsoft. Rather, it is important to keep the comfort of the mixed reality experience in mind. This is closely related to the section on identifying issues with hologram quality, such as jitter, judder, drift, and other issues that can cause discomfort to the user.
A small but important detail is managing the clip plane of the experience. The clipping plane is the distance from the user at which the hologram stops being rendered. For HoloLens applications, the distance recommended by Microsoft is 0.85 meters. This means that once the user is 0.85 meters or less from the hologram, it isn’t rendered to the user’s view, and disappears.
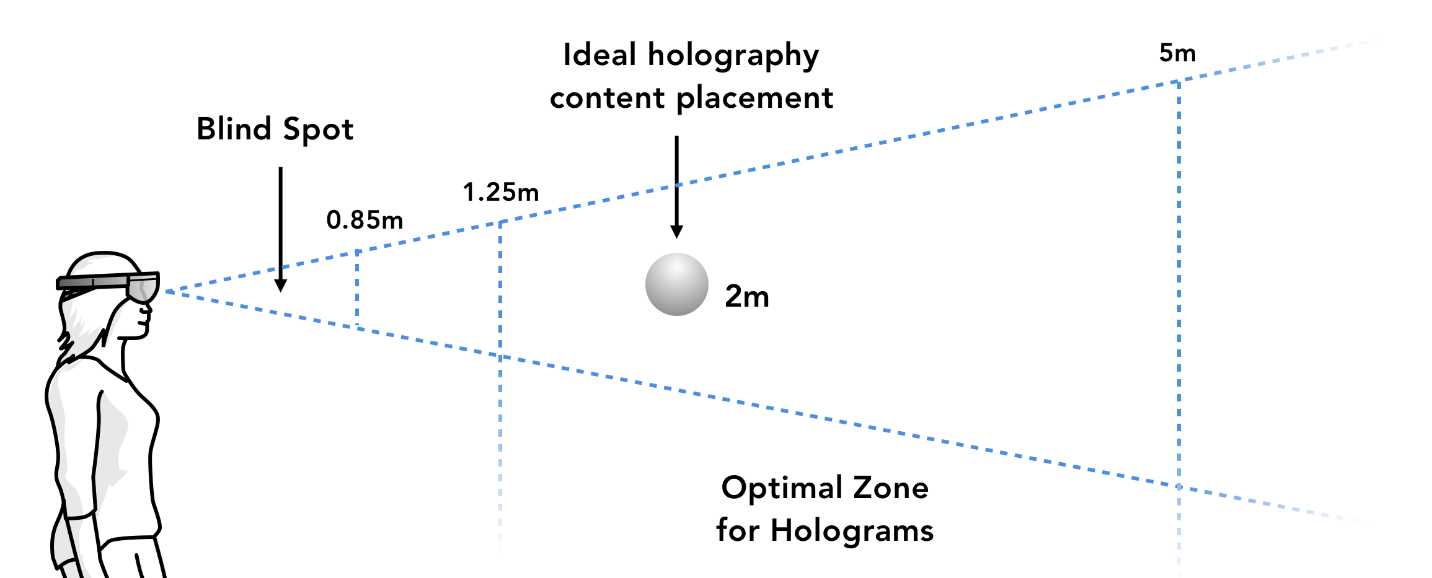
Figure 47: Recommended Distances for Holograms
There are scenarios where the clipping plane can be more or less than the recommended distance, but make sure you make a conscious decision to alter it. Users will expect the experience to be consistent with other HoloLens apps. Rendering the holograms in the user’s blind spot (Figure 47) can result in a sense of uneasiness and lost confidence in the experience.
Power management
The battery time on a HoloLens is 2–3 hours on average. Your app should not affect this benchmark at all. Unless your experience only needs to run for a few minutes at the time, make sure to perform some stress tests on the battery consumption of the app.
You also need to ensure that powering the HoloLens off and turning it back on again will allow users to continue the experience in a way that makes sense. If your app relies on multiple sessions to complete an objective, don’t make the user perform the same set of actions every time they start up. Instead, let them continue where they left off.
- 1800+ high-performance UI components.
- Includes popular controls such as Grid, Chart, Scheduler, and more.
- 24x5 unlimited support by developers.