
HDInsight Succinctly®

CHAPTER 3
HDInsight and the Windows Azure Storage Blob
Loading Data into Azure Blob Storage
The HDInsight implementation of Hadoop can reference the Windows Azure Storage Blob (WASB) which provides a full-featured Hadoop Distributed File System (HDFS) over Azure Blob Storage.[6] This separates the data from compute nodes. This conflicts with the general Hadoop principle of moving the data to the compute in order to reduce network traffic, which is often a performance bottleneck. This bottleneck is avoided in WASB as it streams data from Azure Blob Storage over the fast Azure Flat Network Storage—otherwise known as the “Quantum 10” (Q10) network architecture)—which ensures high performance.[7]
This allows you to store data on cheap Azure Storage rather than maintaining it on the significantly more expensive HDInsight cluster’s compute nodes’ storage. It further allows for the relatively slow process of uploading data to precede launching your cluster and allows your output to persist after shutting down the cluster. This makes the compute component genuinely transitional and separates the costs associated with compute from those associated with storage.
Any Hadoop process can then reference data on WASB and, by default, HDInsight uses it for all storage including temporary files. The ability to use WASB applies to not just base Hadoop functions but extends to higher-level languages such as Pig and Hive.
Loading data into Azure Blob Storage can be carried out by a number of tools. Some of these are listed below:
Name | GUI | Free | Source |
AzCopy | No | Yes | |
Azure Storage Explorer | Yes | Yes | |
CloudBerry Explorer for Azure Storage | Yes | Yes | http://www.cloudberrylab.com/free-microsoft-azure-explorer.aspx |
CloudXplorer | Yes | No | |
Windows and SQL Azure tools for .NET professionals | Yes | No |
A screenshot of CloudBerry Explorer connected to the Azure Storage being used in this example is below:
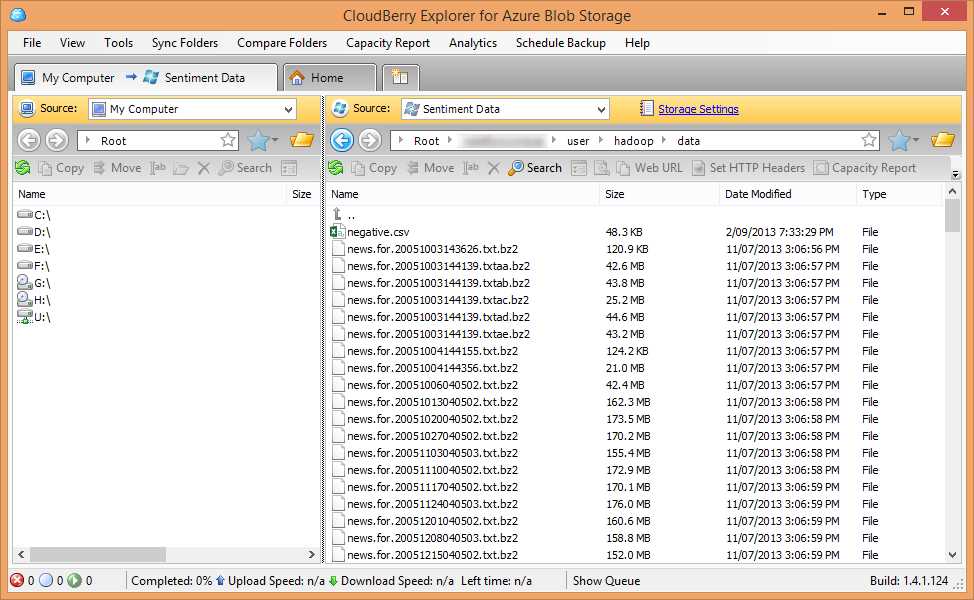
As you can see, it is presented very much like a file explorer and most of the functionality you would expect from such a utility is available.
Uploading significant volumes of data for processing can be a time-consuming process depending on available bandwidth, so it is recommended that you upload your data before you set up your cluster as these tasks can be performed independently. This stops you from paying for compute time while you wait for data to become available for processing.
Referencing Data in Azure Blob Storage
The approach to referencing data held in the WASB depends on the configuration of the HDInsight instance.
When creating the HDInsight cluster in the Management Portal using the Quick Create option, you specify an existing storage account. Creating the cluster will also cause a new container to be created in that account. Using Custom Create, you can specify the container within the storage account.
Normal Hadoop file references look like this:
hdfs://[name node path]/directory level 1/directory level 2/filename
eg:
hdfs://localhost/user/data/big_data.txt
WASB references are similar except, rather than referencing the name node path, the Azure Storage container needs to be referenced:
wasb[s]://[<container>@]<accountname>.blob.core.windows.net/<path>
eg:
wasb://[email protected]/user/data/big_data.txt
For the default container, the explicit account/container information can be dropped, for example:
hadoop fs -ls wasb://user/data/big_data.txt
It is even possible to drop the wasb:// reference as well:
hadoop fs –ls user/data/big_data.txt
Note the following options in the full reference:
* wasb[s]: the [s] allows for secure connections over SSL
* The container is optional for the default container
The second point is highlighted because it is possible to have a number of storage accounts associated with each cluster. If using the Custom Create option, you can specify up to seven additional storage accounts.
If you need to add a storage account after cluster creation, the configuration file core-site.xml needs to be updated, adding the storage key for the account so the cluster has permission to read from the account using the following XML snippet:
<property> <name>fs.azure.account.key.[accountname].blob.core.windows.net</name>
<value>[accountkey]</value> </property>
Complete documentation can be found on the Windows Azure website.[8]
As a final note, the wasb:// notation is used in the higher-level languages (for example, Hive and Pig) in exactly the same way as it is for base Hadoop functions.
HDInsight and PowerShell
PowerShell is the Windows scripting language that enables manipulation and automation of Windows environments.[9] It is an extremely powerful utility that allows for execution of tasks from clearing local event logs to deploying HDInsight clusters on Azure.
When HDInsight went into general availability, there was a strong emphasis on enabling submission of jobs of all types through PowerShell. One motivation behind this was to avoid some of the security risks associated with having Remote Desktop access to the head node (a feature now disabled by default when a cluster is built, though easily enabled through the portal). A second driver was to enable remote, automated execution of jobs and tasks. This gives great flexibility in allowing efficient use of resources. Say, for example, web logs from an Azure-hosted site are stored in Azure Blob Storage and, once a day, a job needs to be run to process that data. Using PowerShell from the client side, it would be possible to spin up a cluster, execute any MapReduce, Pig or Hive jobs, and store the output somewhere more permanent such as a SQL Azure database—and then shut the cluster back down.
To cover PowerShell would take a book in itself, so here we will carry out a simple overview. More details can be found on TechNet.[10]
PowerShell’s functionality is issued through cmdlets. These are commands that accept parameters to execute certain functionality.
For example, the following cmdlet lists the HDInsight clusters available in the specified subscription in the console:
Get-AzureHDInsightCluster -Subscription $subid
For job execution, such as committing a Hive job, cmdlets look like this:
Invoke-Hive "select * from hivesampletable limit 10"
These act in a very similar manner to submitting jobs directly via the command line on the server.
Full documentation of the available cmdlets is available on the Hadoop (software development kit (SDK) page on CodePlex.[11]
Installing the PowerShell extensions is a simple matter of installing a couple of packages and following a few configuration steps. These are captured in the official documentation.[12]
- 1800+ high-performance UI components.
- Includes popular controls such as Grid, Chart, Scheduler, and more.
- 24x5 unlimited support by developers.