
Hadoop for Windows Succinctly®

CHAPTER 2
Enterprise Hadoop for Windows
Physical and virtual enterprise Hadoop distributions for Windows
Virtual machines have allowed big-data vendors from Cloudera to MapR to package Hadoop distributions that run on Windows. Generally, these distributions are fine for testing or development, but less suited to production environments. While you can load a Linux Virtual Machine that runs Hadoop for Windows, it’s still Hadoop running on Linux. What we need is multi-node enterprise Hadoop with Hive, Pig, and Sqoop running within Windows itself.
Three vendors have released software that falls into this category: Apache, Hortonworks, and Syncfusion. We’ve already done an Apache installation, and Hortonworks is in archive, so Syncfusion and Microsoft remain. Why do I include Microsoft? It’s because their enterprise-level changes to Windows Server made multi-node Hadoop installations possible. They have gone even further with their flagship enterprise database product, SQL Server 2019. Though not yet released, the technology preview of SQL Server 2019 has taken Hadoop integration in Windows to new levels. We will look more closely at that product in Chapter 4. All this progression would not have been possible without Apache themselves, as can be seen at Apache.org.
The next two figures highlight this, with the first discussing a patch for running Hadoop for Windows without Cygwin. This was an important milestone in terms of Hadoop being able to run on Windows. On the left-hand side in Figure 31, there are numerous other issues that have been raised and logged.

Figure 31: Apache.org shows issues for Hadoop for Windows
Figure 32 shows an enhancement to support Hadoop natively on Windows Server and Windows Azure environments. This highlights an expectation to run Hadoop natively on Windows, the same way Hadoop runs on Linux. Managing user expectations are vital in this area.

Figure 32: Enhancement to support Hadoop for Windows Server and Windows Azure at Apache.org
We'll be using the Hadoop distribution from Syncfusion, which is available from Syncfusion.com. Before installation, there are a few things we need to be aware of. Windows and Linux are very different environments, and using the same application in either environment will not be the same. If the version of Spark your customer uses is more recent than the one you're demonstrating, be aware of that in advance. If there are features of the latest version of Spark that your client depends on, it may be an issue for you. For these reasons, Hadoop distributors need to update Hadoop ecosystem components within reasonable timescales.
There are key features that Linux developers will expect to see in Hadoop for Windows. Often these issues are sorted out by looking at the feature sets of the Hadoop distribution in question. Impala, for example, is thought to be the fastest SQL-type engine for Hadoop, but it only runs on Linux. A bigger problem is when the issue is not the feature set of the Hadoop distribution, but the operating system itself. In Linux you have control groups (cgroups), which aren't present in Windows Server, nor is there an equivalent. I will discuss cgroups in Chapter 3 in the section about memory management and Hadoop performance in Windows. When you talk to Linux users about potentially using Hadoop in Windows, you should demonstrate awareness of these matters. While Hyper-V and virtual machines can be used to allocate resources in Windows, they're just not the same as cgroups in Linux.
Network setup and installation
Before we set up a production cluster, we need to understand the network we’re going to install it on. Sometimes you hear complaints that Hadoop is slow or doesn’t meet expectations. Often, it’s because the network it’s installed on isn’t the optimum network for Hadoop. A positive of Microsoft Azure is that Microsoft gives you all the computing power you need to run Hadoop. This enables companies to analyze a hundred terabytes of data or more. If you're fortunate enough to be able to build your own data network, build the fastest network you possibly can. If you have access to physical servers, use those instead of virtual servers—you’ll notice the power of a production cluster on a more powerful network.
There is a price premium for these gains, but they can be negated by cost savings per terabyte. The faster a system can analyze data, the less time you spend running the cluster and its associated electricity, CPU, and cooling costs. This is partly how HDInsight works; you pay for what you use, and can provision or decommission clusters when you’re not using them. You can do this yourself on-premises, but you’d have setup costs that you don’t have on Azure.
Suitable network components
We require our network to run at speeds associated with a production environment. As a minimum, I would recommend a 10 Gbps switch, while the optimum would be 25-to-40 Gbps.
Figure 33: ProSAFE 16 Port 10-Gigabit Managed switch |

If you’re dealing with hundreds of terabytes, a good strategic investment may be a 10–100 Gbps switch; this gives a wider coverage of network speeds without having to change switches.
Figure 34: Cisco Nexus 7700 Switch - 10, 40, and 100 Gbps |

Figure 35: QLogic 40 Gbps Ethernet Adapter |

The following cables can manage up to 40 Gbps, with the most economical solution to buy bulk Cat 8 cabling and fit the RJ45 plugs.
Figure 36: BAKTOONS Cat 8, 40Gbps RJ45 - Cat 8 bulk cable 25/40 Gbps |

Suitable server hardware and Windows licensing
You can use your own servers that meet the requirements shown in Table 6, for example, two physical servers with five VMs (virtual machines) or five physical servers. Different configurations of the Dell C4130 shown in the next figure meet the requirements at an economical price.
Figure 37: The Dell PowerEdge C4130 |

Table 6: Server requirements for production Hadoop cluster
Active Namenode Server | Standby Namenode Server | Datanode 1 | Datanode 2 (If needed) | Cluster Manager |
|---|---|---|---|---|
CPU: 2-4 Octa-core+ 96 GB RAM Hard Drive: 2x1TB Network: 10Gbps | CPU: 2-4 Octa-core+ 96 GB RAM Hard Drive: 2x1TB Network: 10Gbps | CPU: 2-4 Octa-core+ 64 GB RAM Hard Drive: 4x1TB SAS JBOD (16x 1TB) Network: 10Gbps | CPU: 2-4 Octa-core+ 64 GB RAM Hard Drive: 4x1TB SAS JBOD (16x 1TB) Network: 10Gbps | CPU: 2-4 Octa-core+ 32 GB RAM Hard Drive: 2x1TB Network: 10Gbps |
If you can’t access servers with the RAM listed in the preceding table, use nodes with at least 32GB of RAM. You won’t be able to handle very large amounts of data, but it will certainly work.

Figure 38 Server roles in our Windows cluster
We now have the server roles in our cluster defined; I’d recommend four physical servers over virtual ones. The pricing for Windows Server is listed, but if you already have Windows Server licenses, you can use those.
Table 7: Windows Server 2016 licenses
Windows Server Standard 2016 | You must buy a minimum 16 core licenses per server = $883 per server
|
Windows Server Datacenter 2016 | You must buy a Minimum 16 core licenses per server = $6,155 per server
|
A minimum of eight core licenses must be purchased per processor, and each server core has to be licensed. A 1 CPU Quad Core Server is no cheaper than a 2 CPU Quad Core, due to the minimum fee.
The reason I wouldn’t recommend one physical server to host three or four virtual ones is that if it shuts down due to CPU overheating, it will shut down all running virtual servers with it. This leaves even the Hadoop standby node unavailable, and your Hadoop cluster becomes useless. You need to work out how mission critical the data and operations on your servers are going to be. Put yourself in the situation of something having gone wrong, and ask yourself what decisions you'd make. You may wish to use solid state drives (SSDs) or high-RPM hard disks. Of the two disk types, SSDs have more efficient energy use. While this is not a book about computer networking, if you hire someone to build a network for you, check that what you’ve specified is delivered. If you’ve paid for high-quality network components, find a way to check those components, and make sure inferior ones aren’t used in parts of the network you can’t see or that are underground.
Required Hadoop software
You will need:
- Syncfusion Big Data Agent v3.2.0.20
- Syncfusion Big Data Cluster Manager v3.2.0.20
- Syncfusion Big Data Studio v3.2.0.20
You can sign up for a free Syncfusion account to download the files from Syncfusion. For businesses with a turnover of less than £1,000,000, the Syncfusion Big Data software is free. For businesses with higher turnover, prices of around £4,000 per developer license are available. Free trials are available that are totally unrestricted.
Security and Active Directory
Figure 39: Choosing the functional level of the New Forest and Root Domain |

An in-depth look at Active Directory is outside the scope of this book, but a competent Windows Administrator should be able to assist in setting it up. The servers in the Hadoop cluster must be part of the same domain; they should be joined to the domain via Active Directory, as shown in Figure 40. If they are not, DNS and reverse DNS validation can fail, and the Hadoop installation won’t proceed. Just having computers on the same physical network is not enough.
Figure 40: Adding machines to our domain using Active Directory Administration Center |


Figure 41: Point servers to the DNS server IP address
Enterprise Hadoop installation
To install Hadoop, we need to put the Syncfusion Big Data Agent on all machines we want to join the cluster. That means each server that is going to act as a cluster node requires the Big Data Agent. Please note that Port 6008 must be available on each server. This is the port the Syncfusion Big Data Agent listens on when placed on the Active, Standby, and data nodes. Do not install the Big Data Agent on the machine on which you are going to install the Cluster Manager. This is because the Cluster Manager manages the cluster, but isn't part of the cluster.
Install the Syncfusion Big Data Agent by running the downloaded Syncfusion Big Data Agent v3.2.0.20 file. Run the file as an administrator, and choose to install it to the default directory. The following installation screen appears before you see the final “Installed successfully” screen.
Figure 42: Installing Syncfusion Big Data Agent |

Figure 43: Syncfusion Big Data Agent running in Windows Server Services |
Figure 44: Syncfusion Big Data Platform screen |

You will see the Syncfusion Cluster Manager interface, which opens in a web browser, as shown in the following figure.

Figure 45: Browser based Syncfusion Cluster Manager interface
Log in to the Cluster Manager with the default admin username and password, and click the green Login button shown in Figure 45.
Creating a multi-node Hadoop cluster in Windows
Once you're logged in, you'll see the screen in the following figure. On the right-hand side, you'll see the Create button.

Figure 46: The CREATE cluster button in Syncfusion Cluster Manager
The next figure shows a closer view of the button. Click Create to continue.

Figure 47: Closer view of the create cluster button in Cluster Manager
Choose Normal Cluster from the three options displayed, then click Next, as shown in the following figure.

Figure 48: Choosing the type of cluster to create
On the next screen, choose Manual Mode and click Next. Provide a name for the cluster and leave the replication value at 3. You then need to provide IP or host name information to identify and assign the following nodes.
Figure 49: Adding cluster name and IP Address of the Active name node |

Figure 50: Add the IP Address of the Standby Name Node, leave the replication at 3 |

Figure 51: Add the IP Address of the data node |

After adding the IP addresses of the servers, click the Next button on the top-right side of the screen. The Import option is for importing multiple host names or IP addresses from a single-column CSV file. To add additional data nodes (if needed), you'd click Add Node.

Figure 52: Location of the Next button
If after clicking Next, you see server clock-time errors (as shown in Figure 53), ensure that server clock times are within 20 seconds of one another. Synchronize the times of the servers in the cluster, then click Next again.
Figure 53: Server clock time errors |

Figure 54: Reverse DNS and host name resolution success |

Figure 55: Hadoop Cluster and ecosystem installing |

Figure 56: Hadoop and its ecosystem installed and running |

If not, go to the very right-hand side of each white bar, which represents each node. You will see three gray dots, as shown in Figure 57. Click on the three dots, then click Start Services to select each element that is not running, to check that you can run all services. On a powerful machine on a fast network, you'll hopefully have no issues running all the services shown in the Figure 56. On machines with less RAM, or where there are system or network bottlenecks, you may find you can't run all the services listed. Take care not to stop the node. If you do, be aware that when you go to start the node, there’s an option to remove the node, so be careful. To prevent accidental removals, confirmation messages will appear and ask you to confirm any deletion actions.
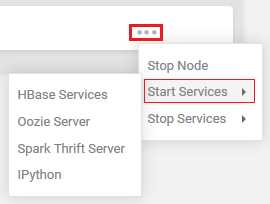
Figure 57: Starting services via the three gray dots
Cluster maintenance and management
Figure 58: Status of Hadoop clusters in Syncfusion Cluster Manager |

The Syncfusion Cluster Manager aids us in this by displaying the status of the nodes at all times. Figure 58 shows the four status levels that nodes can be classified as:
- Active: The active node is denoted by a green circle. This is why the name and data nodes have green circles by them in the IP Address and HBase columns.
- Dead: A dead node is denoted by a red circle, and while this is negative, it’s also helpful to know before installation. You will recall the dead nodes denoted by red circles when the server clock times failed to synchronize. This allowed us to fix the problem by synchronizing the clock times so the installation could proceed. At that point, the notes turned to green.
- Standby: The standby node is denoted by a gray circle, and is shown with a gray circle in the IP Address and HBase columns. It is correct for the standby node to be displaying a gray circle, as it is on standby.
- Unhealthy: An unhealthy node is shown by an amber circle. Our cluster is showing no unhealthy nodes, but what if it was?
Whether it’s a local or enterprise installation, it’s imperative that you investigate why your cluster is unhealthy. You should be able to do this in any distribution of Hadoop, not just an enterprise one that does it automatically. If this isn't possible on all Windows machines running Hadoop, you can't realistically use it. To briefly test this, start the Hadoop installation we did in Chapter 1, and use the following command.
Code Listing 13: Checking the status of the HDFS
hadoop fsck / |
Figure 59: HDFS Healthy Status Result |

- Over-replicated blocks: This refers to blocks that are replicated more than your chosen level of replication. HDFS can correct this on its own.
- Under-replicated blocks: This is basically the opposite of over-replicated blocks, and again, HDFS can correct this on its own.
- Mis-replicated blocks: These blocks involve a failure to replicate in line with your replication policy. You need to manually correct this, depending on the error you discover.
- Corrupt blocks: This is self-explanatory, and reflects corrupt blocks. This can be corrected by HDFS on its own if at least one block is not corrupt.
- Missing replicas: This is where a block has no replicas in the cluster.
If our cluster shows errors, one of the first things we can do is to seek more detail. This is achieved by using the following command to show the status of individual files.
Code Listing 14: Checking the status of files in HDFS
hadoop fsck / -files |
Figure 60: Results of the files status check |

The hadoop fsck / -files command is also available in the Syncfusion Big Data Platform, and is included in the final piece of software we need to install. We will use the Syncfusion Big Data Studio v3.2.0.20 file downloaded from Syncfusion, and install it on the same machine as the Cluster Manager. You could install it on another machine on your network, but I'm doing it this way, as I want to show you something.
You install the software the same way you install any Windows software. Accept its default install location and follow the on-screen instructions until completion. Now, start the Big Data Studio from the Windows program menu, and you'll see the Syncfusion Big Data Platform screen, as shown in Figure 61. You'll notice that under Syncfusion Big Data Studio, the Launch Studio button has replaced the Download button. This is because the Cluster Manager and Big Data Studio are now recognized on the same server.

Figure 61: Cluster Manager and Big Data Studio on the same server
Click Launch Studio, as highlighted in Figure 61.

Figure 62: Fsck sample inside Syncfusion Big Data Studio
You are now inside the Syncfusion Big Data Studio where HDFS, Hive, and others are visible from the displayed tabs. If you click the Hadoop tab, you'll see a selection of samples. The Hadoop/DFS/Attributes folder has the fsck sample, as shown in Figure 62. If you go to the Big Data Platform main screen, you can click the Command Shell link shown in Figure 63, which you can use to launch a command prompt from the Big Data Studio.

Figure 63: Launching the Command shell from the Big Data Platform main screen
From the command prompt, you can access Hadoop commands in the normal way. Syncfusion Big Data Platform is giving you flexibility to work within the more-interactive Windows environment, or to use the more traditional command-line environment.
Working with local development and live production clusters
An essential part of cluster management and maintenance is the ability to switch between production clusters and local development clusters. In Cluster Manager you can see not only the Davinicks cluster we created, but a second cluster, called Hadoop4windows, that was automatically added. Adding an existing cluster is a simple process compared to creating a new cluster, as we did earlier.
On the main screen in Cluster Manager, simply click the Add button on the top-right side of the screen.

Figure 64: The Add cluster button
Next, you see a screen offering to manage an existing cluster; type in values for Cluster Name and Name Node, as shown in the following figure. Enter localhost, as when we installed the Syncfusion Big Data Studio, a local development cluster was automatically installed on the local machine. I named it Hadoop4windows, as I can call it any name I choose. Now click the Add, and you'll notice a message stating "Collecting details of cluster."
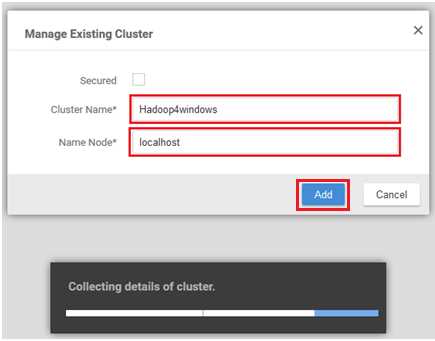
Figure 65: Adding an existing cluster in Cluster Manager
You now have two clusters, which are visible in the following figure: the multi-node cluster Davinicks, and the local development cluster Hadoop4windows. If you click a cluster under the Cluster Name column, you can access a screen with more cluster details. Click Hadoop4windows.

Figure 66: Multiple clusters in Cluster Manager
This takes you to a screen with menu items including Management and Monitoring, as shown in Figure 67. If you wish to switch between clusters at any time, simply click the dropdown box to select the cluster you’d like to work with.

Figure 67: Switching between clusters in Cluster Manager
If you click the menu item called Monitoring, you can see the cluster Active Namenode and Active Datanode details. The green dots highlighted in Figure 68 denote that the nodes are active and healthy. The name of the cluster you're working with is shown on the top-left side of the screen.
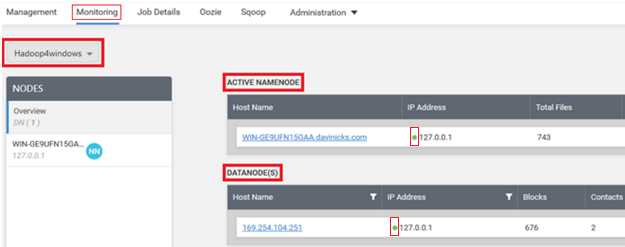
Figure 68: Monitoring your chosen cluster
We can now switch back to the production cluster called Davinicks by using the drop-down box. The Hadoop Services Monitoring screen is visible in the following figure.
Figure 69: Hadoop Services Monitoring screen |


Figure 70: Zooming in on the Hadoop Services Monitoring screen
This web-style navigation allows you to see useful information on many pre-defined cluster elements. These include network usage, garbage collection, JVM Metrics, and useful information about how much RAM and disk space are available. You will also see the load on the CPU, IP addresses, and general machine configurations. It is useful that under Machine Configurations, there are three CPU information elements as highlighted: the System CPU Load, Process CPU Load, and Process CPU time.

Figure 71: Comprehensive CPU information under Machine Configurations
Experienced Windows Server administrators might say that Windows Server has many ways of accessing detailed information on similar variables, and they'd be right. That said, cluster manager is useful, as it presents data about server resources used by the cluster all in one place. You can access each Windows Server in the cluster and use its tools to compare what Cluster Manager is telling you for each node. You may also check where you feel cluster manager or Windows Server is under- or over-reporting resource use. You have to ask though, how practical is it to do that when running many clusters and nodes? It's not practical at all, which is why Cluster Manager is both essential and useful, and accurate enough to rely on. This is important, as Hadoop administrators won't use a cluster-management tool they don't trust.
Syncfusion Cluster Manager has other tools that are useful for monitoring clusters. Click the dropdown arrow next to the bell icon, as highlighted in Figure 72. You will see a circular settings icon lower down, which is also highlighted in the same figure. If you click on this icon, you will access an Alert Settings screen.
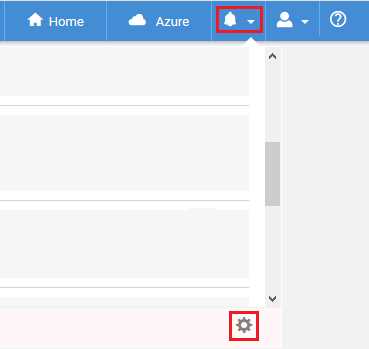
Figure 72: Accessing alert settings in Syncfusion Cluster Manager
Check all the boxes for each cluster, as shown in Figure 73, and set the alert Frequency to minutes. Now, click Save in the top-right corner.

Figure 73: Selecting your clusters and choosing alert settings
I'm going to create some cluster faults that will trigger alerts, but I’m not advising you to do this in any way. After introducing the faults, the alerts box now shows the errors affecting the cluster.

Figure 74: Alerts now showing in Cluster Manager
If you do not open or view the alert messages in Cluster Manager, you will see the number of alerts shown in white on a little red square. This is useful for letting you know there are errors as soon as you enter Cluster Manager.
![]()
Figure 75: Alerts in Syncfusion Cluster Manager
Other useful facilities for handling clusters include the ability to simply and quickly remove a cluster. On the same screen you've already used to create or add clusters, you'll see the Add and Create buttons we used. Go to the right-hand side of the cluster you wish to delete, and you'll see three gray dots, as highlighted in Figure 76. After you click on the dots, click Remove to remove the cluster, and answer any confirmation prompts.
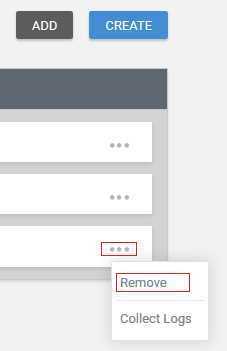
Figure 76: Removing cluster in Cluster Manager
The methodology for stopping individual nodes is to click the three gray dots on the right-hand side of each node, and then click Stop Node.

Figure 77: Stopping an individual node
At the top-right side of the screen, there are also facilities to stop or start all nodes using the Start/Stop button, as highlighted in Figure 78. In addition, there is a Manage Nodes button, which allows you to add both journal and data nodes in addition to removing dead nodes. You will remember that dead nodes are denoted by a red dot, as opposed to active nodes, which are denoted by a green dot.
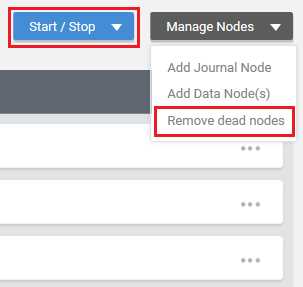
Figure 78: Remove dead nodes and Start/Stop all nodes
These facilities are useful when a node fails; they allow you to replace the failed node using the same method of node creation. This involves simply entering the IP address and node type of the node you wish to create.
To further manage and maintain clusters, we need to start putting them to work to see how they perform. To achieve this, we need to start ingesting data into Hadoop, which is covered in the next chapter.
Summary
In Chapter 2, we dealt with the network, environment, and server specifications for deploying multi-node Hadoop installations. We also covered Windows Server licensing and touched upon the setup of Active Directory. We created a Hadoop cluster using Windows Server machines and the Syncfusion distribution of Hadoop. We then ensured all components of Hadoop and the Hadoop ecosystem were installed and running without fault.
After installing Hadoop, we compared the cluster-management tools used in Apache Hadoop against those available in the Syncfusion Hadoop distribution. We established the availability of the command line, giving users choices for working within Hadoop for Windows. Cluster creation, swapping between clusters, and starting, stopping, and removing clusters was also covered. We highlighted facilities for monitoring clusters, with reference to the ability of Windows Server to monitor activity on each Hadoop node. We also set up cluster alerts and examined the methods used to start, stop, and remove cluster nodes.
- 1800+ high-performance UI components.
- Includes popular controls such as Grid, Chart, Scheduler, and more.
- 24x5 unlimited support by developers.