
Gulp Succinctly®

CHAPTER 2
Let’s Build Something
Installing Gulp
As mentioned in Chapter 1, Gulp is a task runner that runs on top of node.js. So to have Gulp running, we will need to install node.js. You can download it for your system here. With it comes the Node Package Manager, or npm. You will use npm a lot throughout the rest of the book to install the needed Gulp plugins. More on that later.
After you’ve installed node.js, you need to open a console window or terminal window and type in the following:
npm install --global gulp
This installs Gulp globally and adds Gulp to the path on your machine.
Tip: when you don’t run under administrator privileges on a Mac, you will need to prefix this command with sudo. So it becomes sudo npm install --global gulp.
The former steps only need to be performed once per machine on which you want to use Gulp.
Once you have taken these steps, you can type in the following command to check if all is set up and good to go.
node –v
npm –v
gulp –v
This will give you the version of each component. When I was writing this paragraph, the versions you see in the next figure were available on my machine. By the time you read this, the version numbers will likely have already changed.

Figure 3: Showing the versions of node.js, npm, and Gulp CLI
How to install plugins
The steps you had to take in the former paragraph only need to be performed once per machine. Plugins, however, you will need to install for each project you are working on.
Depending on which tools you use, things might be automated for you. In that case, check the documentation of the tool you are making use of.
If you are simply using a text editor and a terminal window like the first chapters in this book, you can follow these steps:
- Create a folder where you want to make your application
- Open that folder and type in npm init. This will create a package.json file after you have gone through all of the setup steps. During the setup, you can either fill in every line, or you can quickly step through it by pressing the Enter key for every question and answering Yes at the end.
- You can now install Gulp and Gulp plugins via the command:
- npm install gulp --save-dev
- npm install gulp-less --save-dev (to install the Gulp plugin gulp-less, for example)
Tip: When you know the plugins up front, you can also make this one statement, like npm install gulp gulp-less gulp-coffeescript --save-dev to install all three modules at once.
Tip: If you found sample code and notice a lot of entries in the package.json file, you can simply retrieve them all by typing npm install --save-dev, which will in turn look up the packages and restore them locally.
gulpfile.js
gulpfile.js is where you’ll spend your time writing your tasks on a per-project basis. It is the standard file for Gulp to look into what to do. You can create it with your favorite text editor.
For this book, you can either obtain the code from GitHub, or even better, type in the code yourself in your favorite editor and learn by doing.
Create a folder where you want to keep the code, and create a subfolder in it called Chapter 2. Create a new file called gulpfile.js and have it opened in a text editor of your choice.
gulpfile.js is always placed in the root folder of your project. As such, the commands mentioned for the terminal windows or DOS box are meant to be run from the root of that same project root folder. Further in the book, I took the privilege to put the start files, like less, sass, and coffeescript under an Assets subfolder. I’ll also state where to put the listings from the current subfolder position. It’s up to you to decide where you want to put it on your local hard drive (likely some temp or code folder). The place for code listings will be written like /Assets/colors.less or /gulpfile.js, for example, where / stands for the subfolder you started to test out the code. For example: c:\code\chapter2\defaulttask\.
Default task
Ok, you’re ready for your first task. Or better, the default task. This is the task that will run when you execute the gulp command without specifying which task should be run. Be sure to have your environment set up to be able to use Gulp. Please refer to Appendix A.
In an Assets subfolder, create two new files, which will contain the following:
Code Listing 3: CodeFolder/Assets/Colors.less
@color:#b6ff00; @backcolor:#808080; |
Code Listing 4: /Assets/Styles.less
@import "Colors.less"; body { background-color: @backcolor; } a { color: @color; &:hover { color: @color + @backcolor; } } |
Now directly under the Chapter 2 folder, open the gulpfile.js file and add the following piece of code:
Code Listing 5: /gulpfile.js
"use strict"; var gulp = require('gulp'); var less = require('gulp-less'); var minifyCSS = require('gulp-clean-css'); gulp.task('default', function () { gulp.src('Assets/Styles.less') .pipe(less()) .pipe(gulp.dest('wwwroot/css')); }); |
In Code Listing 5, we see there are some plugins needed, so let’s install them via the commands. Be sure to set the path of your terminal window or console window to Chapter 2:
- npm install --save-dev gulp
- npm install --save-dev gulp-less
- npm install --save-dev gulp-clean-css
Tip: when you don’t run under administrator privileges on a Mac, you can prefix these commands with sudo, so it becomes sudo npm install --save-dev gulp. This will ask for a password after which the installation will continue without having to run with administrative permissions.
From that terminal window or DOS window you’re in now in, make sure you’re in the folder Chapter 2, where the gulpfile.js file is. Type gulp and press the Enter key. Wait a bit and see the result under the newly created wwwroot\css subfolder. Depending on your machine, this can be fast or very fast—great performance is one of the strong points of Gulp.
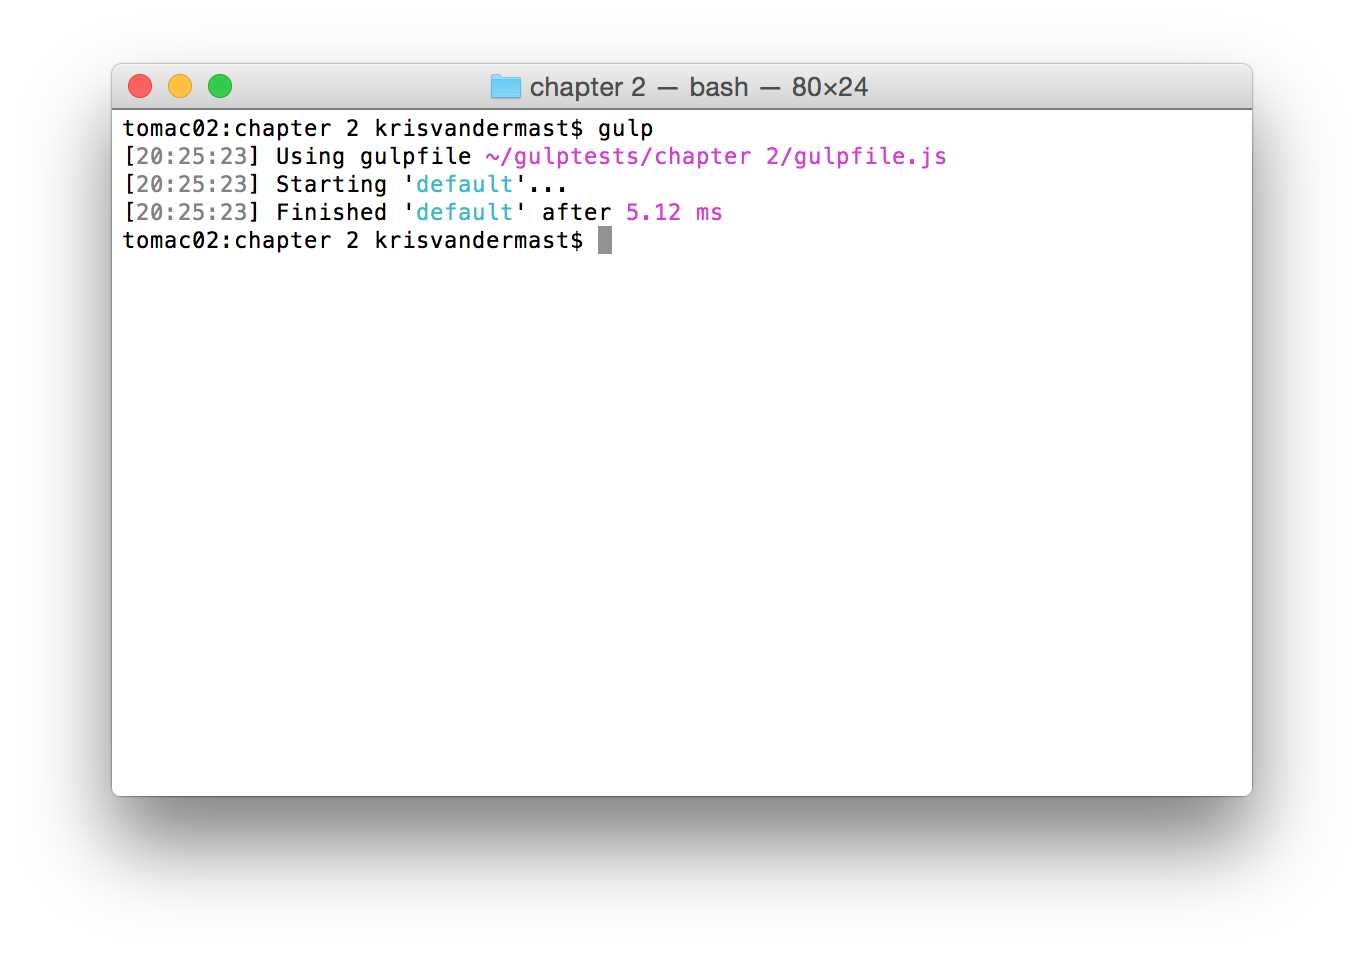
Figure 4: Running a default task in Gulp
There’s only one styles.css file right now, with the following expected output:
Code Listing 6: /wwwroot/css/styles.css
body { background-color: #808080; } a { color: #b6ff00; } a:hover { color: #ffff80; } |
Great to see our less files got compiled and written out as a .css file we can use. But we also want to minify the .css file, so re-open the gulpfile.js file and make use of the minification plugin, like this:
Code Listing 7: Adjusted /gulpfile.js
"use strict"; var gulp = require('gulp'); var less = require('gulp-less'); var minifyCSS = require('gulp-clean-css'); gulp.task('default', function () { gulp.src('Assets/Styles.less') .pipe(less()) .pipe(minifyCSS({ keepBreaks: false })) .pipe(gulp.dest('wwwroot/css')); }); |
Run Gulp again, and now the outcome becomes:
Code Listing 8: Minified css file: /wwwroot/css/styles.css
body{background-color:grey}a{color:#b6ff00}a:hover{color:#ffff80} |
Options
In Code Listing 6, we not only made use of the call to minifyCSS, but we also passed in a parameter, {keepBreaks:false}. Some plugins provide the ability to pass in options. Depending on the text editor you’re using, you might get code completion, but usually the easiest way is to take a look at the documentation. So for example, for gulp-clean-css, we can take a look at this documentation.
However, we don’t see the options being mentioned. How come? We can see on that page that this plugin is rather a simple wrapper around the clean-css Node.js library. Clicking further to the documentation of that particular library, we can see the overview. As you can see, there are quite a lot of them.
As an exercise, you can play around with the different options and see what happens to the output. You can start with the simplest change in your Gulp file and set {keepBreaks:true}.
Other tasks
The previous paragraph introduced you to running a task. It was also pretty simple to add extra plugins into the stream, and as such, alter the behavior of our task. Well that’s all great, but you might be tempted to put everything into one big task. It would lead to cumbersome code, however, and would become hard to maintain later on during and after your development cycle.
This is the reason why it is also possible to have multiple tasks in Gulp. Just like in most other programming languages, you would write or refactor your code into smaller pieces. It makes it easier to find the code you want to change or copy to another project. Another advantage is that perhaps you don’t want to have all of your tasks being executed at the same time. It could very well be that only a small portion needs to be run again, instead of the monolithic bunch.
Let us take again the code from Code Listing 6 and change the default task to what it really does: transforming less files and minifying the resulting CSS from that process. The code now becomes:
Code Listing 9: Adjusted /gulpfile.js
"use strict"; var gulp = require('gulp'); var less = require('gulp-less'); var minifyCSS = require('gulp-clean-css'); gulp.task('transformLessAndMinifyCSS', function () { gulp.src('Assets/Styles.less') .pipe(less()) .pipe(minifyCSS({ keepBreaks: false })) .pipe(gulp.dest('wwwroot/css')); }); |
Now go back to your terminal and run the gulp command. As you can see from Figure 5, nothing will run, as we don’t have a default task anymore.
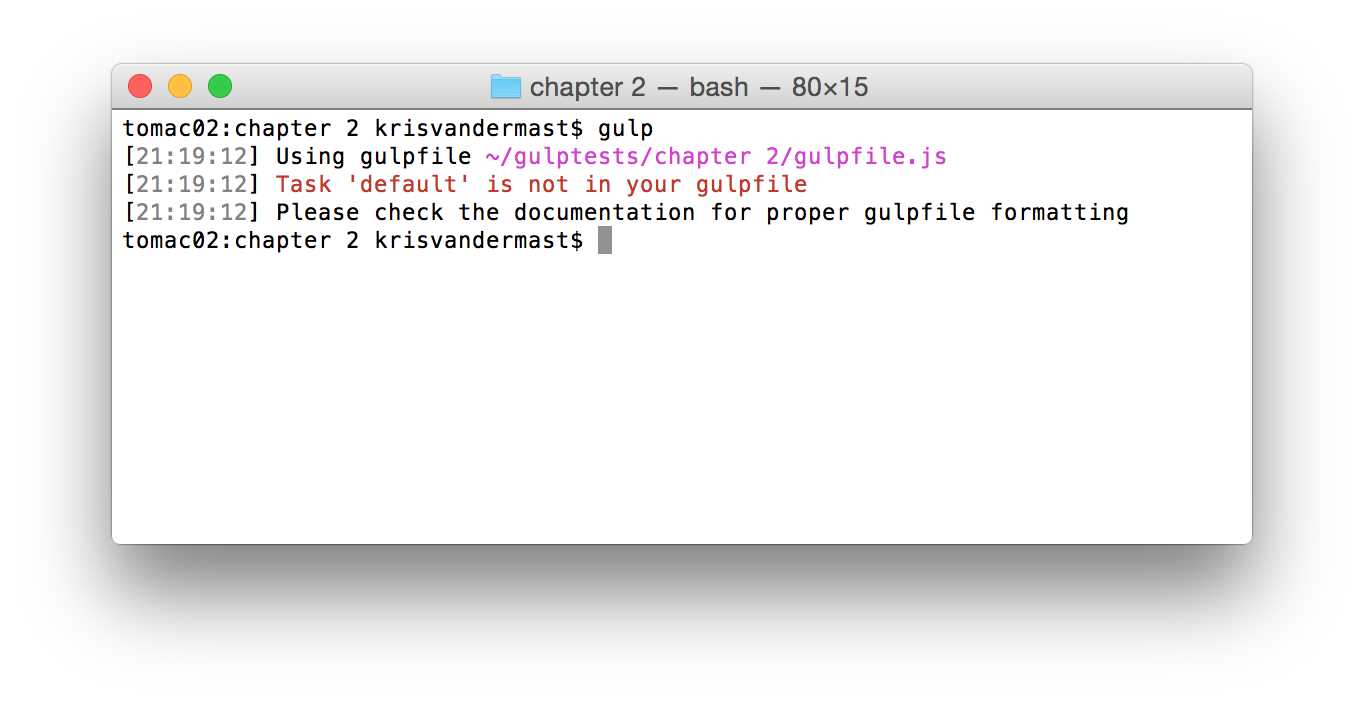
Figure 5: Trying to run a default task but nothing got found
However, if we try to run the gulp command accompanied with the specific name of the task, it will run. So in the terminal, type gulp transformLessAndMinifyCSS. See the output of that in Figure 6. If you want to verify the output, I recommend deleting the generated file under /wwwroot/css. Later on we will see that we can also make use of Gulp to do that for us. This will give us more certainty that the output is really what we expect.
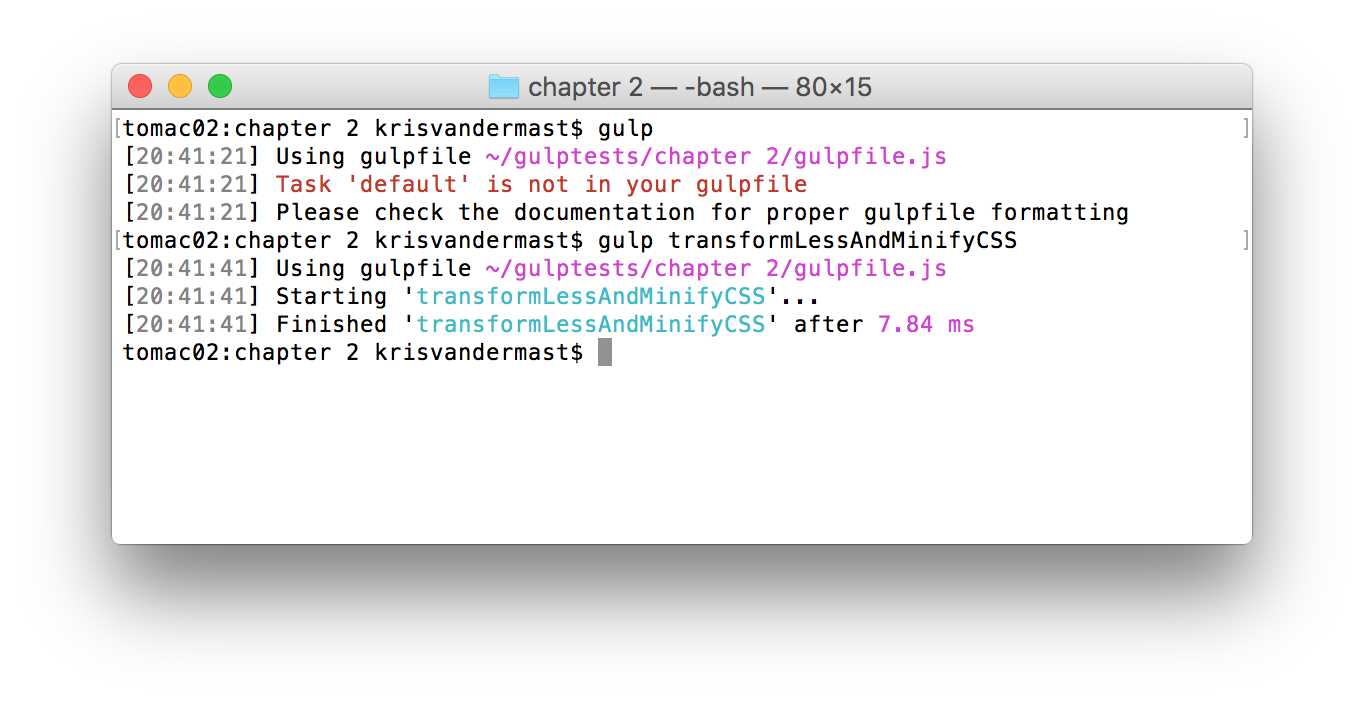
Figure 6: Specifying the task you want to run explicitly
It would be nice, though, if we could have one entry point, the default task, and have another task run from there. If we make some adjustments to our gulpfile.js file, we can reach that goal as well.
Code Listing 10: Default task calls transformLessAndMinifyCSS task /gulpfile.js
"use strict"; var gulp = require('gulp'); var less = require('gulp-less'); var minifyCSS = require('gulp-clean-css'); gulp.task('default', ['transformLessAndMinifyCSS'], function () { console.log('Do something else while you\'re here...'); }); gulp.task('transformLessAndMinifyCSS', function () { gulp.src('Assets/Styles.less') .pipe(less()) .pipe(minifyCSS({ keepBreaks: true })) .pipe(gulp.dest('wwwroot/css')); }); |
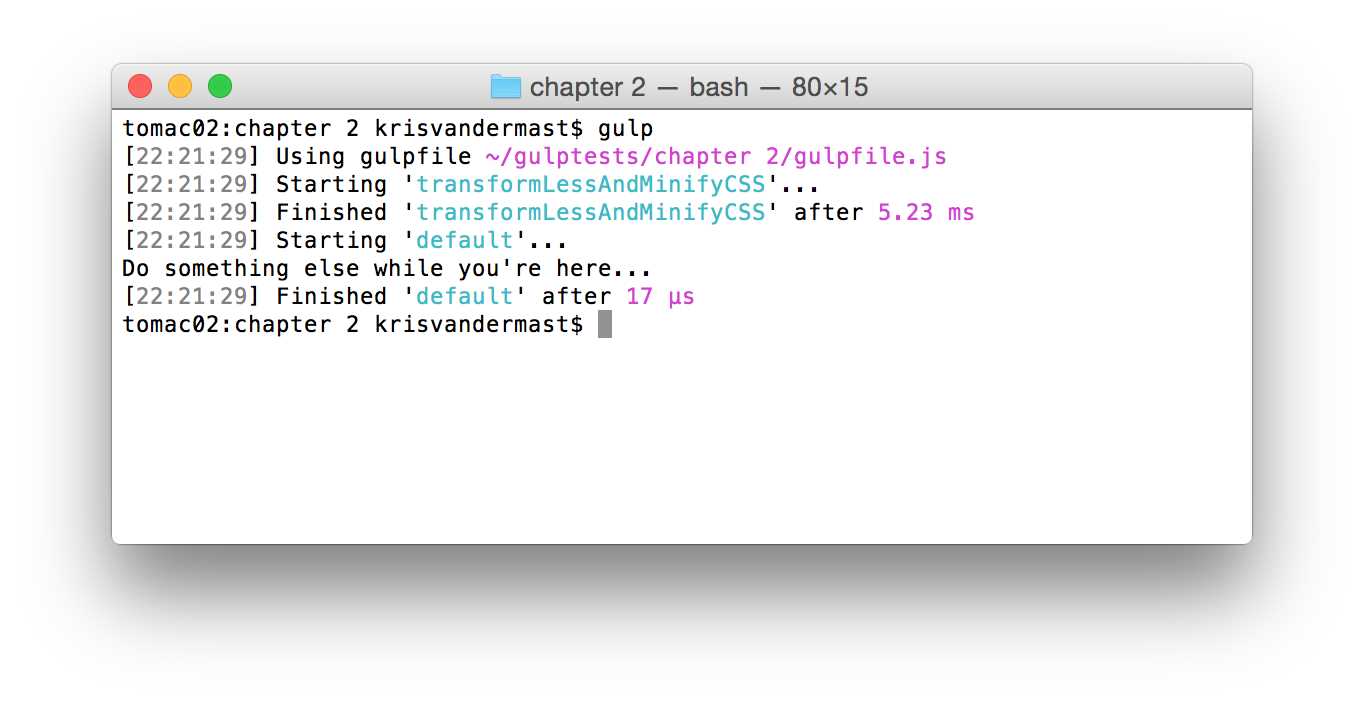
Figure 7: Running a dependent task
In Figure 6 we can see that task transformLessAndMinifyCSS ran before going to the function body of the default task where a console.log statement was put to show the order of execution.
Code Listing 8 shows an extra parameter in the task function call:
gulp.task('default', ['transformLessAndMinifyCSS'], function()
It’s the way Gulp passes in other functions that it’s dependent on. Let’s discuss that shortly.
Task dependencies
So far we’ve only seen a simple task, up until the last sample, Code Listing 8. By default, Gulp tries to be as performant as it can be, and runs tasks in maximum concurrency.
Code Listing 11: Running in maximum concurrency /gulpfile.js
"use strict"; var gulp = require('gulp'); var less = require('gulp-less'); var minifyCSS = require('gulp-clean-css'); gulp.task('task1', function () { console.log('Task 1 is executing...'); }); gulp.task('task2', function () { console.log('Task 2 is doing its thing...'); }); gulp.task('build', ['task1', 'task2']); gulp.task('default', ['build'], function () { console.log('default task...'); }); |
The output of this is the following:
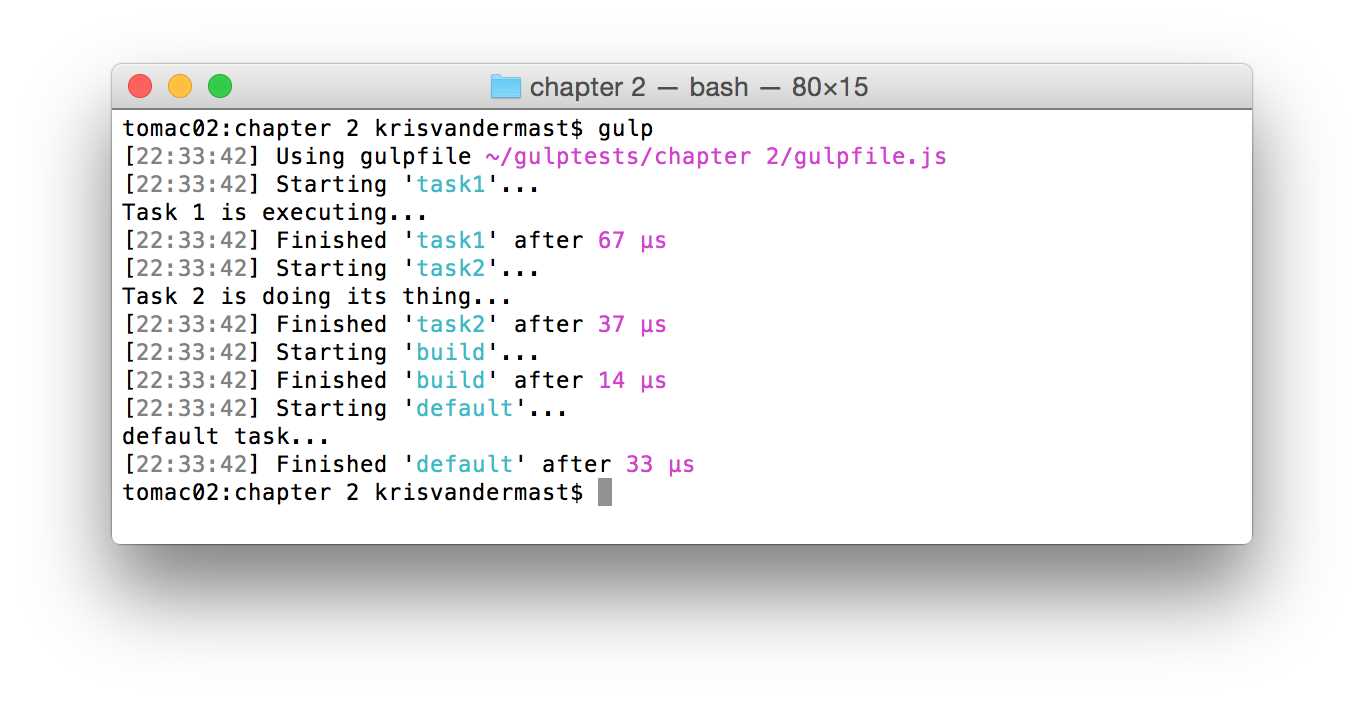
Figure 8: Running dependent tasks
We can see that we start with the default task in our code, which calls the build task, which on its own calls both task1 and task2. We see that task1 and task2 run first, as the build task is dependent on these two, and will not run before both have finished. Once that happens, the build function can do its part, and then it’s up to the default task to run. The following figure displays the tree used in this code:
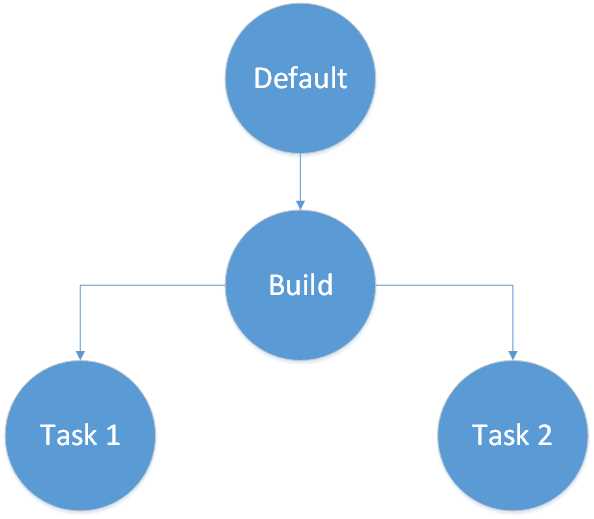
Figure 9: Dependent tasks
This was a small and, frankly, quite easy tree. As you can imagine in a real-life project, there will more tasks in a gulpfile.js with either standalone tasks or a mix of standalone and dependent tasks. What if several tasks are made dependent on the same task? What happens then? Let’s find out. To make it easier to follow, here is the tree of what’s going to happen:
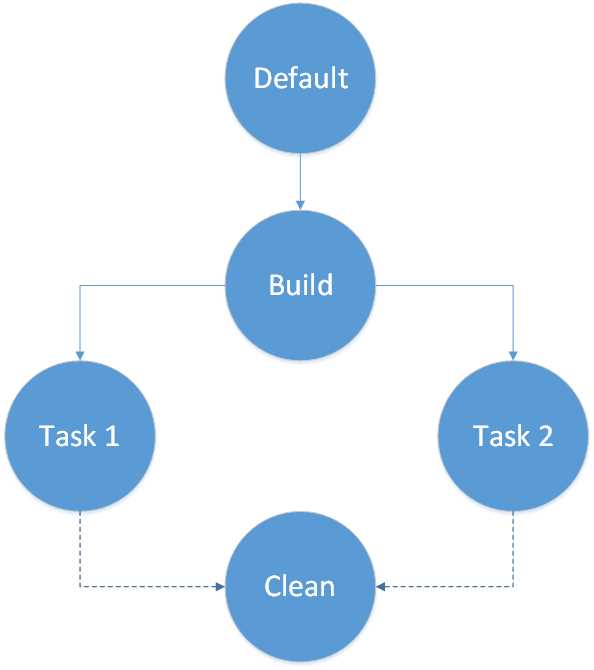
Figure 10: Dependent tasks running the same sub-task
And our code:
Code Listing 12: Running a task from different places /gulpfile.js
"use strict"; var gulp = require('gulp'); gulp.task('clean', function () { console.log('Cleaning up...'); }); gulp.task('task1', ['clean'], function () { console.log('Task 1 is executing...'); }); gulp.task('task2', ['clean'], function () { console.log('Task 2 is doing its thing...'); }); gulp.task('build', ['task1', 'task2']); gulp.task('default', ['build'], function () { console.log('default task...'); }); |
You can see that both task1 and task2 depend on the clean task. An example could be that some output folder(s) need to be cleaned before other tasks can do what they are intended for, and you don’t want to leave something behind from a previous run.
And you guessed correctly: the clean task will only be run once. Gulp is smart enough to figure out that there are more tasks that might make the call, but that it would be overhead to run the same task twice.
After running the code in the gulpfile.js file, the output can be seen in the following figure:
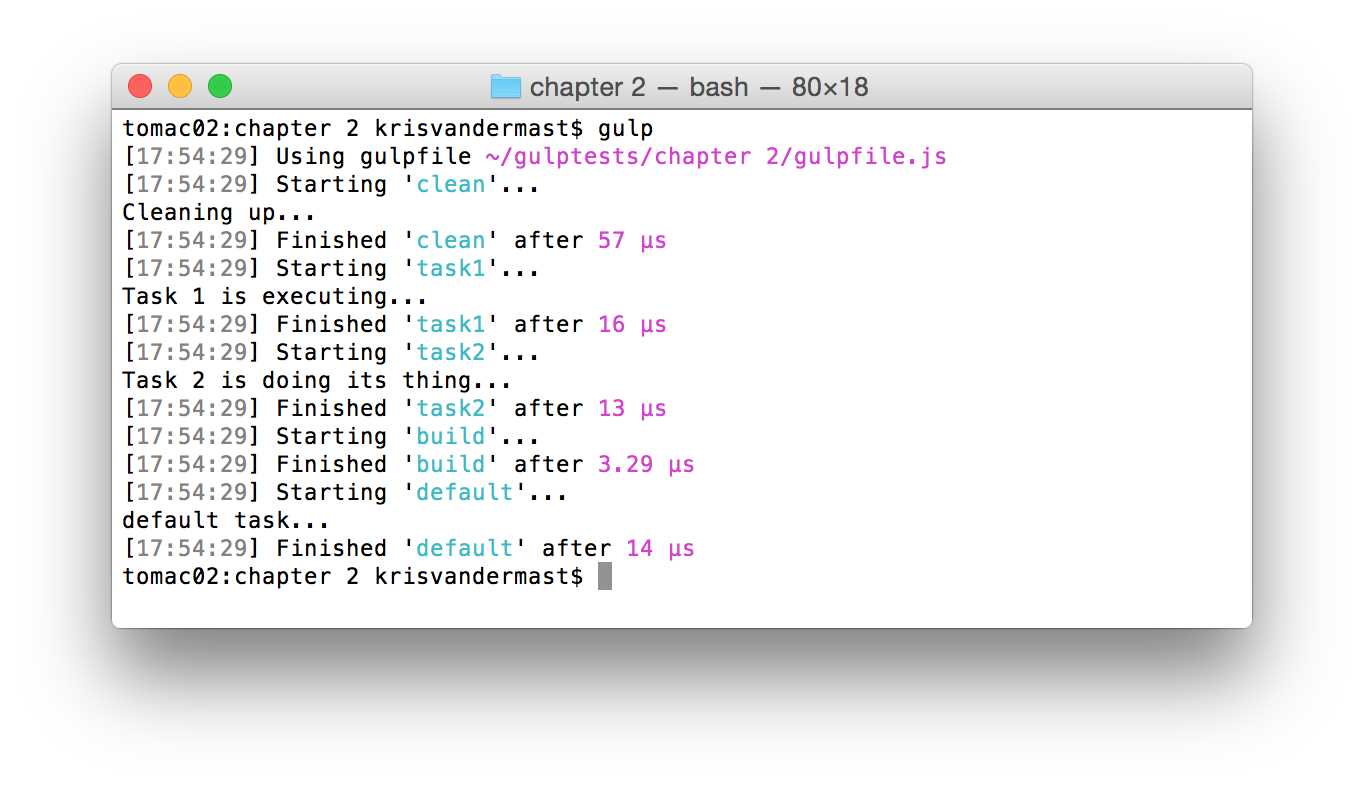
Figure 11: Running multiple tasks that depend on the same task
Summary
In this chapter we saw the basics of Gulp tasks. We saw single tasks, the default task, multiple tasks, and even dependencies on other tasks. In later chapters we will see more examples, but for now, you know the basics and the different combinations.
- 1800+ high-performance UI components.
- Includes popular controls such as Grid, Chart, Scheduler, and more.
- 24x5 unlimited support by developers.