
Gulp Succinctly®

CHAPTER 4
Handy Little Tasks
This chapter’s purpose is to get the reader further into Gulp. We’ll do this by showing small snippets of code and usage of everyday tasks that a developer might need.
Script translation
During the past years, the web has seen an incredible increase in the usage of JavaScript. In the beginning, it was merely used to respond to some click event to toggle the visibility of some HTML element like a picture. Nowadays, it is no exception to see web applications with thousands of lines of JavaScript code, performing a bunch of tasks in the browser instead of posting back everything to the server and waiting for an answer. So-called Singe Page Applications (SPA) have seen an increase in popularity. It comes with a downside though: complexity can become very tough and small mistakes are easily made. As such, we also see a growing number of tools and languages that transpile the code you write in them into JavaScript. Normally this is a manual task that might become tedious after a while. Luckily we are making use of gulp.js, which makes life easier by automating things.
Note: Transpiling is a specific term used to indicate the process of transforming one language into another one while keeping the same level of abstraction—basically going from CoffeeScript, TypeScript…to JavaScript. Compiling is going from one language and transforming it into something else, like compiling C# into binary code (IL in this case).
CoffeeScript
CoffeeScript was likely the first language I encountered that would generate JavaScript after translation. However, if you have a bunch of files, and several are changed, it would mean translating them one by one. Not anymore with Gulp. There’s a simple plugin available for it, which we can use in our gulp tasks or watchers.
Code Listing 23: Fibonaci in CoffeeScript – /Assets/Coffee/fibonacci.coffee
fib = (x) -> if x < 2 x else fib(x-1) + fib(x-2) solutions = [] for number in [0..10] solutions.push ( fib number )
console.log solutions |
The sample is the well known Fibonacci sequence, which we would like to be translated into JavaScript.
Create a new gulpfile.js directly under the Fibonacci folder, and run the following commands:
- npm init (This will generate the package.json file after you go through the wizard.)
- npm install gulp --save-dev
- npm install gulp-coffee --save-dev
In the gulpfile.js file, enter the following:
Code Listing 24: gulpfile.js for CoffeeScript demo - /gulpfile.js
"use strict"; var gulp = require('gulp'), coffee = require('gulp-coffee'); gulp.task('coffee', function () { gulp.src('./Assets/Coffee/**/*.coffee') .pipe(coffee()) .pipe(gulp.dest('./wwwroot/scripts')); }); gulp.task('default', ['coffee']); |
In a terminal window or DOS box, run the default Gulp task, which will output the following JavaScript file under the wwwroot/scripts folder as expected (as specified as parameter for gulp.dest):
Code Listing 25: fibonacci.js - /wwwroot/scripts/fibonacci.js
(function () { var fib, i, number, solutions; fib = function (x) { if (x < 2) { return x; } else { return fib(x - 1) + fib(x - 2); } }; solutions = []; for (number = i = 0; i <= 10; number = ++i) { solutions.push(fib(number)); } console.log(solutions); }).call(this); |
If you do not like this style of output, then you can pass in a parameter to the coffee call, like .pipe(coffee({ bare:true})).
This will then compile the fibonacci.coffee file into the following JavaScript code:
Code Listing 26: fibonacci.js with bare : true - /wwwroot/scripts/fibonacci.js
var fib, i, number, solutions; fib = function (x) { if (x < 2) { return x; } else { return fib(x - 1) + fib(x - 2); } }; solutions = []; for (number = i = 0; i <= 10; number = ++i) { solutions.push(fib(number)); } console.log(solutions); |
Some handling when an error occurs
Exceptions do happen, so it is better to keep them in mind and act appropriately if needed. After all, an exception might break your entire Gulp script, and Gulp plugins might respond to erroneous events.
For example, say you want to put some comment in the CoffeeScript file as a small note to yourself of what the code is supposed to do. You might write /* some comment */ in the file. That is perfectly fine in JavaScript, but the CoffeeScript compiler returns an error when performing its magic.
To make the code in Code Listing 24 more robust, we can change it to:
Code Listing 27: gulpfile.js with error event listener - /gulpfile.js
"use strict"; var gulp = require('gulp'), coffee = require('gulp-coffee'); gulp.task('coffee', function () { gulp.src('./Assets/Coffee/**/*.coffee') .pipe(coffee({ bare: true }).on('error', function (e) { console.log(e + '\r\n There\'s something wrong with the CoffeeScript file(s)'); })) .pipe(gulp.dest('./wwwroot/scripts')); }); gulp.task('default', ['coffee']); |
Now open the fibonacci.coffee file. On top, write /* Fibonacci sequence */ and run the default Gulp task again. We will see the following output:
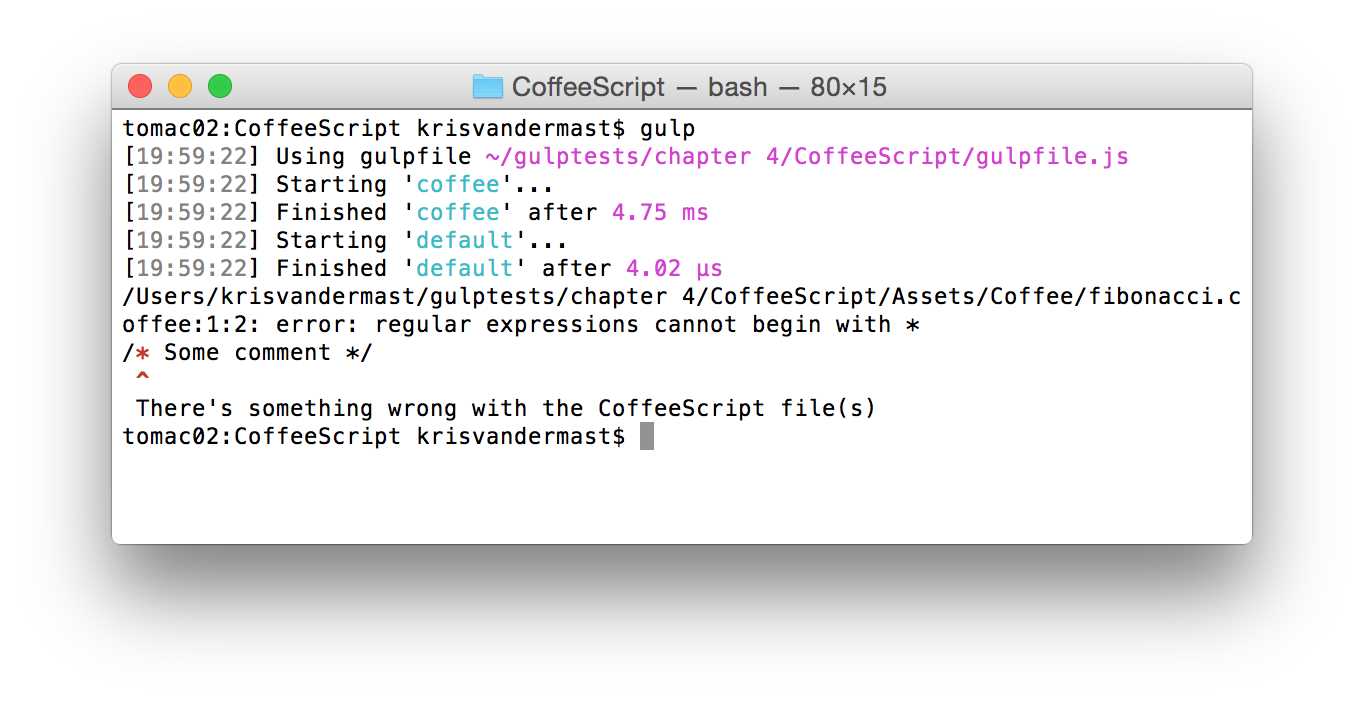
Figure 23: When something goes wrong and we would like to get notified
The output of the gulp-coffee plugin now shows nicely where it goes wrong so you can quickly find out and solve the problem.
TypeScript
TypeScript is a language developed by Microsoft, and just like CoffeeScript, compiles to JavaScript. It is gaining a lot of interest and momentum nowadays since the Angular.js team over at Google announced a close collaboration. TypeScript has been chosen as the go-to language to write an upcoming Angular.js-based application. As you can sense already, this will be big in the coming years.
If you want to know more about TypeScript, I suggest you take a look at this website, especially the Playground section to see it at work. The example being used here is one of them.
Code Listing 28: inheritance.ts - /Assets/TypeScript/inheritance.ts
class Animal { constructor(public name: string) { } move(meters: number) { alert(this.name + " moved " + meters + "m."); } } class Snake extends Animal { constructor(name: string) { super(name); } move() { alert("Slithering..."); super.move(5); } } class Horse extends Animal { constructor(name: string) { super(name); } move() { alert("Galloping..."); super.move(45); } } var sam = new Snake("Sammy the Python"); var tom: Animal = new Horse("Tommy the Palomino"); sam.move(); tom.move(34); |
There are several plugins available to compile TypeScript to JavaScript. I opted for gulp-typescript-compiler, but you can try out any of the others.
Code Listing 29: gulpfile.js for compiling TypeScript - /gulpfile.js
var gulp = require('gulp'), ts = require('gulp-typescript-compiler'); gulp.task('ts', function () { return gulp.src('./Assets/TypeScript/**/*.ts') .pipe(ts()) .pipe(gulp.dest('./wwwroot/js')); }); gulp.task('default', ['ts']); |
This results in the following EcmaScript 5 code:
Code Listing 30: Compiled JavaScript - /wwwroot/js/inheritance.js
var __extends = this.__extends || function (d, b) { for (var p in b) if (b.hasOwnProperty(p)) d[p] = b[p]; function __() { this.constructor = d; } __.prototype = b.prototype; d.prototype = new __(); }; var Animal = (function () { function Animal(name) { this.name = name; } Animal.prototype.move = function (meters) { alert(this.name + " moved " + meters + "m."); }; return Animal; })(); var Snake = (function (_super) { __extends(Snake, _super); function Snake(name) { _super.call(this, name); } Snake.prototype.move = function () { alert("Slithering..."); _super.prototype.move.call(this, 5); }; return Snake; })(Animal); var Horse = (function (_super) { __extends(Horse, _super); function Horse(name) { _super.call(this, name); } Horse.prototype.move = function () { alert("Galloping..."); _super.prototype.move.call(this, 45); }; return Horse; })(Animal); var sam = new Snake("Sammy the Python"); var tom = new Horse("Tommy the Palomino"); sam.move(); tom.move(34); |
Wow, I bet you didn’t want to write that yourself. You can also pass in options in the ts call. Be sure to check them out and play around with them to see what works for you, like sourcemap generation, for example:
Code Listing 31: gulpfile.js for compiling TypeScript with options - /gulpfile.js
var gulp = require('gulp'), ts = require('gulp-typescript-compiler'); gulp.task('ts', function() { return gulp.src('./Assets/TypeScript/**/*.ts') .pipe(ts({ sourcemap:true, target:'ES3' })) .pipe(gulp.dest('./wwwroot/js')); }); gulp.task('default', ['ts']); |
This will generate a sourcemap file with the name inheritance.js.map in the output folder wwwroot/js. It will also add the following line at the bottom of the generated inheritance.js file to indicate the relationship between both: //# sourceMappingURL=inheritance.js.map.
EcmaScript 6
EcmaScript 6 (ES6) is the new, upcoming version of JavaScript. Since it is so new, most browsers do not support it yet (or at least not fully). That’s a pity, as the things you can start doing with it are pretty awesome. Luckily for developers, there is already a way to make use of it and then transpile it to EcmaScript, 5 which current browsers understand all too well. One example is making use of classes and inheritance—something JavaScript as we knew it wasn’t particularly good at. Take the following ES6 sample:
Code Listing 32: ES6 file inheritance.js - /Assets/ES6/inheritance.js
class Shape { constructor(id, x, y) { this.id = id this.move(x, y) } move(x, y) { this.x = x this.y = y } } class Rectangle extends Shape { constructor(id, x, y, width, height) { super(id, x, y) this.width = width this.height = height } } class Circle extends Shape { constructor(id, x, y, radius) { super(id, x, y) this.radius = radius } } var c = new Circle('firstCircle', 3, 4, 5); console.log(c); c.move(10, 20); console.log(c); |
It has a class Shape, which has a move function. Two other classes, Circle and Rectangle, inherit from it. After the class declarations, there are four more lines, which instantiate a new Circle object and pass in some parameters to its constructor, which calls in its turn the base class constructor as well via the super() call. To see the object itself, we write it to the console. Then we move the circle object to some new x:y coordinates and write it again to the console. Hey, this might be the start of a fun new game!
To transpile it to ES5, however, we need some help. There is at the time of writing a Gulp plugin, and likely more are soon to follow once ES6 takes off. Our Gulp file will look like this:
Code Listing 33: gulpfile.js - /gulpfile.js
var gulp = require('gulp'), es6 = require('gulp-es6-transpiler'); gulp.task('js:es6', function () { return gulp.src('./Assets/ES6/inheritance.js') .pipe(es6({ 'disallowUnknownReferences': true })) .pipe(gulp.dest('./wwwroot/js')); }); gulp.task('default', ['js:es6']); |
Note: Before you run the gulp task, make sure you have the gulp and gulp-es6-transpiler packages installed.
The ES5 equivalent will be generated into the following code. For the faint of heart, perhaps take a look at the next paragraph instead, as it is not pretty.
Code Listing 34: ES5 file inheritance.js of transpiling our ES6 inheritance.js file - /wwwroot/js/inheritance.js
var PRS$0 = (function (o, t) { o["__proto__"] = { "a": t }; return o["a"] === t })({}, {}); var DP$0 = Object.defineProperty; var GOPD$0 = Object.getOwnPropertyDescriptor; var MIXIN$0 = function (t, s) { for (var p in s) { if (s.hasOwnProperty(p)) { DP$0(t, p, GOPD$0(s, p)); } } return t }; var SP$0 = Object.setPrototypeOf || function (o, p) { if (PRS$0) { o["__proto__"] = p; } else { DP$0(o, "__proto__", { "value": p, "configurable": true, "enumerable": false, "writable": true }); } return o }; var OC$0 = Object.create; var Shape = (function () { "use strict"; var proto$0 = {}; function Shape(id, x, y) { this.id = id this.move(x, y) } DP$0(Shape, "prototype", { "configurable": false, "enumerable": false, "writable": false }); proto$0.move = function (x, y) { this.x = x this.y = y }; MIXIN$0(Shape.prototype, proto$0); proto$0 = void 0; return Shape; })(); var Rectangle = (function (super$0) { "use strict"; if (!PRS$0) MIXIN$0(Rectangle, super$0); function Rectangle(id, x, y, width, height) { super$0.call(this, id, x, y) this.width = width this.height = height } if (super$0 !== null) SP$0(Rectangle, super$0); Rectangle.prototype = OC$0(super$0 !== null ? super$0.prototype : null, { "constructor": { "value": Rectangle, "configurable": true, "writable": true } }); DP$0(Rectangle, "prototype", { "configurable": false, "enumerable": false, "writable": false }); ; return Rectangle; })(Shape); var Circle = (function (super$0) { "use strict"; if (!PRS$0) MIXIN$0(Circle, super$0); function Circle(id, x, y, radius) { super$0.call(this, id, x, y) this.radius = radius } if (super$0 !== null) SP$0(Circle, super$0); Circle.prototype = OC$0(super$0 !== null ? super$0.prototype : null, { "constructor": { "value": Circle, "configurable": true, "writable": true } }); DP$0(Circle, "prototype", { "configurable": false, "enumerable": false, "writable": false }); ; return Circle; })(Shape); var c = new Circle('firstCircle', 3, 4, 5); console.log(c); c.move(10, 20); console.log(c); |
Indeed, the ES6 style of writing that is much easier on the eyes.
To test this transpiled file quickly in a browser, you can open jsfiddle.net, paste the code in the JavaScript pane, and run it. Open the F12 tools of your favorite browser and take a look at the Console. The following screenshot shows the outcome of the code:

Figure 24: Both Circle objects before and after the move function call
Source maps
Source maps are a handy way to make a browser aware of where the original files were for a certain resource like a JavaScript or CSS file. We already saw a glimpse of it being used earlier in this chapter under the TypeScript paragraph. There, it was an optional setting. Not every Gulp plugin, however, has this out of the box. Luckily, there is a dedicated Gulp plugin available to inject into the stream. Actually, as we will see in a moment, it takes two points into the stream: one that does the initialization, and another that does the writing.
We are going to make use of Sass for this example; be sure to use npm install to get the gulp-sass package. Just like Less, this is a popular CSS precompiler syntax that is gaining more popularity. The next version of the famous Bootstrap library, for example, will be written with Sass, while the current version makes use of Less. Note that Sass files have the extension .scss. To make yourself familiar with the syntax of Sass, I encourage you to take a look at this guide.
Code Listing 35: Styles.scss - /Assets/Sass/styles.scss
a.CoolLink { color: blue; &:hover { text-decoration: underline; } &:visited { color: green; } } |
Code Listing 36: gulpfile.js - /gulpfile.js
var gulp = require('gulp'), sass = require('gulp-sass'), sourcemaps = require('gulp-sourcemaps'); gulp.task('css', function () { return gulp.src('./Assets/Sass/**/*.scss') .pipe(sourcemaps.init()) .pipe(sass({ outputStyle: 'compressed' })) .pipe(sourcemaps.write()) .pipe(gulp.dest('./wwwroot/css')); }); gulp.task('default', ['css']); |
This code listing does quite a bit, so let us examine the css task a bit closer. First, all Sass files are put into the stream. Then the sourcemap gets initialized. You can put this after the Sass pipe, but it is recommended to put it before. Then the compilation of Sass into CSS performs its magic and the sourcemap gets written. In the current call, the mapping will be written in the resulting CSS file, like the following:
Code Listing 37: Styles.css with sourcemapping included in the file itself - /wwwroot/css/styles.css
a.CoolLink{color:blue}a.CoolLink:hover{text-decoration:underline}a.CoolLink:visited{color:green} /*# sourceMappingURL=data:application/json;base64,eyJi9zb3VyY2UvIn0= */ |
This works, but personally I like to keep the mapping in a separate file. This can be done quite easily by just changing the call to the write function like the following:
Code Listing 38: Adjusted gulpfile.js to write the sourcemap to another file – gulpfile.js
var gulp = require('gulp'), sass = require('gulp-sass'), sourcemaps = require('gulp-sourcemaps'); gulp.task('css', function () { return gulp.src('./Assets/Sass/**/*.scss') .pipe(sourcemaps.init()) .pipe(sass({ outputStyle: 'compressed' })) .pipe(sourcemaps.write('../maps')) .pipe(gulp.dest('./wwwroot/css')); }); gulp.task('default', ['css']); |
After running the default Gulp task, this time another subfolder will be created, maps, which will hold the generated sourcemap file like this:

Figure 25: Styles.css and its corresponding Styles.css.map file
Unlike with the inline mapping before, in Styles.css the separate Styles.css.map file looks somewhat different. Also, the Styles.css now only holds a short indication as to where the browser can find the mapping file.
Code Listing 39: Styles.css.map - /wwwroot/maps/styles.css.map
{"version":3,"sources":["Styles.scss"],"names":[],"mappings":"AAAC,CAAC,SAAS,CACP,KAAK,CAAE,IAAK,CADJ,AAEP,CAAC,SAAS, MAAH,AAAS,CACb,eAAe,CAAE,SAAU,CADtB,AAGR,CAAC, SAAS,QAAD,AAAS,CACf,KAAK,CAAE,KAAM,CADN", "file":"Styles.css","sourcesContent":["a.CoolLink {\n color: blue;\n &:hover {\n text-decoration: underline;\n }\n &:visited {\n color: green;\n }\n}"],"sourceRoot":"/source/"} |
Note: The sourcemap file might look a bit different on your machine. Here you see \n, which is return and newline on Mac OS X, while on Windows it will show \r\n instead. Also, the order of the properties of the json file might be different, but essentially the same information will be in there.
Code Listing 40: Styles.css - /wwwroot/css/styles.css
a.CoolLink{color:blue}a.CoolLink:hover{text-decoration:underline}a.CoolLink:visited{color:green} /*# sourceMappingURL=../maps/Styles.css.map */ |
To test this in the browser, add an HTML file under the wwwroot folder with the following content:
Code Listing 41: index.html - /wwwroot/index.html
<!DOCTYPE html> <html lang="en"> <head> <meta charset="UTF-8"> <title>Sourcemaps</title> <link rel="stylesheet" href="css/Styles.css"> </head> <body> <a href="http://www.krisvandermast.com" class="CoolLink">This is a cool link</a> <a href="#">This is not a cool link</a> </body> </html> |
The output on the screen will come as no surprise. The interesting part happens when you open the so-called F12 tools of your browser. Open the Resource pane and see the mapping being made. Note that every browser differs a bit in showing it, however.
Safari:
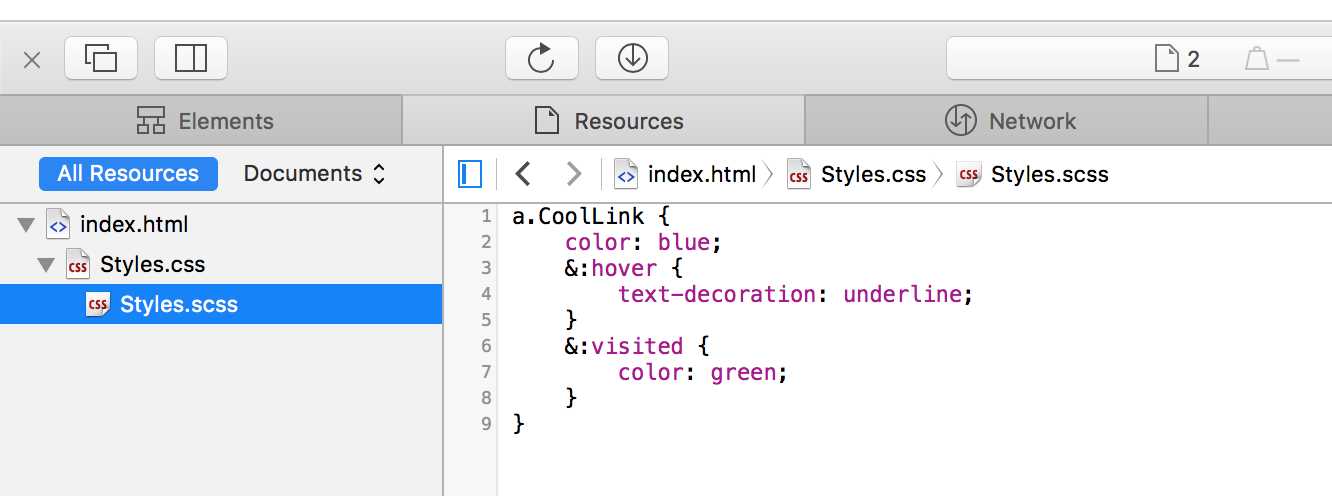
Figure 26: Sourcemaps in Safari
Chrome:
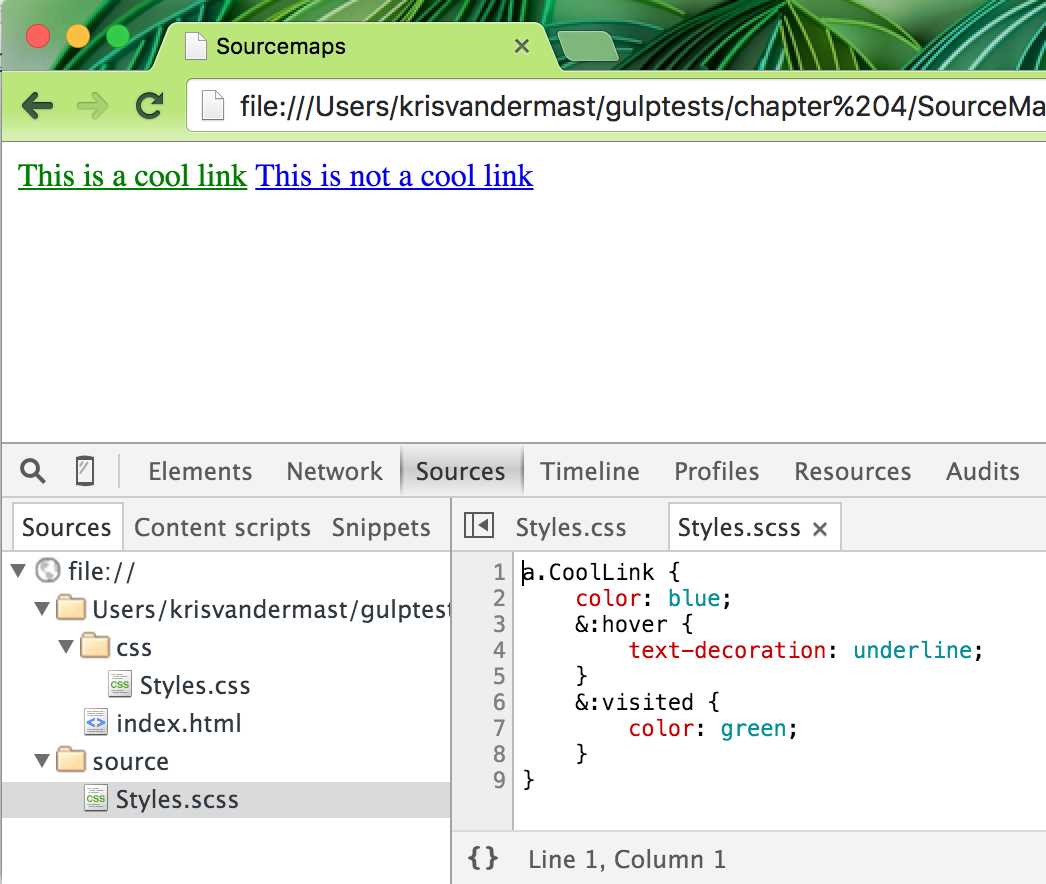
Figure 27: Sourcemaps in Chrome
Note that source mapping does not only apply to CSS, but can also be used for JavaScript files compiled or transpiled from another source file. Browsers can make use of this to show where some code came from originally. We already saw a sample of JavaScript source maps previously in the TypeScript section.
Restoring order
Loading in files to be processed by a specific task is what Gulp makes a great tool. These files are being loaded in the same order they are in the folder. That means that if you have files which need to be outputted in a certain order in the resulting file, you will have to do some manipulation. A situation where this might occur is the concatenation of a bunch of CSS files. The order is very important in such a file, as it might make your application look different from what you intended.
Take the following three small .css files and Gulp file:
Code Listing 42: /Assets/css/anotherstylewhichshouldbeattheend.css
div { border:4px solid red; } |
Code Listing 43: /Assets/css/something.css
body { background-color: blue; } |
Code Listing 44: /Assets/css/styles.css
div { border:1px dashed green; background-color: green; } |
Code Listing 45: /gulpfile.js
var gulp = require('gulp'), concat = require('gulp-concat'); gulp.task('css', function () { return gulp.src('./Assets/css/**/*.css') .pipe(concat('all.css')) .pipe(gulp.dest('./wwwroot/css')); }); gulp.task('default', ['css']); |
We have introduced here another Gulp plugin: gulp-concat. Be sure to have it installed it before running the gulp command. What it does is concatenate the stream into one file, all.css files in this particular case. This makes it very easy to bundle scripts together and reduces the number of files the browser needs to fetch.
The output of running the default Gulp task will result in the following all.css file:
Code Listing 46: /wwwroot/css/all.css
div{ border:4px solid red; } body { background-color: blue; } div { border:1px dashed green; background-color: green; } |
This is not exactly what we want, as the style which makes the div borders red should become the last in the file. We can do this in different ways; let us investigate just how.
Ordering via gulp.src
This is a pretty simple approach, as you do not have to get another Gulp plugin. Actually, it is already in your code as gulp.src. Instead of simply filling in a glob like ./Assets/less/**/*.less to grab all the Less files under Assets/less and its subfolders, it is possible to make an array with the order of the files you want them in. Let us take the following example:
Code Listing 47: gulpfile.js with ordering in gulp.src - /gulpfile.js
var gulp = require('gulp'), concat = require('gulp-concat'); gulp.task('css', function () { return gulp.src(['./Assets/css/styles.css', './Assets/css/**/*.css']) .pipe(concat('all.css')) .pipe(gulp.dest('./wwwroot/css')); }); gulp.task('default', ['css']); |
Be sure to have installed the packages gulp, gulp-concat, and gulp-order.
The output will now become the following after running the default Gulp task:
Code Listing 48: /wwwroot/css/all.css
div { border:1px dashed green; background-color: green; } div{ border:4px solid red; } body { background-color: blue; } |
The styles.css file was put as first in the ordering, and while keeping the rest of the files in order of filename in the folder, the all.css file gets generated.
Ordering with gulp-order
Even though ordering via gulp.src works out, it makes it prone to change, and actually does two things: fetching files and ordering them. That is not always desired from a separation of concerns point of view. As such, it is better to make use of a dedicated Gulp plugin: gulp-order, which gets introduced in the following changed Gulp file.
Code Listing 49: gulpfile.js with ordering via the gulp-order plugin
var gulp = require('gulp'), order = require('gulp-order'), concat = require('gulp-concat'); gulp.task('css', function () { return gulp.src('./Assets/css/**/*.css') .pipe(order(['styles.css', '*.css'])) .pipe(concat('all.css')) .pipe(gulp.dest('./wwwroot/css')); }); gulp.task('default', ['css']); |
The output is the same, as in Code Listing 48.
Logging
Gulp.js is a task runner, which means it does all its magic behind closed doors. You do not have real visual feedback like when opening a browser and navigating to some page. At best, you get some default output to a console window of what is going on. If you want more information, then you will have to put it in yourself. We will take a look at a few different ways to do this.
console.log
This is the “poor man’s” way of logging, and it works without having to install some fancy plugin. In former chapters, we already saw the usage of this, for example, in Code Listing 10.
gulp-util
This handy little plugin does more than just logging, so be sure to check out the documentation for an overview of all the options. It’s capable of making a good old “beep” sound, and it facilitates showing colored messages on the screen. As an example, take a look at the following code:
Code Listing 50: gulpfile.js for gulp-util - /gulpfile.js
var gulp = require('gulp'), gutil = require('gulp-util'); gulp.task('log', function () { gutil.beep(); gutil.log(gutil.colors.red.underline('Error'), 'Something went terribly wrong...'); gutil.log(gutil.colors.bgGreen('OK'), 'Everything went smooth.'); }); gulp.task('default', ['log']); |
I cannot provide the “beep” sound in this book, but the colored output looks like the following:
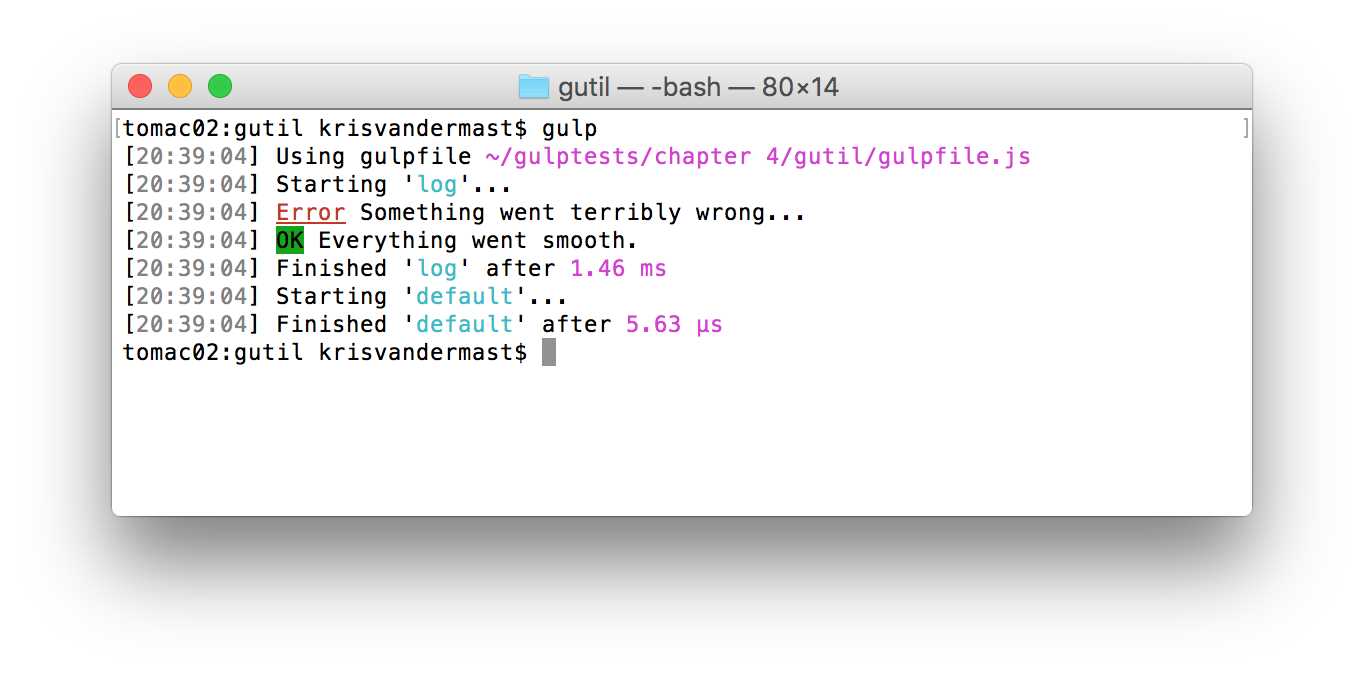
Figure 28: Colored output with gulp-util
Note: There are not that many colors available. gulp-util makes use of the Chalk npm module. The colors can be found in the following table.
gulp-util colors | |||
bold | dim | italic | underline |
Inverse | black | strikethrough | red |
green | yellow | blue | magenta |
cyan | white | gray | bgBlack |
bgRed | bgGreen | bgYellow | bgBlue |
bgMagenta | bgCyan | bgWhite | |
It’s possible to chain these colors together to get another effect. As we saw in the demo gulpfile, underline was concatenated to red, resulting in a red text that was underlined. Note that the underline might not work on your machine, for example, in Windows, as not every terminal in Windows allows for underlined text.
gulp-logger
This is a third logging helping component. Its purpose is to log the progress of the current task for every item in the stream we are providing to it. Take a look at the following Gulp file:
Code Listing 51: gulpfile.js for gulp-logger - /gulpfile.js
var gulp = require('gulp'), sass = require('gulp-sass'), logger = require('gulp-logger'); gulp.task('css:sass', function () { gulp.src('./Assets/Sass/**/*.scss') .pipe(logger({ before: 'Going to process Sass files...', after: 'Sass files were processed...', beforeEach: 'Processing... ', afterEach: ' ...Done' })) .pipe(sass()) .pipe(gulp.dest('./wwwroot/css')); }); gulp.task('default', ['css:sass']); |
Through the means of options, we can manipulate how the gulp-logger module is going to behave. In this example we use only four, but there are more that can come in handy. Be sure to check out the documentation of this component to read about those extra option settings.
The output can be seen in the following figure. Note the colored messages. The colors option is set to true by default. You could turn it off if you wanted to by setting it to false.

Figure 29: Output of the gulp-logger module with extra options set
Cleaning up
Gulp is great at generating output, and overwrites output from before. When setting up a Gulp architecture in your application, you will likely test it on every step. This might end up giving output files in the end which you might not need anymore or, or which just become ballast. Potentially, you might integrate the leftovers in your real-life solution, degrading performance, or worse, cause bugs.
As such, it’s a good practice to start up with a clean slate and clean out the output folder and its subfolders before performing Gulp magic. Usually this is done as a dependent task of the default task like:
gulp.task('default', ['clean','build','watch','connect']);
As we will find out, there are Gulp plugins available for cleaning up. However, this is a good case to show that it’s not always the trivial plugin you want to make use of. The trivial one in this case would be gulp-clean. When we take a look at its documentation, we will see the message:
Deprecated use gulp-rimraf instead!
Ok, following that link, we open the documentation page of gulp-rimraf. There we see the following message:
Deprecated in favor of https://github.com/gulpjs/gulp/blob/master/docs/recipes/delete-files-folder.md
So we end up with the del module from node.js directly. The showcase of this is that even though every day there are new plugins being made for Gulp, there are also existing plugins being removed in favor of better ones. Finding these might be a bit of a challenge in the beginning, but you will soon find the good ones that work out for you.
Using the del module in your Gulp file is easy, as you can see in the following demo, where we have a wwwroot folder with css and js subfolders with files in them.
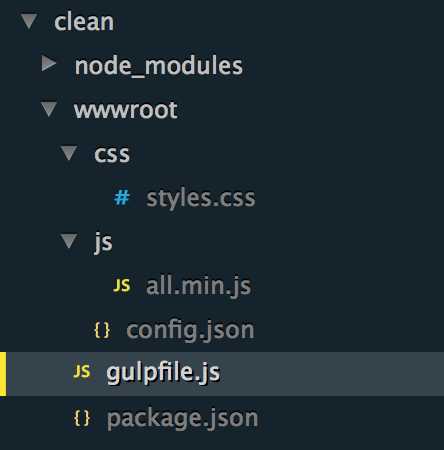
Figure 30: Project overview before cleaning
We only want to remove the files and their folders under css and js, but not the config.json file, as that might hold important information. We can make an exception while deleting everything by putting a ! in front of the path to exclude the file.
Code Listing 52: gulpfile.js cleaning - /gulpfile.js
"use strict"; var gulp = require('gulp'), del = require('del'); gulp.task('clean', function () { return del(['./wwwroot/css', './wwwroot/js', '!./wwwroot/config.json']); }); gulp.task('build', function () { console.log('Building stuff - using less and coffeescript'); }); gulp.task('default', ['clean', 'build']); |
Note from this sample that we do not make use of gulp.src as we have seen so many times before. We directly call the del module and pass in an array of paths to delete: all with the exception of the config.json file. After running the default task, we keep the following structure in our project:
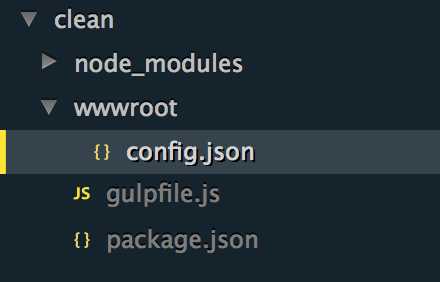
Figure 31: Project after having cleaned out the wwwroot folder
Load plugins dynamically
So far, we have been writing require statements at the top of each of our Gulp files. That list might become pretty long when you’re adding a lot of plugins. For example, the following is not an exception:
Code Listing 53: A lot of require statements - /gulpfile.js
var gulp = require('gulp'), del = require('del'), less = require('gulp-less'), path = require('path'), autoprefixer = require('gulp-autoprefixer'), sourcemaps = require('gulp-sourcemaps'), concat = require('gulp-concat'), order = require('gulp-order'), filesize = require('gulp-filesize'), uglify = require('gulp-uglify'), rename = require('gulp-rename'), minify = require('gulp-minify'), connect = require('gulp-connect'), jshint = require('gulp-jshint'), jade = require('gulp-jade'), minifyCss = require('gulp-clean-css'), coffee = require('gulp-coffee'); |
That might even become more cumbersome when you start adding additional plugins. There is, however, an alternative way, one that reduces this listing tremendously by making use of a Gulp plugin. The following listing shows the usage of the gulp-load-plugins plugin.
Code Listing 54: Reducing it to loading plugins lazily - /gulpfile.js
var gulp = require('gulp'), gulpLoadPlugins = require('gulp-load-plugins'), plugins = gulpLoadPlugins(); |
The secret is in the fact that the plugins are known in the package.json file and installed via npm. So when we have the following package.json:
Code Listing 55: /package.json
{ "name": "d", "version": "1.0.0", "description": "", "main": "index.js", "scripts": { "test": "echo \"Error: no test specified\" && exit 1" }, "author": "", "license": "ISC", "devDependencies": { "gulp": "^3.9.0", "gulp-less": "^3.0.3", "gulp-load-plugins": "^0.10.0", "gulp-sass": "^2.0.4", "gulp-util": "^3.0.6" } } |
We can then refactor a gulpfile.js file to make use of the plugins variable:
Code Listing 56: gulpfile.js loading plugins in a lazy fashion - /gulpfile.js
var gulp = require('gulp'), gulpLoadPlugins = require('gulp-load-plugins'), plugins = gulpLoadPlugins(); gulp.task('css:less', function () { return gulp.src('./b.less') .pipe(plugins.less()) .pipe(gulp.dest('./')); }); gulp.task('css:sass', function () { return gulp.src('./c.scss') .pipe(plugins.sass()) .pipe(gulp.dest('./')); }); gulp.task('default', function () { return plugins.util.log('Gulp is running!') }); |
Instead of writing less(), we then write plugins.less() to make it work.
Summary
This chapter covered several small but handy samples, which you can reuse in your own projects. Be sure to play around with the options of each plugin and experiment to see what works out best for your project.
- 1800+ high-performance UI components.
- Includes popular controls such as Grid, Chart, Scheduler, and more.
- 24x5 unlimited support by developers.