
Gradle Succinctly®

CHAPTER 8
Multi-Project Builds
In Gradle, a multi-project build consists of a root project, and one or more subprojects that may also have subprojects. This scenario is useful in order to organize and understand a project as a set of smaller, interdependent modules. In this case, all the modules are linked together.
Structure of a multi-project build
A multi-project build should follow a consistent structure, which has the following characteristics:
- A settings.gradle file in the root project’s directory.
- A build.gradle file in the root project’s directory.
- Child directories who have their own build.gradle files (some multi-project builds may omit child projects’ build scripts).
The settings.gradle file tells Gradle how the project and subprojects are structured. The following command displays a project’s structure.
Code Listing 75
gradle -q projects |
The output should look like this.
Code Listing 76
|
------------------------------------------------------------ Root project ------------------------------------------------------------ Root project 'multiProject' \--- Project ':secondproject' To see a list of the tasks of a project, run gradle <project-path>:tasks For example, try running gradle :secondproject:tasks |
This tells us that multiProject has one immediate child project, named secondproject. The name of the subproject is displayed in a project’s path format (as explained in Chapter 5). If a subproject has child projects, these are displayed under its name in a tree structure way. This output maps to the directory structure for all projects. So, secondproject can be found at the multiproject\secondproject directory.
Usually, each project has its own build.gradle file. This is not necessary in some cases (for example, when a subproject is only a container for other subprojects), but the root project has one.
The root project’s build.gradle file is often used to share common configuration between the child projects. For example, it might be needed to apply the same sets of plugins to all of them. It also can be used to configure individual subprojects, if it’s preferable to have all projects’ configuration in one place. This means that looking into the root build file is a good way to discover how a particular subproject is being configured.
Executing a multi-project build
Multi-project builds are still collections of tasks that Gradle can run. The difference relies on the fact that the user may want to control which project’s tasks should be executed. The following options apply to a multi-project build execution.
- You can change to the directory that corresponds to the project you want to run, and then execute gradle <taskname> as usual.
- You can specify a qualified task name from the directory of the root project. For example, gradle :ftputils:build will build the fptutils subproject and any subprojects it depends on.
- You can specify a task name that can be found in the root project, or in any subprojects it depends on, by issuing gradle <taskname> command.
The first and third options are similar to the single-project use case, but Gradle will work slightly differently in a multi-project case. The following command…
Code Listing 77
gradle hello |
…will execute the hello task in any subprojects that have the task, relative to the current directory.
The second option gives more control over what gets executed. The following command…
Code Listing 78
gradle :secondproject:subProjectTask |
…will execute the subProjectTask task of the secondproject subproject, and all its dependencies.
Paying attention to the following project structure…
Code Listing 79
|
------------------------------------------------------------ Root project ------------------------------------------------------------ Root project 'multiProject' +--- Project ':secondproject' \--- Project ':secondproject/thirdproject' To see a list of the tasks of a project, run gradle <project-path>:tasks For example, try running gradle :secondproject:tasks |
…if the user executes the following command…
Code Listing 80
gradle subProjectTask |
…the subProjectTask task will be executed in every project where it is defined. Gradle will look for this task starting from the root project, and ending in the last project included in the settings.gradle file.
The code for the root project is the following.
Code Listing 81
task hello << { println "I'm $project.name" } |
This is the code for secondproject project:
Code Listing 82
task hello << { println "I'm $project.name" } task subProjectTask << { println 'I am the subProjectTask of secondproject' } |
The code for secondproject/thirdproject is:
Code Listing 83
task hello << { println "I'm $project.name" } task subProjectTask << { print "I am the subProjectTask of $project.name" } |
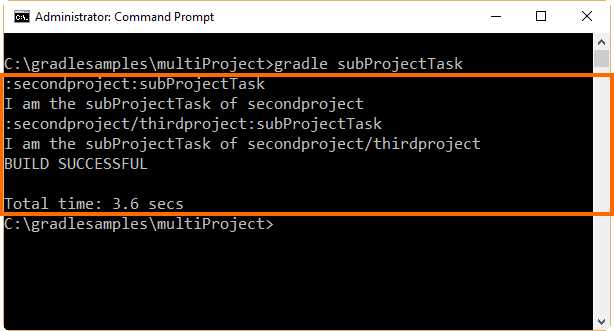
- The output for gradle subProjectTask command
Defining common behavior
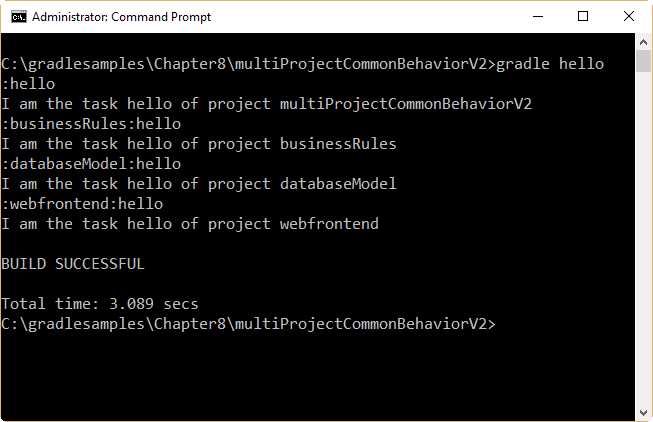
As explained previously in this chapter, in a multi-project build it is not necessary for the subprojects to have their own build.gradle file. That is, build scripts are optional in a multi-project build. But this doesn’t mean that you cannot define a specific behavior for each one of the dependent subprojects. Considering the following project structure…
Code Listing 84
------------------------------------------------------------ Root project ------------------------------------------------------------ Root project 'multiProjectCommonBehavior' +--- Project ':businessRules' +--- Project ':databaseModule' \--- Project ':unserinterface' To see a list of the tasks of a project, run gradle <project-path>:tasks For example, try running gradle :businessRules:tasks |
…and the following build script in the build.gradle file of the root project…
Code Listing 85
Closure cl = { task -> println "I'm $task.project.name" } allprojects { task hello << cl } |
…the output for the previous build script is displayed in the following figure.

- The output for the common behavior example
Gradle provides in its API a property called allprojects. This property returns a list with the current project and all its subprojects underneath it. If the user calls allprojects with a closure, all the statements of the closure are delegated to the projects associated with this property. So, despite that there’s no build.gradle file for the subprojects, the task hello of the example is delegated for each one of them from the root project’s build.gradle file.
An iteration via allprojects.each can be done, like in the following example.
Code Listing 86
Closure cl = {task -> println "I am the task $task.name of project $task.project.name"} allprojects.each {
project("$it.path") { task hello << cl }
} |
The previous code assigns a closure to an object variable. Then, when iteration via allprojects.each is done, the closure is assigned to a task named hello, and the task is assigned to each project using the project method, which receives the project’s path as a parameter.
Now, when the user executes the following command…
Code Listing 87
gradle hello |
…the output displayed looks like the following figure.
- Output for allprojects.each iteration
Defining a specific behavior
The allprojects.each iteration can be useful for assigning a different closure to a project, depending on its path. Assuming a project structure like the following…
Code Listing 88
------------------------------------------------------------ Root project ------------------------------------------------------------ Root project 'multiProjectCustomBehavior' +--- Project ':businessRules' +--- Project ':databaseModel' \--- Project ':webfrontend' To see a list of the tasks of a project, run gradle <project-path>:tasks For example, try running gradle :businessRules:tasks |
...the code shown in the following snippet should be used to accomplish this goal.
Code Listing 89
/* Four closures are defined. */ Closure clbr = {task -> println "I am the task $task.name of project $task.project.name. I'm in charge of Business Rules."} Closure cldm = {task -> println "I am the task $task.name of project $task.project.name. I'm in charge of Database Model."} Closure clwf = {task -> println "I am the task $task.name of project $task.project.name. I'm in charge of Web Front End displaying."} Closure clroot = {task -> println "I am the task $task.name of project $task.project.name. I'm the entry point for all process."} /* Depending on the project's path, a different closure is assigned to the task hello. This produces a specific behavior for the same task, depending on which project is executed. */ allprojects.each {
project("$it.path") { switch (it.path) { case ":businessRules" : task hello << clbr ; break; case ":databaseModel" : task hello << cldm ; break; case ":webfrontend" : task hello << clwf ; break ; default: task hello << clroot; } } } |
The code assigns one of the four closures declared at the beginning of the build script to the hello task. This assignment depends on which project is being executed. The build script evaluates the name of the project using the path property of the project object, which is stored in the implicit it variable created by the each loop. A switch statement, which is placed within the curly braces of the project method, makes all comparisons needed to assign the proper closure to the task. In some way, the previous code uses the polymorphism ability of object-oriented programming.
If you execute the following command…
Code Listing 90
gradle hello |
…the output should look like the following figure.
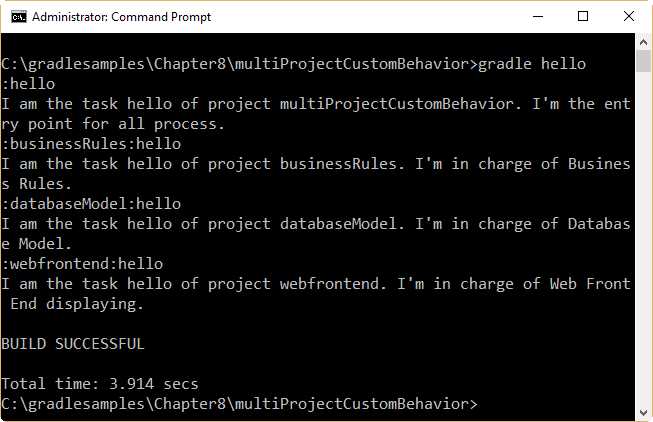
- Output for multiProjectCustomBehavior
Subproject configuration
The subprojects property
There’s also a way to access the subprojects only. This can be done by using the subprojects property. This property performs an iteration through the subprojects of the build only. The following code shows how to perform this iteration.
Code Listing 91
allprojects { task hello << {task -> println "I'm $task.project.name"} } subprojects { hello << {println " - and I depend on subProjectListing"} } |
The output for this build is shown in the following figure.
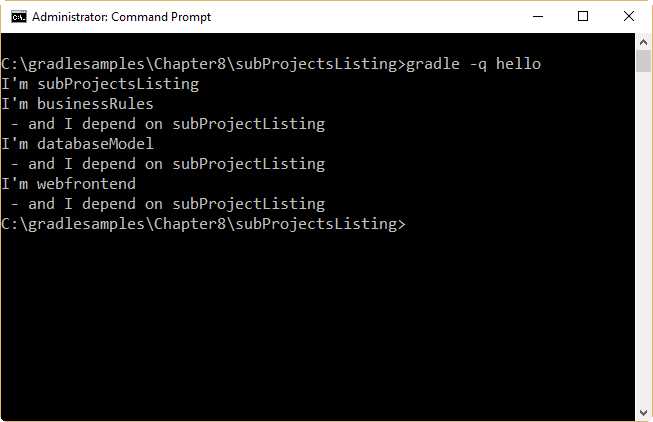
- SubProjectsListing output
The projects’ execution order can be determined by looking at the output displayed in Figure 41. First, at the configuration phase, the allprojects loop assigns the hello task to the root project and its dependents. When this action finishes, the subprojects loop assigns a new action for every hello task belonging to each one of them. Since allprojects assigned an action in the first place, the action added to each subproject will be executed after the first one assigned. Then, the execution phase produced the results shown in the figure.
Adding specific behavior to a given subproject
Like the allprojects property, subprojects has an each iteration, which allows users to access subprojects individually. This iteration can be useful if you want to add a specific behavior to any of the dependent subprojects.
Code Listing 92
allprojects { task hello << {task -> println "I'm $task.project.name"} } subprojects.each { project("$it.path").hello << { println " - and I depend on subProjectsBehavior" }
if (it.path == ":webfrontend") { project("$it.path").hello << { println " - and I manage Web User Interface, too." } } } |
This code is derived from the example discussed in the previous section. The each iteration for the subproject property is used in order to learn the name of each dependent subproject. The hello task for every subproject receives a closure, which displays the phrase “ - and I depend on subProjectsBehavior,” and when the :webfrontend subproject is evaluated, only its hello task receives a new closure, which displays the “- and I manage Web User Interface, too." statement.
When the following command is executed…
Code Listing 93
gradle -q hello |
…the following output will be displayed.
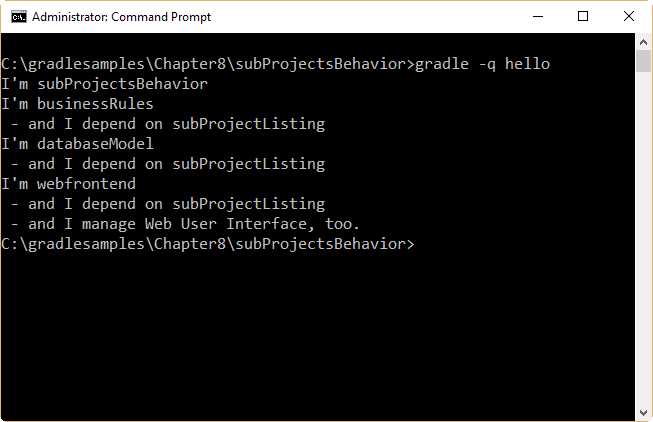
- Output for subProjectsBehavior build script
Adding specific behavior using build.gradle files
Another way to add specific behavior to a subproject is to create its own build.gradle build script file. Assuming a project structure like the following…
Code Listing 94
------------------------------------------------------------ Root project ------------------------------------------------------------ Root project 'subProjectsBehaviorV2' +--- Project ':businessRules' +--- Project ':databaseModel' \--- Project ':webfrontend' To see a list of the tasks of a project, run gradle <project-path>:tasks For example, try running gradle :businessRules:tasks |
…a build.gradle file will be created for every subproject.
Code Listing 95
/* businessRules\build.gradle */ hello.doLast { println " - and I'm in charge of Business Rules along the entire application." } |
Code Listing 96
/* databaseModel\build.gradle */ hello.doLast { println " - and I'm in charge of database management." } |
Code Listing 97
/* webfrontend\build.gradle */ hello.doLast { println " - and I'm in charge of Web Responsive User Interface." } |
Code Listing 98
/* build.gradle */ allprojects { task hello << {task -> println "I'm $task.project.name"} } subprojects.each { project("$it.path").hello << { println " - and I depend on subProjectsBehavior" } } |
The doLast method is used in every subproject build script. This method adds a closure for the hello task in each subproject, which will be executed after all previous closures assigned to the same task, in the build script of the root project. Remember, the root project is the first one evaluated in the configuration phase. Then, every subproject enters in configuration phase following the order established in the settings.gradle file. After that, every subproject’s build.file will enter configuration mode—that’s why the closure declared in each subproject’s build.gradle file is added at the end of the execution chain.
Even if the user has access to all subprojects from the root’s build script, it is recommended to put project-specific behavior in a separate build.gradle file for each subproject. This makes project maintenance less complex.
Now, running the following command…
Code Listing 99
gradle -q hello |
…the following output will be displayed.
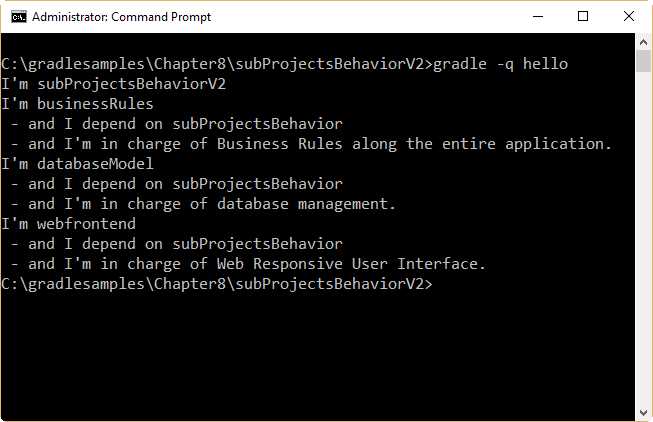
- Output for subProjectsBehaviorV2
Filtering by name
Another way to control a project’s behavior is by using the configure method in the build script of the root project. This method takes a list with a series of project objects as an argument. Then, the method applies the configuration to the projects in the list.
Code Listing 100
allprojects { task hello << {task -> println "I'm $task.project.name"} } subprojects.each { project("$it.path").hello << { println " - and I depend on subProjectsFiltering" } } configure(subprojects.findAll {it.name != 'zipPackage'}) { hello << {println " - and I'm part of the application."} } |
This code and the project structure for this build script are derived from the sample project of the previous section. The difference consists of a new subproject called zipPackage, which has its own build.gradle file, too.
The build.gradle file for the zipPackage project is displayed in the following code snippet.
Code Listing 101
/* zipPackage\build.gradle */ hello.doLast { println " - and I'm in charge of creating a ZIP file for the distribution package." } |
Once the following command is executed…
Code Listing 102
gradle -q hello |
…the output displayed is the following.
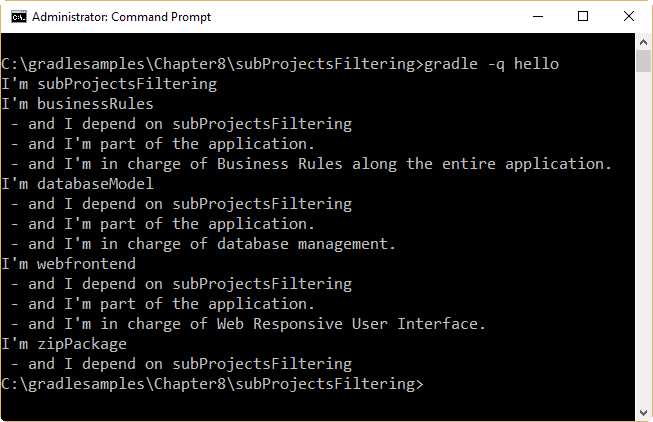
- Output for subProjectsFiltering
In Figure 44, you can see that the closure declared in zipPackage’s build script is not executed. Why? The configure method is responsible for that. Again, every subproject’s build script enters the configuration phase after the allprojects and subprojects methods are configured. But in this build script, the configure method has been declared. So, this method is in charge of dealing with configuration phases for all subprojects. The method receives a parameter, which is a list with all projects to be configured, and then executes the statements within the curly braces for each project in the list, before executing the statements contained in the project’s build.gradle file, if there are any.
The findAll method of the subprojects object creates a sublist with all the projects, which complies with the condition declared within the curly braces. In this case, the condition tells the findAll method that a project should be added to this sublist when it has a name different from zipPackage. Once the sublist is created, it is passed as a parameter to the configure method. Due to the condition specified to the findAll method, the zipPackage project is not included. Therefore, no configuration is applied to the project, and that includes the configuration of its own build.gradle file.
Filtering by properties
A filter can be established using extra project properties. To define an extra property, this one should be declared in the project’s build script with its name preceded by the keyword ext, followed by a dot. An extra property should look like this:
Code Listing 103
ext.software = true |
In the previous code, an extra property named software is declared, and the value of true is assigned to it.
Now, this extra property should be declared in all build scripts within the multi-project directory structure (the example of the previous section is going to be used, with a few changes). The value for this property will always be true, except for the zipPackage’s subproject, in which this property will contain a false value.
The build.gradle file for the root project should look like this:
Code Listing 104
allprojects { task hello << {task -> println "I'm $task.project.name"} } subprojects { hello { doLast {println " - and I depend on $rootProject.name"} } afterEvaluate {Project project -> if (project.software) { hello.doLast {println " - and I'm part of the application."} } } } |
In the previous code, when the subprojects method enters the configuration phase, a closure is added to the hello task of each subproject, one by one. This closure displays the name of the project on which the subproject depends, using the name property of the rootProject object. After that, the build.gradle file for the subproject is also configured, and the doLast method adds another closure to the hello task. Then, the afterEvaluate advice action is fired for each subproject that is being configured, passing the subproject object as a parameter. This advice action evaluates the software extended property declared for every project in the directory structure, and adds a closure to the hello task if the value for that property is true. The suggestion made for the zipPackage’s build script was to set the software property’s value to false. So, no closure will be added to zipPackage’s hello task by the afterEvaluate advice. Finally, Gradle enters into the execution phase.
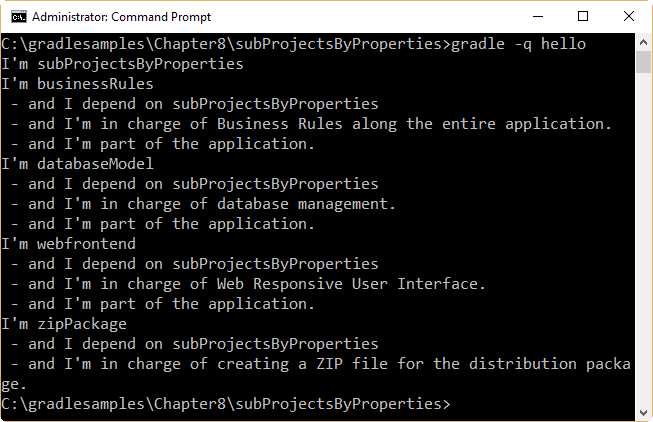
- Output for subProjectsByProperties example
Execution rules for multi-project builds
When the hello task from the root project directory is executed, an intuitive behavior happens automatically: all hello tasks of the different projects are executed. If the user switches to the databaseModel directory and executes…
Code Listing 105
gradle -q hello |
…the following output will be displayed.
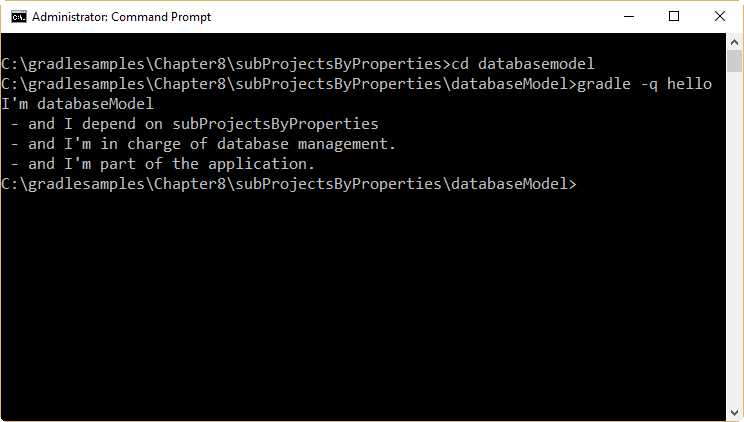
- Executing hello task from databaseModel directory
There’s a basic rule behind Gradle’s behavior. Gradle looks down the hierarchy, starting with the current directory, for all tasks with the name hello and executes them. One thing should be noted: Gradle always evaluates every project in the multi-project build, and creates all existing task objects. Then, Gradle filters the tasks that should be executed, according to the task name argument and the current directory. Every project has to be evaluated before any task gets executed.
A real-life Java example
The following example consists of a parent project that builds two Java applications, and then creates a distribution including the two applications.
Code Listing 106
defaultTasks 'build', 'copyDist', 'packageDistribution' allprojects { apply plugin: 'java' group = 'hello' version = '1.0' } project(':helloWorld').jar { manifest { attributes 'Specification-Title' : 'Gradle Succinctly' attributes 'Specification-Version' : '1.0' attributes 'Specification-Vendor' : 'Syncfusion, Inc.' attributes 'Implementation-Title' : 'hello.HelloWorld' attributes 'Implementation-Version' : 'build02' attributes 'Implementation-Vendor' : 'Syncfusion, Inc.' attributes 'Main-Class': 'hello.HelloWorld' } } project(':sendMessage').jar { manifest { attributes 'Specification-Title' : 'Gradle Succinctly' attributes 'Specification-Version' : '1.0' attributes 'Specification-Vendor' : 'Syncfusion, Inc.' attributes 'Implementation-Title' : 'hello.HelloWorld' attributes 'Implementation-Version' : 'build02' attributes 'Implementation-Vendor' : 'Syncfusion, Inc.' attributes 'Main-Class': 'hello.SendMessage' } } task copyDist(type: Copy) { into "$buildDir\\libs" subprojects { from tasks.withType(Jar) } } /* This task will be executed after the copyDist task and will create a zip file with the contents of the build\libs directory (the jar programs).
The zip file will be saved in the build\distributions folder, and will be named distPackage-1.0.zip */ task packageDistribution(type: Zip){ from 'build\\libs' baseName = 'distPackage' version = '1.0' } |
First, the build script declares three default tasks that will be executed in order, starting from the left. For the purposes of this example, the build task should be executed first. Then, the copyDist task will be executed after Gradle finishes building the two Java applications. This task will copy the two applications to the root project’s build\libs folder. Finally, the packageDistribution tasks will take the contents of the root project’s build\libs folder and create a compressed .zip file with the two applications. This file will be saved in the build\distributions folder of the root project.
In the previous example, the multi-project build consists of two subprojects: helloWorld and sendMessage. The allprojects method applies the Java plugin for all projects included in the build. It also assigns a version number (1.0) and a common group name for the two applications (hello). After that, the jar object is used for both projects in order to declare the application’s entry point and set the package information. When the user issues the gradle command with no task name, the build task is executed first. Then, when Java applications are built, the copyDist takes all artifacts of Jar type created by the build (in this case, the two Java applications) and copies them to the root project’s build\libs directory. Now, the packageDistribution task takes all files saved in the build\libs directory and creates a .zip compressed file in the root project’s build\distributions directory.
Chapter summary
In Gradle, a multi-project build consists of a root project, and one or more subprojects that may also have subprojects. In this case, all the projects are linked together.
A multi-project build should follow a consistent structure, which has a main directory known as the root project’s directory. Every subproject consists of a subdirectory within the root. A settings.gradle file and a build.gradle file should be in the project’s root directory. The settings.gradle file tells Gradle how the project and subprojects are structured.
Multi-project builds are still collections of tasks Gradle can run. The difference relies on the fact that the user may want to control which project’s tasks should be executed. The following options apply to a multi-project build execution:
- You can change to the directory that corresponds to the project you want to run, and then execute gradle <taskname> as usual.
- You can specify a qualified task name from the directory of the root project. For example, gradle :ftputils:build will build the fptutils subproject and any subprojects it depends on.
You can specify a task name that can be found in the root project, or in any subprojects it depends on, by issuing the gradle <taskname> command.
In a multi-project build, sometimes it is not necessary for the subprojects to have their own build.gradle file. That is, build scripts are optional in a multi-project build. Gradle provides in its API a property called allprojects, which returns a list with the current project and all its subprojects underneath it. If a closure is used when allprojects is called, all the statements of the closure are delegated to the projects associated with this property.
The allprojects.each iteration can be useful for assigning a different closure to a project, depending on its path.
There’s also a way to access the subprojects only. This can be done by using the subprojects property. Like the allprojects property, subprojects has an each iteration, which allows you to access subprojects individually.
Another way to add specific behavior to a subproject is by creating a build.gradle file in the subproject directory. Also, a project’s behavior can be controlled using the configure method in the build script of the root project. This method takes a list with a series of project objects as an argument. Then, the method applies the configuration to the projects in the list.
A filter for the subprojects can be established using extra properties. To define an extra property, it should be declared in the project’s build script with its name preceded by the keyword ext followed by a dot (for example, ext.software).
When a task from the root project directory is executed, an intuitive behavior happens automatically: all tasks of the different projects with the same task name are executed. There’s a basic rule behind Gradle’s behavior. Gradle looks down the hierarchy, starting with the current directory, for all tasks with the same name and executes them. It should be noted that Gradle always evaluates every project in the multi-project build, and creates all existing task objects. Then, Gradle filters the tasks that should be executed according to the task name argument and the current directory. Every project has to be evaluated before any task gets executed.
- 1800+ high-performance UI components.
- Includes popular controls such as Grid, Chart, Scheduler, and more.
- 24x5 unlimited support by developers.