
Gradle Succinctly®

CHAPTER 6
More on Writing Build Scripts
Using a different build script file
So far, every build script has been saved in a file named build.gradle, and each time Gradle was executed, it looked for this file by default.
A build script can be saved in a file with different name, however. For the next example, another.bld will be used as the filename.
Code Listing 50
task emptyTask << { } task DisplayTasks << { tasks.each { println "Task name is ${it.name}" } } |
This example displays the names of all tasks that are present in the build. The following command is used to execute the build script.
Code Listing 51
gradle -b another.bld DisplayTasks |
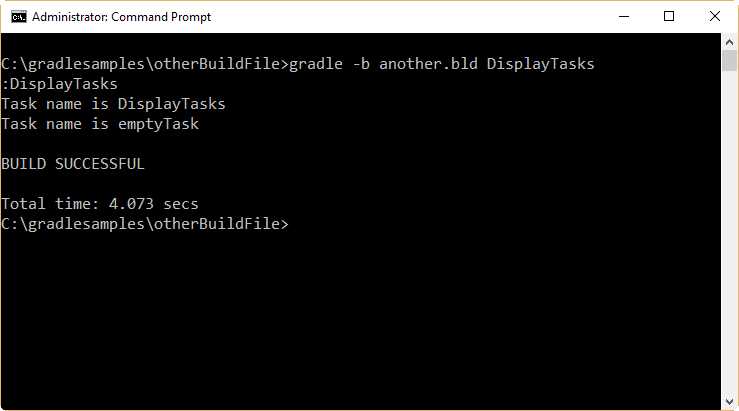
- Output for DisplayTasks example
Specifying a default task
Build scripts allow you to specify a series of default tasks, which will be executed if no task is specified in the command line (when the user calls gradle).
Code Listing 52
defaultTasks 'DisplayTasks' task emptyTask << { } task DisplayTasks << { tasks.each { println "Task name is ${it.name}" } } |
The previous code defines DisplayTasks as the default task. Assuming that the build script is saved in the build.gradle file, if the user executes gradle in the following way, DisplayTasks will be executed automatically, because no task name was specified in the command line.
Code Listing 53
gradle |
Another way defaultTasks can be used is displayed in the following sample.
Code Listing 54
/* A list of default tasks is supplied. Each task will be executed in order, starting from the left. */ defaultTasks 'SetEnvironment','extractDatabase','ResetEnvironment' task SetEnvironment << { println 'Setting operating system environment' } task extractMetadata << { println 'Extacting metadata.' } task extractData << { println 'Extracting database data.' } task extractDatabase << {
} task ResetEnvironment << { println 'Resetting operating system environment' } /* Code that will be executed after extractDatabase action ends. */ extractDatabase << { println 'Zipping extracted data to backupdata.zip' } extractDatabase << { println 'Closing database connection.' } /* extractDatabase will depend on extractData and extractMetadata. */ /* extractData is executed first, then extractMetadata will be executed. */ extractDatabase { dependsOn extractData, extractMetadata } /* Code that will be executed before extractData task action begins is set up at configuration phase. */ extractData { doFirst { println 'Connecting to the database.' } doFirst { println 'Setting up database connection.' } } |
The previous code sets three tasks as default tasks. It will be assumed that the code is saved in a file named severaldefaults.gradle, so when this build script is called with the following command, SetEnvironment, extractDatabase, and ResetEnvironment will be executed, in that order.
Code Listing 55
gradle -b severaldefaults.gradle |
Taking a Java quick start
At this point, it has been stated that Gradle is a general-purpose build tool. It can build anything you want to implement in a build script. But, simply out-of-the-box, Gradle doesn’t build anything unless you add code to the build script to do so.
This section is intended to explain how to build a Java program. Most Java projects are pretty similar: a set of Java source files needs to be compiled, some unit tests need to be run, and a .jar file needs to be created to contain all classes. Coding all these steps for every project could be annoying, and could result in a huge waste of time. Fortunately, Gradle solves this problem with the use of the Java plugin. A plugin is an extension to Gradle that configures the project in some way, typically by adding some preconfigured tasks that together do something useful.
To use the Java plugin, a series of conventions must be used. That means that the plugin defines default values for many aspects of the project. These aspects include Java sources, production resources, and tests location. Following these conventions in a project, you don’t need to do much in the build script to get a useful build.
Creating a Java project
To create a Java project in Gradle, the Java plugin needs to be applied in the build script, such as in the following example.
Code Listing 56
apply plugin: 'java' |
The previous code is all you need to define a Java project. The Java plugin will be applied to the project, and will add a number of tasks to it.
Project layout
The Java plugin is convention based. This was explained in the “Taking a Java quick start” section of this chapter. So, the Java plugin assumes a certain layout for the project. This layout is shown in the following table.
Table 2: Java plugin project layout
Directory | Meaning |
|---|---|
src\main\java | Production Java source code |
src\main\resources | Production resources |
src\test\java | Test Java source |
src\test\resources | Test resources |
When the build script ends its execution, the result of the build is saved in a directory named build. This directory contains the following relevant subdirectories.
Table 3: Build directory subdirectories
Subdirectory | Meaning |
|---|---|
build\classes | Contains the compiled .class files. |
build\libs | Contains the .jar or .war files created by the build. |
Creating Java code
In order to build the Java project, a subdirectory named hello should be created in the src\main\java directory. Next, the file HelloWorld.java should be saved with the following code.
Code Listing 57
package hello; public class HelloWorld { public static void main(String[] args){ System.out.println("Hello World!"); } } |
Now, the following command will build the Java executable .jar file in the build\libs directory. The file will be saved as javaProgram.jar.
Code Listing 58
gradle build |
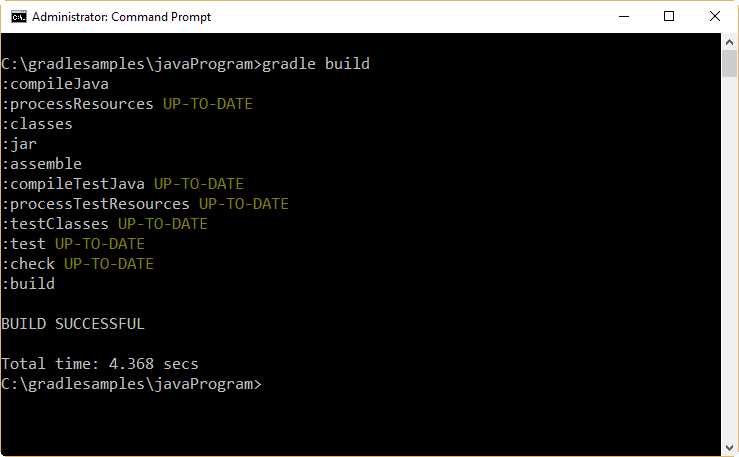
- Build task output
Running javaProgram.jar with the following command...
Code Listing 59
java -jar build\libs\javaProgram.jar |
...will display the following output.
Code Listing 60
no main manifest attribute, in build\libs\javaProgram.jar |
This problem is the result of not configuring the main class of the .jar file. This main class can be configured in a file known as the manifest file.
Configuring the main class of a .jar file
The Java plugin exposes a jar task into the project. Every jar object has a manifest property, which is an instance of the manifest class. A detailed explanation for these classes is out of the scope of this book, but in this section, we will explain how to use the jar object to configure the main class for the .jar executable.
The attributes method of the manifest instance is used to set the entry point of an application. This can be accomplished by using a map that contains key-value pairs, and these attributes will be added to the manifest file. The value of the Main-Class attribute must be set with the name of the class, which acts as the entry point of the program. The changes to the build.gradle file should look like this.
Code Listing 61
apply plugin: 'java' jar { manifest { attributes 'Main-Class': 'hello.HelloWorld' } } |
A new .jar file will be created by issuing the gradle build command. After that, the user can run the .jar file. The output displayed by the program is shown in the following figure.
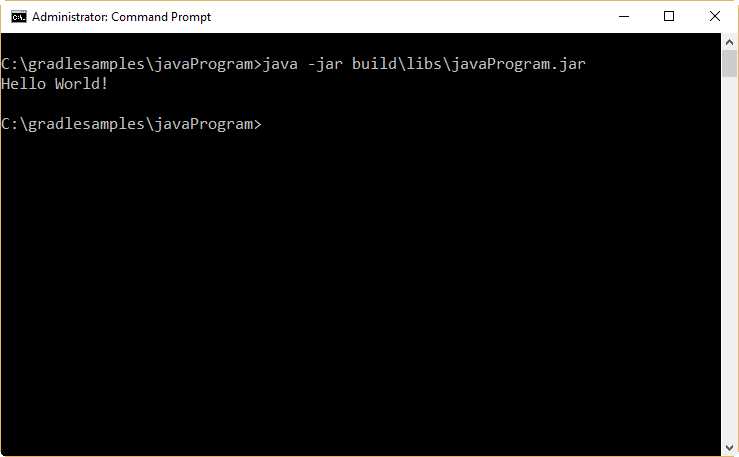
- The Hello World class in action
Learning about the tasks of a Java project
The Java plugin adds many tasks to the build. The most relevant tasks for the purposes of this book are the following:
- The assemble task: compiles the source code of the application and packages it into a .jar file, but doesn’t run the unit tests.
- The build task: performs a full build of the project, including code compilation, unit tests and .jar file packaging.
- The clean task: deletes the build directory.
- The compileJava task: compiles the source code of the project.
- The check task: compiles and tests the code.
It’s a good idea to get an overview of the project without reading the build script. To do so, the following command should be used.
Code Listing 62
gradle tasks |
The output should look like this.
Code Listing 63
:tasks ------------------------------------------------------------ All tasks runnable from root project ------------------------------------------------------------ Build tasks ----------- assemble - Assembles the outputs of this project. build - Assembles and tests this project. buildDependents - Assembles and tests this project and all projects that depend on it. buildNeeded - Assembles and tests this project and all projects it depends on. classes - Assembles main classes. clean - Deletes the build directory. jar - Assembles a jar archive containing the main classes. testClasses - Assembles test classes. Build Setup tasks ----------------- init - Initializes a new Gradle build. [incubating] wrapper - Generates Gradle wrapper files. [incubating] Documentation tasks ------------------- javadoc - Generates Javadoc API documentation for the main source code. Help tasks ---------- buildEnvironment - Displays all buildscript dependencies declared in root project 'javaProgramv2'. components - Displays the components produced by root project 'javaProgramv2'. [incubating] dependencies - Displays all dependencies declared in root project 'javaProgramv2'. dependencyInsight - Displays the insight into a specific dependency in root project 'javaProgramv2'. help - Displays a help message. model - Displays the configuration model of root project 'javaProgramv2'. [incubating] projects - Displays the sub-projects of root project 'javaProgramv2'. properties - Displays the properties of root project 'javaProgramv2'. tasks - Displays the tasks runnable from root project 'javaProgramv2'. Verification tasks ------------------ check - Runs all checks. test - Runs the unit tests. Rules ----- Pattern: clean<TaskName>: Cleans the output files of a task. Pattern: build<ConfigurationName>: Assembles the artifacts of a configuration. Pattern: upload<ConfigurationName>: Assembles and uploads the artifacts belonging to a configuration. To see all tasks and more detail, run gradle tasks --all To see more detail about a task, run gradle help --task <task> BUILD SUCCESSFUL Total time: 4.637 secs |
The previous example shows the full list of runnable tasks and their descriptions. As can be seen at the bottom of the previous example, if the user needs more detailed information about a particular task, the following command should be used.
Code Listing 64
gradle help --task <task> Where <task> is the name of the task to be inquired. |
The following example gets detailed information about the clean task.
Code Listing 65
gradle help --task clean |
The output should look like this.
Code Listing 66
:help Detailed task information for clean Path :clean Type Delete (org.gradle.api.tasks.Delete) Description Deletes the build directory. Group build BUILD SUCCESSFUL Total time: 3.652 secs |
The attributes displayed for a task by the help command are the following:
- Path: the task’s path (as discussed in the “Properties of DefaultTask” section in Chapter 5).
- Type: the task type (as discussed in the “About task types” section in Chapter 5).
- Description: a brief description about the purpose of the task.
- Group: the name of the group to which the task belongs (in the example, the clean task is part of the build group).
Setting package version information for the project
Sometimes, the user may need to include package version information in the build. This can be accomplished by setting a set of headers, using the manifest method of the jar object. These headers are summarized in the following table.
Table 4: Headers in the manifest file
Header | Definition |
|---|---|
Name | The name of the package. |
Specification-Title | The title for describing the package. |
Specification-Version | The version number of the package. |
Specification-Vendor | The vendor name. |
Implementation-Title | The title of the implementation that is being packaged. |
Implementation-Version | The build number of the implementation. |
Implementation-Vendor | The vendor of the implementation. |
The build script should look like the following example.
Code Listing 67
apply plugin: 'java' jar { manifest { attributes 'Specification-Title' : 'Gradle Succinctly' attributes 'Specification-Version' : '1.0' attributes 'Specification-Vendor' : 'Syncfusion, Inc.' attributes 'Implementation-Title' : 'hello.HelloWorld' attributes 'Implementation-Version' : 'build02' attributes 'Implementation-Vendor' : 'Syncfusion, Inc.' attributes 'Main-Class': 'hello.HelloWorld' } } |
The .jar file can be built as usual. But now, the manifest file will have all package information after the build process.
Creating a distribution for being shipped
The following build script will create a .zip file from the jar program, in order to be shipped to any customer.
Code Listing 68
/* Declaring default tasks will ensure the zip packaging after the build. */ defaultTasks 'build', 'packageDistribution' /* Execute gradle with no tasks, in order to succeed. */ apply plugin: 'java' /* Adding the needed attributes to the manifest file. */ jar { manifest { attributes 'Specification-Title' : 'Gradle Succinctly' attributes 'Specification-Version' : '1.0' attributes 'Specification-Vendor' : 'Syncfusion, Inc.' attributes 'Implementation-Title' : 'hello.HelloWorld' attributes 'Implementation-Version' : 'build02' attributes 'Implementation-Vendor' : 'Syncfusion, Inc.' attributes 'Main-Class': 'hello.HelloWorld' } } /* This task will be executed after the build task and will create a zip file with the contents of the build\libs directory (the jar program).
The zip file will be saved in the build\distributions folder, and will be named distPackage-1.0.zip */ task packageDistribution(type: Zip){ from 'build\\libs' baseName = 'distPackage' version = '1.0' } |
This build script takes advantage of defaultTasks and the Zip task type, in order to create a distribution package in a .zip compressed format.
As explained within the code, issuing the gradle command with no task name will automatically execute all tasks declared by the defaultTasks statement. In this case, the build task will be executed first, and after the build process ends, the packageDistribution task will create the .zip file with the jar program in it.
Chapter summary
This chapter has gone beyond the simple build.gradle file used for saving build scripts. Different names can be used for a build script file, and you can look for this named file by using the -b option from the command line.
You can also execute a build script without specifying a task name. In this case, the use of the defaultTasks statement allows you to indicate which tasks, given in a quoted and comma-separated list, are going to be executed. The order of execution is always from left to right.
In order to demonstrate that Gradle can build something, the rest of the chapter describes how to create a Java project using the java plugin. A plugin is an extension to Gradle that configures the project in some way, typically by adding some pre-configured tasks.
The Java plugin is convention-based. That means that the plugin defines default values for many aspects of the project, including Java sources, production resources, and tests location.
For creating a Java project, a specific directory layout must exist within the project’s directory, since Gradle searches for that layout during the build process. All results of a build are saved in the build directory. This directory is created automatically if it doesn’t exist.
The relevant tasks added by the Java plugin, for the purposes of this book, are: assemble, clean, compileJava, build, and check. Assemble compiles Java code and creates the .jar executable file, but doesn’t run the unit tests; clean deletes the build directory; compileJava compiles the Java code only; build performs a full build for the project, including code compilation, unit tests, and .jar packaging; and check compiles and tests the code.
A Java project built with Gradle needs to be configured around which class is going to be the entry point for the application. The Java plugin exposes a jar task into the project, which has manifest property. The attributes method of this property is used to set the entry point by assigning to the Main-class attribute of this method the name of the class that will act as the entry point.
The manifest property can also be used to add detailed information about a jar package. The attributes that can hold this information are Name, Specification-Title, Specification-Title, Specification-Version, Specification-Vendor, Implementation-Title, Implementation-Version, and Implementation-Vendor.
A build script can take advantage of the defaultTasks statement and the Zip task type in order to create a .zip distribution package automatically, after the build process.
- 1800+ high-performance UI components.
- Includes popular controls such as Grid, Chart, Scheduler, and more.
- 24x5 unlimited support by developers.