
Gradle Succinctly®

CHAPTER 4
Build Script Basics
Project and task: the two basic concepts in Gradle
Everything in Gradle sits on top of two basic concepts: projects and tasks. A project is a collection of tasks, and each task performs some actions, such as compiling classes, or running unit tests. From now on, each folder containing the Gradle examples discussed in this book will be considered a project container.
Project lifecycle
A build.gradle file has a one-to-one relationship with a project. Every time a build script is executed, Gradle assembles a project object for each project that will participate in the build at build initialization. The project object is assembled in the following order:
- Create a Settings instance for the build.
- Evaluate the settings.gradle script, if present, against the Settings object to configure it.
- Use the configured Settings object to create the hierarchy of Project instances.
- Finally, each project is evaluated by executing its build.gradle file, if present, against the project. Every project in a build project is evaluated before its child projects.
Once these steps are complete, the build ends, and two folders named build and .gradle can be found as a result of the process.
Tasks
A task is considered the fundamental unit of build activity, and represents a basic piece of work that is performed by a build. This might be compiling some classes, creating a .jar file, generating Javadoc, or storing some archives to a repository.
This chapter will focus on a simple tasks definition for a one-project build. Multi-project builds and more about tasks will be discussed in later chapters.
Build scripts are Groovy code
As mentioned in Chapter 1, Gradle’s build scripts are based on Groovy code, so the user can take advantage of the full power of Groovy. The following sample demonstrates that.
Code Listing 16
task upper << { String someString = 'I am Gradle' println "Original: " + someString println "Upper case: " + someString.toUpperCase() } |
To execute this code, create a folder named groovysample in C:\gradlesamples. After that, save a build.gradle file with the code in the groovysample folder. The result of the build is shown in the following figure.
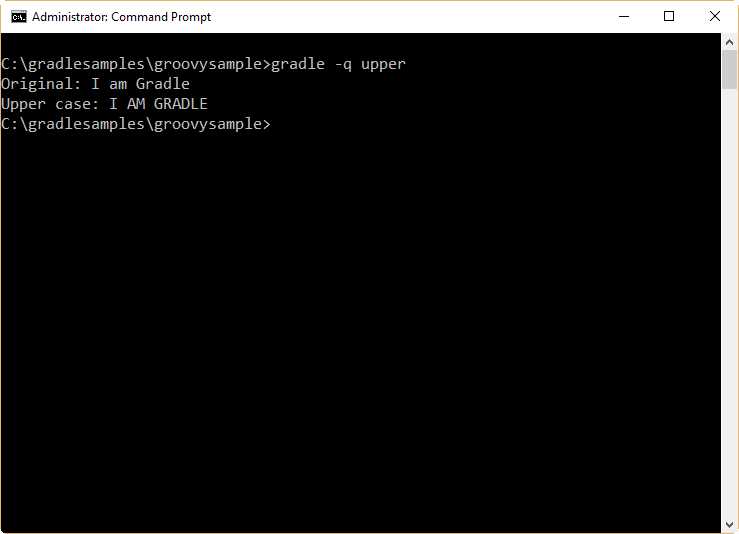
- Groovy sample output
Another sample can use the Groovy times loop. The code for the build.gradle file should be created in a folder named C:\gradlesamples\groovysamplev2.
Code Listing 17
task count << { 6.times { print "$it " } println '' } |
The result of the previous build is displayed in the following figure.

- Groovy times loop sample output
Task dependencies
Gradle allows you to declare tasks that depend on other tasks. This can be done by using the dependsOn: clause after the task name, and placing the name of the dependent task after the declaration. The following build script shows an example.
Code Listing 18
task firstTask << { println 'First Task.' } task secondTask(dependsOn: 'firstTask') << { println 'Second Task.' } task thirdTask(dependsOn: 'secondTask') << { println 'Third task.' } |
This example shows three tasks, two of which (secondTask and thirdTask) have dependencies declared. In this case, secondTask depends on firstTask to be executed before it, and thirdTask depends on secondTask to be executed first. The output for the build is displayed in the following figure.
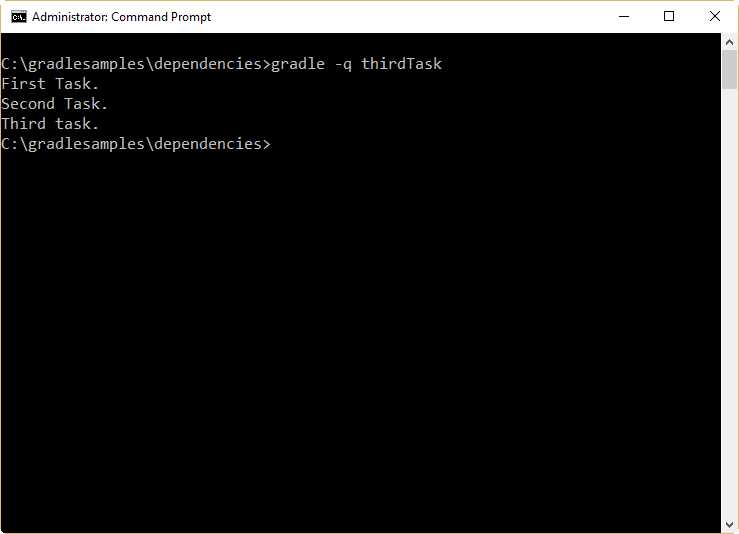
- Dependencies sample output
Dependencies can be declared with no strict order. Thus, the following code works in the same way as the example discussed at the beginning of this section.
Code Listing 19
task secondTask(dependsOn: 'firstTask') << { println 'Second Task.' } task thirdTask(dependsOn: 'secondTask') << { println 'Third task.' } task firstTask << { println 'First Task.' } |
Dynamic tasks
Due to the power of Groovy, Gradle allows you to create tasks dynamically. The following code illustrates this capability, using the Groovy times loop statement.
Code Listing 20
9.times { index -> task "task$index" << { println "I'm the task number $index" } } |
In this case, the times statement creates a loop that will iterate nine times. The index variable receives the iteration number (between 0 and 8) every time a loop iteration is executed, and a task is created within the loop. The name for each task is formed by the word task and the number stored in the index variable. So, the tasks created are task0, task1, task2, and so on.
Now, this build script can be executed by calling a task with a number between 0 and 8 (for example, task6). The output for the build script is presented in the following figure.

- Dynamic tasks example output
Task manipulation
Tasks can be accessed using an API after they’re created. The following example adds dependencies to a task at runtime.
Code Listing 21
5.times { index -> task "task$index" << { println "I'm the task number $index" } } task0.dependsOn task2, task3 |
In the previous example, the dependencies for task0 are declared using the dependsOn method, which is part of the task0 object. Task objects will be discussed later in this book. The output for this code should look like this:
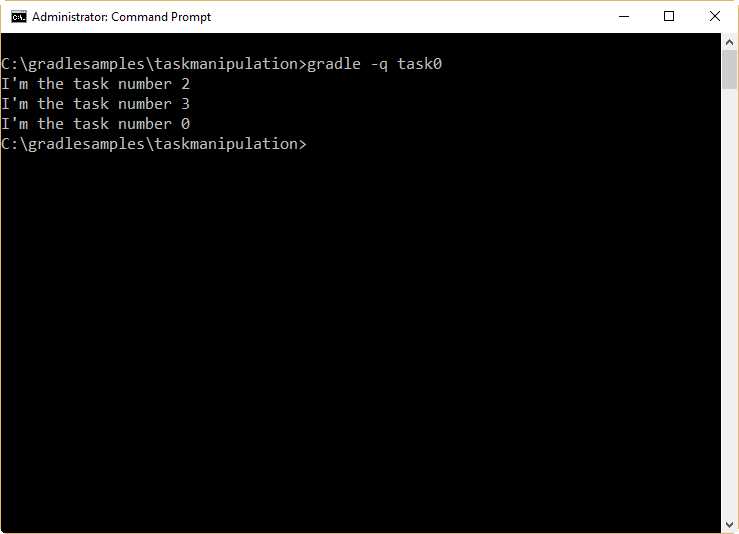
- Task manipulation example output
Chapter summary
Everything in Gradle sits on top of two basic concepts: projects and tasks. A project is a collection of tasks, and each task performs some actions, such as compiling classes or running unit tests.
A build.gradle file has a one-to-one relationship with a project. Every time a build script is executed, Gradle assembles a Project object in the build
A task is considered the fundamental unit of build activity, and represents a basic piece of work that is performed by a build. This might be compiling some classes, creating a .jar file, generating Javadoc, or storing some archives to a repository.
Gradle allows you to declare tasks that depend on other tasks. This can be done by using the dependsOn: clause after the task name, and placing the name of the dependent task after the declaration. Dependencies can be declared with no strict order.
Since Gradle’s build scripts are based on Groovy code, you can take advantage of the full power of the Groovy language. This can be useful for creating tasks dynamically, or for task manipulation at runtime.
- 1800+ high-performance UI components.
- Includes popular controls such as Grid, Chart, Scheduler, and more.
- 24x5 unlimited support by developers.