
Gradle Succinctly®

CHAPTER 3
Beginning with Gradle
The ever-present Hello World
The first meeting with Gradle will take place by creating and running the traditional Hello World file. To do this, type the following sample using a text editor.
Code Listing 2
task helloworld << { println 'hello, world' } |
Now, to run the previous code, the user needs to save the file, naming it build.gradle. For the purposes of this book, all samples will be saved in a folder called C:\gradlesamples, and there will be a subfolder within for each one of the samples. For this case, a subfolder named helloworld will be created to store the file.
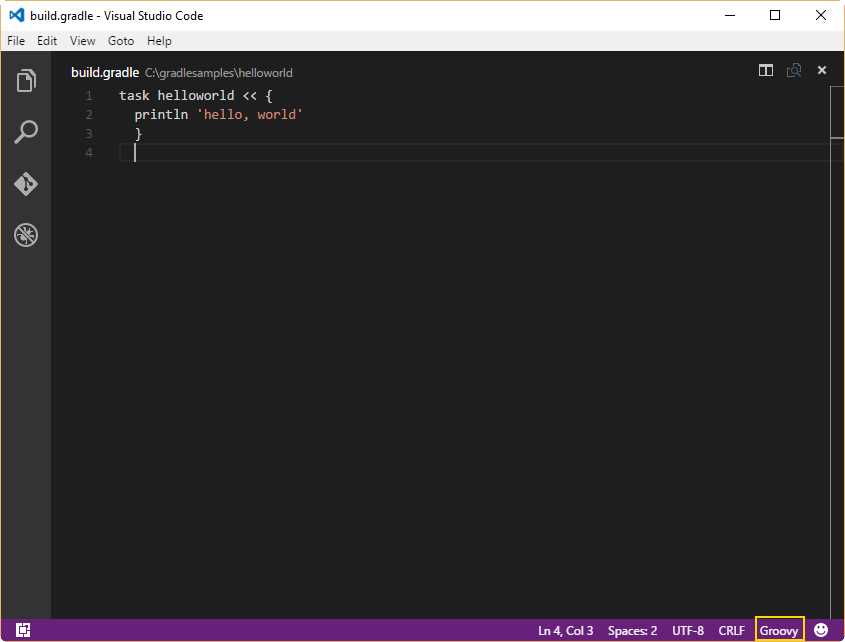
- The file C:\gradlesamples\helloworld\build.gradle being edited with Visual Studio Code
The previously mentioned file is known as a build script, and it is the container for all Gradle build statements. As mentioned in Chapter 1, all these statements correspond to the Groovy language. This can be noticed in the highlighted area of Figure 8.
In this example, the build script doesn’t do much, other than printing out a sample message. To run the Hello World sample, open a command prompt window and get into the C:\gradlesamples\helloworld folder. After that, issue the following command.
Code Listing 3
gradle -q helloworld |
The output produced by this command is shown in the following figure.
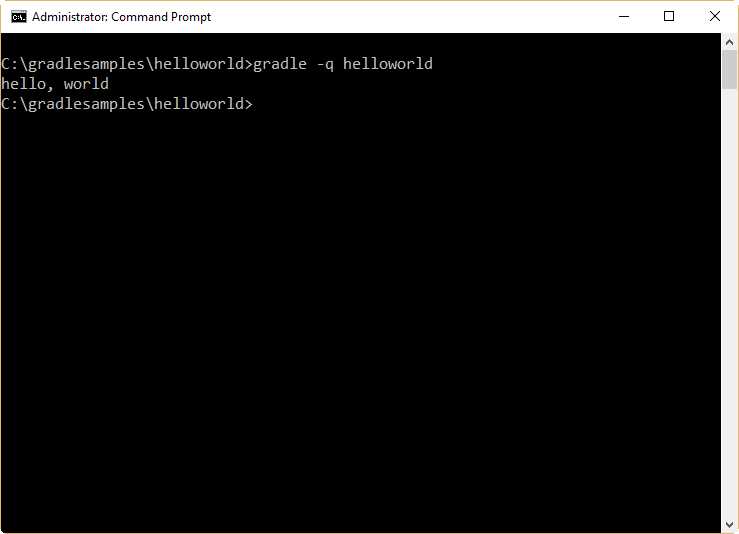
- Output for Hello World sample
Build scripts and builds
For the purposes of this book, build scripts will refer to every build.gradle file used in the examples, and build will mean the execution process of those scripts.
Going a little further with Hello World
Looking into the Hello World example, you can see that the first line of code starts with a task statement. This statement will be explained in detail later in this book. For now, it’s enough to know that task is one of the two basic concepts on which Gradle sits.
For the next example, you need to create a folder called helloworldv2. Then, the file build.gradle will be created in this folder with the following code.
Code Listing 4
// hello world v2 task hello << { print 'hello, ' } task world(dependsOn: hello) << { println 'world' } |
To run this build script, execute the second task (world) by issuing the following command.
Code Listing 5
gradle -q world |
The output is similar to the first example. The difference is that two tasks are executed to produce the same output.
When the world task is executed, the dependsOn statement (declared within the parentheses) tells Gradle that a task named hello should be executed before the world task. Then, the hello task produces the “hello” output. The print command leaves the cursor in the same line, after the white space position. Now, the world task is executed producing the “world” output and a line feed, followed by a carriage return.
The dependsOn statement declared in the code means that dependencies are being used for this build script. Dependencies will be explained in more detail later in this book.
Using the Gradle command line
The previous examples have been executed from a command prompt window. In other words, the gradle command line was used to run these build scripts. The gradle command line will be used in this book, and the options needed to be productive right away are explained in the following table.
Table 1: Gradle Command Line Options
Option | Description |
|---|---|
--help or -h | Displays the help messages, which describe all command-line options. |
--info or -i | Sets the Gradle log level to INFO, which causes a few more information messages to be displayed during the build script execution. |
-Dproperty=value | Defines a system property; this is a mechanism for passing parameters into a build from the command line. |
--debug or -d | Turns on debug logging for the build script. This generates a lot of output, but can be quite useful for troubleshooting build problems. |
--dry-run or -m | Evaluates and runs the build script, but does not execute any task actions. |
--quiet or -q | Supresses most output, showing error messages only. |
--gui | Launches the Gradle GUI. |
properties | Displays all the properties of the build’s Project object. The Project object represents the structure and state of the current build. |
tasks --all | Displays a list of all tasks available in the current build script. Plugins may introduce tasks of their own, so this list may be longer. |
--profile | Writes a report that contains timing information about build script execution. |
Displaying help messages
To show all help text associated with command-line options, issue the following command.
Code Listing 6
gradle -h |
The output should look like this:
Code Listing 7
USAGE: gradle [option...] [task...] -?, -h, --help Shows this help message. -a, --no-rebuild Do not rebuild project dependencies. -b, --build-file Specifies the build file. -c, --settings-file Specifies the settings file. --configure-on-demand Only relevant projects are configured in this build run. This means faster build for large multi-project builds. [incubating] --console Specifies which type of console output to generate. Values are 'plain', 'auto' (default) or 'rich'. --continue Continues task execution after a task failure. -D, --system-prop Set system property of the JVM (e.g. -Dmyprop=myvalue). -d, --debug Log in debug mode (includes normal stacktrace). --daemon Uses the Gradle daemon to run the build. Starts the daemon if not running. --foreground Starts the Gradle daemon in the foreground. [incubating] -g, --gradle-user-home Specifies the gradle user home directory. --gui Launches the Gradle GUI. -I, --init-script Specifies an initialization script. -i, --info Set log level to info. -m, --dry-run Runs the builds with all task actions disabled. --max-workers Configure the number of concurrent workers Gradle is allowed to use. [incubating] --no-color Do not use color in the console output. [deprecated - use --console=plain instead] --no-daemon Do not use the Gradle daemon to run the build. --offline The build should operate without accessing network resources. -P, --project-prop Set project property for the build script (e.g. -Pmyprop=myvalue). -p, --project-dir Specifies the start directory for Gradle. Defaults to current directory. --parallel Build projects in parallel. Gradle will attempt to determine the optimal number of executor threads to use. [incubating] --parallel-threads Build projects in parallel, using the specified number of executor threads. [deprecated - Please use --parallel, optionally in conjunction with --max-workers.] [incubating] --profile Profiles build execution time and generates a report in the <build_dir>/reports/profile directory. --project-cache-dir Specifies the project-specific cache directory. Defaults to .gradle in the root project directory. -q, --quiet Log errors only. --recompile-scripts Force build script recompiling. --refresh-dependencies Refresh the state of dependencies. --rerun-tasks Ignore previously cached task results. -S, --full-stacktrace Print out the full (very verbose) stacktrace for all exceptions. -s, --stacktrace Print out the stacktrace for all exceptions. --stop Stops the Gradle daemon if it is running. -t, --continuous Enables continuous build. Gradle does not exit and will re-execute tasks when task file inputs change. [incubating] -u, --no-search-upward Don't search in parent folders for a settings.gradle file. -v, --version Print version info. -x, --exclude-task Specify a task to be excluded from execution. |
Making it a little bit easier: task-name abbreviation
When tasks are specified in the command line, the user doesn’t have to type the full name of those tasks. It’s enough to provide a portion of the task name, which uniquely identifies this task within the build script.
For the helloworldv2 example, the following command can be used to run the build script.
Code Listing 8
gradle -q wo |
If the abbreviation is not unique within the build script, Gradle will throw a warning. For example, consider a build script like the following.
Code Listing 9
task helloTask << { println 'helloTask output' }
task hello << { print 'hello, ' } task world(dependsOn: hello) << { println 'world' } |
If the user executes the following command.
Code Listing 10
gradle -q h |
Gradle will throw the following output.
Code Listing 11
FAILURE: Build failed with an exception. * What went wrong: Task 'h' is ambiguous in root project 'helloworldv2'. Candidates are: 'hello', 'help'. * Try: Run gradle tasks to get a list of available tasks. Run with --stacktrace option to get the stack trace. Run with --info or --debug option to get more log output. |
Tip: It’s useful to name tasks in order to take advantage of task abbreviation.
Listing the tasks for a build script
You can get a report for all the tasks belonging to the build script, by executing the following command.
Code Listing 12
gradle -q tasks --all |
The output should look like the following.
Code Listing 13
------------------------------------------------------------ All tasks runnable from root project ------------------------------------------------------------ Build Setup tasks ----------------- init - Initializes a new Gradle build. [incubating] wrapper - Generates Gradle wrapper files. [incubating] Help tasks ---------- buildEnvironment - Displays all buildscript dependencies declared in root project 'helloworldv2'. components - Displays the components produced by root project 'helloworldv2'. [incubating] dependencies - Displays all dependencies declared in root project 'helloworldv2'. dependencyInsight - Displays the insight into a specific dependency in root project 'helloworldv2'. help - Displays a help message. model - Displays the configuration model of root project 'helloworldv2'. [incubating] projects - Displays the sub-projects of root project 'helloworldv2'. properties - Displays the properties of root project 'helloworldv2'. tasks - Displays the tasks runnable from root project 'helloworldv2'. Other tasks ----------- helloTask world hello |
Getting detailed information about tasks
You can get detailed information about a specific task by using the help option combined with the --task switch. To get information about the task world of of the helloworldv2 example, execute the following command.
Code Listing 14
gradle help --task world |
The output for this command should be the following.
Code Listing 15
:help Detailed task information for world Path :world Type Task (org.gradle.api.Task) Description - Group - BUILD SUCCESSFUL Total time: 2.863 secs |
Getting a profile for the build script
The --profile command-line option allows you to get a report with information about the build. This report is written into the build\reports\profile folder. The report will be named using the date and time when the build script was run, and will be saved in HTML format.
This report lists summary times and detailed information for both the configuration phase and task execution. All operations are sorted, with the most expensive operation (in terms of consuming time) first. The results also indicate if any tasks were skipped, and the reason why this happened, and if tasks that were not skipped didn’t work.
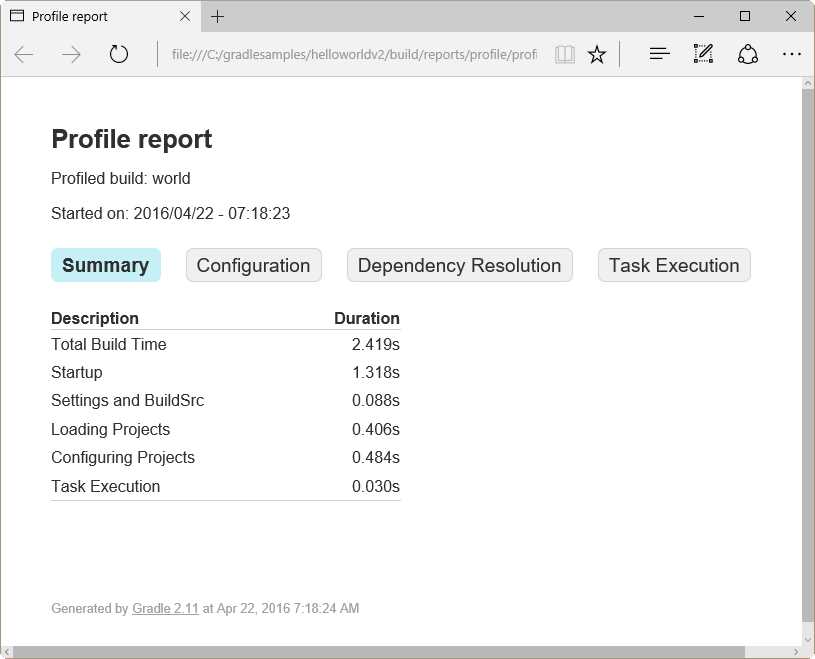
- Profile report example for helloworldv2 build script
Chapter summary
This chapter has shown how to begin using Gradle. The traditional Hello World sample was used to understand the basic working concepts.
For the purposes of this book, all samples will be saved in a folder called C:\gradlesamples, and a subfolder for each example will be created within. For the Hello World sample, a subfolder named helloworld will be created, and a file named build.gradle will be created in the subfolder. This file is known as a build script, and it is the container for all Gradle build statements, which are Groovy language statements.
The first line of code for the build.gradle file starts with a task statement. Task is one of the two basic concepts on which Gradle sits.
A build script can contain several tasks, and a task can depend on another one to be executed. This can be accomplished by using the dependsOn clause in a task declaration, within parentheses. A declaration such as task world(dependsOn: hello) tells Gradle that a task named hello must be executed prior the task named world.
The gradle command line will be used throughout this book. There are options included that can be used to be productive right away. For example, the -h option is used to display all help text associated with command-line options, the tasks --all option is used to get a report of all tasks in the build script, the help --task option is used to get detailed information about a task, and the --profile option generates a report about build execution.
You don’t have to type the full name of a task when executing it from the command-line—Gradle allows you to provide a portion of the task name, which uniquely identifies the task within the build script. This mechanism is known as abbreviation. It’s recommended to name tasks in a way that avoids ambiguous references when using abbreviations, because Gradle will throw a warning during build if this happens.
- 1800+ high-performance UI components.
- Includes popular controls such as Grid, Chart, Scheduler, and more.
- 24x5 unlimited support by developers.