
Google Maps API Succinctly®

CHAPTER 3
Customizing the Map Controls
At the end of the previous chapter, we showed you how your Google Maps API applications include the MapTypeControl by default, which allows users to select different base maps at runtime. We also demonstrated how you can hide this control if you don’t want users to have this option by disabling it within the map options object. In this chapter, we’ll have a look at some of the other controls that Google provides, and how you can hide, show, and change how they are displayed.
The default map controls
If you don’t configure your application otherwise, the controls shown in Figure 10 are included in your application.
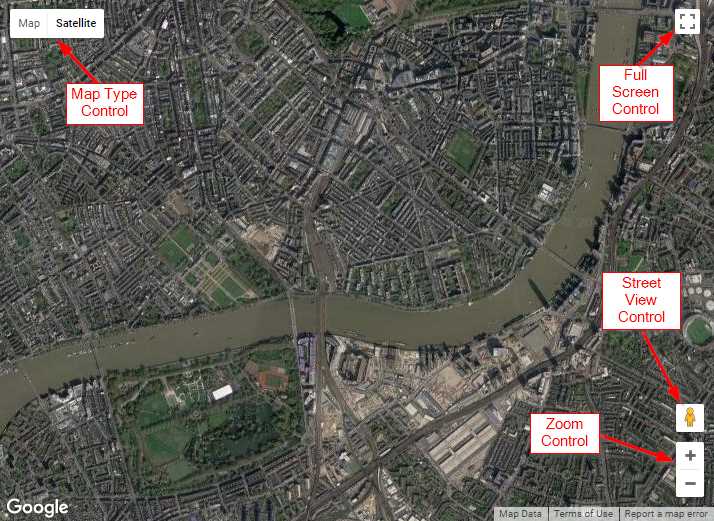
Figure 10: The default map controls.
- Map Type control: We’ve already discussed this control. It allows you to choose a different base layer for your map from roadmap, satellite, hybrid, and terrain.
- Full Screen control: Lets you open the map in full screen mode on desktop and Android devices (this feature is not supported, and therefore does not appear, on iOS devices).
- Street View control: Enables Street View mode for areas where street view imagery is visible. To use it, just drag the “peg man” to the area of interest.
- Zoom control: Provides buttons for zooming in (+) and out (-) of the map.
Hiding the default controls
If you don’t want these controls to appear in your application, copy Ch2_MapTypes.html to a new file called Ch3_HideMapControls.html. Remove the <select> element and the setBaseMap() function, and then amend your mapOptions object, as shown in Code Listing 6.
Code Listing 6: Hiding the default map controls
<div id="map"></div> <script> var map; function initMap() { var mapOptions = { center: new google.maps.LatLng(51.503, -0.135), zoom: 12, mapTypeControl: false, zoomControl: false, streetViewControl: false, fullscreenControl: false }; map = new google.maps.Map(document.getElementById('map'), mapOptions); } </script> |
The map now appears without any controls, as seen in Figure 11.

Figure 11: The map with no default controls.
A quicker way to disable all the default controls is to set the disableDefaultUI property to true:
var mapOptions = {
center: new google.maps.LatLng(51.503, -0.135),
zoom: 12,
disableDefaultUI: true
};
If you use disableDefaultUI to remove the default controls, you can explicitly enable any controls individually by setting the control property to true. For example, to add the zoom control back in:
var mapOptions = {
center: new google.maps.LatLng(51.503, -0.135),
zoom: 12,
disableDefaultUI: true,
zoomControl: true
};
Adding a scale bar
In addition to the default controls, you can add a scale bar to your Google Maps API applications with scaleControl:
var mapOptions = {
center: new google.maps.LatLng(51.503, -0.135),
zoom: 12,
scaleControl: true
};
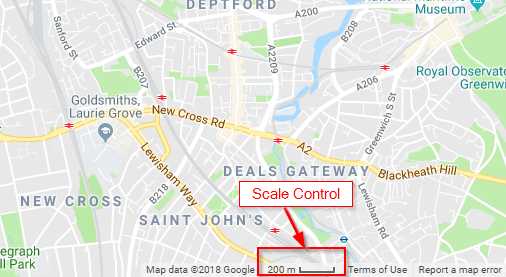
Figure 12: Scale control
Note: If you worked with the Google Maps API in earlier versions, you might be wondering where other controls, like Overview Control and Pan Control, have gone. They were deprecated in September 2015, leaving a veritable paucity of out-of-the-box controls in recent versions. The good news is that you can create your own controls, although this is beyond the scope of this book. Consult the reference documentation for details here.
Changing control display and positioning
Earlier in this chapter, we decided that we didn’t like the way the MapType control looked and went about creating our own version as a drop-down list. It turns out, however, that we need not have bothered. The MapType control, like some of the other controls, allows us to specify different display options, including a drop-down list. We can also change the location of the control on the map by specifying a ControlPosition constant in each control’s options object’s position property.
Figure 13 shows the available ControlPosition constants, and to which part of the map they refer.
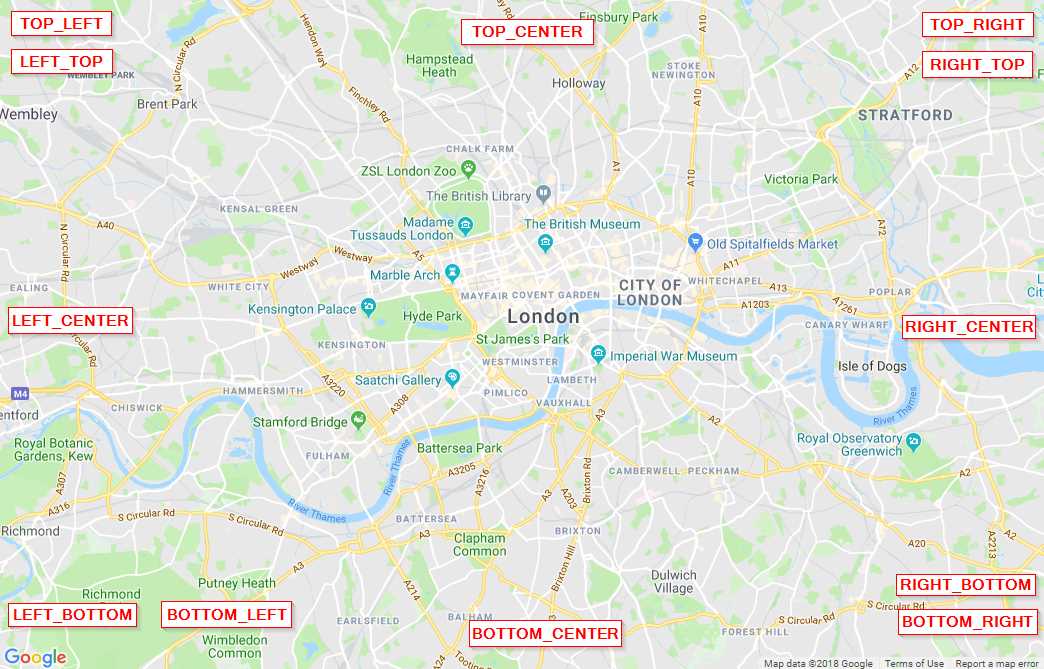
Figure 13: ControlPosition constants.
To demonstrate how this works, let’s configure the Map Type control as a drop-down list and place it in the top center of the map. Let’s also move the zoom and fullscreen controls so that they are in the bottom-left and bottom-right corners of the map, respectively. Copy Ch3_HideMapControls.html to a new file called Ch3_ConfiguringMapControls.html, and make the changes shown in Code Listing 7 to your initMap() code.
Code Listing 7: Changing the appearance and position of map controls
<script> var map; function initMap() { var mapOptions = { center: new google.maps.LatLng(51.503, -0.135), zoom: 12, disableDefaultUI: true, mapTypeControl: true, mapTypeControlOptions: { mapTypeIds: [google.maps.MapTypeId.ROADMAP, google.maps.MapTypeId.HYBRID], style: google.maps.MapTypeControlStyle.DROPDOWN_MENU, position: google.maps.ControlPosition.TOP_CENTER }, zoomControl: true, zoomControlOptions: { position: google.maps.ControlPosition.BOTTOM_LEFT }, fullscreenControl: true, fullscreenControlOptions: { position: google.maps.ControlPosition.BOTTOM_RIGHT } }; map = new google.maps.Map(document.getElementById('map'), mapOptions); } </script> |
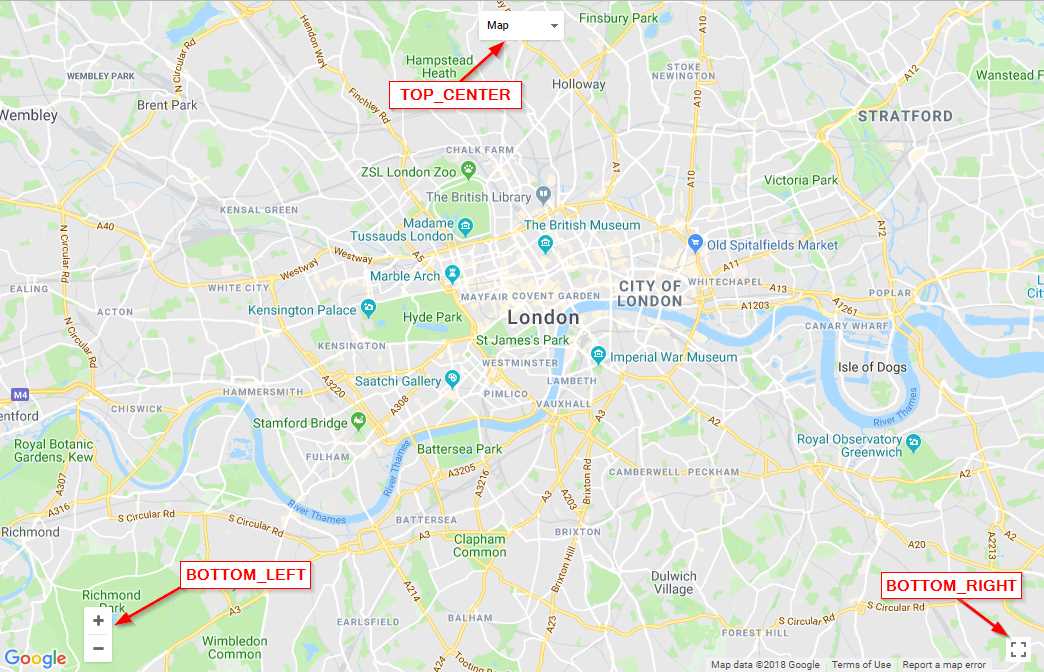
Figure 14: The relocated and restyled map controls.
Creating custom controls
Of course, there will come a time when the out-of-the-box controls are not sufficient for our purposes. The great thing is that we can use any HTML element as a custom map control.
Since our drop-down list of base maps now appears to be a bit redundant, let’s create a button that returns the map to the default center and zoom level. We’ll complete the functionality for this control later, when we talk about events. But, for now, let’s just create and position the button.
First, copy Ch3_ConfiguringMapControls.html to a new file called Ch3_CustomControl.html. Then, in the <style> tag, add CSS for a button with an ID of btnReset, as shown in Code Listing 8.
Code Listing 8: The CSS for our custom button
<style> #map { height: 100%; } #btnReset { background: aqua; font-family: "Times New Roman", Times, serif; font-size: 2em; text-align: center; height: 40px; width: 130px; border: 5px solid blue; padding: 5px; } html, body { height: 100%; margin: 0; padding: 0; } </style> |
Then, add the code that creates a <div> element called btnReset and positions it on the map, as shown in Code Listing 9.
Code Listing 9: Creating and positioning the custom control
<script> var map; // The code to create the map goes here. function initMap() { var mapOptions = { center: new google.maps.LatLng(51.503, -0.135), zoom: 12, disableDefaultUI: true, }; map = new google.maps.Map(document.getElementById('map'), mapOptions); var myResetControl = document.createElement('div'); myResetControl.id = "btnReset" myResetControl.innerHTML = 'Reset'; map.controls[google.maps.ControlPosition.TOP_LEFT].push(myResetControl); } </script> |
Note how, in the last line of code, we add the control to the map’s controls property. We can’t use the usual approach of configuring the MapOptions object, because the API does not know anything about our control. The map’s controls property consists of an array of each ControlPosition, which in turn is an array that contains all the controls in that location. We are using the standard JavaScript push() method to add our control to that array.
When you launch the page in the browser, you should see the control appear, as shown in Figure 15.

Figure 15: Our custom control.
Unfortunately, the control doesn’t do anything yet. Save your work in Ch3_CustomControl.html, because we’ll be returning to this example in the chapter titled “Working with Events.”
- 1800+ high-performance UI components.
- Includes popular controls such as Grid, Chart, Scheduler, and more.
- 24x5 unlimited support by developers.