
Go Web Development Succinctly®

CHAPTER 7
Development Techniques
If you’ve stuck around this long, you should now have a good grasp of the various bits and pieces that go toward creating a web application in Go. In this chapter, I want to cover a couple of techniques that will help you debug and test your Go web applications.
Logging
Any application that grows beyond the trivial will need good logging in order to enable its developers to locate and fix errors.
Basic logging
Go’s log package lets you write to all the standard devices, custom files, or any destination that supports the io.Writer interface. So far, we’ve only logged to stdout (via fmt.Println, etc), but that’s not a realistic option for production applications. So, let’s consider how we might log output to files and be specific about which file gets which type of log message.
In the following code, we create an application that will log notices to notices.log, warnings to warnings.log, and errors to errors.log.
Code Listing 38: Logging to Different Files Based on the Type of Information
package main import ( "log" "os" ) var ( Notice *log.Logger Warning *log.Logger Error *log.Logger ) func main() { noticeFile, err := os.OpenFile("notice.log", os.O_RDWR|os.O_APPEND, 0660) defer noticeFile.Close() if err != nil { log.Fatal(err) } warnFile, err := os.OpenFile("warnings.log", os.O_RDWR|os.O_APPEND, 0660) defer warnFile.Close() if err != nil { log.Fatal(err) } errorFile, err := os.OpenFile("error.log", os.O_RDWR|os.O_APPEND, 0660) defer errorFile.Close() if err != nil { log.Fatal(err) } Notice = log.New(noticeFile, "NOTICE: ", log.Ldate|log.Ltime) Notice.SetOutput(noticeFile) Notice.Println("This is basically F.Y.I.") Warning = log.New(warnFile, "WARNING: ", log.Ldate|log.Ltime) Warning.SetOutput(warnFile) Warning.Println("Perhaps this needs your attention?") Error = log.New(errorFile, "ERROR: ", log.Ldate|log.Ltime) Error.SetOutput(errorFile) Error.Println("You REALLY should fix this!") } |
Note that in the above code listing, 0660 is the file mode argument that enables reading and writing of the file to users and groups. For more information on file mode 0660 (and file modes in general), see http://www.filepermissions.com/file-permission/0660.
The output is as shown in Code Listing 39.
Code Listing 39: Log File Output

However, none of that is very useful for logging web requests, which any decent web server can do. So, let’s consider another approach for this.
Logging web requests
Let’s revisit the RESTful web service that we created in Chapter 5. Remember how we split the routes from the router into routes.go and router.go, respectively? Let’s look again at a number of code listing examples and separate the various concerns into these modules:
- router.go
- routes.go
- logger.go
- logger.go containing Logger middleware
- Logger middleware added to routers
Code Listing 40: router.go
package main import "github.com/gorilla/mux" func NewRouter() *mux.Router { router := mux.NewRouter().StrictSlash(true) for _, route := range routes { router. Methods(route.Method). Path(route.Pattern). Name(route.Name). Handler(route.HandlerFunc) } return router } |
Code Listing 41: routes.go
package main import "net/http" type Route struct { Name string Method string Pattern string HandlerFunc http.HandlerFunc } type Routes []Route var routes = Routes{ Route{ "HomePage", "GET", "/", HomePage, }, Route{ "CityList", "GET", "/city", CityList, }, Route{ "CityDisplay", "GET", "/city/{id}", CityDisplay, }, Route{ "CityAdd", "POST", "/cityadd", CityAdd, }, Route{ "CityDelete", "GET", "/citydel/{id}", CityDelete, }, } |
Managing routes in this way makes decorating them with middleware very easy, as we discussed in Chapter 2. Consider this new addition to our web service application, shown in Code Listing 42.
Code Listing 42: logger.go, Containing Logger Middleware
package main import ( "log" "net/http" "time" ) func Logger(inner http.Handler, name string) http.Handler { return http.HandlerFunc(func(w http.ResponseWriter, r *http.Request) { startTime := time.Now() inner.ServeHTTP(w, r) log.Printf( "%s\t%s\t%s\t%s", r.Method, r.RequestURI, name, time.Since(startTime), ) }) } |
The new file logger.go contains a function called Logger. We can pass our handlers to Logger, which will then automatically provide logging and timing information.
Middleware is pretty cool, right?
We can apply this middleware to our handlers by modifying the NewRouter function in router.go.
Code Listing 43: Adding Logger Middleware to Our Routers
package main import ( "net/http" "github.com/gorilla/mux" ) func NewRouter() *mux.Router { router := mux.NewRouter().StrictSlash(true) for _, route := range routes { var handler http.Handler handler = route.HandlerFunc handler = Logger(handler, route.Name) router. Methods(route.Method). Path(route.Pattern). Name(route.Name). Handler(handler) } return router } |
Next, when we launch the application and create a request, our console displays log messages as in Figure 33.
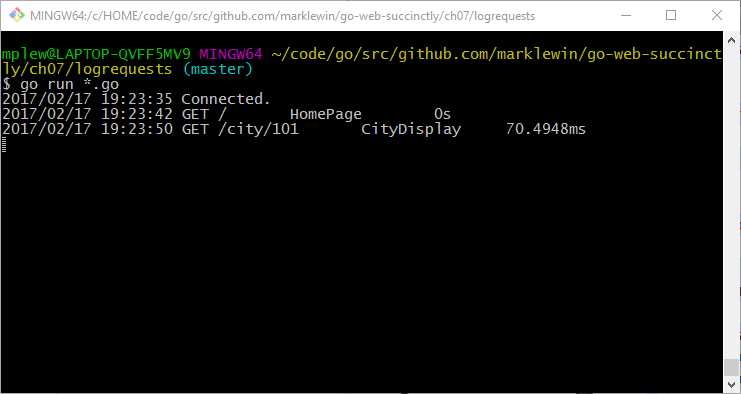
Figure 32: Testing the Logger Middleware
Testing
Testing is baked into the Go language, with the testing package in the standard library. Testing offers the ability to run tests by executing the go test command.
And better still, Go testing is quite simple and intuitive. In order to write a test, you need only to import the testing package and write a test function.
All test functions in Go begin with the word “Test” and receive a single parameter of type *testing.T:
package foo
import "testing"
func TestSomething(t *testing.T) {
// do your testing here...
}
When you have written a test and saved it in a file with a name ending in _test.go, you next exercise it by running go test in the same directory.
Let’s look at an example of how it all works.
We’ll create a very simple function that calculates the average of a slice of numbers in a function called Average, in a package called math, in a file called average.go.
Code Listing 44: The Average Function in the Math Package
package math func Average(nums []float64) float64 { total := float64(0) for _, x := range nums { total += x } return total / float64(len(nums)) } |
Code Listing 45 shows the main function in main.go that we would normally use to invoke our Average function.
Code Listing 45: main.go, in Package Main
package main import ( "fmt" "github.com/marklewin/go-web-succinctly/ch07/testing/math" ) func main() { nums := []float64{1, 2, 3, 4} avg := math.Average(nums) fmt.Println(avg) } |
Next, we can create a function called TestAverage in a file called average_test.go, also in math, in order to test the function.
Code Listing 46: The Code to Test the Average Function in the Math Package
package math import "testing" func TestAverage(t *testing.T) { var v float64 v = Average([]float64{1, 2, 3, 4, 5}) if v != 3.0 { t.Error("Expected 3.0, got ", v) } } |
Now, run the test from the same directory in which the files reside. Use the -v flag in go test for verbose output.
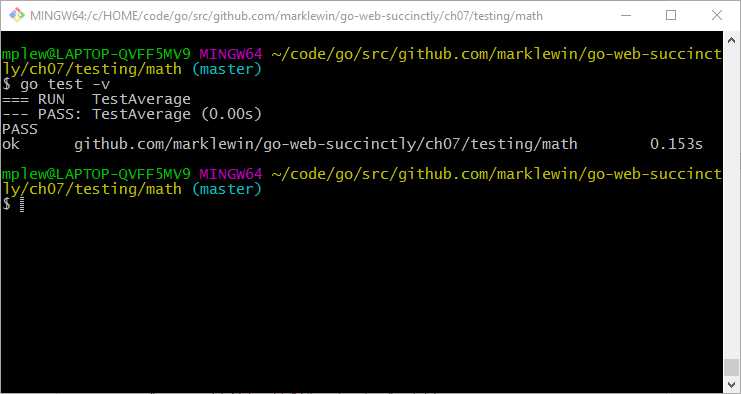
Figure 33: Executing the Test Successfully
In this instance, all the tests in the math package passed (although currently there is only the one).
What if our test fails? Let’s simulate that. In this instance, it is our test, rather than the code we are testing, that’s at fault—it’s expecting a different value from the correct one.
Code Listing 47: Sabotaging the TestAverage Function
package math import "testing" func TestAverage(t *testing.T) { var v float64 v = Average([]float64{1, 2, 3, 4, 5}) if v != 4.0 { t.Error("Expected 4.0, got ", v) } } |
Figure 35 demonstrates what a failed test looks like.
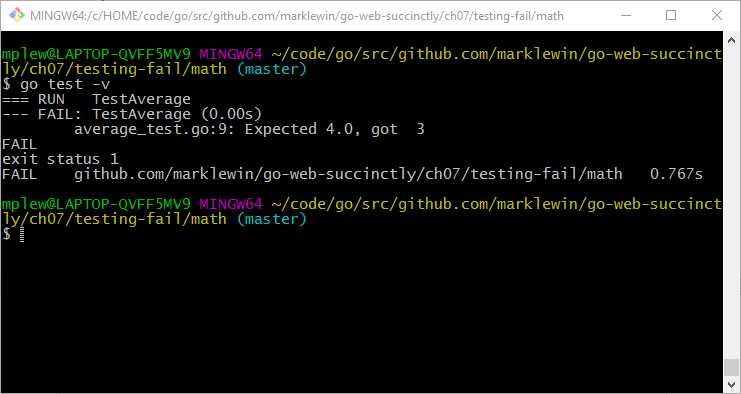
Figure 34: A Failed Test
Hopefully, you won’t experience too many failing tests during your Go web development adventures, but better to know in development rather than in production!
Whatever happens, I wish you a very happy and productive time as a Go web developer!
- 1800+ high-performance UI components.
- Includes popular controls such as Grid, Chart, Scheduler, and more.
- 24x5 unlimited support by developers.