
Force.com Succinctly®

CHAPTER 4
UI Basics
Introduction
When you create an object in Force.com, you instantly get a user interface for it. Think about that for a moment—you automatically get List Views and Object Views with inline and full editing capabilities without having to add any code.
It is even possible to customize the Views by changing Page Layouts using a drag-and-drop, intuitive Layout Properties configuration interface. It is also possible to have different kinds of layouts, even for mobile devices. All this without writing a single line of code.
If you need more flexibility, there’s Visualforce. It’s a bit more complex than the drag-and-drop configuration interface, as you need to know some basic HTML markup along with some Apex tags; however, there’s no need to know anything about styling or CSS. With Visualforce, a lot of functionality can be done with standard Apex controllers, which is also an advantage.
After Visualforce came Lightning—which is the user interface we have been seeing so far throughout this book. It’s modern and responsive—it adapts nicely to different device formats and looks cool.
In this chapter, we’ll explore the basics of user interfaces in Force.com, focusing on the Lightning Experience.
We’ll also look at the layouts that were “auto-magically” built when we created our custom objects. Sounds interesting, so let’s find out more.
Built-in layouts
In the previous chapters, when we created the Client and Renewal objects, Force.com automatically and behind the scenes created some layouts for us. Layouts are simply a way for us to see and manipulate fields within objects.
In the Setup Home page of our Lightning Experience, we should see a list of the Most Recently Used items. There you will surely find the Client and Renewal objects.
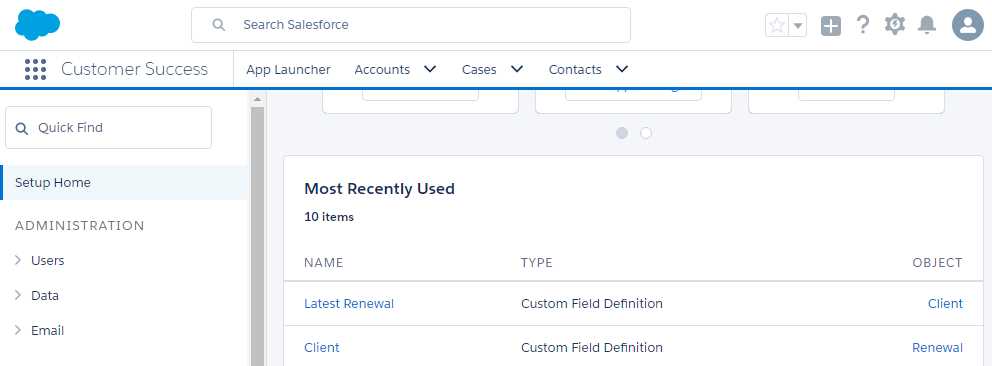
Figure 4-a: The List of Most Recently Used Items
So, let’s click on the Client object in order to explore the layouts that were automatically added when we created this object. Then, click Page Layouts.

Figure 4-b: The Client Object’s Definition
Click Client Layout, as seen in the following figure.

Figure 4-c: The Client Layout Item
When you have clicked on that link, you’ll be presented with the Client Layout configuration interface, which looks like Figure 4-d.
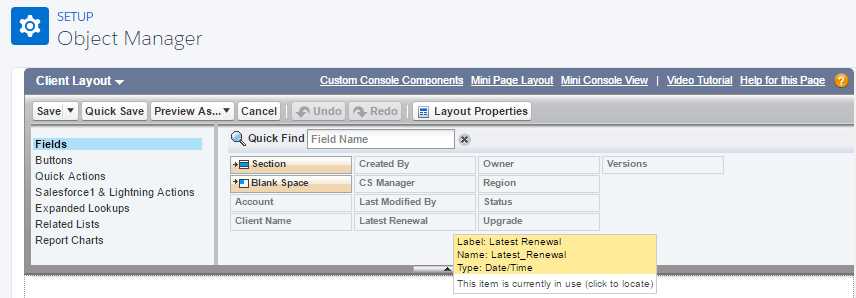
Figure 4-d: The Layout Configuration Interface
Scroll a bit further down to the Client Detail section. This shows exactly how Force.com has set up the Client layout for us—that is, in which order the fields will appear when a new Client record is created, or when an existing Client record is modified.
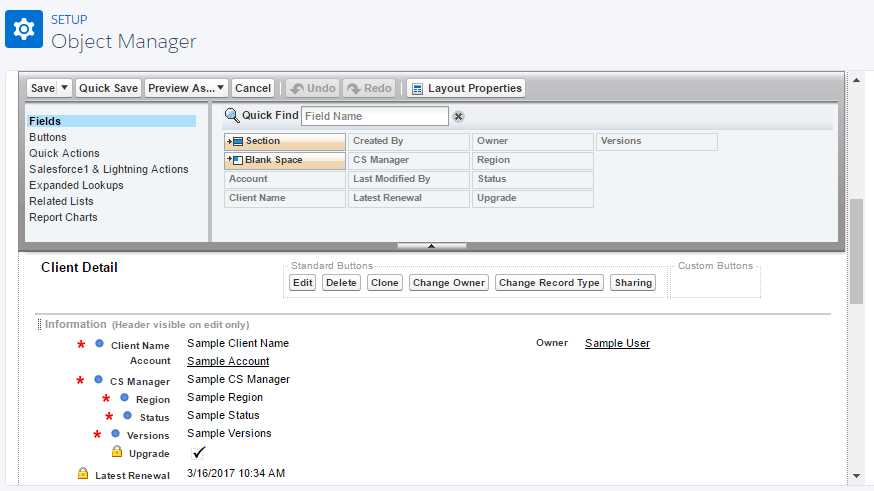
Figure 4-e: The Details of the Client Layout (Field Order)
Here we see the order in which the Client fields will appear on the screen, as seen under the Client section. If we want to rearrange the order, we can simply drag and drop any of the fields to the desired location.
For example, let’s move down the Versions field, so it appears as the last field of the Client layout. In order to do this, simply click on the field and drag it down below the Latest Renewal field.
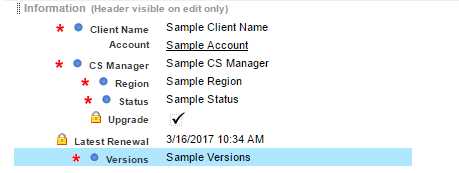
Figure 4-f: The Re-Ordered Client Layout
After you’ve done that, click Save in order keep this layout change.
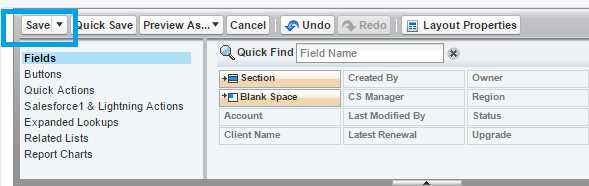
Figure 4-g: The Save Button on the Configuration Interface
Once you have clicked on the Save button, you will be redirected to the main setup screen of the Client object (under Setup Home > PLATFORM TOOLS > Object Manager).
We’ve now seen how to quickly alter one of the built-in layouts that Force.com has automatically created for us.
There’s another visual tool called Schema Builder that also provides a drag-and-drop experience in order to customize objects and layouts (which we won’t be covering).
Now, let’s explore how these layouts actually look at runtime—in data-entry mode.
Accessing our custom objects—data-entry mode
Now that we’ve seen how easy it is to customize our object layouts, it’s time to see how they look and feel during runtime—so that we can use them to add and edit data.
I want to take the opportunity to mention that in Force.com, there is really no actual concept of runtime versus design-time. I’d thought I’d use the word though, in order to distinguish between being in setup mode versus being in data-entry mode.
So far in our Lightning Experience, we’ve been in setup mode. In order to go into data-entry mode, which would be the equivalent of running our custom application, we have to explicitly click on the App Launcher button (the 3-by-3 dots icon in the upper-left side), and then select our Customer Success app.
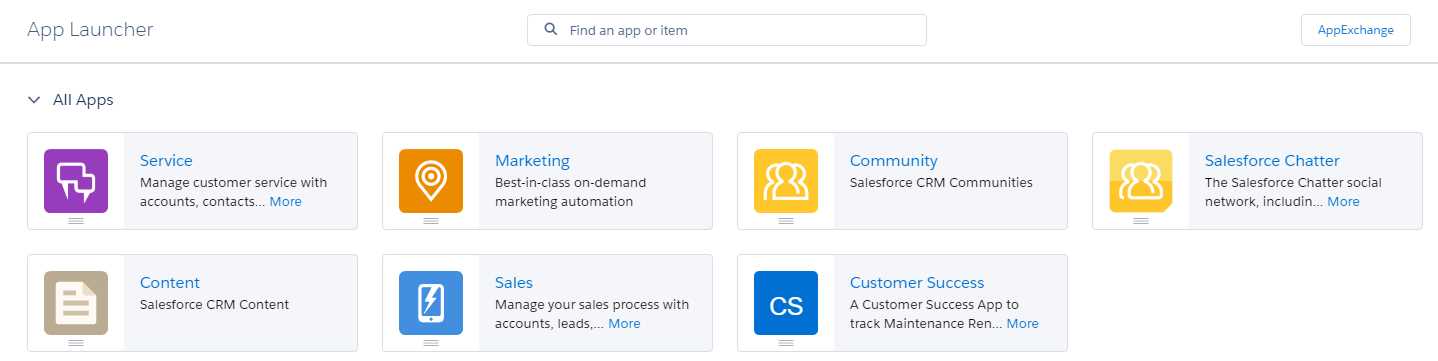
Figure 4-h: App Launcher
Once you’ve clicked on the Customer Success App option, you’ll see the following.
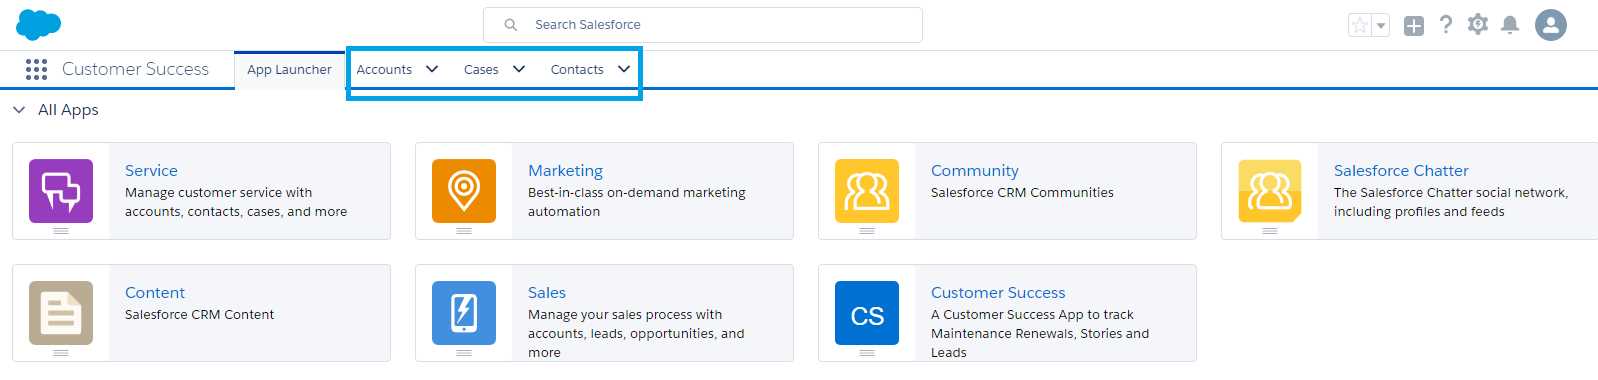
Figure 4-i: The Customer Success App
Notice how, by default, the App Launcher tab is displayed, and only the Accounts, Cases, and Contacts tabs are visible. These correspond to the Account, Case, and Contact objects, respectively.
But where are the Client and Renewal custom objects we created? That’s a good question.
Essentially, in order for us to add and edit data for both the Client and Renewal objects, we must first add a tab to the Customer Success user interface for each object.
Because neither the Client nor Renewal objects have a corresponding tab defined, we cannot access these objects yet in data-entry mode. So, let’s add these tabs.
Adding application tabs
On the top part of the screen, click Gear and then on the Setup option—but open it in a new browser tab. In the Quick Find search box, type in the word tabs, and you’ll see the following.
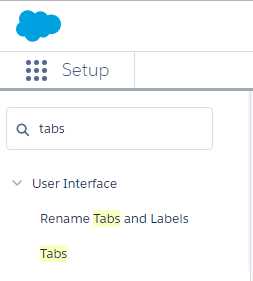
Figure 4-j: Searching for the Tabs Option within the Setup
Then, click on the Tabs option, which will take you to the following screen.

Figure 4-k: The Tabs Setup Screen
Let’s first create a Tab for our Client object. Click New right next to Custom Object Tabs.
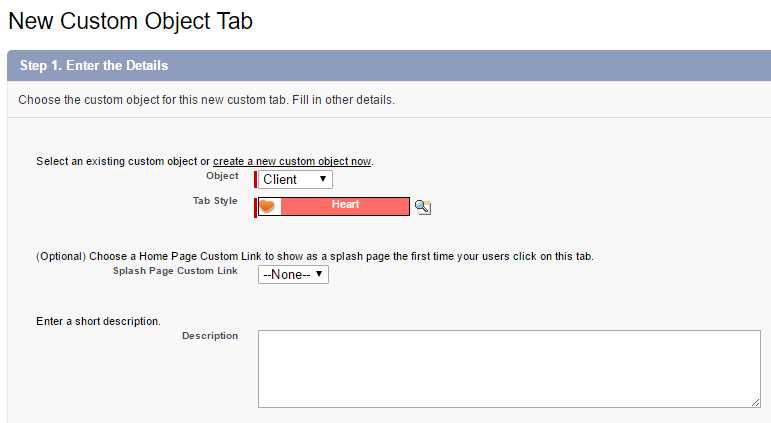
Figure 4-l: The Clients Tab Setup
Select Client as the object, and select any option available for the Tab Style—in my case, I have chosen Heart. Then, click Next.
In Step 2—Add to Profiles, simply leave the default options and click Next. For Step 3—Add to Custom Apps, do the same: leave the default options and click Save. You should now see the Clients tab created.

Figure 4-m: The Clients Tab Created
Let’s now do the same for the Renewal object, and create a tab for it. Click New button, which is next to Custom Object Tabs, and follow the same steps, but this time select Renewal as the Object, and also a different Tab Style—in my case, I’ll select Sack as the style.
If you now switch back to the Customer Success app, which you left open on your other browser tab, and refresh the page, you will see two new tabs.

Figure 4-n: The Customer Success App with the Clients & Renewals Tabs
Adding records
Let’s now add some data to our application. Before we can add any data to the Client object, we’ll create a couple of Accounts. This is because our Client object has a dependency on the Account object. Once we’ve created at least one Account record, we can then create a Client record.
Before we can create a Renewal record, we’ll need to have a Client record created—as the Renewal object has a dependency on the Client object. At least one Case record will have to be added as well, because the Renewal object also depends on it—so keep this in mind. Now let’s add some data.
Click on the Accounts tab, and then New, in order to create a new Account record.
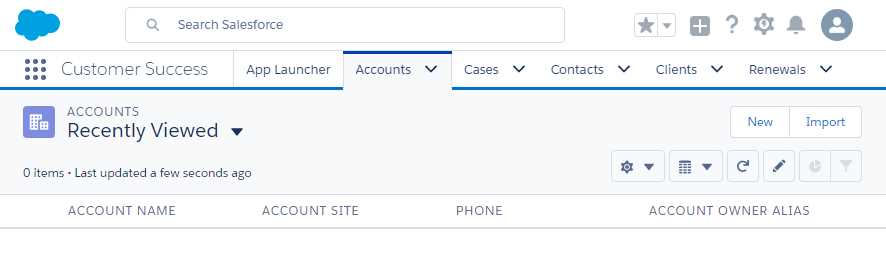
Figure 4-o: The Accounts Tab
Once you’ve clicked on the New button, you’ll see the data-entry form shown in Figure 4-p. Fill in the required fields and some other non-required fields you might find useful.
An Account record refers to the very high-level details of a customer’s organization that represents your Client. You can enter details related to their Billing Address and also SLA info. Once done, click Save.
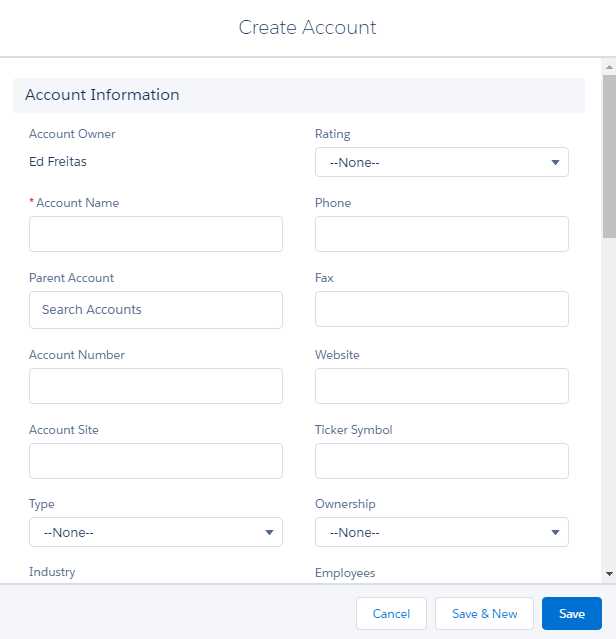
Figure 4-p: The Create Account Form
Feel free to create a few extra Account records if you wish. When you have done that, click on the Client tab in order to create some Client records for each of those Accounts created.
It might seem at first that we are duplicating information by adding Account and Client records. Although the relationship between Account and Client is usually a one-to-one relationship, there are cases when we might want to have more than one Client for the same Account—for instance, for having two separate business units.
The other reason is that the Account object is used by other Force.com apps that are provided out-of-the-box, so it’s convenient not to extend this object with custom properties that are specific to the Customer Success app, but instead to add those specific properties to a new custom object—this is another reason why the Client object was created.
With that said, let’s add the Client records. Assuming you are already on the Clients tab, click New. The Client record data-entry form will appear as follows.
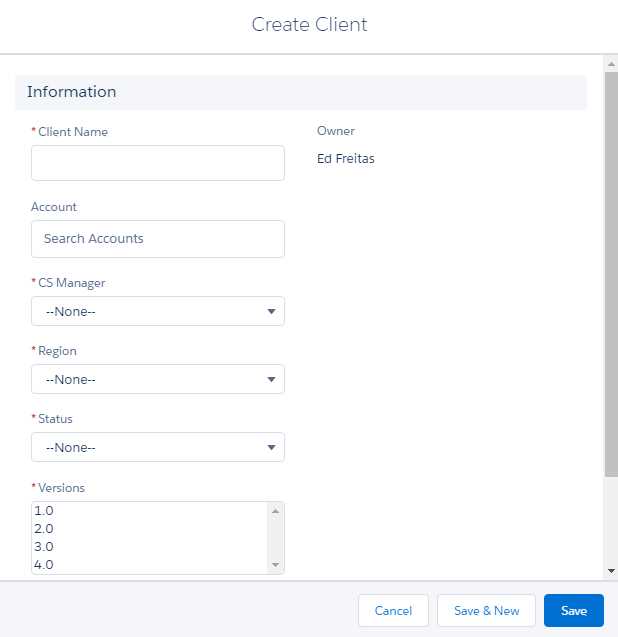
Figure 4-q: The Create Client Form
Enter the required fields, then click Save, or Save & New if you want to create more Client records.
By now you should have created one or more Client records. I created a couple of them, and what I see under my Clients tab is shown in Figure 4-r.
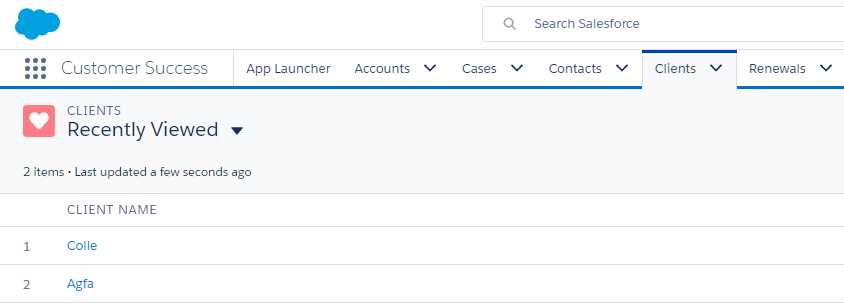
Figure 4-r: Client Records
Feel free to add some Renewal records as well. This will come in handy later.
Editing data
Now that we have some records and data to work with, we can easily edit any record by clicking on the record name from the list—this will bring up the data associated with the record as follows.
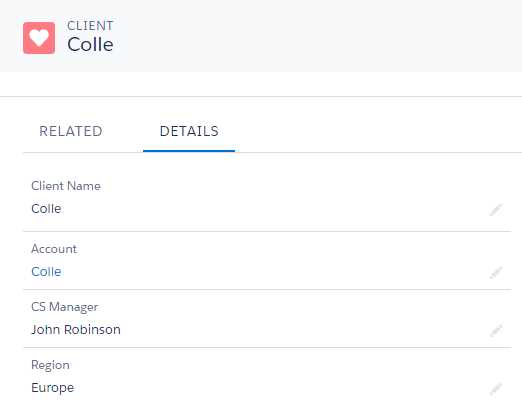
Figure 4-s: Details of a Client Record
If you would like to make any changes to this record, all you need to do is to double-click on any part of the record—when you do that, the screen will look as follows.

Figure 4-t: Client Record—in Edit Mode
Notice that when you double-click on a record, it goes into Edit Mode, which means that you can change any of the values for any of the fields. Once you are done making changes, simply click Save.
Deleting a record
Removing a record is also very simple. From the record list, there’s an arrow button for each record that has a Delete option.
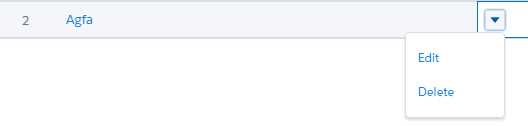
Figure 4-u: The Delete Record Option
Clicking Delete will remove that specific record.
Summary
Throughout this chapter, we’ve explored the Lightning Experience Layouts that are provided out-of-the-box when objects are created, and also how to modify them.
We’ve had a look at how to add, edit, and remove record data, and how to add custom objects to the user interface by adding Tabs.
In essence, without any programming required—except the use of a couple of formula fields—we have created a data-entry application with a clean and modern looking UI and that is powered by a strong relational object database. We did this simply by following a series of easy steps and intuitive point-and-click wizards. I personally think this is quite powerful, and part of the beauty of Force.com.
In the following chapters, we’ll move our attention to the programming side of the platform and how to add specific custom logic.
- 1800+ high-performance UI components.
- Includes popular controls such as Grid, Chart, Scheduler, and more.
- 24x5 unlimited support by developers.