
Force.com Succinctly®

CHAPTER 3
Renewal Custom Object
Introduction
For SaaS businesses, getting customers onboard is vital, but keeping them hooked to a product and paying subscription or maintenance—also known as renewals—is critical for long-term cash flow.
In recent years, a new profession has emerged, one focused on reducing churn and keeping customers engaged with an organization’s products—this role is most commonly known as the Customer Success Manager.
Throughout this chapter, we’ll create a Renewal object that will be closely related to the Client object we previously created.
The idea behind renewals in general is to keep track of when the customer’s support contract expires and how much they pay, and to keep notes and activities related to issues they raise.
This should be more than enough to have some sort of basic Customer Success functionality within our application—from a database perspective. So, in this chapter we’ll focus on creating this object and linking it to functionality we have previously created.
In later chapters, we’ll start adding some logic and business rules in order to bring the app to life. There’s still a lot of interesting things to build and learn. Let’s keep having fun.
Renewal custom fields
Just as we did with the Client object, let’s define which fields we need in order to keep track of Renewal records. Here’s the list of fields we will create.
Table 3-a: Fields for Our Renewal Custom Object
Field | Type |
|---|---|
Client | Master-Detail (on the Client object) |
Renewal Name | Text (80) Unique Case Insensitive |
Start Date | Date |
End Date | Date |
Expired | Formula (Checkbox) |
Invoiced | Checkbox |
Amount | Number (16, 2) |
Currency | Picklist |
Cases | Master-Detail (on the Case object) |
We’ll have to create each of these fields. We can see that our Renewal object will have two Master-Detail fields, which we have not covered yet—so this will be a great asset to learn, as it is an important part of any Force.com application. But before we can create any field, we need to create the Renewal object itself—so let’s do that.
Creating the Renewal custom object
In order to create the Renewal object, go to the main Lightning Experience screen. On the left side, click PLATFORM TOOLS > Objects and Fields > Object Manager. Once you do this, you’ll see the list of available objects that already exist—including our custom Client object we previously created.
In order to create a new custom object, click Create, and then click the Custom Object option. Refer back to Figure 2-a.
Let’s specify the object’s basic information—we’ll need to initially type in the Label and Plural Label. The Object Name is automatically generated, and so is the Record Name.
As previously suggested, it is advisable to enter a meaningful Description for our object.
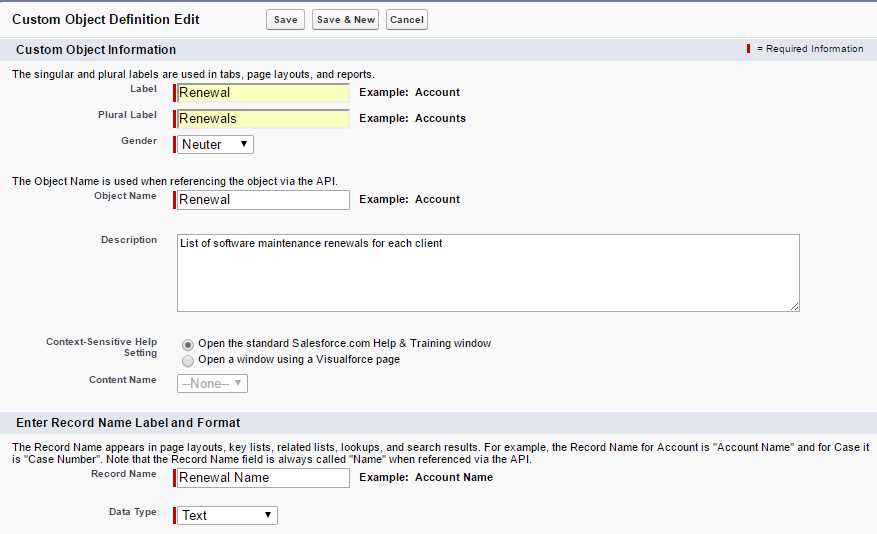
Figure 3-a: The Renewal Object (Basic Details)
With these details entered, let’s scroll a bit further down in order to finish creating this object.
Just as we did when we created the Client object, make sure Allow Reports, Allow Activities, Allow in Chatter Groups, Allow Sharing, Allow Bulk API Access, and Allow Streaming API Access are all ticked.
Make sure the Deployment Status is set to Deployed. I also recommend that you specifically select the Allow Search and Add Notes and Attachment related list to default page layout options, too.
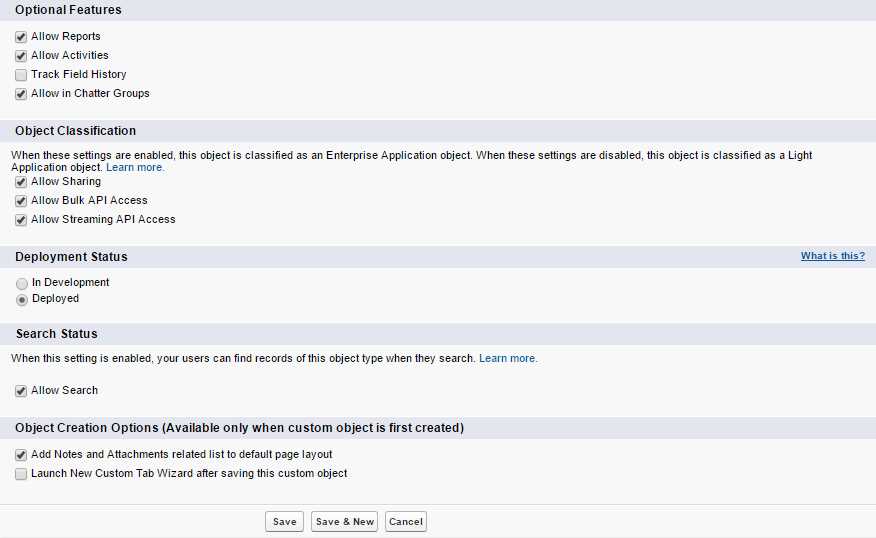
Figure 3-b: The Renewal Object (Extended Details)
Great—with all these properties defined, let’s click Save. This will create our Renewal object.
We can see that the following fields have been automatically added by Force.com to our Renewal object.
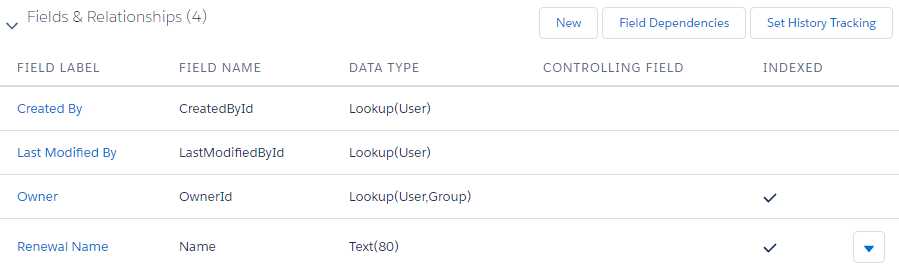
Figure 3-c: Automatically Created Fields (Renewal Object)
We are ready to start creating our custom fields. The first field we need to create is the Client field, which will be linked to the Client object. Let’s go and do that.
The Client Master-Detail field
The Client field will contain the name of the Client object that is related to a Renewal record. A Client record can have multiple Renewal records, each during different periods of time.
This means that there will be a Master-Detail relationship between the Client object (Master) and the Renewal object (Detail).
Under Fields & Relationships, click New, then choose the Master-Detail Relationship as the data type for the new field.
![]()
Figure 3-d: Selecting the Master-Detail Relationship
After selecting this data type, click Next in order to choose the object to which this field will be related.
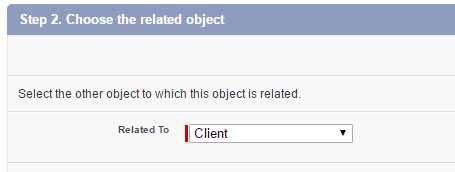
Figure 3-e: Selecting the Related Object for the Master-Detail Field
Select the Client object and click Next. Then type in the Field Label and add a Description. The Field Name is automatically assigned by Force.com.
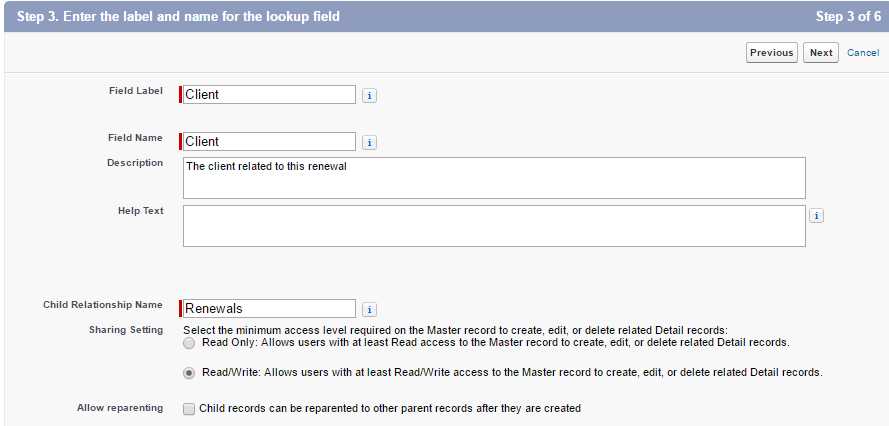
Figure 3-f: The Lookup Relationship Details
The Child Relationship Name is also automatically assigned by Force.com. The Sharing Setting is set by default to Read/Write.
This allows users with read and write access to the Master record to create, edit, or delete any related Detail records—this is the option we are interested in, as we want users to be able to both read and write Client and Renewal records.
Also by default, the Allow reparenting option is not selected—which we can leave as is, as we want every Renewal record to be parented (associated) to its corresponding Client record.
If you scroll down a bit, there are some Lookup Filter options that we are also not interested in—which we can skip. So, click Next, which will display the field-level security screen, which has nothing really for us to do—so click Next again.
Afterward, we arrive at the Add reference field to Page Layouts screen, which also has nothing for us to do, so again, let’s click Next.
Finally, we are at the Add custom related lists screen, as we can see in Figure 3-g.
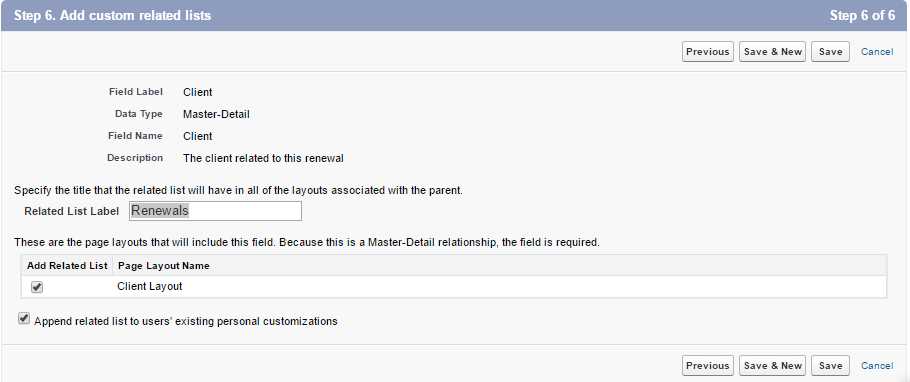
Figure 3-g: The Add Custom Related Lists Screen
Force.com has automatically assigned a name to the Related List Label, which is the same as the plural of our Detail object—Renewals. We can leave this as is.
In order to create the Client field, simply click Save. We’ve now created our first Master-Detail field.
The Dates fields
The Start and End dates are key for tracking renewals. Both are, as you might have guessed, Date data type fields.
Let’s create them. We’ll start by creating the Start Date field. Click on the New button under Fields & Relationships.
When asked, choose Date as the field type, then click Next.
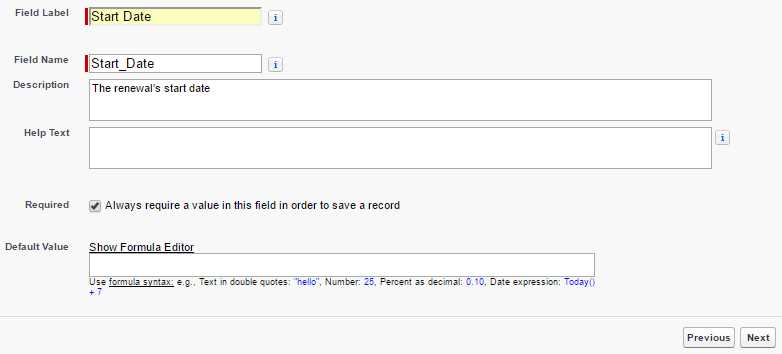
Figure 3-h: Start Date Field Details
Enter the Field Label—Force.com will automatically assign the Field Name property. Also enter a meaningful Description. Set the Required property, and then click Next.
On the field-level security screen, click Next, and on the Add to page layouts screen, click Save & New—this way we can immediately create the End Date field also.
Follow the same steps as for the Start Date field, and make sure you set the Field Label as End Date.
The Expired Formula checkbox
Now that we’ve created the Dates fields, let’s create a Formula Checkbox field that will basically tell us if a Renewal record has expired or not. Expired means that the support maintenance contract is no longer valid—it has not been renewed to this date. This is a handy field to have, so let’s create it.
Click New under Fields & Relationships. When asked, choose Formula as the field type, and then click Next.
On the Field Label, type in the name Expired. Force.com will automatically assign the Field Name based on the Field Label. Then, as the Formula Return Type, select Checkbox and click Next.
We’ll use the following formula in order to determine if a Renewal record has expired.
Code Listing 3-a: The Expired Field Formula
IF(End_Date__c < TODAY(), true, false) |
End_Date__c is the internal name of the End Date field. Remember that internally, all custom fields within Force.com are appended the __c suffix.
The formula is quite simple. Essentially, if the value of End Date is less than today’s date, then true is returned—which means that the Renewal record has expired. On the contrary, if false is returned, it means that the record has not expired.
Scroll a bit further down and set the Blank Field Handling property as Treat blank fields as blanks, then click Next.
On the Establish field-level security screen, leave all the default options as is, and click Next.
Do the same on the Add to page layouts screen—leave the default option and click Save in order to create the field.
The Invoiced checkbox
The Invoiced field is simply a Checkbox that will indicate if the customer has been invoiced for the applicable renewal period. It’s just a flag—a Boolean, and not a calculated field. So, let’s create it now.
Click on the New button under Fields & Relationships. When asked, choose Checkbox as the field type, and then click Next.
Now we type in the Field Label—the Field Name will automatically be assigned. Also enter a Description and click Next.
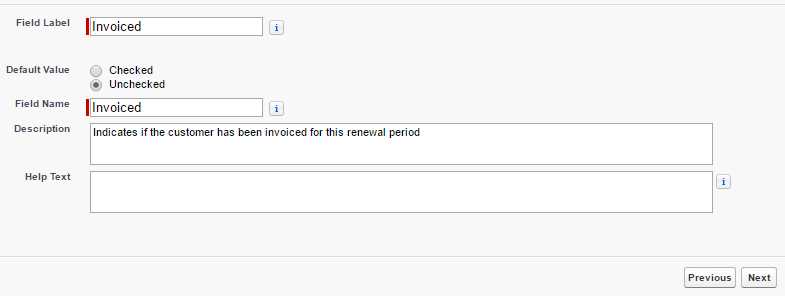
Figure 3-i: Start Date Field Details
On the Establish field-level security screen, leave the defaults and click Next. On the Add to page layouts screen, leave the default option and click Save in order to create the field.
Great, we have created another field. Let’s move on.
The Amount field
The Amount field, as its name implies, corresponds to the tamount that the customer will be paying for maintenance—basically, the Renewal cost. Let’s create it.
Click on the New button under Fields & Relationships. When asked, choose Number as the field type, and then click Next.
Now type in the Field Label, using Amount as the name. Set the Length to 16 and the Decimal Places to 2.
Enter a Description, select the Required property, and then click Next.
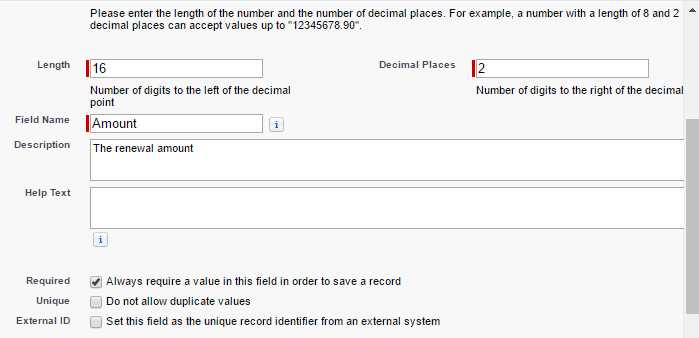
Figure 3-j: The Amount Field Details
On field-level security there’s nothing to do, so click Next, and on the Add to page layouts screen, click Save in order to create the field.
The Currency field
With the Amount field created, we can now create the Currency field. This will be used to indicate which currency applies to the Renewal. We’ve created Picklists before, so this should be familiar.
To create this field, click New, under Fields & Relationships. When asked, choose Picklist as the field type, and then click Next.
Type in Currency as the Field Label, and for the Values property, select the option Enter values, with each value separated by a new line. Then type in the values as shown in the following screenshot.
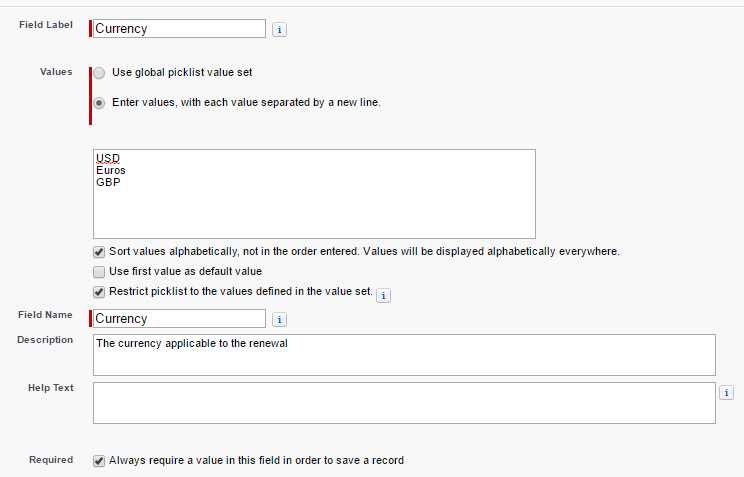
Figure 3-k: The Currency Field Details
Select the options Sort values alphabetically and Always require a value in this field in order to save a record. By default, the option Restrict picklist to the values defined in the value set is selected.
Following that, click Next—this will display the Establish field-level security screen, on which there’s nothing to do, so click Next again. Finally, on the Add to page layouts screen, click Save in order to create the field.
The Cases Master-Detail field
We’ve now reached the last field of the Renewal object—exciting! The Cases field is a Master-Detail field linked to the Case standard object. In other words, once we create this field, Force.com will establish a one-to-many relationship between the Renewal and the Case object. This means that any given Renewal record could have multiple Case records.
Let’s create this field. Click on New under Fields & Relationships. For the field-type, select the Master-Detail Relationship option, and click Next.
Immediately afterwards, you’ll be asked to choose the related object. Select the Case object from the dropdown list.
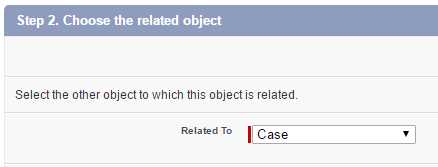
Figure 3-l: The Related Object for the Cases Field
Once you’ve selected this object, click Next. On the screen that follows, you’ll be asked to specify the Field Label and other properties. Type in Cases as the Field Label, enter a Description, and then click Next.
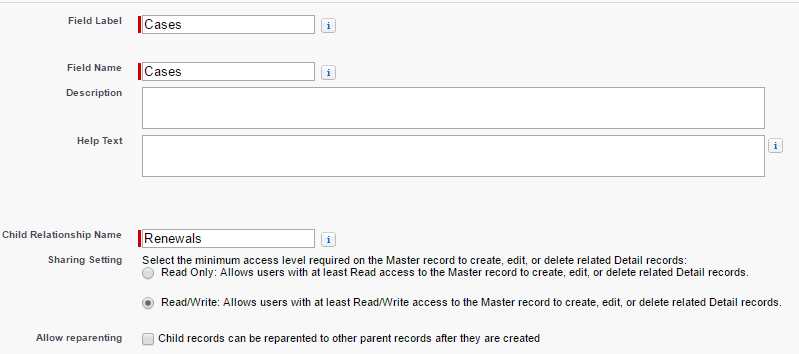
Figure 3-m: Details of the Cases Field
As you might have guessed, the following screen is the field-level security. Nothing to do really, so simply click Next.
On the Add reference field to page Layouts screen, click Next, and, finally, on the Add custom related lists screen, accept the default options and click Save—this will create the field.
Awesome—we have now created all the fields of the Renewal object. However, do you remember that there is one field that is part of the Client object that we couldn’t create because it was dependent on having the Renewal object ready?
The field that we have yet to create is the Latest Renewal Roll-Up Summary field. So, let’s go ahead and create it.
The Latest Renewal Roll-Up Summary field
The purpose of this field is to know which is the most recent Renewal object for any given Client record—this is what is known in Force.com as a Roll-Up Summary field.
It is an aggregation field—in this case we’ll be aggregating by the Creation Date field of the Renewal object.
Under PLATFORM TOOLS > Object and Fields > Object Manager, locate the Client object previously created, and click it. Under Fields & Relationships, click New.
Select Roll-Up Summary as the field-type and click Next.
![]()
Figure 3-n: The Roll-Up Summary Field Type
Type in the Field Label (Latest Renewal) and a Description, and click Next. Now comes the interesting part, something we have not covered before.
In this step, we need to Define the summary calculation. Under the Summarized Object property, select Renewals from the dropdown list.
Under Select Roll-Up Type, select MAX, and on the Field to Aggregate property, choose the Created Date field from the list.
By default, the Filter Criteria is set to All records should be included in the calculation. Click Next.
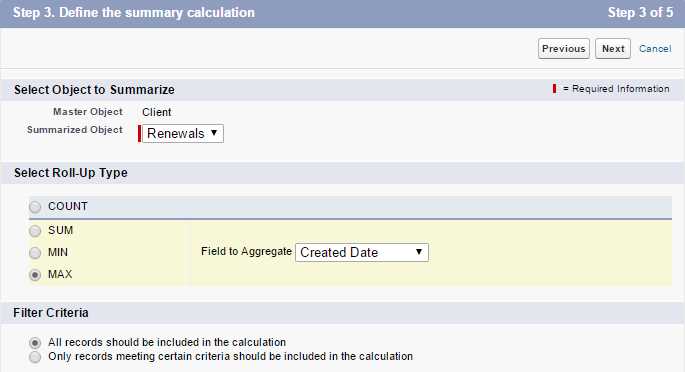
Figure 3-o: The Define Summary Calculation Screen
On the Establish field-level security screen, leave the default options as shown in the following figure, and click Next.
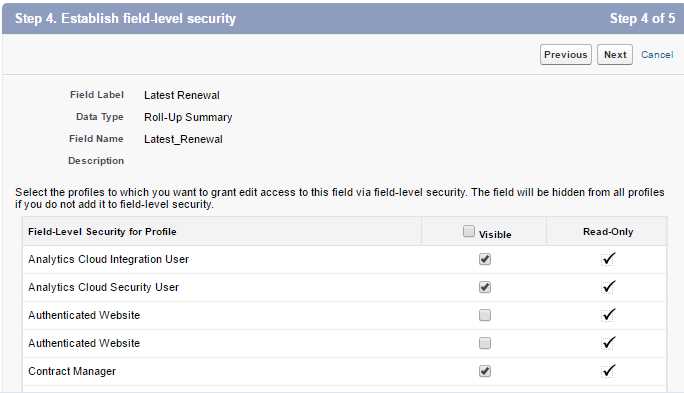
Figure 3-p: The Establish Field-Level Security Screen
Finally, on the Add to page layouts screen, leave the default option as is, and click Save. We now have all the fields from both the Client and Renewal objects created.
Summary
Throughout this chapter, we explored step-by-step how to create each of the fields of the Renewal object—which is at the very core of our Customer Success app.
Furthermore, we’ve explored various field types and their relationship with the main Client object.
In the next chapter, we’ll explore the Lightning Experience user interface, how to add, edit, and remove records, and also how add tabs for our custom objects.
Up to this point, we’ve been immersed in the design of relational objects and their fields, without which we would not be able to have an app on the Force.com platform. Going forward, we’ll learn how bring these objects to life.
- 1800+ high-performance UI components.
- Includes popular controls such as Grid, Chart, Scheduler, and more.
- 24x5 unlimited support by developers.