
Force.com Succinctly®

CHAPTER 2
Client Custom Object
Introduction
Force.com comes with a few objects out-the-box that provide many of the features that are included with some of the built-in Salesforce applications, such as CRM and Sales. I’ve already briefly mentioned some of these objects, such as Accounts, Cases, and Contacts.
These default objects are amazing because they come with a lot of pre-built fields, validations, and layouts—in essence, a lot of useful functionality to build any new custom app.
Besides this, Force.com allows us to create our own custom objects, which is very handy when it comes to creating an app. Although it is possible to create an app with only default objects, you’ll see that being able to create and use custom objects is a quite a powerful feature.
You can think of objects as database tables, but with extra features like predefined field types, built-in validations, and layout capabilities. Besides this, default and custom objects can be related to one another by master-detail and lookup relationships, just like tables in a relational database.
Objects are the heart and soul of a Force.com app, and custom objects are like clean canvases on which we can sketch out our app. In this chapter, we’ll dive into this topic in detail, and we’ll be creating the Client object for our Customer Success app. Ready, set, go!
Creating custom objects
Within the main Lightning Experience screen, on the left side, click PLATFORM TOOLS > Objects and Fields > Object Manager. Once you do this, you’ll see the list of available objects that already exist, which should look similar to Figure 2-a.

Figure 2-a: The Object Manager
In order to create a new custom object, click Create on the top-right side, and then the Custom Object option.
The first custom object we will need for our Customer Success app is the Client object. This will be the main object our app will use.
Once we have clicked on the Custom Object option, we’ll see a screen similar to the following one.

Figure 2-b: Creating a New Custom Object: Client
When creating a new object, Force.com will ask us to enter some details about the object we are interested in creating.
The first detail we are asked to enter is the Label of the object, which is just the caption or text that will visually identify the object on one of the Force.com tabs.
We’ll label our object as Client. Interestingly, Force.com will always ask us for the Plural Label, which in this case will be Clients.
There’s a Gender field, which we can leave set to the default option and the name of the object itself, which we will also designate as Client.
Further to that, it is recommended to enter a Description; it is not a required field, but it helps to give some basic information about our object in case we need to come back in the future and make some adjustments, or, alternatively, if someone else needs to revise the app structure later on.
If we scroll down, there are other fields that are both required and optional. Let’s explore them.

Figure 2-c: Creating a New Custom Object: Client (Continued)
We can leave the Context Sensitive Help option as is and notice that for the Record Name field, Force.com has chosen for us by default Client Name as the main field for our object, and has also set the Data Type as Text. We can leave this as is.
The Optional Features are usually unchecked by default, so I have explicitly selected Allow Reports, Allow Activities, and Allow in Chatter Groups.
I have done this because it is useful to have Client object data show up in reports. Also, activities can be added to any Client record, and Client records can also be fetched when users interact with each other using the pre-built Chatter functionality within Force.com.
We don’t really need to keep track of any field changes, so we can leave the option Track Field History unchecked.
We’re not done yet, so let’s scroll a bit further down and finish setting up the rest of our Client object properties.

Figure 2-d: Creating a New Custom Object: Client (Last Part)
The Object Classification properties allow the object to be exposed to other Force.com APIs that can be used when creating enterprise applications. So by default, Allow Sharing, Allow Bulk API Access, and Allow Streaming API Access are checked; we can leave this as is—which is recommended, anyway.
These APIs are beyond the scope of this e-book, but you can read more about them here.
As for the Deployment Status, this is set to Deployed by default. Deployment Status allows us to control when a custom object and its associated custom tab, related lists, and reports become visible to non-admin users.
As for the Search Status, we are definitely interested that the data this object will contain can be fully text searchable. By default, this option is unchecked, so it is highly recommended that you select it.
Finally, in regard to the Object Creation Options, which is only available when a custom object is first created (not available when a custom object is modified), I usually like to select the Add Notes and Attachments related list to default layout option (which is unchecked by default), as it is handy to have a placeholder for adding text notes and attachments (files) to an object.
In order to create the Client object, all we have to do is to click Save. Once we do that, we’ll see the following screen.

Figure 2-e: The Newly Created Client Custom Object
This contains the list of properties and all the details that our Client object has at this point. From here, we’ll add custom fields that define the object (Client__c) layout, which is what users will see and interact with.
Now that we’ve created our Client object, we’ll need to define what fields we’ll use to store data inside of it, so let’s go ahead and do that.
Creating custom fields
Creating custom fields in Force.com for any object is like creating fields in a table within a relational database, but on steroids—there’s a lot of functionality already baked into the product, mostly predefined field types.
Let’s first look at the fields we’ll be adding to our Client object. The Field column on Table 2-a represents the name of the custom field, and Type indicates the actual Force.com data type.
Don’t worry if some of these data types sound a bit unfamiliar, as they are actually very easy to understand—we’ll explore each as we go along.
Table 2-a: Fields for Our Client Custom Object
Type | |
|---|---|
Account | Lookup (on the Accounts object) |
Client Name | Text (80) Unique Case Insensitive |
CS Manager | Picklist |
Versions | Picklist (Multi-Select) |
Latest Renewal | Roll-Up Summary (MAX Renewal) |
Region | Picklist |
Status | Picklist |
Upgrade | Formula (Checkbox) |
Now that we know which fields we want to add to our Client object, let’s add one at a time.
We carry on where we left on Figure 2-e, on the SETUP > OBJECT MANAGER > Client object. Scroll a bit down to the Fields & Relationships section and notice that by default, four fields have been automatically created—one of them being the Client Name that we examined earlier, which is an index field. You can think of it like a Primary Key in a relational database table.

Figure 2-f: Default Fields & Relationships (Client Object)
The other three default fields are: Created By, which stores the name of the user that created a Client record, Last Modified By, which indicates which user last updated a Client record, and Owner, which indicates which user or group owns the record.
These fields are automatically added when any new object is created. Only the Client Name field can be edited, and this can be done by clicking on the arrow button and then on the Edit option—however, we won’t do this.
Now, let’s create our first custom field. In order to do this, click New inside the Fields & Relationships region. Once you have done that, a screen similar to the following one will appear.

Figure 2-g: Creating a New Custom Field
Notice that Force.com requests us to specify what type of information this field will contain. We’ll be creating the Account field, which will be a Lookup on the Account standard object.
Let’s scroll down and select the Lookup Relationship option.

Figure 2-h: The Lookup Relationship Option for the Account Name Field
Once you’ve selected this option, click Next. At this stage, Force.com will ask us which object this Lookup Relationship is related to—choose the Account object from the list.

Figure 2-i: Choosing the Related Object for the Lookup Relationship
Click Next once again to continue the process. The next stage is where we define the actual field itself and give it a name, so let’s do that.
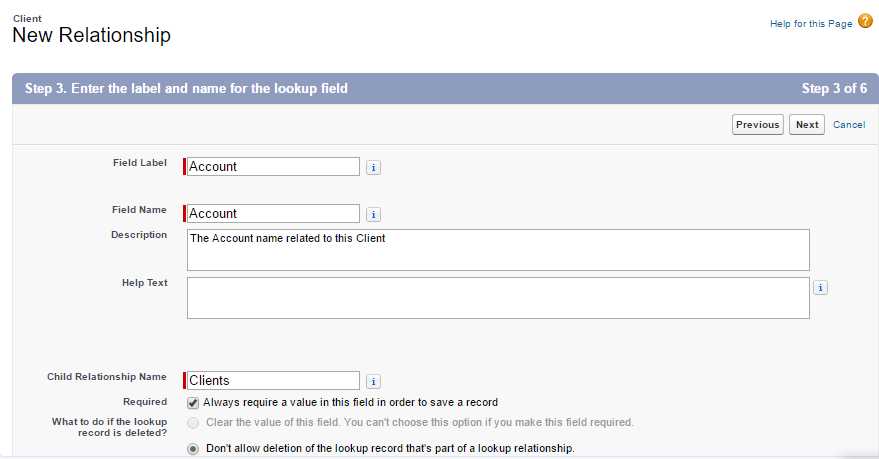
Figure 2-j: Giving the Custom Field an Identity
Enter the Field Label and Field Name values—in our case, we’ll enter the same for both and call it Account. It’s always recommended that we enter a Description, so let’s do that as well.
Once we’ve entered these basic details, it is important to notice that the Child Relationship Name is automatically provided by Force.com, and it’s recommended that we leave this value as is, unless you chose to name the relationship differently.
The Required option is not selected by default, which means that if we keep it this way, we will be able to leave the field empty when creating a new Client object. In this case, we want to enforce the condition that the Account field is not empty when a new Client object is saved, so let’s set it as required by clicking this option.
The other option we want to have selected is the one called Don’t allow deletion of the lookup record that’s part of a lookup relationship.
This means that if the Client record is removed, the Account linked to that Client record won’t be deleted from the Force.com database. This is useful and important, as the Account object is also commonly used by other Force.com apps, such as CRM and Sales.
What is happening here is that by adding this Lookup field, Force.com is establishing, behind the scenes, a database relationship between our Client custom object and the out-of-the-box Account standard object.
If we scroll down a bit, there’s an optional Lookup Filter section, which can be used to limit the number of records available to the users in the Lookup field. This can come in handy if we would like to limit the results, but we won’t be using this option.

Figure 2-k: The Lookup Filter Optional Section
In order to continue, scroll a bit further down and click Next again. Once you have done that, you’ll be asked to establish the field-level security for the field being created.
Here you can select which profiles can have access to this field. By default, the field is set to have access to all profiles (the Visible checkbox is selected for all profiles). In my case, I have left these default options selected.

Figure 2-l: Field-Level Security for the Field that is Being Created
In order to continue, click Next. Once that has been done, you’ll be presented with a screen where you’ll be asked to select the page layout(s) that should include this field.
By default, the field will be included within the layout of our object—in our case, this corresponds to the layout of the Client object.

Figure 2-m: Add Reference Field to Page Layouts
To continue, click Next. You’ll be presented with the final field creation screen. Here you’ll be asked to specify the title that this field will have in all the layouts associated with the Account object, and also in which of those layouts you would like the field to be shown. This is because this field is linked to the Account object.

Figure 2-n: Add Custom Related Lists
You may unselect one or more of the associated Account object layouts—in our case we can leave it as is, so this field can be shown in all those layouts.
Finally, click Save to finalize the creation of the field, or the Save & New button in order to save this field and create a new one.
I’ve clicked on the Save button, and our field now appears under the Fields & Relationships section of the Client object.

Figure 2-o: The Newly Created Account Field
Awesome—we have created our first custom field. This is a great achievement, but our Client object is far from done. Let’s create the rest of the fields it needs, as mentioned on Table 2-a.
The CS Manager field
By default, the Client Name field was created when the Client object was set up, so we’ll skip this one.
The next field on our list is CS Manager. This field is basically a Picklist that will contain the names of the customer success managers that will be assigned to various customer accounts. Let’s create it.
Under the Fields & Relationships section, click New. You’ll be presented with the New Custom Field screen. Here, scroll down and select the Picklist data type, and then click Next.

Figure 2-p: Selecting the Text Field Type for the CS Manager Field
Notice that there’s also a Picklist (Multi-Select) data type, which allows us to select more than one value.
For our app, we are only interested in having one CS Manager per Account, and this is why we have chosen Picklist instead of Picklist (Multi-Select).
Once we click Next, we’ll see the following screen. I’ve already filled in the details to save some time.

Figure 2-q: Properties of the CS Manager Field
The first property we need to fill in is the Field Label—I’ve entered the name CS Manager as the field’s label, and Force.com has automatically assigned to the Field Name property the value CS_Manager.
As you’ve probably noticed, Force.com simply added an underscore, as field names cannot contain spaces. It is possible to change the Field Name to something else, but it’s really not a must—so we can leave it as is.
By default, the Values property is set to Use global picklist value set; however, I chose the option Enter values, with each value separated by a new line. This is because I have a list of customer success managers that I want to be able to select, so I’ve manually entered them.
I’ve also selected the option Sort values alphabetically—which is not selected by default. The option Restrict picklist to the values defined in the value set is selected by default, which I have left as is.
Last but not least, I’ve entered a meaningful Description so that we don’t forget what this field is for—it’s always useful to have later on.
The Required property is also not selected by default, so I’ve selected it because I’m interested in always having a CS Manager assigned when a Client record is added. Once this has been done, click Next to continue.
On the screen that follows, you’ll be shown the field-level security screen. There’s nothing really to do here, as all the field-level security settings are set to Visible by default, so simply click Next.

Figure 2-r: Field-Level Security for the CS Manager Field
The following screen is Add to page layouts. Nothing to do here either, as the field is automatically selected to be added to the layout of the Client object. Simply click Save in order to finalize the creation of the field.

Figure 2-s: Add to Page Layouts for the CS Manager Field
Our newly created field will show up under the Fields & Relationships section of the Client object.

Figure 2-t: Fields of the Client Object
Important: Notice how some fields are always appended the __c suffix, which indicates that these are custom fields that we have created. Fields that are created by Force.com do not have the __c suffix appended to them.
So now we’ve now created another field. Let’s carry on and finalize our Client object.
For the next fields, in order to save some time, I’ll skip the Establish field-level security and Add to page layouts screens, by simply clicking Next and Save.
Let’s fast forward and immediately create the Region and Status fields first, as they are also Picklist types.
The Region & Status Picklists
The Region field will indicate which geographical region a Client record belongs to, and the Status field will indicate the customer’s position within our organization—if the customer is in active support or is being upgraded, for instance.
Let’s create the Region field first. Click New under the Fields & Relationships section of the Client object.
Chose Picklist as the data type and continue. Then, enter Region as the Field Label, and on the Values property, type in the following entries: North America, Latin America, Europe, Middle East, Africa, Asia, and Pacific—each of them on separate lines.
Make sure that Sort values alphabetically is selected and Restrict picklist is checked. Enter a meaningful Description and make sure that the Required property is also ticked.
Click Next to continue—you’ll then be presented with the Field-level security screen, so simply click Next to carry on. Finally, on the last screen click Save & New.
Awesome—our Region field has been created, and now we can create the Status field. Choose again the Picklist data type when prompted, and continue. Enter Status as the Field Label, and on the Values property, type in the following entries: In Active Support, Upgrading, End of Life, and Inactive.
Just as we did a moment ago for the Region field, make sure that Sort values alphabetically is selected and Restrict picklist is checked.
Don’t forget to enter a meaningful Description, and make sure that the Required property is selected.
Next is the Field-Level security screen—you know what to do. On the last one, click Save, and we’re done! We’ve now created the Status field.

Figure 2-u: The Region & Status Fields
Now that we’ve created all our Picklist fields for our Client object, let’s create the rest of the fields—some of them include other interesting data types that we haven’t explored yet.
The Versions Multi-Select Picklist
The Versions field is an interesting one, as it should allow us to select multiple product versions that customers of our organization might be using. It’s quite similar to the Picklist data type, but with a subtle difference. Let’s explore that.
In order to create our field, click New under the Fields & Relationships section of the Client object.
Select Picklist (Multi-Select) as the field data type, and then click Next, which will display the screen to enter the field details.
Within the field properties, notice that there’s a Visible Lines property that is not present on regular Picklist fields, which indicates how many lines will be displayed—Multi-Select Picklists are shown in a scrolling box, and not a dropdown menu like regular Picklists.
I’ve entered the following details for the Versions field.

Figure 2-v: Details of the Versions Field
With these details in place, click Next and then Save in order to finish creating this field. We now have our Versions field created.
The Upgrade Formula Checkbox field
Because our customers could be using multiple versions of our product, it would be quite useful if with a quick glimpse, we could easily see which ones would require an upgrade to our product’s latest version. A quick way to achieve this is with a Formula Checkbox field.
The Upgrade field’s purpose is to precisely determine this. If the field is checked, it indicates that a customer needs an upgrade. But how can we determine if the customer needs an upgrade?
The answer is easy: if the customer is using the latest (highest) version of our product, they will not require an upgrade—even though they might still be using older versions in parallel. On the contrary, if they are not using the latest version, then they will require an upgrade—the Upgrade checkbox will be ticked. This can be determined by using a formula.
So, let’s go ahead and create our Upgrade field. Click New under the Fields & Relationships section.
Select Formula as the field data type, and then click Next. Specify the Field Label, and for the Formula Return Type, select Checkbox.

Figure 2-w: The Output Type of the Upgrade Field
Then, click Next—this will take us to a screen where we’ll be able to enter the formula for our field.
The formula editor is easy to understand and navigate. I usually use the Advanced Formula tab, as it has a handy listbox that allows us to quickly view the available set of functions we can use.
Code Listing 2-a shows the formula we’ll use in order to determine if a customer requires an upgrade.
Code Listing 2-a: The Upgrade Field Formula
IF(INCLUDES(Versions__c, "5.0"), false, true) |
The formula is very straightforward, and it basically checks whether or not the field Versions (Versions__c) includes the string 5.0—if it does, then false is returned, which means that no upgrade is required. On the contrary, if 5.0 is not found, then true is returned—meaning that an upgrade would be needed.
Say, for example, that in the future, version 6.0 of our software is released, and we need to update the Versions field and, subsequently, the Upgrade Field Formula. So what do we do?
Easy—we can update this at any time by going to the Fields & Relationships section of the Client object and clicking on the arrow button, and then on the Edit option—this is available for each field.
So, let’s add our formula and use the Advanced Formula editor.

Figure 2-x: The Advanced Formula Editor
It’s always useful to verify that the formula we have typed in is actually accurate. There’s a Check Syntax button just below the formula editor. Click it in order to verify that the formula indeed does have a valid syntax.
If you scroll down a bit further, there’s an important section called Blank Field Handling. By default, this is set to Treat blank fields as zeroes; however, for this formula, we are interested in Treat blank fields as blanks.

Figure 2-y: Blank Field Handling
Because our Versions field is actually just a List of Strings, it makes more sense to treat blank fields as blanks rather than zeroes.
Let’s click on Next in order to continue—we’ll be shown the field-level security screen. We can skip this and accept the default settings by clicking Next.
Finally, the Add to page layouts screen will be shown. Leave the default settings and click Save—this will create our Upgrade field.
Summary
Wait, aren’t we missing a field for our Client object? Good point! We haven’t yet created the Latest Renewals field, as shown in Table 2-a. We haven’t created this field yet because it depends on another object that we haven’t created—the Renewal object.
The Latest Renewals field will be a Roll-Up Summary field that will retrieve information from the most recent Renewal record.
First, we need to create our Renewal object, then we can come back to the Client object and add this Latest Renewals summary field.
Customer success for most organizations means that we want to keep our customers engaged and using our products, so renewals are an important part of a Customer Success application—this is why, in the chapter that follows, we’ll create the Renewal object and tie it to the Client object we’ve created.
Our app is starting to take shape. Let’s keep exploring what lies ahead.
- 1800+ high-performance UI components.
- Includes popular controls such as Grid, Chart, Scheduler, and more.
- 24x5 unlimited support by developers.