
Flutter UI Succinctly®

CHAPTER 5
Navigation Widgets
Overview
Being able to move around through an app’s UI is key for a good user experience and a functional application.
Flutter provides several navigation widgets that can be used to achieve that. This is what this chapter is all about: exploring the navigation possibilities that exist within Flutter.
Succinctly books app
Before we begin exploring the various navigation widgets we have available within Flutter, we are going to refactor the code we’ve written and add some extra features.
The idea is to showcase the various navigation widgets available in Flutter by creating a Flutter app that can navigate between a reduced list of Succinctly books. The changes are highlighted in bold in the following code listing.
Code Listing 5-a: Updated main.dart
import 'package:flutter/material.dart'; void main() => runApp(MyApp()); class StaticBooks { static const String cdn = "https://cdn.syncfusion.com/"; static const String path = "content/images/downloads/ebook/ebook-cover/"; static const List<String> covers = [ "visual-studio-for-mac-succinctly-v1.png", "angular-testing-succinctly.png", "azure-devops-succinctly.png", "asp-net-core-3-1-succinctly.png", "angulardart_succinctly.png" ]; static const List<String> titles = [ "Visual Studio for Mac Succinctly", "Angular Testing Succinctly", "Azure DevOps Succinctly", "ASP.NET Core 3.1 Succinctly", "AngularDart Succinctly" ]; } class Succinctly extends StatelessWidget { final String book; final String title; Succinctly({ @required this.book, @required this.title, }); @override Widget build(BuildContext context) { return Scaffold( appBar: AppBar( title: Text(title), ), body: Container( decoration: BoxDecoration( image: DecorationImage( image: NetworkImage(StaticBooks.cdn + StaticBooks.path + book), fit: BoxFit.scaleDown, ), ), ), floatingActionButton: FloatingActionButton( child: Icon(Icons.book_online), onPressed: () { print('Awesome book!'); }, ), ); } } class MyApp extends StatelessWidget { @override Widget build(BuildContext context) { return MaterialApp( debugShowCheckedModeBanner: false, home: Succinctly( book: StaticBooks.covers[0], title: StaticBooks.titles[0], ), theme: ThemeData( primaryColor: Colors.indigo, accentColor: Colors.amber, textTheme: TextTheme( bodyText2: TextStyle( fontSize: 26, fontStyle: FontStyle.italic), ), brightness: Brightness.dark, ), ); } } |
After making these changes and saving main.dart, we should see the app’s UI updated on the emulator. On my machine, it looks as follows.
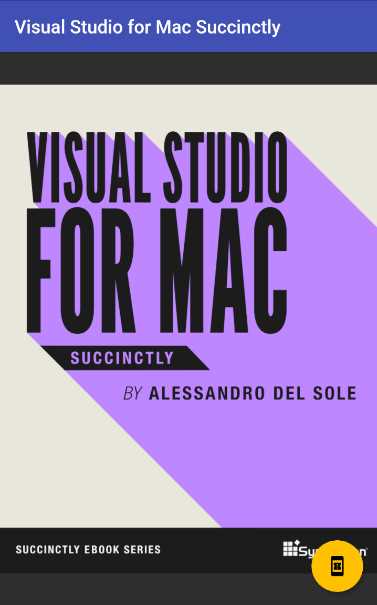
Figure 5-a: Succinctly Books App
That looks cool! With a few code changes, we now have a basic app to view the covers of some Succinctly books. Let’s go over the code changes.
The first thing we did was create the StaticBooks class, which contains the hardcoded covers and of some titles of Succinctly books, the base URL (cdn) of the content delivery network (CDN), and the location (path) where the cover images are located.
Next, we created the Succinctly class, which essentially contains the Scaffold code that was previously directly assigned to the home property of the MaterialApp widget.
This means we’ve taken that code and refactored it into a new class that inherits from StatelessWidget. In essence, the Succinctly class returns a Scaffold widget.
The Succinctly class has two properties: book, which refers to the book’s cover image, and title, which refers to the book’s name.
The Succinctly class has a constructor method with two required parameters: book and title, which initialize their respective properties.
Finally, the Succinctly class has a build method that overrides the one inherited from the StatelessWidget class, which is responsible for creating the Scaffold widget.
With regards to the appBar property, the only difference is that we now set the value of the title property dynamically.
Regarding the floatingActionButton property, the icon was changed to book_online, and the text that is printed to the console was also changed to a message more aligned with the topic of this app: books.
The most important changes are related to the body property, which is assigned a Container widget. The Container widget contains a BoxDecoration widget, assigned to the decoration property, that has a DecorationImage widget which uses the NetworkImage widget to fetch an image from the web.
The image that is fetched from the web using the NetworkImage widget is the result of the concatenation of the (StaticBooks.cdn + StaticBooks.path + book) expression.
PopupMenuButton
Perhaps the easiest way to add navigation features and control to a Flutter application is by using a PopupMenuButton widget. The PopupMenuButton widget shows a menu when pressed. Let’s add a PopupMenuButton widget to the app’s toolbar as a way to navigate to the different Succinctly books. The changes are highlighted in bold.
Code Listing 5-b: Updated main.dart – Using a PopupMenuButton
import 'package:flutter/material.dart'; void main() => runApp(MyApp()); class StaticBooks { static const String cdn = "https://cdn.syncfusion.com/"; static const String path = "content/images/downloads/ebook/ebook-cover/"; static const List<String> covers = [ "visual-studio-for-mac-succinctly-v1.png", "angular-testing-succinctly.png", "azure-devops-succinctly.png", "asp-net-core-3-1-succinctly.png", "angulardart_succinctly.png" ]; static const List<String> titles = [ "Visual Studio for Mac Succinctly", "Angular Testing Succinctly", "Azure DevOps Succinctly", "ASP.NET Core 3.1 Succinctly", "AngularDart Succinctly" ]; } class Succinctly extends StatelessWidget { final String book; final String title; Succinctly({ @required this.book, @required this.title, }); PopupMenuItem<String> bookItem(item) { return PopupMenuItem<String>( child: Text(item), value: item, ); } List listBooks() { return StaticBooks.titles.map((String item) { return bookItem(item); }).toList(); } List<Widget> popupMenuButton() { return <Widget>[ PopupMenuButton( icon: Icon(Icons.book), itemBuilder: (BuildContext context) { return listBooks(); }, ), ]; } @override Widget build(BuildContext context) { return Scaffold( appBar: AppBar( title: Text(title), actions: popupMenuButton(), ), body: Container( decoration: BoxDecoration( image: DecorationImage( image: NetworkImage(StaticBooks.cdn + StaticBooks.path + book), fit: BoxFit.scaleDown, ), ), ), floatingActionButton: FloatingActionButton( child: Icon(Icons.book_online), onPressed: () { print('Awesome book!'); }, ), ); } } class MyApp extends StatelessWidget { @override Widget build(BuildContext context) { return MaterialApp( debugShowCheckedModeBanner: false, home: Succinctly( book: StaticBooks.covers[0], title: StaticBooks.titles[0], ), theme: ThemeData( primaryColor: Colors.indigo, accentColor: Colors.amber, textTheme: TextTheme( bodyText2: TextStyle( fontSize: 26, fontStyle: FontStyle.italic), ), brightness: Brightness.dark, ), ); } } |
After making these changes and saving main.dart, we should see the app’s UI updated on the emulator. On my machine, it looks as follows.

Figure 5-b: Succinctly Books App with a PopupMenuButton (Closed)
Notice that on the top-right corner of the app’s toolbar, there is an icon that we can click on. Let’s do that.
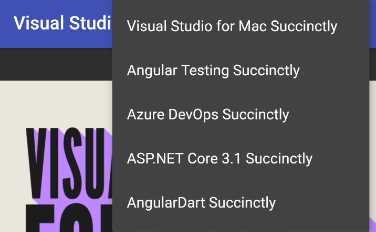
Figure 5-c: Succinctly Books App with a PopupMenuButton (Open)
When clicking the icon, we can see the list of books. The goal is that if you click on any of the book titles, you will be shown its respective cover image, which is something we have yet to implement.
But before we do that, let’s have a look at the changes we made. The first thing to notice is that we added the actions property to the AppBar widget, which gets assigned the result returned by the popupMenuButton method (List<Widget>).
The popupMenuButton method creates an instance of PopupMenuButton class, to which its itemBuilder property is assigned a List returned by the listBooks method, which is essentially a list of PopupMenuItem<String> items.
The way the listBooks method works is that it creates a list of each of the book titles by invoking the map method from the StaticBooks.titles array, and for each title, the bookItem method is invoked.
All the bookItem method does is create a PopupMenuItem<String> instance, which represents a book title on the menu.
Now that we know how this works, we can focus on adding the remaining functionality: that when a menu option is clicked, the correct corresponding cover image is shown, and the book title is updated.
Push and pop
In Flutter, app navigation is based on the Stack class, which contains all the roots that an application has since it began executing. When the app needs to change the page being displayed, the Navigator class is used.
The Navigator class has two methods that interact with the Stack: the push and pop methods. The push method inserts a new page at the top of the Stack, whereas the pop method removes the page from the top of the Stack so that the previous page on the Stack becomes visible again.
When using the push method, we need to specify the page we want to load, and to achieve that, we need to use the MaterialPageRoute class. To the MaterialPageRoute class, we specify the name of the page we want to pass to the push method.
Both the push and pop methods require the current context. So, with the theory covered, let’s make the changes necessary to the code. The changes are highlighted in bold in the following listing.
Code Listing 5-c: Updated main.dart – Using a PopupMenuButton with Navigation
import 'package:flutter/material.dart'; void main() => runApp(MyApp()); class StaticBooks { static const String cdn = "https://cdn.syncfusion.com/"; static const String path = "content/images/downloads/ebook/ebook-cover/"; static const List<String> covers = [ "visual-studio-for-mac-succinctly-v1.png", "angular-testing-succinctly.png", "azure-devops-succinctly.png", "asp-net-core-3-1-succinctly.png", "angulardart_succinctly.png" ]; static const List<String> titles = [ "Visual Studio for Mac Succinctly", "Angular Testing Succinctly", "Azure DevOps Succinctly", "ASP.NET Core 3.1 Succinctly", "AngularDart Succinctly" ]; } class Succinctly extends StatelessWidget { final String book; final String title; Succinctly({ @required this.book, @required this.title, }); PopupMenuItem<String> bookItem(item) { return PopupMenuItem<String>( child: Text(item), value: item, ); } List listBooks() { return StaticBooks.titles.map((String item) { return bookItem(item); }).toList(); } List<Widget> popupMenuButton(BuildContext context) { return <Widget>[ PopupMenuButton( icon: Icon(Icons.book), itemBuilder: (context) { return listBooks(); }, onSelected: (value) => showBook(context, value), ), ]; } void showBook(BuildContext context, String mItem) { String title; String cover; if (mItem == StaticBooks.titles[0]) { cover = StaticBooks.covers[0]; title = StaticBooks.titles[0]; } else if (mItem == StaticBooks.titles[1]) { cover = StaticBooks.covers[1]; title = StaticBooks.titles[1]; } else if (mItem == StaticBooks.titles[2]) { cover = StaticBooks.covers[2]; title = StaticBooks.titles[2]; } else if (mItem == StaticBooks.titles[3]) { cover = StaticBooks.covers[3]; title = StaticBooks.titles[3]; } else if (mItem == StaticBooks.titles[4]) { cover = StaticBooks.covers[4]; title = StaticBooks.titles[4]; } Navigator.push( context, MaterialPageRoute( builder: (context) => Succinctly( book: cover, title: title, ))); } @override Widget build(BuildContext context) { return Scaffold( appBar: AppBar( title: Text(title), actions: popupMenuButton(context), ), body: Container( decoration: BoxDecoration( image: DecorationImage( image: NetworkImage(StaticBooks.cdn + StaticBooks.path + book), fit: BoxFit.scaleDown, ), ), ), floatingActionButton: FloatingActionButton( child: Icon(Icons.book_online), onPressed: () { print('Awesome book!'); }, ), ); } } class MyApp extends StatelessWidget { @override Widget build(BuildContext context) { return MaterialApp( debugShowCheckedModeBanner: false, home: Succinctly( book: StaticBooks.covers[0], title: StaticBooks.titles[0], ), theme: ThemeData( primaryColor: Colors.indigo, accentColor: Colors.amber, textTheme: TextTheme( bodyText2: TextStyle( fontSize: 26, fontStyle: FontStyle.italic), ), brightness: Brightness.dark, ), ); } } |
After making these changes and saving main.dart, we should see the app’s UI updated on the emulator. On my machine, it looks as follows.
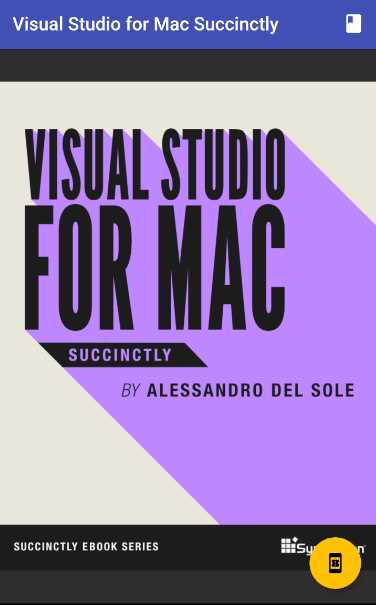
Figure 5-d: Succinctly Books App with a PopupMenuButton with Navigation (Closed)
If we click any of the menu options, we should be able to navigate to the respective book. I’ll test it out by clicking the second menu option, Angular Testing Succinctly.
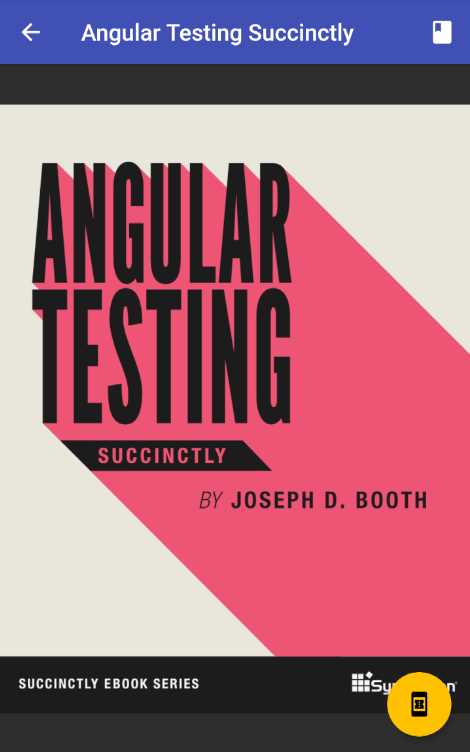
Figure 5-e: Succinctly Books App with Navigation Working
We can see that on the app’s title, there’s an icon to go back to the previous page. Awesome—we’ve managed to implement navigation successfully.
To make this happen, the first thing we had to do was pass the context parameter to the popupMenuButton method, which is something we hadn’t done before. The reason for doing this is that the context is required when invoking the Navigator class; therefore, the context is passed to the showBook method through the onSelected event.
The onSelected event was added to the PopupMenuButton widget. When the onSelected event gets triggered, the showBook method is executed, which is responsible for displaying the book selected through the menu.
The logic behind the showBook method is very simple. The parameter mItem indicates the name of the book selected using the menu. The value of the mItem parameter is compared against the values defined within the StaticBooks.titles list, and depending on the match, the cover and title values are assigned.
Finally, the Navigator.push method is invoked, to which the context, cover, and title are passed as parameters, resulting in a new page being added to the Stack, with the corresponding information from the book selected through the menu.
Bottom navigation bar
The BottomNavigationBar is a Flutter widget that is shown at the bottom of the app’s screen, regularly used with a Scaffold, and it should be used for a small number of items, usually between three and five.
The BottomNavigationBar widget provides a quick and easy solution to include navigation in your apps. Let’s get straight into the details and see how we can implement our book app navigation with a BottomNavigationBar widget. The changes are highlighted in bold in the following code.
Code Listing 5-d: Updated main.dart – Using a BottomNavigationBar
import 'package:flutter/material.dart'; void main() => runApp(MyApp()); class StaticBooks { static const String cdn = "https://cdn.syncfusion.com/"; static const String path = "content/images/downloads/ebook/ebook-cover/"; static const List<String> covers = [ "visual-studio-for-mac-succinctly-v1.png", "angular-testing-succinctly.png", "azure-devops-succinctly.png", "asp-net-core-3-1-succinctly.png", "angulardart_succinctly.png" ]; static const List<String> titles = [ "Visual Studio for Mac Succinctly", "Angular Testing Succinctly", "Azure DevOps Succinctly", "ASP.NET Core 3.1 Succinctly", "AngularDart Succinctly" ]; } class Succinctly extends StatelessWidget { final String book; final String title; Succinctly({ @required this.book, @required this.title, }); void showBook(BuildContext context, String mItem) { String title; String cover; if (mItem == StaticBooks.titles[0]) { cover = StaticBooks.covers[0]; title = StaticBooks.titles[0]; } else if (mItem == StaticBooks.titles[1]) { cover = StaticBooks.covers[1]; title = StaticBooks.titles[1]; } else if (mItem == StaticBooks.titles[2]) { cover = StaticBooks.covers[2]; title = StaticBooks.titles[2]; } else if (mItem == StaticBooks.titles[3]) { cover = StaticBooks.covers[3]; title = StaticBooks.titles[3]; } else if (mItem == StaticBooks.titles[4]) { cover = StaticBooks.covers[4]; title = StaticBooks.titles[4]; } print(cover); Navigator.push( context, MaterialPageRoute( builder: (context) => Succinctly( book: cover, title: title, ))); } static int _index = 0; @override Widget build(BuildContext context) { return Scaffold( appBar: AppBar( title: Text(title), ), bottomNavigationBar: BottomNavigationBar( selectedItemColor: Colors.orange, currentIndex: _index, onTap: (value) { String _title = StaticBooks.titles[value]; _index = value; showBook(context, _title); }, items: [ BottomNavigationBarItem( label: 'Visual Studio Mac', icon: Icon(Icons.book), ), BottomNavigationBarItem( label: 'Ang. Testing', icon: Icon(Icons.book_online), ), BottomNavigationBarItem( label: 'Azure DevOps', icon: Icon(Icons.book_online_outlined), ), BottomNavigationBarItem( label: 'ASP.NET Core', icon: Icon(Icons.book_online_rounded), ), BottomNavigationBarItem( label: 'AngularDart', icon: Icon(Icons.book_online_sharp), ), ], ), body: Container( decoration: BoxDecoration( image: DecorationImage( image: NetworkImage(StaticBooks.cdn + StaticBooks.path + book), fit: BoxFit.scaleDown, ), ), ), floatingActionButton: FloatingActionButton( child: Icon(Icons.book_online), onPressed: () { print('Awesome book!'); }, ), ); } } class MyApp extends StatelessWidget { @override Widget build(BuildContext context) { return MaterialApp( debugShowCheckedModeBanner: false, home: Succinctly( book: StaticBooks.covers[0], title: StaticBooks.titles[0], ), theme: ThemeData( primaryColor: Colors.indigo, accentColor: Colors.amber, textTheme: TextTheme( bodyText2: TextStyle( fontSize: 26, fontStyle: FontStyle.italic), ), brightness: Brightness.dark, ), ); } } |
After we have made these changes and saved main.dart, the app’s UI should be updated on the emulator.
I’ll click on the fifth icon of the BottomNavigationBar from left to right, which corresponds to the AngularDart Succinctly book. On my machine, it looks as follows.
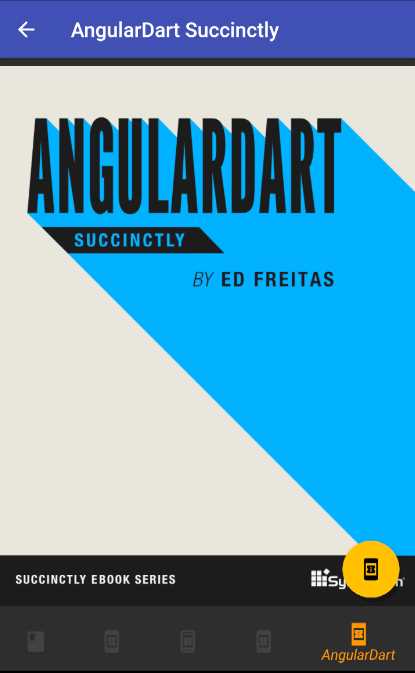
Figure 5-f: Succinctly Books App – BottomNavigationBar
So, one of the changes made (which is probably not noticeable) was that the action property from the AppBar widget was removed, along with all the logic responsible for creating the menu.
The bottomNavigationBar property was added to the build method, which gets assigned a BottomNavigationBar widget, and a static variable called _index was added to the Succinctly class. The static _index variable is used to keep track of which book is selected using the BottomNavigationBar widget.
With regards to the BottomNavigationBar widget, we are using several properties. The selectedItemColor property indicates the color that is shown when an item is selected—in this case, Colors.orange, as can be seen in Figure 5-f.
Then we have the currentIndex property, which gets assigned the value of the static _index variable. This property is used internally to keep track of which book is selected.
We have the onTap event, which gets triggered when a book is selected, by tapping on any of the items of the BottomNavigationBar widget.
When the onTap event is executed, the title of the book selected is retrieved by the StaticBooks.titles[value] instruction, and this value is assigned to the _title variable.
The value of the _title variable is passed to the showBook method, which then displays the cover of the selected book.
The items that are shown within the BottomNavigationBar widget are specified within the items property, which is an array of BottomNavigationBarItem widgets.
Each BottomNavigationBarItem is a button within the BottomNavigationBar widget, and two properties for each are used: an icon and a label.
As you might have noticed, the BottomNavigationBar widget is best suited when you have a fixed number of tabs (items) that you want to display, which we do in this example. When you have a dynamic number of items to display, using the BottomNavigationBar widget might not be the best option.
Tab bar
Another way to add navigation to a Flutter application is to use the TabBar class, which is made up of three main parts.
The first part is the TabController, the second is the TabBar itself (which contains the tabs), and the third part is the TabBarView with its children.
A TabBar displays a horizontal row of tabs, and when you click on one of the tabs, the TabBarView class displays different widgets with an animation.
Let’s go ahead and implement the app’s navigation using a TabBar widget. The changes to the code are highlighted in bold in the following listing.
Code Listing 5-e: Updated main.dart – Using a TabBar
import 'package:flutter/material.dart'; void main() => runApp(MyApp()); class StaticBooks { static const String cdn = "https://cdn.syncfusion.com/"; static const String path = "content/images/downloads/ebook/ebook-cover/"; static const List<String> covers = [ "visual-studio-for-mac-succinctly-v1.png", "angular-testing-succinctly.png", "azure-devops-succinctly.png", "asp-net-core-3-1-succinctly.png", "angulardart_succinctly.png" ]; static const List<String> titles = [ "Visual Studio for Mac Succinctly", "Angular Testing Succinctly", "Azure DevOps Succinctly", "ASP.NET Core 3.1 Succinctly", "AngularDart Succinctly" ]; } class Succinctly extends StatelessWidget { @override Widget build(BuildContext context) { return DefaultTabController( length: 5, child: Scaffold( appBar: AppBar( title: Text('Succinctly Books'), bottom: TabBar( tabs: <Widget>[ Tab(icon: Icon(Icons.book), text: 'VSM'), Tab(icon: Icon(Icons.book_online), text: 'AT'), Tab(icon: Icon(Icons.book_online_outlined), text: 'AZ'), Tab(icon: Icon(Icons.book_online_rounded), text: 'ASP'), Tab(icon: Icon(Icons.book_online_sharp), text: 'AD'), ], ), ), body: TabBarView( children: <Widget>[ Container( decoration: BoxDecoration( image: DecorationImage( image: NetworkImage(StaticBooks.cdn + StaticBooks.path + StaticBooks.covers[0]), fit: BoxFit.scaleDown, ), ), ), Container( decoration: BoxDecoration( image: DecorationImage( image: NetworkImage(StaticBooks.cdn + StaticBooks.path + StaticBooks.covers[1]), fit: BoxFit.scaleDown, ), ), ), Container( decoration: BoxDecoration( image: DecorationImage( image: NetworkImage(StaticBooks.cdn + StaticBooks.path + StaticBooks.covers[2]), fit: BoxFit.scaleDown, ), ), ), Container( decoration: BoxDecoration( image: DecorationImage( image: NetworkImage(StaticBooks.cdn + StaticBooks.path + StaticBooks.covers[3]), fit: BoxFit.scaleDown, ), ), ), Container( decoration: BoxDecoration( image: DecorationImage( image: NetworkImage(StaticBooks.cdn + StaticBooks.path + StaticBooks.covers[4]), fit: BoxFit.scaleDown, ), ), ), ], ), ), ); } } class MyApp extends StatelessWidget { @override Widget build(BuildContext context) { return MaterialApp( debugShowCheckedModeBanner: false, home: Succinctly(), theme: ThemeData( primaryColor: Colors.indigo, accentColor: Colors.amber, textTheme: TextTheme( bodyText2: TextStyle( fontSize: 26, fontStyle: FontStyle.italic), ), brightness: Brightness.dark, ), ); } } |
After we’ve made these changes and saved main.dart, the app’s UI should be updated on the emulator.
I’ll click the fifth icon of the TabBar from left to right, which corresponds to the Azure DevOps Succinctly book. On my machine, it looks as follows.
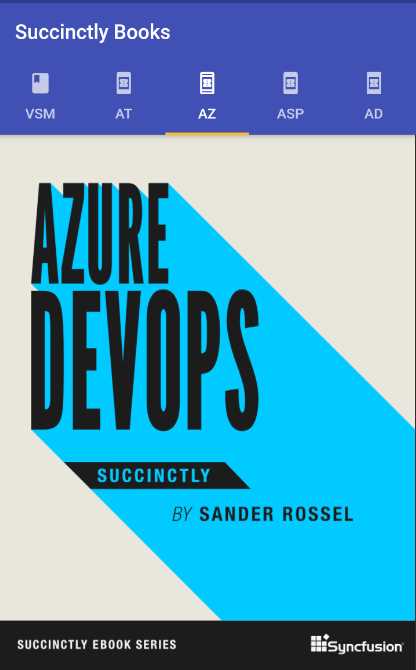
Figure 5-g: Succinctly Books App – TabBar
The first thing to notice is the Succinctly class was simplified; only the build method remains. Everything else was removed, and the class no longer takes any parameters.
The build method of the Succinctly class was completely changed. The most noticeable change is that this method now returns a DefaultTabController instead of a Scaffold widget as before.
The DefaultTabController widget contains length and child properties. The length indicates the number of tabs that the widget will contain, and the child property is assigned to a Scaffold widget.
The Scaffold widget has an AppBar that includes a TabBar widget, which contains an array of Tab widgets. Each Tab widget contains an icon and a text property, each corresponding to a tab item from the TabBar widget.
The body property of the Scaffold widget is assigned to a TabBarView widget, which contains a children property that includes an array of Container widgets.
Each Container widget corresponds to a Succinctly book. Within every Container widget, there is a BoxDecoration widget, which contains a DecorationImage widget.
Each DecorationImage contains a NetworkImage widget that retrieves the corresponding book image from the web.
As you might have noticed, the TabBar widget is also best suited when you have a fixed number of tabs (items) that you want to display, and mostly when the content is static (it doesn’t vary), which is the case for this example.
So, when you have a dynamic number of items to display, using the TabBar widget might not be the best option.
Summary
Throughout this chapter, we’ve explored how to add various types of navigation mechanisms to a Flutter application.
Although we touched base on most of the common Flutter app navigation methods, I’d like to leave you with a challenge: how could you implement navigation using the Flutter Drawer class?
If you do have the time to try this out, I’d love to hear from you about your results. In the next and final chapter, we will cover the Stack, ListView, and GridView widgets to wrap things up.
- Advanced custom widgets and file-format libraries.
- Built from scratch.
- Dart-powered widgets for extraordinary apps.
- A wide range of products and hassle-free licensing.