
Flutter Succinctly®

CHAPTER 2
App Fundamentals
Quick intro
To get a sense of what we will be building throughout this book, let’s have a look at how the main screen of our finished application will look—we can see this as follows.
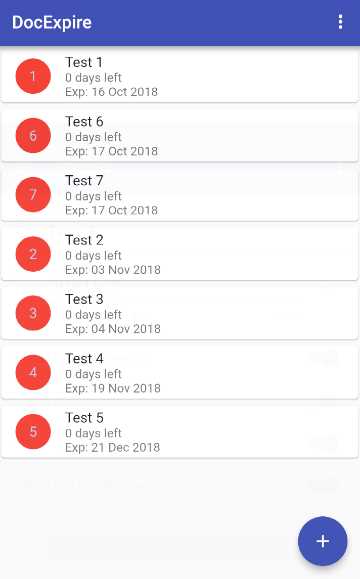
Figure 2-a: The finished app
We can see that the app contains a list of documents, each with the remaining days before they expire and their expiration date.
The app’s UI is based on Google’s Material Design library, which comes out of the box with Flutter.
Note: You can find all the finished Dart source code files and the Pubspec.yaml file for this app in the appendix at the end of the book.
Rewriting—main.dart
With the setup phase behind us, it’s now time to start building the foundations of our application.
To do that, go to the main.dart file found under the lib folder, and remove all the existing code it contains. With all the out-of-the-box code removed from the main.dart file, let’s add the following code.
Code Listing 2-a: The new, finished main.dart code
import 'package:flutter/material.dart'; import './ui/doclist.dart'; void main() => runApp(DocExpiryApp()); class DocExpiryApp extends StatelessWidget { @override Widget build(BuildContext context) { return MaterialApp( debugShowCheckedModeBanner: false, title: 'DocExpire', theme: new ThemeData( primarySwatch: Colors.indigo, ), home: DocList(), ); } } |
What have we done here? Let’s dissect this code into smaller pieces to understand it better.
Code Listing 2-b: The new, finished main.dart code (part 1)
import 'package:flutter/material.dart'; import './ui/doclist.dart'; |
The first line imports the Material Design library, which we will use to create our app’s widgets (UI components).
The second line references a file that we have not created yet within our application, which will contain the logic for creating and displaying the list of documents, showing whether they have expired or not.
Next, we invoke the main method, which is the app’s main entry point. This method invokes runApp, to which a new instance of the DocExpiryApp class is passed.
Code Listing 2-c: The new, finished main.dart code (part 2)
void main() => runApp(DocExpiryApp()); |
Following that, we declare the DocExpiryApp class, which inherits from the StatelessWidget class. This is one of two types of widget classes that Flutter supports.
Code Listing 2-d: The finished DocExpiryApp code
class DocExpiryApp extends StatelessWidget { @override Widget build(BuildContext context) { return MaterialApp( debugShowCheckedModeBanner: false, title: 'DocExpire', theme: new ThemeData( primarySwatch: Colors.indigo, ), home: DocList(), ); } } |
A StatelessWidget describes a widget that does not require mutable state—in other words, it is a widget without a state. You can find more details in the official documentation.
Basically, every UI component in Flutter is a widget, either with state, StatefulWidget, or without state, StatelessWidget.
Within the DocExpiryApp class, we are overriding the Build method inherited from the StatelessWidget class, which is responsible for returning a Widget object to its caller, and thus building the UI element.
So, in essence, the Build method creates a MaterialApp widget, the app’s main component. The home property is assigned to the result that will be returned from the DocList method. The DocList method is imported from doclist.dart (yet to be created), which will return the list of documents to be displayed.
To better understand the relationship between what you see in the code and what is displayed on the device’s screen when the app runs, let’s have a look at the following diagram.
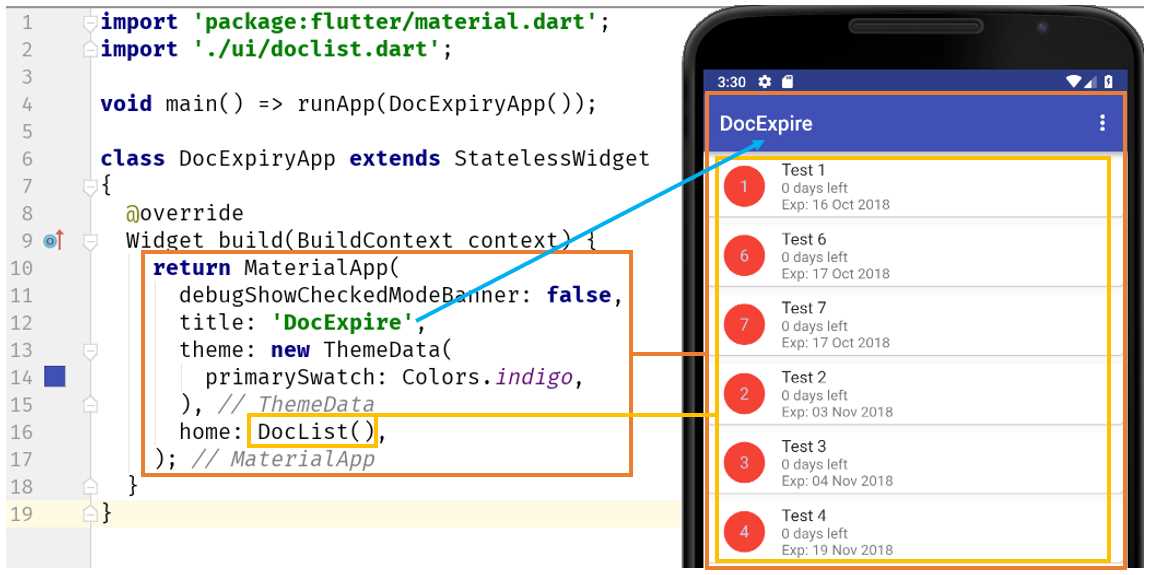
Figure 2-b: Relationship between the main.dart code and the app’s main UI
The MaterialApp widget has properties that determine some of its functionality. The title property needs no explanation, but the debugShowCheckedModeBanner and theme properties do.
As its name indicates, the debugShowCheckedModeBanner property is used for displaying a smaller banner that indicates that the app is running in debug mode when the property is set to true.
This is how the app’s main screen would look with the debugShowCheckedModeBanner property set to true. Notice the small Debug banner on the top, right-hand side of the screen.
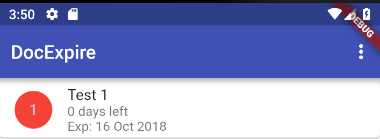
Figure 2-c: The app’s main UI with debugShowCheckedModeBanner set to true
The theme property basically represents the main color used for the app’s UI, which in this case is indigo. More information about theming in Flutter can be found in the official documentation.
If you’re tempted to run the app after having made these changes to main.dart, you’ll get some compilation errors. This is because we haven’t yet created Doclist.dart—but we are referencing it in the code.
Also, we have assigned to the home property the value returned by the DocList method—also part of Doclist.dart.
So, if you would like to run the app at this stage and check how it looks, you’ll have to wait until we have written some more code, specifically within the doclist.dart file.
Project structure
With the main.dart code rewritten, let’s explore how the current project structure looks, what other files and folders we would need to create, and what the finished application project structure will look like.
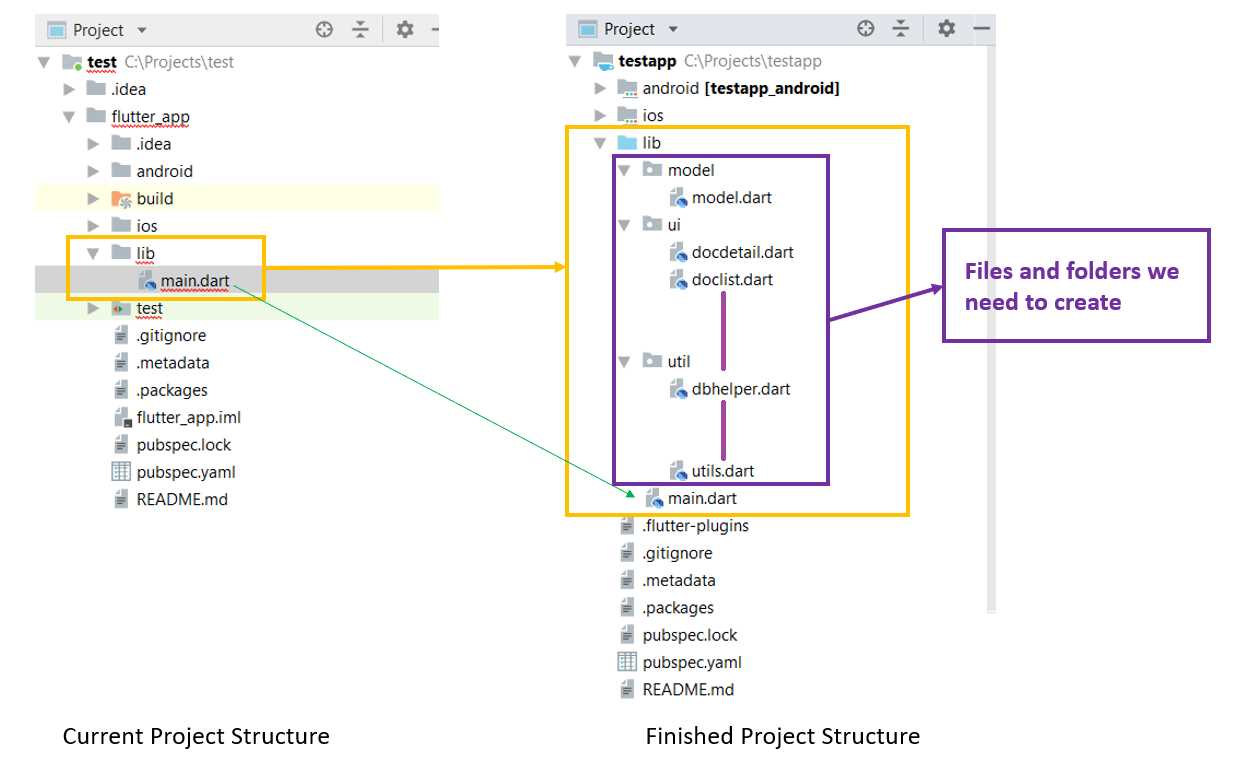
Figure 2-d: The app’s project folder structure comparison
As we can see in the preceding diagram, the main differences between the current project folder structure and the finished one are the subfolders and files found under the project’s lib folder, which we will create throughout this book.
The lib folder is where all our app’s source code is going to be organized. To make the code organization easy, we’ll have three subfolders:
- The model folder, which will be used to keep the object model that will be used for storing information on the SQLite database.
- The ui folder, which is where we will have all the logic related to the app’s UI and navigation.
- The util folder, which will contain utility, general purpose code, and database helper classes and methods.
By using this structure, we can keep our source code organized. Notice that this is not the only possible project folder structure; you might want to name your folders differently or organize them in another way. Flutter doesn’t impose a specific way of organizing source files—the way you organize your code is entirely up to you.
However, I suggest you keep this structure, as it will make it easier to follow along with the various stages of the development of the application.
Bottom-to-top coding approach
For our application to be fully functional, we need to be able to display the list of documents. To be able to do that, we need a database model, database helper functions, a detail page that will be used for each document, and some generic utility functions.
All this code needs to be written before we can attempt to display the list of documents. This means that doclist.dart will be the last module we will write for our application.
The first module we will write is going to be called utils.dart, which will contain generic and form validation functions that we will need throughout the application.
We’ll be coding using a bottom-to-top approach, where we write the basic building blocks and then build up based on that. This approach will look as follows.
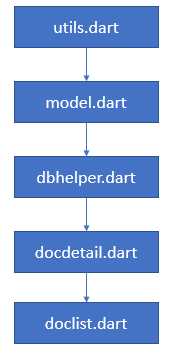
Figure 2-e: Bottom-to-top coding approach
Let’s move on, starting with the utils.dart file.
Writing utils.dart
To be able to properly validate new documents that we will enter using our application, we need to have some general validation routines. This is the main purpose of utils.dart.
To get a visual understanding of what this means, have a look at the following screenshot that represents the finished UI for adding a new document.
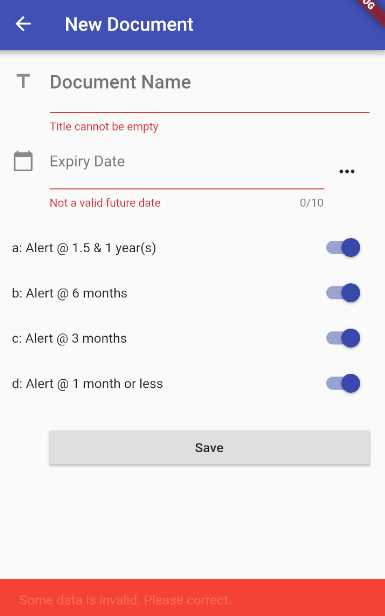
Figure 2-f: App screen to enter a new document
We can immediately see that there are two validations: one for checking that the Document Name field is not empty, and another that checks that the Expiry Date field is a valid future date. This is the logic we’ll add to the utils.dart file—let’s go ahead and do that.
To organize our code properly, create a subfolder under the lib folder called util—this is where we will create the utils.dart file.
You can do this by right-clicking on the lib folder within Android Studio, and then choosing New > Directory.
Next, select the lib folder, right-click, and choose New > File.
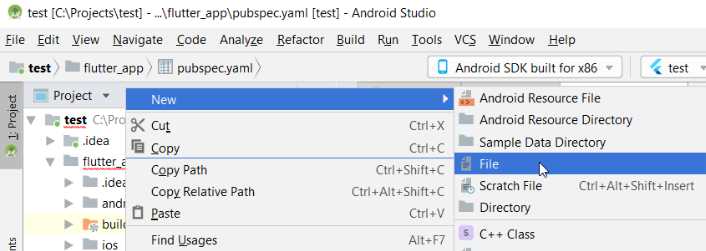
Figure 2-g: New file option
When prompted, enter the name of the file: utils.dart.
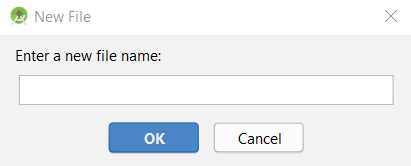
Figure 2-h: New file window
With the utils.dart file created under the lib\util folder path, let’s add the following code to it.
Code Listing 2-e: Full utils.dart code
import 'package:intl/intl.dart'; class Val { // Validations static String ValidateTitle(String val) { return (val != null && val != "") ? null : "Title cannot be empty"; } static String GetExpiryStr(String expires) { var e = DateUtils.convertToDate(expires); var td = new DateTime.now(); Duration dif = e.difference(td); int dd = dif.inDays + 1; return (dd > 0) ? dd.toString() : "0"; } static bool StrToBool(String str) { return (int.parse(str) > 0) ? true : false; } static bool IntToBool(int val) { return (val > 0) ? true : false; } static String BoolToStr(bool val) { return (val == true) ? "1" : "0"; } static int BoolToInt(bool val) { return (val == true) ? 1 : 0; } } class DateUtils { static DateTime convertToDate(String input) { try { var d = new DateFormat("yyyy-MM-dd").parseStrict(input); return d; } catch (e) { return null; } } static String convertToDateFull(String input) { try { var d = new DateFormat("yyyy-MM-dd").parseStrict(input); var formatter = new DateFormat('dd MMM yyyy'); return formatter.format(d); } catch (e) { return null; } } static String convertToDateFullDt(DateTime input) { try { var formatter = new DateFormat('dd MMM yyyy'); return formatter.format(input); } catch (e) { return null; } } static bool isDate(String dt) { try { var d = new DateFormat("yyyy-MM-dd").parseStrict(dt); return true; } catch (e) { return false; } } static bool isValidDate(String dt) { if (dt.isEmpty || !dt.contains("-") || dt.length < 10) return false; List<String> dtItems = dt.split("-"); var d = DateTime(int.parse(dtItems[0]), int.parse(dtItems[1]), int.parse(dtItems[2])); return d != null && isDate(dt) && d.isAfter(new DateTime.now()); } // String functions static String daysAheadAsStr(int daysAhead) { var now = new DateTime.now(); DateTime ft = now.add(new Duration(days: daysAhead)); return ftDateAsStr(ft); } static String ftDateAsStr(DateTime ft) { return ft.year.toString() + "-" + ft.month.toString().padLeft(2, "0") + "-" + ft.day.toString().padLeft(2, "0"); } static String TrimDate(String dt) { if (dt.contains(" ")) { List<String> p = dt.split(" "); return p[0]; } else return dt; } } |
What is going on here? As you might have noticed, the code contains two classes: Val and DateUtils. There’s quite a bit of code within the utils.dart file; it’s not incredibly important right now to understand each line of code within it, but rather, to understand how the main parts relate with each other.
Let’s explore the relationship between both classes and the document entry application screen we looked at before.
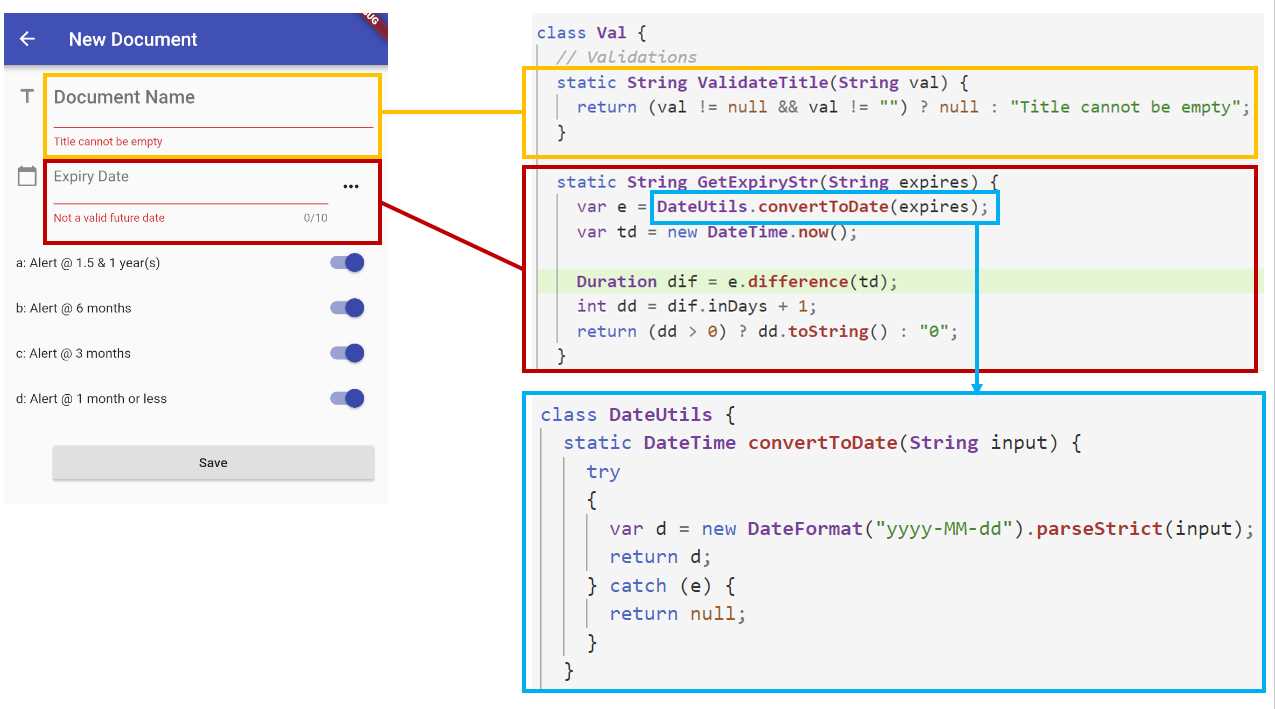
Figure 2-i: Interconnection between the document entry screen and utils.dart code
As you can see in Figure 2-i, the relationship among the parts and the application is very clear and easy to understand. Most of the methods within the Val and DateUtils classes are methods that we will need later as we progressively build our application.
Right now, let’s quickly go over the ones that are essential and that directly relate to the document entry screen. Let’s first have a look at the ValidateTitle method.
Code Listing 2-f: ValidateTitle method (utils.dart)
static String ValidateTitle(String val) { return (val != null && val != "") ? null : "Title cannot be empty"; } |
As we can see, this method is very simple—it basically evaluates, through a ternary conditional expression, if the value of the parameter val—which represents the name of the document entered through the document entry screen—is an empty String object.
If it is not, then null is returned, which means that the validation has passed. If it is an empty String, then a message is returned, indicating that the string cannot be empty—this message is the one displayed in the document entry screen.
Now, let’s explore the GetExpiryStr method and what it does. We can see this in the listing that follows.
Code Listing 2-g: GetExpiryStr method (utils.dart)
static String GetExpiryStr(String expires) { var e = DateUtils.convertToDate(expires); var td = new DateTime.now(); Duration dif = e.difference(td); int dd = dif.inDays + 1; return (dd > 0) ? dd.toString() : "0"; } |
This method is also quite simple. The first instruction converts the document’s expiry date, represented by the expires variable, into a DateTime object by invoking the convertToDate method from the DateUtils class.
What follows is that the current DateTime is obtained by calling the now method. Then, the difference between the document’s expiry date and the current date is calculated by calling the difference method.
If the result of difference is positive, then that value is converted to a String by calling the toString method, and then returned. If the value is negative or zero, then “0” is returned as a String object.
Now, let’s explore the convertToDate method from the DateUtils class—we can see this in the listing that follows.
Code Listing 2-h: convertToDate method (utils.dart)
static DateTime convertToDate(String input) { try { var d = new DateFormat("yyyy-MM-dd").parseStrict(input); return d; } catch (e) { return null; } } |
This method is also very simple—it basically takes the date as an input variable and attempts to parse it using the format “yyyy-MM-dd” by calling the parseStrict method.
If successful, then the parsed value d is returned; otherwise, null is returned.
Awesome—we are almost done covering all we need to know about the utils.dart code. There’s just one small piece missing: the first line of utils.dart.
Code Listing 2-i: Import statement (utils.dart)
import 'package:intl/intl.dart'; |
This line basically tells Flutter that utils.dart needs to import a package called intl.dart—which is a Dart library used for supporting internationalization and localization capabilities.
The DateFormat method that is invoked from the convertToDate method is part of the intl.dart library.
However, there’s still one thing missing—we need to import this package into our Flutter project. We can do this by opening the Pubspec.yaml file found within our main project folder, and then installing the package as follows.

Figure 2-j: Adding the package to Pubspec.yaml
Once the package has been added to the Pubspec.yaml file, we’ll need to run the flutter packages get command, which can be done within Android Studio directly with one click—this is highlighted in Figure 2-j.
Once you’ve clicked the Packages get option, you should see the following output in the Android Studio messages window.
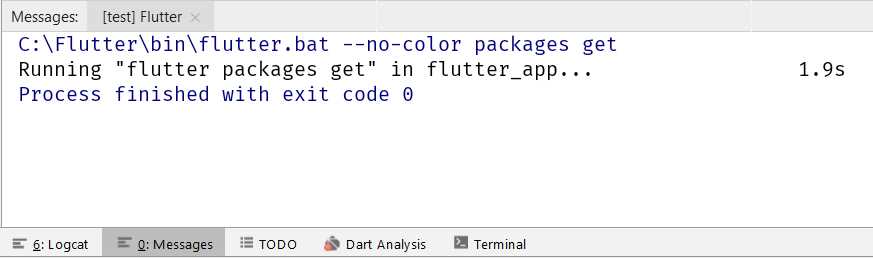
Figure 2-k: Message output in Android Studio after adding a package
Our utils.dart code can now use the DateFormat method, and we are done with utils.dart.
Writing model.dart
With utils.dart covered, let’s move on and create the model.dart file, which represents the data model that will be used for storing and retrieving document data.
To keep things organized, let’s create a model subfolder under the lib folder of our application. Inside this model subfolder, let’s create the model.dart file—we can do this the same way we created the util subfolder and utils.dart with Android Studio.
With the model.dart file created, let’s add the following code to it.
Code Listing 2-j: Full model.dart code
import '../util/utils.dart'; class Doc { int id; String title; String expiration; int fqYear; int fqHalfYear; int fqQuarter; int fqMonth; Doc(this.title, this.expiration, this.fqYear, this.fqHalfYear, this.fqQuarter, this.fqMonth); Doc.withId(this.id, this.title, this.expiration, this.fqYear, this.fqHalfYear, this.fqQuarter, this.fqMonth); Map<String, dynamic> toMap() { var map = Map<String, dynamic>(); map["title"] = this.title; map["expiration"] = this.expiration; map["fqYear"] = this.fqYear; map["fqHalfYear"] = this.fqHalfYear; map["fqQuarter"] = this.fqQuarter; map["fqMonth"] = this.fqMonth; if (id != null) { map["id"] = id; } return map; } Doc.fromOject(dynamic o) { this.id = o["id"]; this.title = o["title"]; this.expiration = DateUtils.TrimDate(o["expiration"]); this.fqYear = o["fqYear"]; this.fqHalfYear = o["fqHalfYear"]; this.fqQuarter = o["fqQuarter"]; this.fqMonth = o["fqMonth"]; } } |
Let’s break this into smaller parts so we can understand what this code does.
First, we import a reference to the utils.dart module we previously created—this is because the fromObject method invokes the TrimDate method from the DateUtils class.
Code Listing 2-k: Importing utils.dart in model.dart
import '../util/utils.dart'; |
Then, we have a Doc class, which in our data model represents the document that will be written and read to the SQLite embedded database we will be using. Let’s first explore the properties of the Doc class.
Code Listing 2-l: Doc class properties
// Previous code… class Doc { int id; String title; String expiration; int fqYear; int fqHalfYear; int fqQuarter; int fqMonth; // The rest of the Doc class code } |
To better understand how these properties relate to a document database record, which is going to be stored within an SQLite table, let’s look at the following diagram.

Figure 2-l: Data model fields
We can clearly establish the relationship between each of the Doc class properties and each of the columns as they will be stored in the SQLite database.
Our Doc class is the object representation of a document record stored in the database.
Moving on, we can see that our class has two constructors—one that will be invoked when creating a new document, and the other for existing documents in the database. This is shown in the following code.
Code Listing 2-m: Doc class constructors
// Previous code… class Doc { // Doc class properties. // Constructor used if we don’t want to assign an id immediately. Doc(this.title, this.expiration, this.fqYear, this.fqHalfYear, this.fqQuarter, this.fqMonth); // Constructor used if we want to assign an id immediately Doc.withId(this.id, this.title, this.expiration, this.fqYear, this.fqHalfYear, this.fqQuarter, this.fqMonth); // Rest of the Doc class code. } |
The first constructor (Doc) is used when we want to create an instance of the Doc class and we don’t want to assign a value to the id property.
The second constructor (Doc.withId) is used when we want to create an instance of the Doc class and we want to assign a value to the id property right away.
When we create a new document or access an existing one, we’ll need to invoke one of these constructors to create an instance of the Doc class—which is how we represent a document within our application.
Now, let’s explore the rest of the Doc class code.
Code Listing 2-n: Rest of the Doc class code
// Previous code… class Doc { // All the previous code Map<String, dynamic> toMap() { var map = Map<String, dynamic>(); map["title"] = this.title; map["expiration"] = this.expiration; map["fqYear"] = this.fqYear; map["fqHalfYear"] = this.fqHalfYear; map["fqQuarter"] = this.fqQuarter; map["fqMonth"] = this.fqMonth; if (id != null) { map["id"] = id; } return map; } Doc.fromOject(dynamic o) { this.id = o["id"]; this.title = o["title"]; this.expiration = DateUtils.TrimDate(o["expiration"]); this.fqYear = o["fqYear"]; this.fqHalfYear = o["fqHalfYear"]; this.fqQuarter = o["fqQuarter"]; this.fqMonth = o["fqMonth"]; } } |
The rest of the code consists of two methods—the toMap and fromObject methods. Let’s see what each does. The toMap method is used when the document information needs to be written to the database.
Code Listing 2-o: The toMap method
Map<String, dynamic> toMap() { var map = Map<String, dynamic>(); map["title"] = this.title; map["expiration"] = this.expiration; map["fqYear"] = this.fqYear; map["fqHalfYear"] = this.fqHalfYear; map["fqQuarter"] = this.fqQuarter; map["fqMonth"] = this.fqMonth; if (id != null) { map["id"] = id; } return map; } |
The first instruction of the toMap method is used to create an instance of Map<String, dynamic>. For further information regarding the usage of Map within the Dart programming language, please refer to the official documentation.
Within the toMap method, the existing Doc instance property values are assigned to their equivalent properties within a Map object—which is convenient for writing the data to the database. The toMap method returns a Map object back to its invoker—which, as we will see later, is going to be a method that writes to the database.
Let’s now have a look at the fromObject method, which does the opposite of what the toMap method does.
Code Listing 2-p: The fromObject method
Doc.fromOject(dynamic o) { this.id = o["id"]; this.title = o["title"]; this.expiration = DateUtils.TrimDate(o["expiration"]); this.fqYear = o["fqYear"]; this.fqHalfYear = o["fqHalfYear"]; this.fqQuarter = o["fqQuarter"]; this.fqMonth = o["fqMonth"]; } |
Essentially, the fromObject method receives a dynamic object as a parameter—which is retrieved from the database—and the properties of this object are then assigned to their respective counterpart properties within the Doc instance.
To recap: the toMap method is used when writing to the database, and the fromObject method is used when reading from the database.
Creating the database—dbhelper.dart
With model.dart behind us, let’s now focus on an essential part of the application, which is the database access layer and helper functions. Let’s create the dbhelper.dart file within the util subfolder.
As the code for the dbhelper.dart file is quite extensive, I won’t paste it all straight away, but instead we’ll take a look at each individual part, one by one.
Code Listing 2-q: The import statements—dbhelper.dart
import 'package:flutter/material.dart'; import 'package:sqflite/sqflite.dart'; import 'package:path_provider/path_provider.dart'; import 'dart:async'; import 'dart:io'; import '../model/model.dart'; |
In the import section, we can see that the first three instructions reference three packages that we haven’t seen before.
The material.dart package is built into Flutter, and was automatically added to the Pubspec.yaml file when the project was created. We can see this in the Pubspec.yaml file as follows.
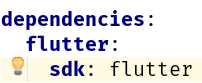
Figure 2-m: Built-in material and Flutter package
The following two lines refer to the sqflite.dart (a Flutter package used to access a SQLite database) and path_provider.dart packages, which have not been added to the Pubspec.yaml file yet. Let’s do this now.
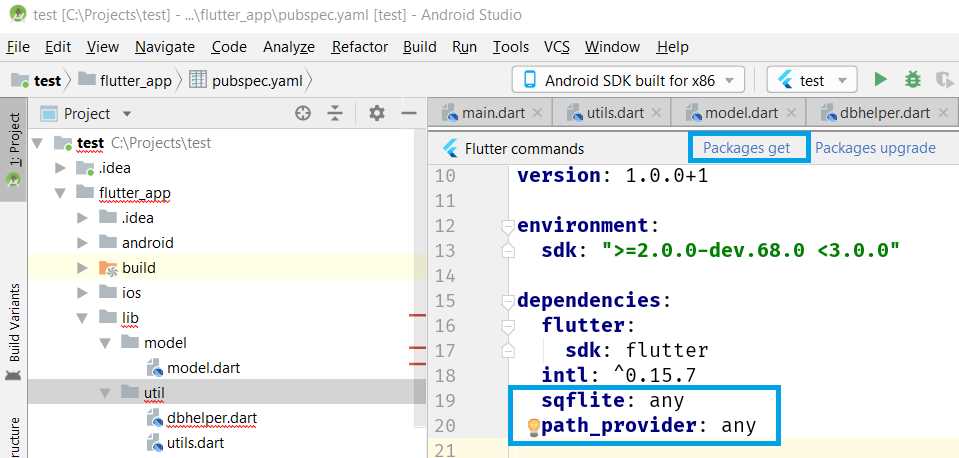
Figure 2-n: Adding the sqflite and path_provider packages
All we’ve done is add both package names below intl, within the Pubspec.yaml file. After doing that, click on the Packages get option, so both packages can get installed.
Following that are two import statements that reference the dart:async and dart:io libraries, which will be used for performing async and file operations.
Finally, we can see the import statement that references the model.dart file, which we will need to read and write documents to the database.
Next, let’s create the DbHelper class, which will contain all the helper functions we need to work correctly with the database.
For now, let’s just add the names of the properties for the database table and fields—we can see this as follows.
Code Listing 2-r: DbHelper class—dbhelper.dart
// Import statements… previous code. class DbHelper { // Tables static String tblDocs = "docs"; // Fields of the 'docs' table. String docId = "id"; String docTitle = "title"; String docExpiration = "expiration"; String fqYear = "fqYear"; String fqHalfYear = "fqHalfYear"; String fqQuarter = "fqQuarter"; String fqMonth = "fqMonth"; // More code will follow… } |
As you can see, the code is self-explanatory—we have tblDocs, which indicates the name of the table that will be used to store the documents, and following that, the names of each of the fields contained within that table.
Next, let’s create the database entry point, which will be a singleton. This is because we want to limit the instantiation of the DbHelper class to one instance only. We can do this as follows.
Code Listing 2-s: DbHelper class—dbhelper.dart (continued)
// Import statements… previous code. class DbHelper { // Previous code // Singleton static final DbHelper _dbHelper = DbHelper._internal(); // Factory constructor DbHelper._internal(); factory DbHelper() { return _dbHelper; } // Database entry point static Database _db; } // More code will follow… |
The first thing we have done is declare the _dbHelper instance as a final variable, which means that it is a single-assignment variable. Once assigned, its value cannot change—this is what we want, as it needs to be a singleton.
That variable is assigned to the value returned by the class’ internal constructor, also known as a Factory constructor, which is then declared.
This Factory constructor pattern is quite common in Dart, and it is primarily used for creating singletons—this Stack Overflow thread explains this Dart pattern very well, in case you would like to know more about it.
Next, we declare a static variable of type Database that will hold the reference to the database entry point. The Database class is part of the sqflite library that we added to the Pubspec.yaml file previously.
Following this, we’ll need to get a runtime reference to the database and initialize it—we can do this as follows.
Code Listing 2-t: DbHelper class—dbhelper.dart (continued)
// Import statements… previous code. class DbHelper { // Previous code Future<Database> get db async { if (_db == null) { _db = await initializeDb(); } return _db; } // Initialize the database Future<Database> initializeDb() async { Directory d = await getApplicationDocumentsDirectory(); String p = d.path + "/docexpire.db"; var db = await openDatabase(p, version: 1, onCreate: _createDb); return db; } } // More code will follow… |
We can get the runtime reference to the database by using an async getter called db, which returns a Future object that will reference the database. This is done by checking that _db is not null, and then invoking the initializeDb method, which is responsible for opening the database.
The initializeDb method returns a Future, which is the runtime reference to the database. It does this by calling the openDatabase async method and passing the location of the database file on the device—Docexpire.db.
The location of the file is determined by invoking the getApplicationDocumentsDirectory method and concatenating it to the actual file name on the device—docexpire.db.
Notice how the openDatabase method has an onCreate parameter, which indicates the name of the method that will be invoked the first time the database is opened. This will create the actual database our app will need, the _createDb method, which we can see as follows.
Code Listing 2-u: DbHelper class—dbhelper.dart (continued)
// Import statements… previous code. class DbHelper { // Previous code // Create database table void _createDb(Database db, int version) async { await db.execute( "CREATE TABLE $tblDocs($docId INTEGER PRIMARY KEY, $docTitle TEXT, " + "$docExpiration TEXT, " + "$fqYear INTEGER, $fqHalfYear INTEGER, $fqQuarter INTEGER, " + "$fqMonth INTEGER)" ); } } // More code will follow… |
As you can see, the _createDb method simply calls the db.execute method and passes a CREATE TABLE statement, which is responsible for creating the database table that will be used for storing the information our app will use.
This is all the code required for initializing and creating the database. Next, we’ll explore how we can add extra functionality to be able to query the database, and insert and delete from the database.
Inserting a new document—dbhelper.dart
The next thing we need to do is to write a method that allows us to save a document to the database. We can do this as follows.
Code Listing 2-v: DbHelper class—dbhelper.dart (continued)
// Import statements… previous code. class DbHelper { // Previous code // Insert a new doc Future<int> insertDoc(Doc doc) async { var r; Database db = await this.db; try { r = await db.insert(tblDocs, doc.toMap()); } catch (e) { debugPrint("insertDoc: " + e.toString()); } return r; } } // More code will follow… |
Notice that this insertDoc method reads the reference to the database (this.db), and then it calls the db.insert method and passes the result of the doc.toMap method, which was previously defined in model.dart.
Since we are dealing with a database insert operation, we wrap this code in a try-catch block to prevent any unhandled exceptions from arising.
As you have seen, adding an item to the database is not so difficult. Notice, though, that all database operations so far return a Future object, and the calls are async. The reason for this is that you don’t want to have the application blocked while waiting for a database operation to finish.
Getting the list of documents—dbhelper.dart
Now that we’ve seen how to insert a document, it’s important to understand how to we can retrieve any document stored within the database. We can do this as follows.
Code Listing 2-w: DbHelper class—dbhelper.dart (continued)
// Import statements…previous code. class DbHelper { // Previous code
// Get the list of docs. Future<List> getDocs() async { Database db = await this.db; var r = await db.rawQuery( "SELECT * FROM $tblDocs ORDER BY $docExpiration ASC"); return r; } } // More code will follow… |
As you can see, the getDocs method that retrieves the list of documents from the database is very simple. We can see a common pattern again—get the reference to the database using this.db.
Then, the actual query to the database is executed by running the db.rawQuery method and passing it the SQL query as a string parameter.
We can see that we are returning the result r in ascending order by the document’s expiration date—docExpiration.
Next, let’s see how we can get a specific document from the database.
Getting a specific document—dbhelper.dart
Getting all the documents available in the database is useful when we want to build up the main list of documents in our UI. However, if we want to modify a specific document that we previously added, we’ll need to be able to retrieve that document from the database—this is what we’ll do next.
Code Listing 2-x: DbHelper class—dbhelper.dart (continued)
// Import statements… previous code. class DbHelper { // Previous code
// Gets a Doc based on the id. Future<List> getDoc(int id) async { Database db = await this.db; var r = await db.rawQuery( "SELECT * FROM $tblDocs WHERE $docId = " + id.toString() + "" ); return r; } // Gets a Doc based on a String payload Future<List> getDocFromStr(String payload) async { List<String> p = payload.split("|"); if (p.length == 2) { Database db = await this.db; var r = await db.rawQuery( "SELECT * FROM $tblDocs WHERE $docId = " + p[0] + " AND $docExpiration = '" + p[1] + "'" ); return r; } else return null; } } // More code will follow… |
We have two ways of retrieving a specific document. One way is to retrieve the document by its id (docId); this is what the getDoc method does. Another way is to retrieve it from the database by its id and by the document’s expiration date (docExpiration)—this is what the getDocFromString method does.
The getDoc method simply calls the db.rawQuery method and runs a query on the tblDocs table. It retrieves the document where the docId has the same value as the id parameter—very straightforward.
The getDocFromStr method is slightly more complex, but not too much. The difference is that this method receives a String object payload, which contains two important bits of data, separated by a pipe (|) character. The first part of the payload is docId, and the second part is docExpiration.
The payload is split and each respective value concatenated onto the SQL query that gets passed to the db.rawQuery method. The SQL query retrieves the document by checking for the correct id and expiration date values.
By using these two methods, we can retrieve any specific document we need.
Counting documents—dbhelper.dart
Now that we know how to retrieve specific documents, we’ll also need to count how many documents we have and retrieve the largest document ID from the database—this will be important for changing the UI state later. So, let’s see how we can do this.
Code Listing 2-y: DbHelper class—dbhelper.dart (continued)
// Import statements… previous code. class DbHelper { // Previous code
// Get the number of docs. Future<int> getDocsCount() async { Database db = await this.db; var r = Sqflite.firstIntValue( await db.rawQuery("SELECT COUNT(*) FROM $tblDocs") ); return r; } // Get the max document id available on the database. Future<int> getMaxId() async { Database db = await this.db; var r = Sqflite.firstIntValue( await db.rawQuery("SELECT MAX(id) FROM $tblDocs") ); return r; } } // More code will follow… |
The first method, getDocsCount, basically executes a SQL query that returns an int value, which counts how many documents there are on the tblDocs table.
The second method, getMaxId, executes a SQL query that returns an int value, which represents the maximum value existing on the tblDocs table for the id field of all documents. In other words, it returns the largest existing document id value within the table.
As you can see, the only difference between these methods is that one uses the SQL COUNT function and the other uses the SQL MAX function.
To be able to change the state of the UI, it’s important we have these functions so we can get the number of documents in the database—this is main reason for having the getDocsCount function.
We use the getMaxId function because when a new document is being added, we need to make sure that this new document gets assigned an id value larger than the largest one available on the tblDocs table. This is done so that each document has an id that is consecutive to the previous one and is not repeated.
Updating and deleting documents—dbhelper.dart
We now almost have all the database functionality we require, but we are still missing an important part—this is the ability to delete and update documents. Let’s add this code as follows.
Code Listing 2-z: DbHelper class—dbhelper.dart (continued)
// Import statements… previous code. class DbHelper { // Previous code. // Update a doc. Future<int> updateDoc(Doc doc) async { var db = await this.db; var r = await db.update(tblDocs, doc.toMap(), where: "$docId = ?", whereArgs: [doc.id]); return r; } // Delete a doc. Future<int> deleteDoc(int id) async { var db = await this.db; int r = await db.rawDelete( "DELETE FROM $tblDocs WHERE $docId = $id"); return r; } // Delete all docs. Future<int> deleteRows(String tbl) async { var db = await this.db; int r = await db.rawDelete("DELETE FROM $tbl"); return r; } } |
The updateDoc method is responsible for updating a specific document on the database, based on the document’s id. This is done by invoking the db.update method by passing the resultant object of the call to doc.toMap, which converts the document from a Dart object to its database model equivalent.
The deleteDoc method removes a document from the tblDocs table by running a scoped SQL DELETE statement, targeting a specific document id by invoking the db.rawDelete method.
Finally, the deleteRows method removes all the documents from the database. This is done by calling the db.rawDelete method and running a SQL DELETE statement that is not scoped to any specific document id.
Awesome—that concludes our dbhelper.dart file, which is responsible for all our app’s database operations.
Summary
We’ve come a long way, and it’s been a detailed, but certainly interesting chapter. So far, we’ve managed to lay out the foundations of our application and how it will be able to interact with the database by adding the model and all the utilities and helper functions required.
In the next chapter, we’ll implement the UI by creating the Document Details screen, docdetail.dart, and from there, we’ll move on to the main screen and finalize the application.
There are still a lot of things to discover and learn with the amazing Flutter framework.
- Advanced custom widgets and file-format libraries.
- Built from scratch.
- Dart-powered widgets for extraordinary apps.
- A wide range of products and hassle-free licensing.