
External Collaboration with Azure AD B2B Succinctly®

CHAPTER 4
The Graph API and PowerShell
In the previous chapter, we finished the entire redemption process for the guest user. The user now has access to the Azure AD tenant and the application.
This guest user was added to the Azure AD tenant manually using the Azure portal. However, it is also possible to use PowerShell and Microsoft Graph to bulk-add a collection of users to the tenant. In addition to that, PowerShell and Graph both offer more configuration possibilities for adding guest users to Azure AD B2B that are not available from the Azure portal. In this chapter, we will cover what the Graph API and PowerShell have to offer and will add some guest users to Azure AD using both.
Introducing the Graph API
Microsoft Graph is a set of APIs that connects multiple Azure services and provides a single endpoint for developers to use in custom applications. Microsoft Graph is made up of relationships between various Azure services. By calling the endpoint on behalf of a user (delegated permissions) who is added to Azure AD, you can retrieve the documents that the user is working on, find their manager, retrieve the user’s meetings, get a list of devices, and much more. It is also possible to call the Graph API based on application permissions, where the application acts as its own entity, instead of on behalf of the user. This means you can retrieve data from the Graph API for multiple accounts.
Azure AD is integrated in Microsoft Graph as well, but it can be leveraged for more than Azure AD features only. In fact, nearly all SaaS products of Azure use Azure AD, such as Office 365, Intune, Dynamics 365, and Azure SQL. All of those Azure services are integrated in Microsoft Graph and can be leveraged inside your apps and APIs.
Microsoft Graph offers two different endpoints: the v1.0 endpoint, which consists of all the APIs that are generally available, and the beta endpoint, which provides APIs that can still change over time.
Tip: To get started with the Graph API using the Graph Explorer, and to register your app in Azure AD, you can refer to this site. This is a great starting point where you can also download secure sample applications for multiple programming languages. You can also get an overview of all the different services and products that are integrated in the Graph API.
Graph API for Azure AD B2B
The Graph API for Azure AD B2B offers some additional values that cannot be set when you create a guest user from the Azure portal. The Azure portal only adds support for the display name, first and last name, email address, personal message, and job information.
Using the Graph API, you can set additional values for each user that you want to invite to your Azure AD tenant. You can set the following values:
- Invitation Redirect URL: You can redirect users to different locations, such as a custom web app or a SharePoint site.
- CC Recipients: You can add others to the CC field of the email, such as an administrator account.
- Suppress invitation email: You can suppress the invitation on a user level. In the portal, you can turn off sending the invitation email, but this setting will result in suppressing all invitations for each user you add to the tenant.
One of the APIs that the Graph API offers is an invitation API that can be used to add guest users to your Azure AD tenant. In the following demonstration, we are going to use the Graph Explorer. This lets us easily connect to our tenant by logging in with an administrator account.
- Open the browser and navigate to https://developer.microsoft.com/en-us/graph/graph-explorer.
- In the left menu, under Authentication, click Sign in to Graph Explorer:

Figure 24: Graph Explorer login
- Log in with your Azure administrator credentials.
- Once logged in, we first need to set the permissions for the request. For the Invitation endpoint, the Azure AD tenant admin must explicitly grant consent for the requested permissions to the Graph Explorer application. We are already logged in with an administrator account, so we can set the permissions now.
- Click the settings button in the authentication section and click Select permissions:
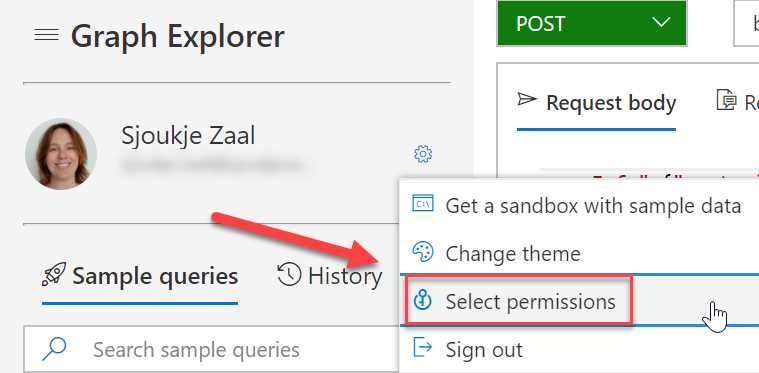
Figure 25: Graph permissions
- In the Permissions wizard, first, scroll down to Directory and select Directory.ReadWrite.All permissions:
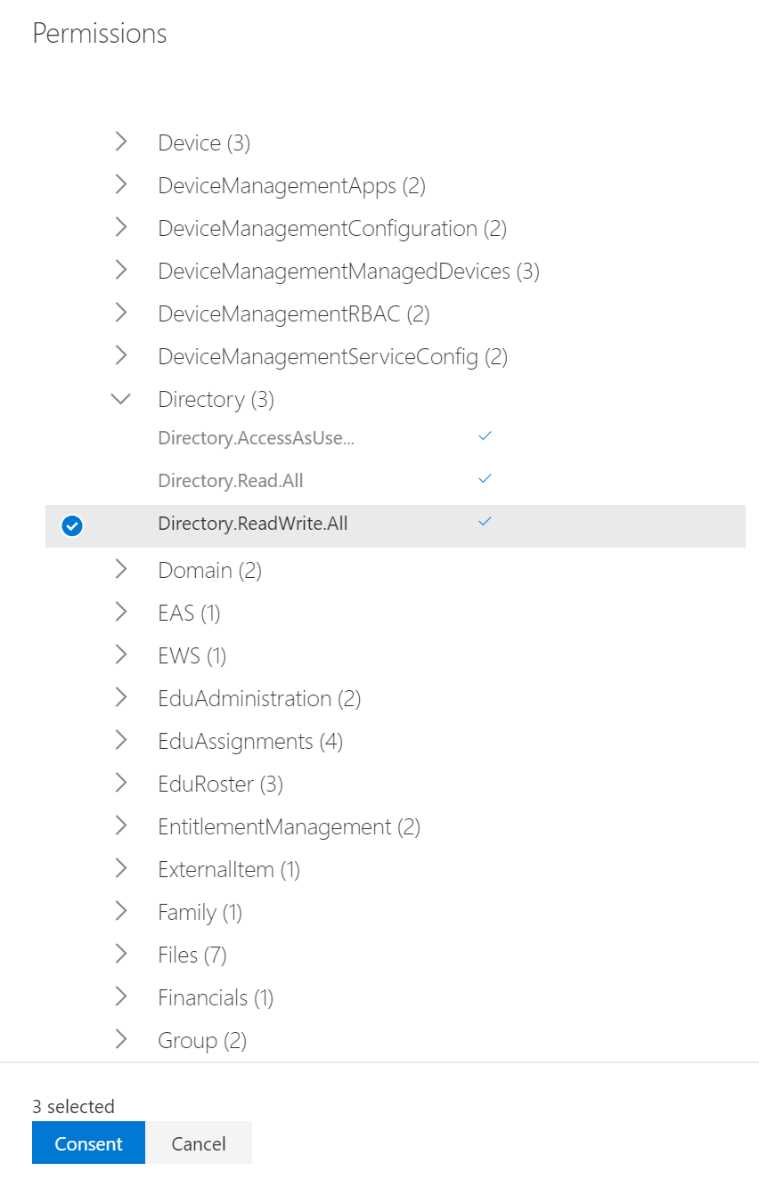
Figure 26: Directory permissions
- Select User.Read and User.ReadWrite.All:
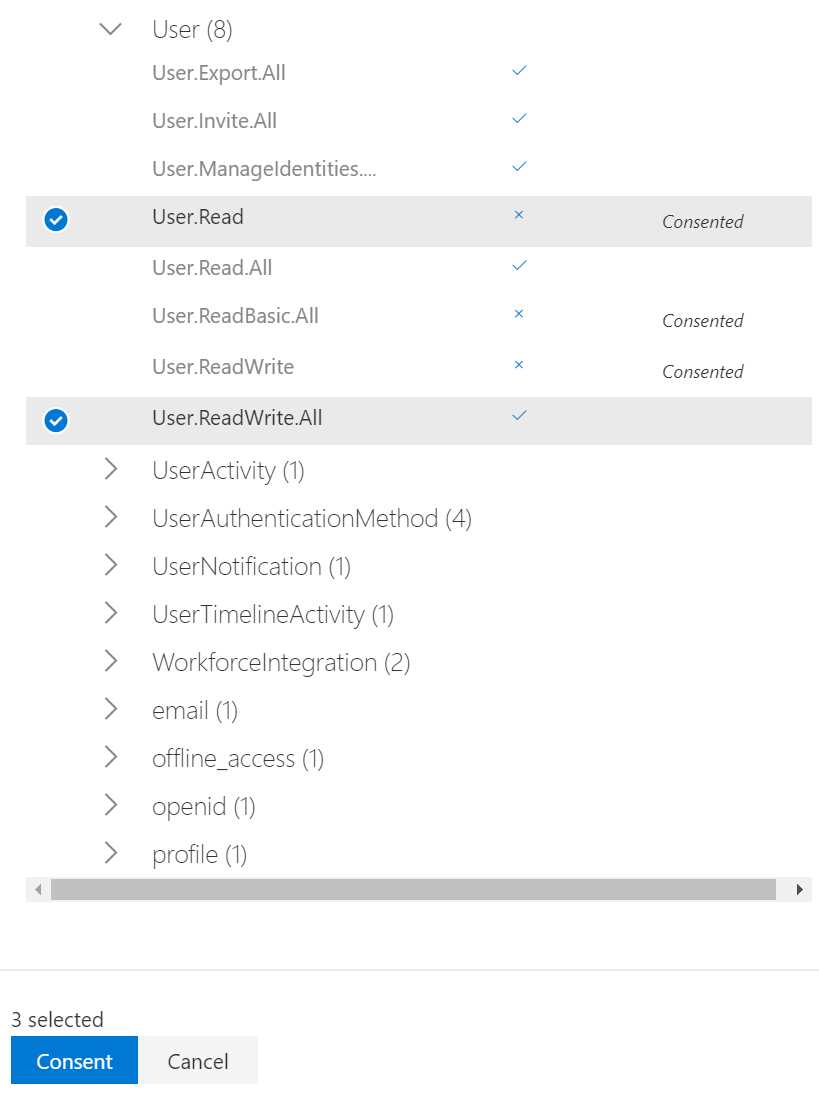
Figure 27: User permissions
- Click Consent.
- There will be a pop-up with a privacy statement that needs to be accepted. Select the Consent on behalf of your organization box:
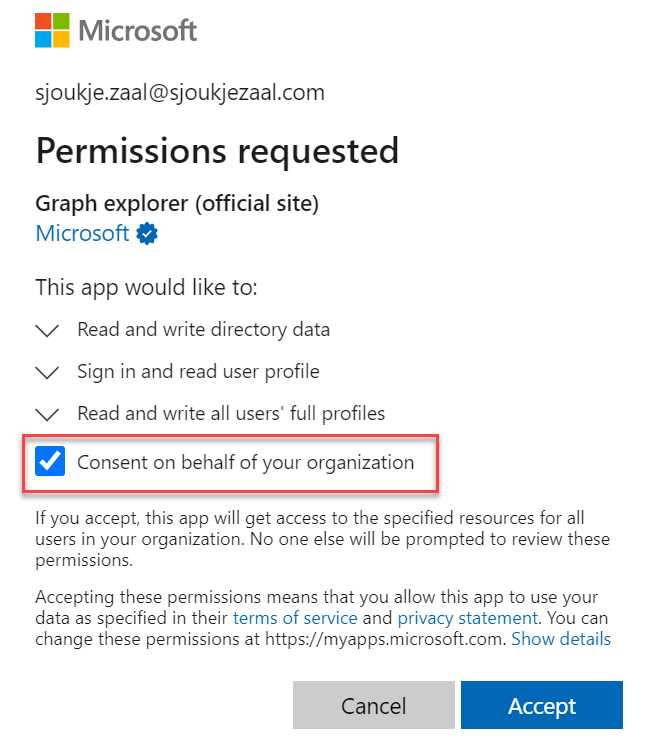
Figure 28: Privacy statement
- Click Accept.
- Change the request method to POST and add the following URL to the invitation API in the URL field at the top right of the screen:
https://graph.microsoft.com/v1.0/invitations
The page will look like the following image:
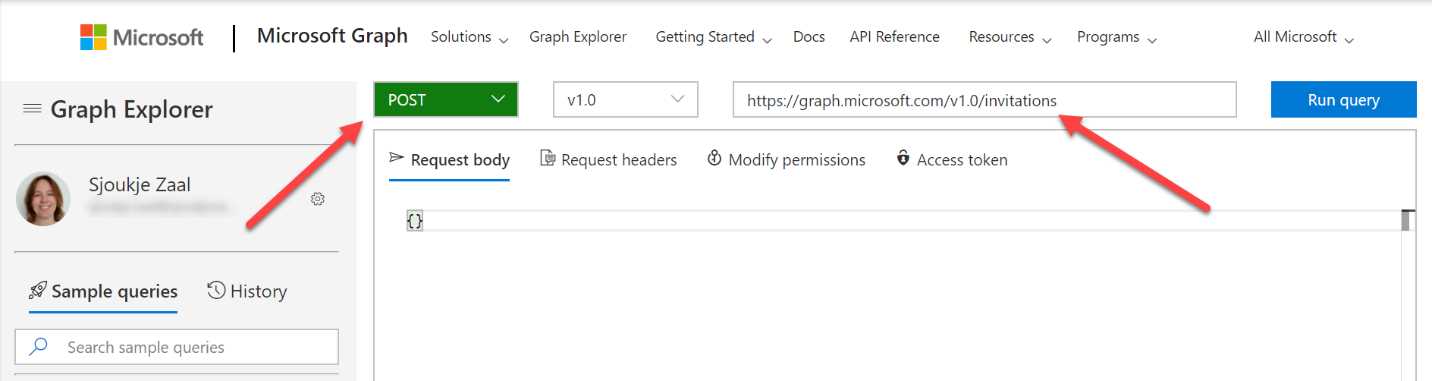
Figure 29: Creating a new Graph request
- Add the following code, changing the values where needed:
Code Listing 1
{ "invitedUserEmailAddress":"<emailaddress>", "inviteRedirectUrl":"https://sjoukjezaal.com", "invitedUserDisplayName":"Sjoukje Zaal", "sendInvitationMessage":true, "invitedUserMessageInfo": { "customizedMessageBody":"Hey there! Check this out. I created an invitation through the Graph API" } } |
- Click Run query, and the user will be created in the Azure AD tenant. This will result in the following output:
Code Listing 2
{ "@odata.context": "https://graph.microsoft.com/v1.0/$metadata#invitations/$entity", "id": "2305df68-fd6c-4dbc-add8-e1abb9afcec7", "inviteRedeemUrl": "https://login.microsoftonline.com/redeem?rd=https%3a%2f%2finvitations.microsoft.com%2fredeem%2f%3ftenant%3d8db5b030-89df-4359-8d4f-926af1102a4e%26user%3d2305df68-fd6c-4dbc-add8-e1abb9afcec7%26ticket%3d858YgoOG%252fpImLDGQenwGplt6K8ww%252fcicsUVuJWuH0Ms%253d%26ver%3d2.0", "invitedUserDisplayName": "Sjoukje Zaal", "invitedUserType": "Guest", "invitedUserEmailAddress": "[email protected]", "sendInvitationMessage": true, "inviteRedirectUrl": "https://sjoukjezaal.com/", "status": "PendingAcceptance", "invitedUserMessageInfo": { "messageLanguage": null, "customizedMessageBody": "Hey there! Check this out. I created an invitation through the Graph API", "ccRecipients": [ { "emailAddress": { "name": null, "address": null } } ] }, "invitedUser": { "id": "d776de55-eb95-44e1-b2a9-095cf410e579" } } |
We have now created a guest user in the Azure AD tenant using the Graph API. We also set some additional values that are not available in the Azure portal, such as the display name and an alternative landing page.
In the next section, we are going to cover how you can add guest users using PowerShell.
PowerShell for Azure AD B2B
Another way to add guest users is by using PowerShell. PowerShell uses the Microsoft Graph for creating the guest user as well. Therefore, you need to download Azure Active Directory PowerShell for Graph from the PowerShell gallery. You can use an Excel file as the input file and add all the guest users to the Excel file. You can also store your guest users in a database or Azure Storage account and connect to it from your PowerShell script.
Because PowerShell is using Graph to create the guest user, PowerShell possesses the same functionality as Graph itself. In the next demonstration, we are going to add two guest users from an Excel file to Azure AD using a PowerShell script and PowerShell cmdlets.
Note: You can refer to this website to install Azure Active Directory PowerShell for Graph.
- Install the Azure Active Directory PowerShell for Graph cmdlets on your local machine.
- Open Excel, and add a table with two columns and the following two headers to the sheet:
- Name
- InvitedUserEmailAddress
- Add the email addresses and display names of the guest users that you want to add to Azure AD. Your Excel file will look like the following image:
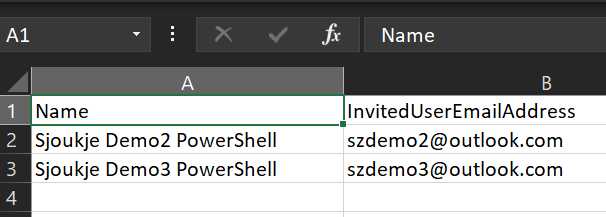
Figure 30: Creating a new Graph request
- Save the Excel sheet as invitations.csv.
- Open Visual Studio Code or PowerShell ISE and add the following lines of code to it:
Code Listing 3
$tenantId = "<replace-with-AzureAD-tenant-id>" $cred = Get-Credential Connect-AzureAD -Credential $cred -TenantId $tenantId $invitations = import-csv "C:\....\invitations.csv" $messageInfo = New-Object Microsoft.Open.MSGraph.Model.InvitedUserMessageInfo $messageInfo.customizedMessageBody = "Hey there! Check this out. I created an invitation through PowerShell" foreach ($email in $invitations) { New-AzureADMSInvitation -InvitedUserEmailAddress $email.InvitedUserEmailAddress ` -InvitedUserDisplayName $email.Name ` -InviteRedirectUrl https://myapps.microsoft.com ` -InvitedUserMessageInfo $messageInfo ` -SendInvitationMessage $true } |
- Replace the tenant ID with your Azure AD tenant ID. You can retrieve this value from the Azure portal. Make sure to set the right location to where the Excel file is saved.
- Execute the script. The script will prompt you to log in to Azure. Provide your Azure administrator credentials. The script will now create the user accounts from the Excel sheet in Azure AD.
- Log in to the Azure portal, navigate to Azure AD, and select Users from the left menu. There you will see both the accounts that are created:
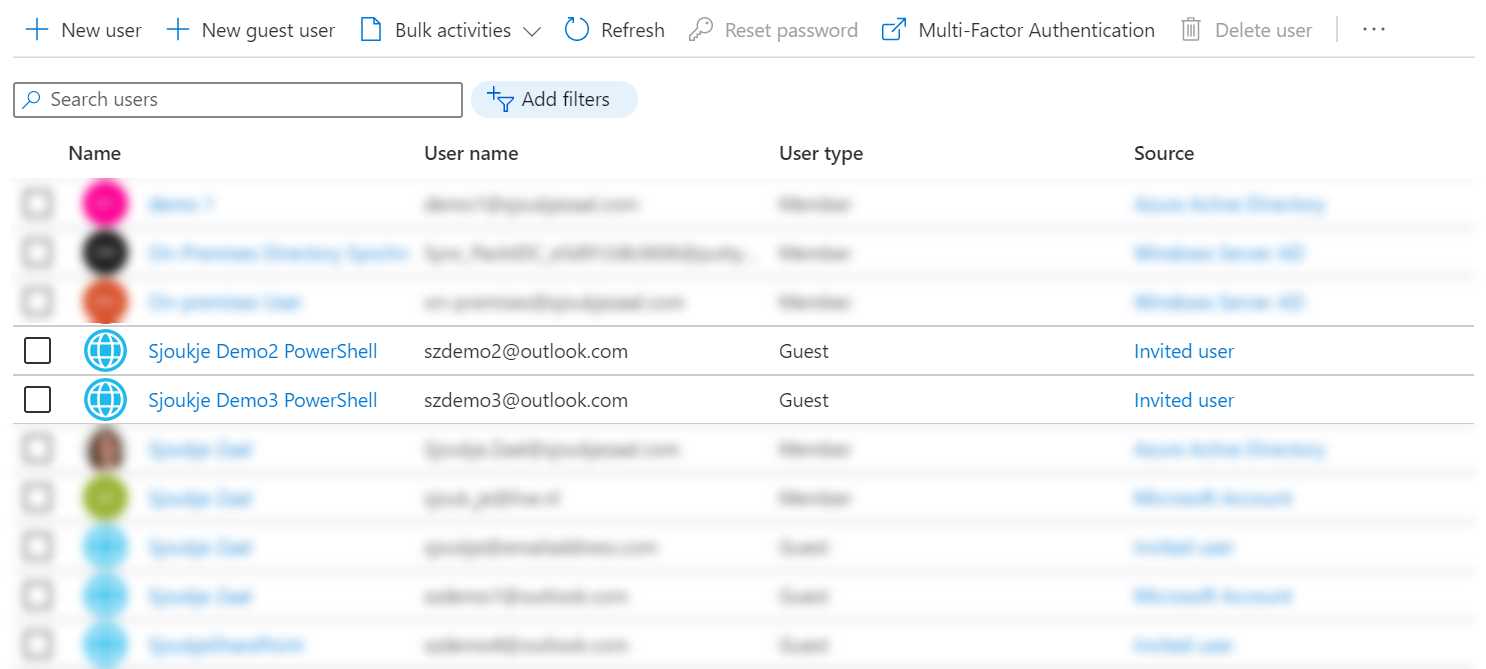
Figure 31: Accounts in Azure AD created with PowerShell
In this chapter, we have covered how you can use PowerShell and the Graph API to create guest users in Azure AD B2B. We have learned that PowerShell uses the Graph API as well to create the guest users. We have also learned that we set more properties for the guest user if we create them programmatically, and then add them manually to Azure AD using the Azure portal.
In the next chapter, we are going to focus on how we can create guest users from an Azure function.
- 1800+ high-performance UI components.
- Includes popular controls such as Grid, Chart, Scheduler, and more.
- 24x5 unlimited support by developers.