
External Collaboration with Azure AD B2B Succinctly®

CHAPTER 6
Entitlement Management
In the previous chapter, we covered how you can use Azure Functions to create guest users in Azure AD. In this chapter, we are going to cover entitlement management, which is part of Azure AD Identity Governance. With entitlement management, organizations can manage identity and access lifecycle at scale.
Before we dive into entitlement management and creating access packages for your guest users, we will first look into Identity Governance in more detail.
Identity Governance
Identity Governance is one of the newest features in Azure AD. It offers tools and support for balancing organizational needs for security and productivity with the right processes and visibility. It provides the ability govern the complete identity and access lifecycle across employees, business partners, vendors, applications, and services, both in the cloud and on-premises. On top of that, it offers secured privileged access for administration.
Identity Governance is mainly intended to help organizations address the following key questions:
- Which users should have access to which resources in Azure and Microsoft 365?
- What are those users doing with all the different services and applications they have access to?
- Are there effective controls for managing access across all the different applications and services?
- Is it possible for auditors to verify that the controls are effectively working?
One of the key challenges of organizations is to maintain balance between productivity and security. You want your services and applications to be accessed quickly and easily when needed, but there is also a need for keeping all those assets secure.
The foundation of Identity Governance is identity lifecycle management. Azure AD Premium has comprehensive integration with the Workday HR system. It also includes Microsoft Identity Manager, which can import records from human capital management (HCM) systems such as Oracle E-Business, Oracle PeopleSoft, and SAP.
Note: For more information about Microsoft Identity Manager, you can refer to this website.
For scenarios that require collaboration with people outside the organization, Azure AD B2B entitlement management offers the tools to manage the complete lifecycle of guest users.
In the next section, we are going to cover entitlement management in more detail.
Entitlement management
Azure Active Directory entitlement management is an identity governance feature that helps organizations manage identity and access lifecycle at scale. Therefore, it offers features for automating access assignments, request workflows, reviews, and access expirations.
Entitlement management can be used for internal and guest users. This can be a cumbersome process because requirements change over time. This is already a difficult process for internal users, but it becomes even more complicated when you are planning to collaborate with external users as well.
Most enterprises face challenges when managing internal access to resources, such as:
- Users don’t know exactly what access they have across the different services and applications, and have trouble locating the different applications and services.
- Users have difficulties locating the right individuals to approve their access when needed.
- Once users have the appropriate access and permissions, they hold on to access longer than required.
In scenarios where collaboration with guest users is required, access becomes even more difficult to manage. Additional challenges arise:
- No one person may know all the specific individuals in the external organization’s directories. This makes it difficult to invite them.
- When guest users are invited, no one in the organization is able to remember to manage all of these users’ access consistently.
Azure AD entitlement management helps address these challenges. It offers the following capabilities:
- Delegate the creation of access packages to non-administrators. Access packages contain all the resources that an internal or guest user can request access to, such as groups, applications, SaaS applications, custom integrated applications, and SharePoint Online sites. The delegated access managers can define rules and policies for which users can request access, who approves their access, and when their access expires.
- In entitlement management, you can select connected organizations whose users can request access. When the request is approved, the user becomes a B2B user and is automatically added to the Azure AD tenant. When the access expires, the user is removed automatically from the tenant as well.
Access packages are not suited for all scenarios. They also don’t replace the other mechanisms for access assignment. Access packages are most suited in cases when employees and guest users need limited-time access to a particular task, application, or other resource in Azure or SharePoint Online. They are also suitable when access to certain resources needs to be approved by a manager, for instance. In cases where certain departments or connected organizations are responsible for managing access, access packages are also the best solution.
In the next section, we are going to create an access package in Azure AD entitlement management.
Creating an access package for guest users
In this demonstration, we are going to create an access package for guest users. We are going to add the required permissions to this package, add a security group to it (one where the guest user is automatically added), and add permissions to an application.
Therefore, we are going to take the following steps:
- Navigate to the Azure portal by opening https://portal.azure.com/.
- In the left menu, select Azure Active Directory.
- The Azure AD overview blade is opened. In the left menu, select Identity Governance:
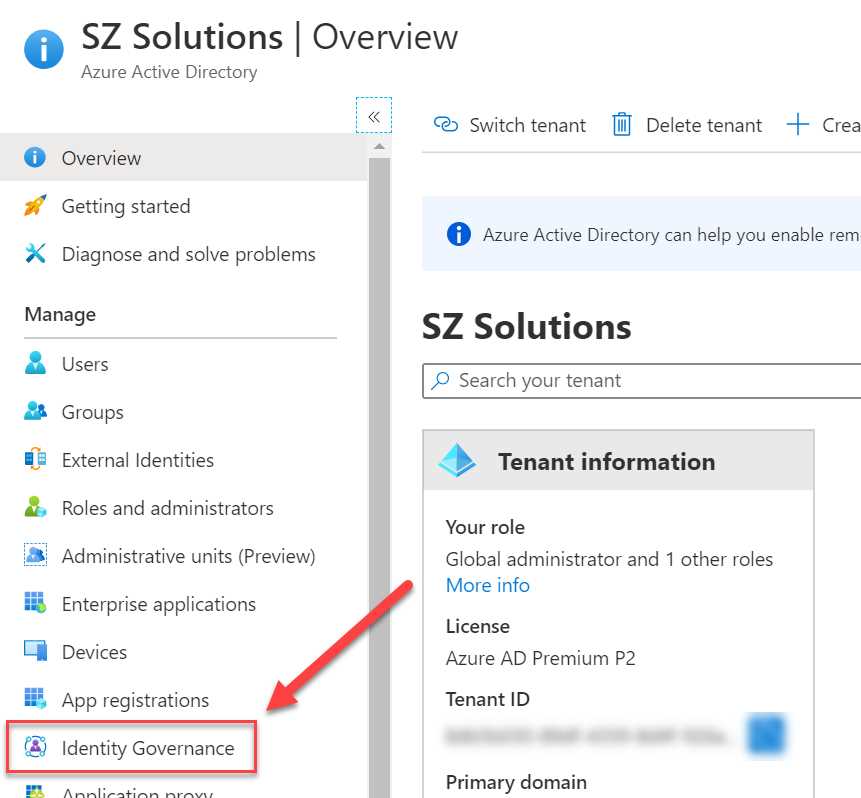
Figure 59: Identity Governance in the Azure portal
- In the Identity Governance overview blade, click Create an access package on the Getting started page:
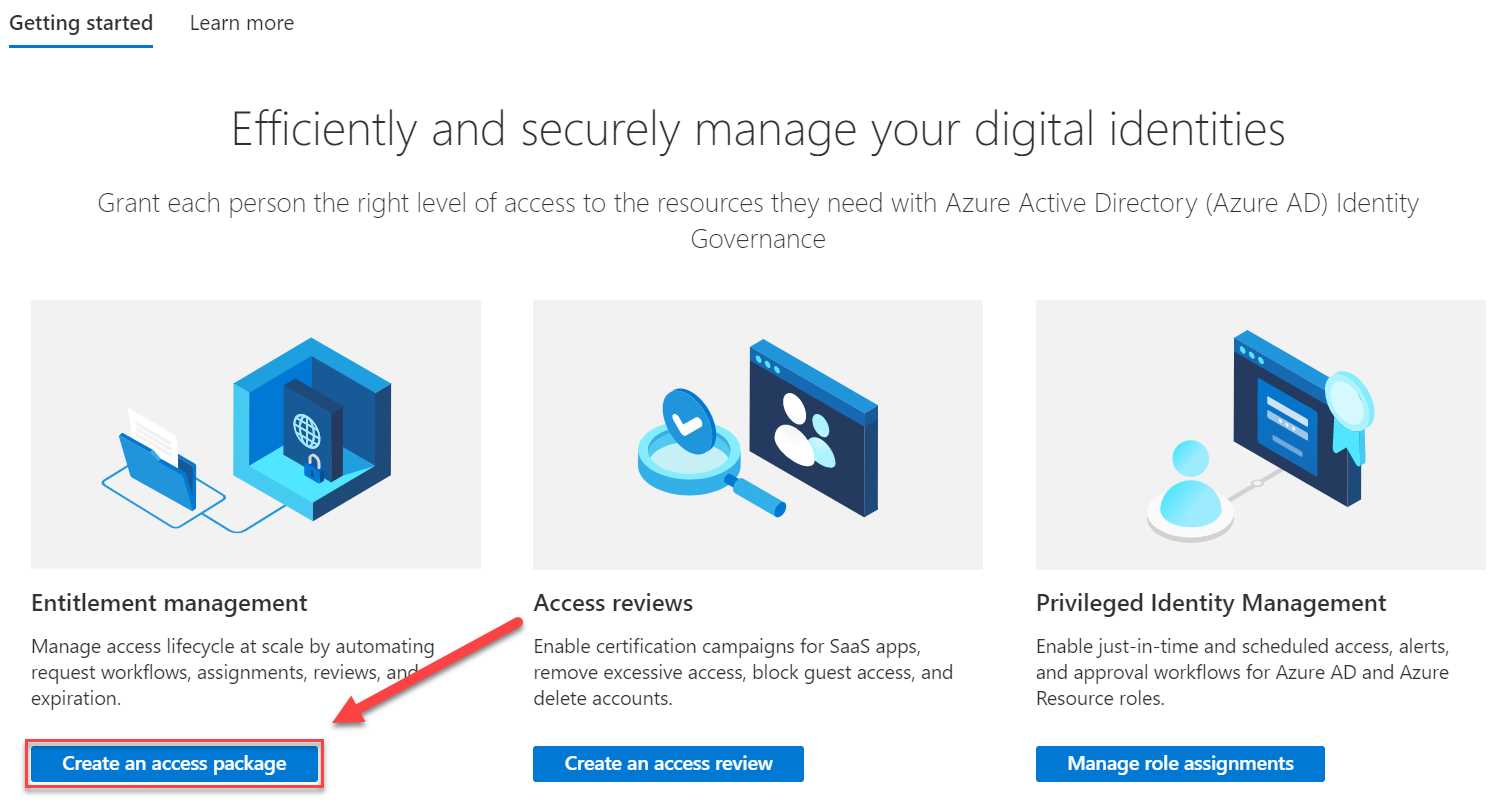
Figure 60: Identity Governance overview blade
- The wizard is started for creating a new access package. This starts with the following basic settings:
- Name: Marketing collaboration package.
- Description: This package gives access to the different marketing collaboration tools and features.
- Catalog: General. You can create multiple catalogs to store access packages. A catalog is basically a container for the packages, and the containers can be assigned to different catalog owners. For now, keep General selected.
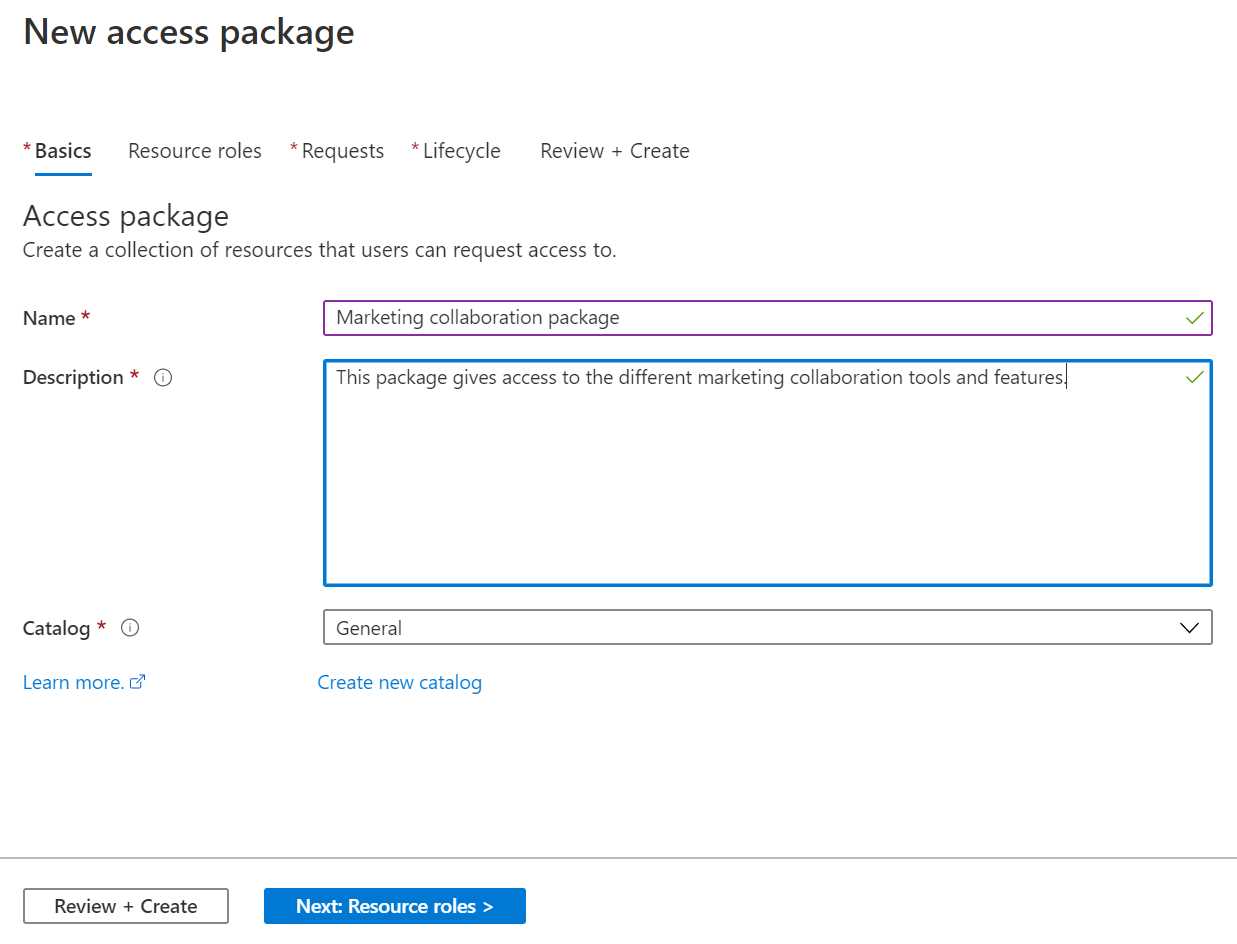
Figure 61: Basic access package settings
- Click Next: Resource roles.
- In the Resource roles blade, you can add the different resources you want to give the user access to. First, click + Groups and Teams. Select the GuestGroup that we created in Chapter 2:
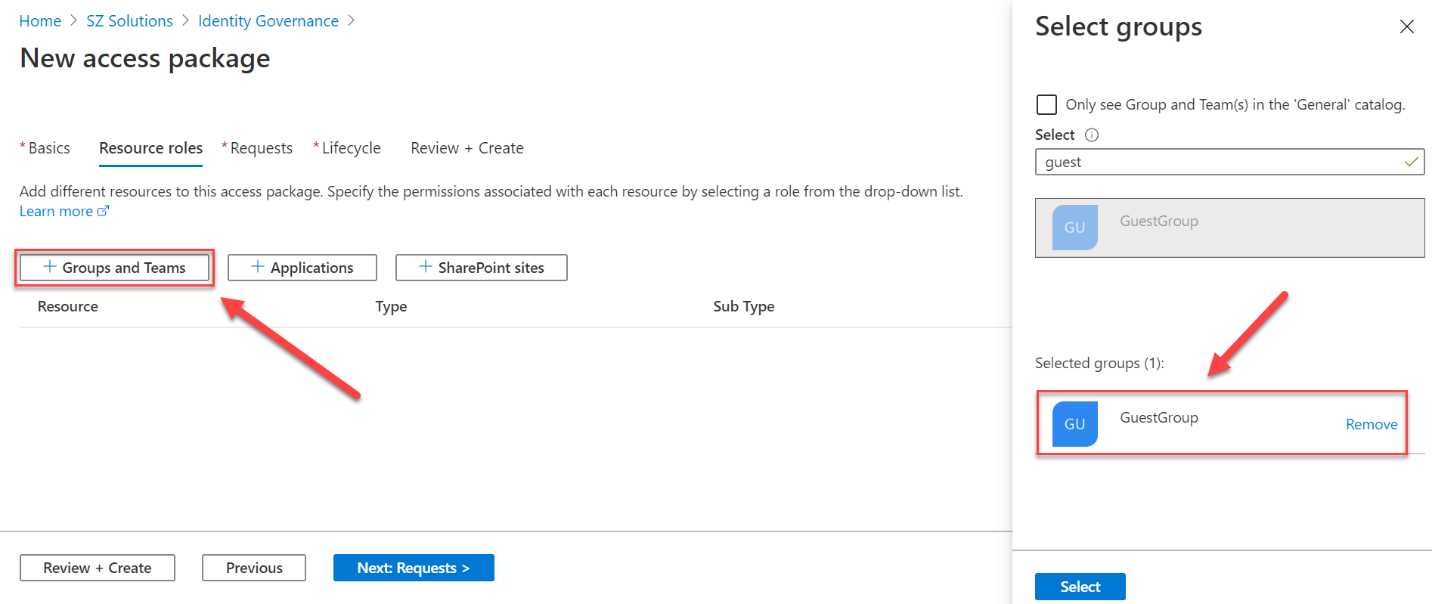
Figure 62: Add a security group
- Click Select.
- Click + Applications in the top menu. There, select the same application that you used in Chapter 2:
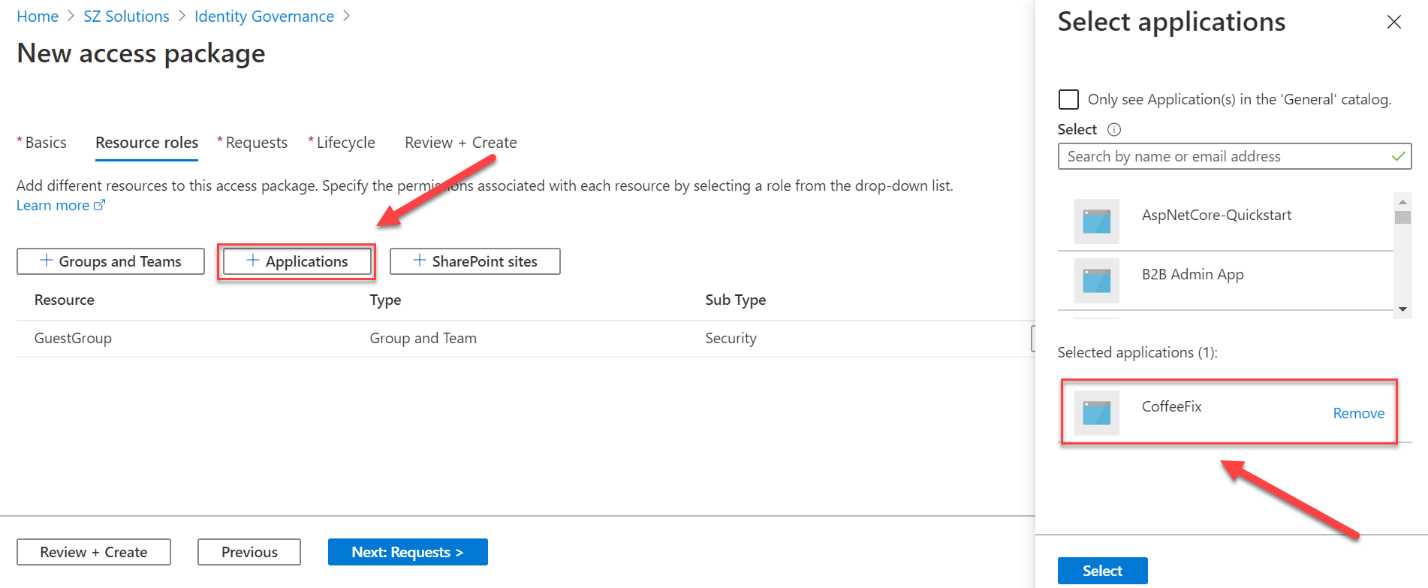
Figure 63: Add applications
- You need to select a role for the security group and the application. For the group, select Member, and for the role, select Default Access:
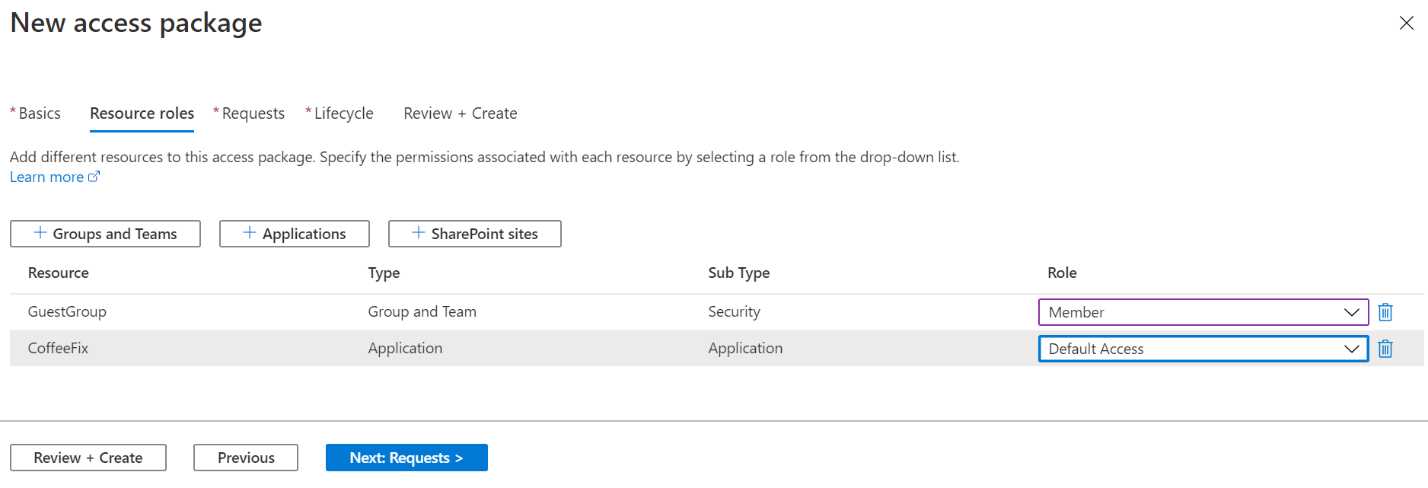
Figure 64: Set resource roles
- Click Next: Requests.
- On the Requests page of the wizard, you can create a policy to establish who can request an access package:
- We are going to create an access package for guest users, so we choose For users in your directory (this also includes guest users).
- Next, you can choose which type of users can access this package: specific users and groups, all members (excluding guest users), or all users. Select All users (including guests).
- Set the Require approval option to No.
- Set the Enable new requests and assignments option to Yes. This is where you can enable or disable this policy for new requests.
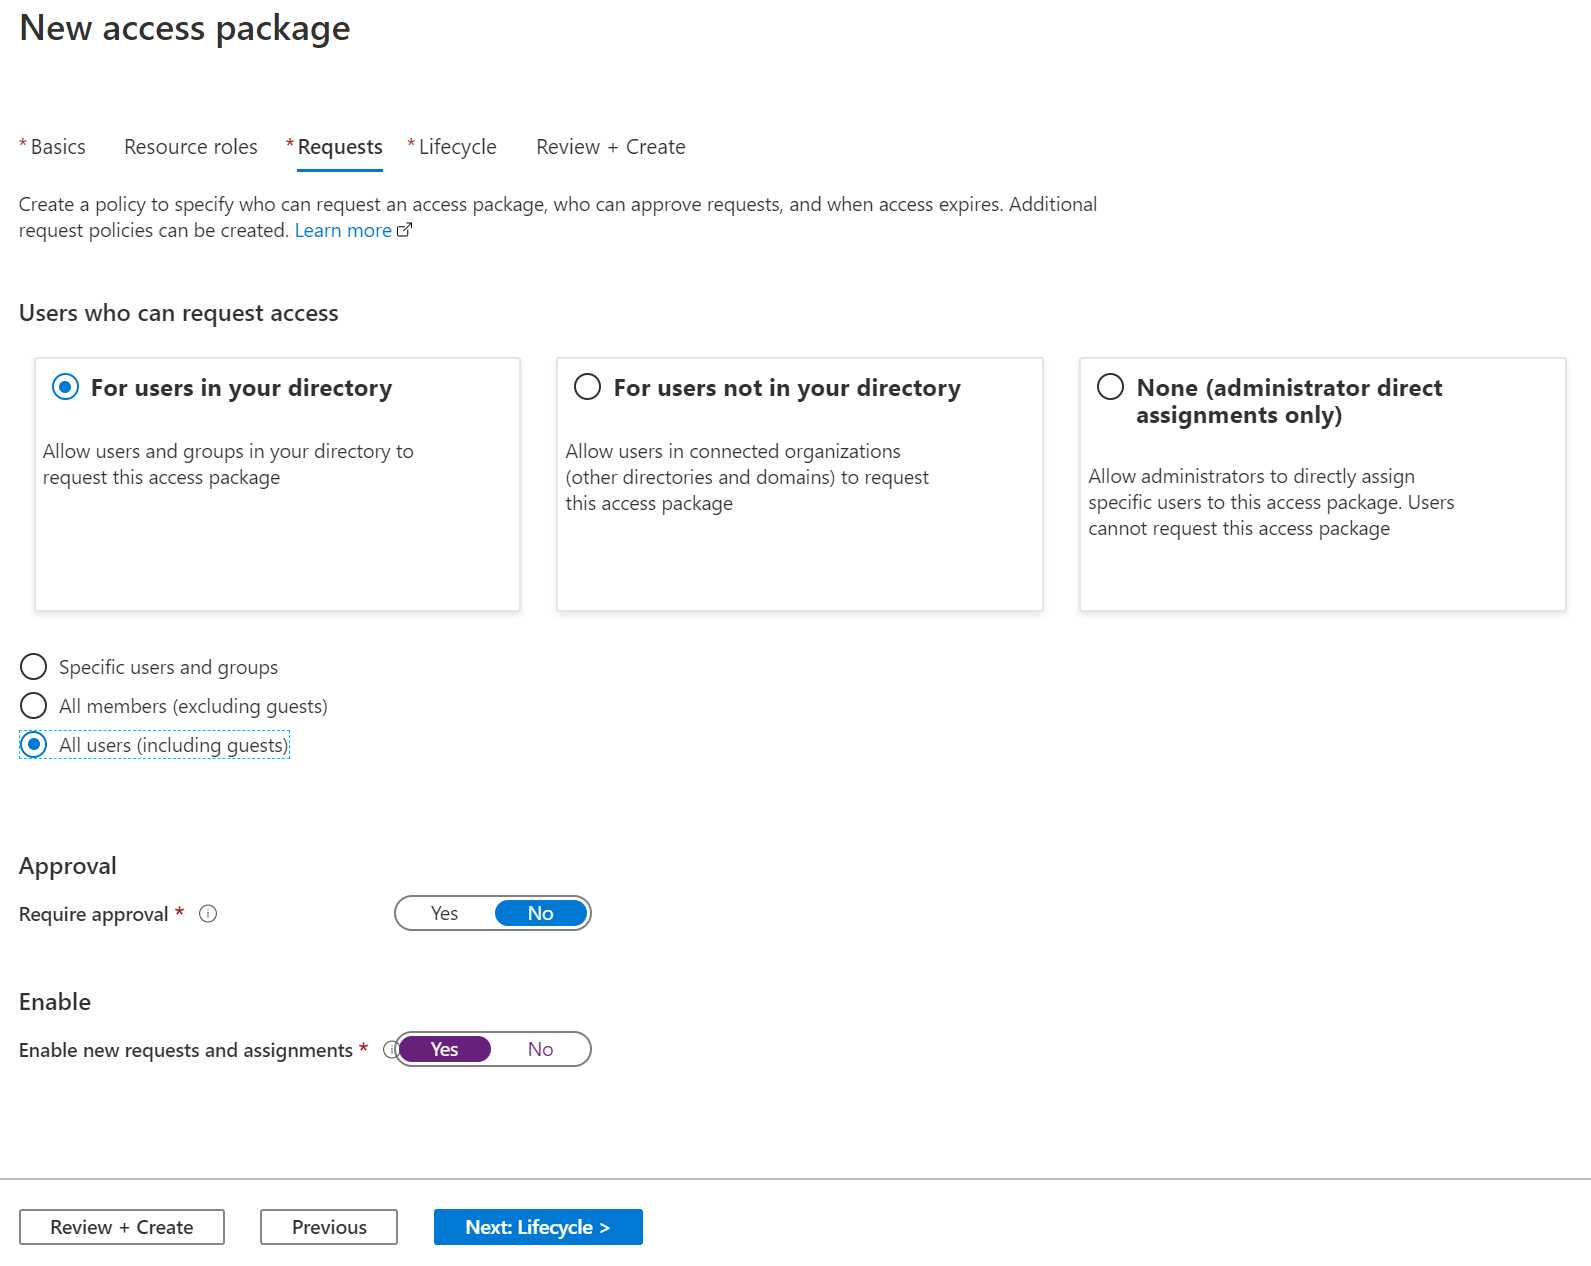
Figure 65: Create access policy
- Click Next: Lifecycle. Here, you can set the expiration date for the package.
- You can choose a specific date, a number of days, or never. Select Number of days.
- Set the Assignments expire after field to 14. This will let the access expire after two weeks.
- Set Require access reviews to No.
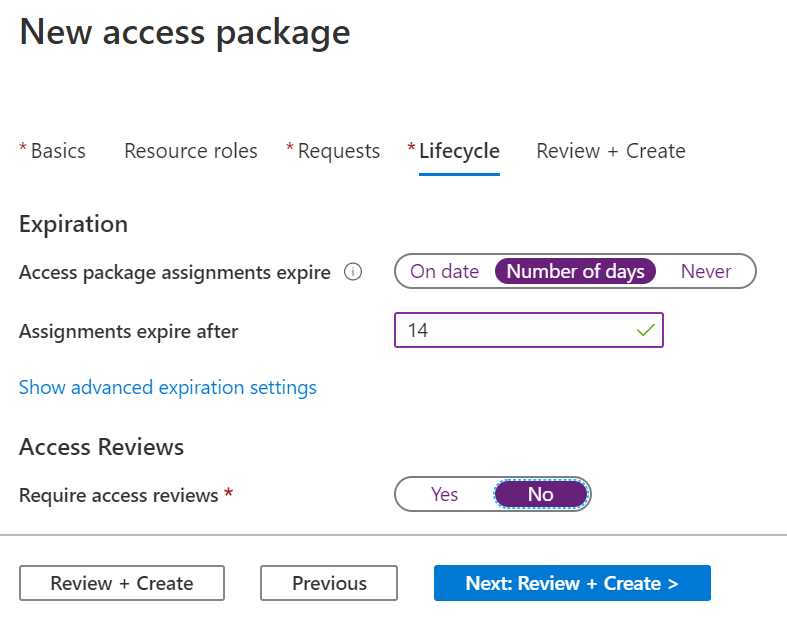
Figure 66: Set expiration
- Click Next: Review + Create. You will get an overview of all the configuration values we specified:

Figure 67: Review all the settings
- Click Create to create the access package.
The package is now created. In the next section, we are going to cover how this access package can be redeemed by the guest user.
Redeeming the access package
To get an overview of the access packages that the guest user has access to, the user can log in to the Access overview page. It is also where the user can request access to other resources, renew access to resources, and so on.
In the next section, we are going to obtain the MyAccess link from the Azure portal. However, there are other ways to get access to this package. Users that already have access to other packages will be familiar with the https://myaccess.microsoft.com/ website. Since this package is scoped to all guest users, they can request access from there as well. In the next demo, we are going to obtain the direct link and use that link to access the package.
- Once the package is created, it is added to the list of available access packages. You can navigate to it by selecting Access packages from the left menu.
- From there, the direct URL can be shared with the user. Click the three dots on the right side of the access package that you have created, and then select Copy MyAccess link:
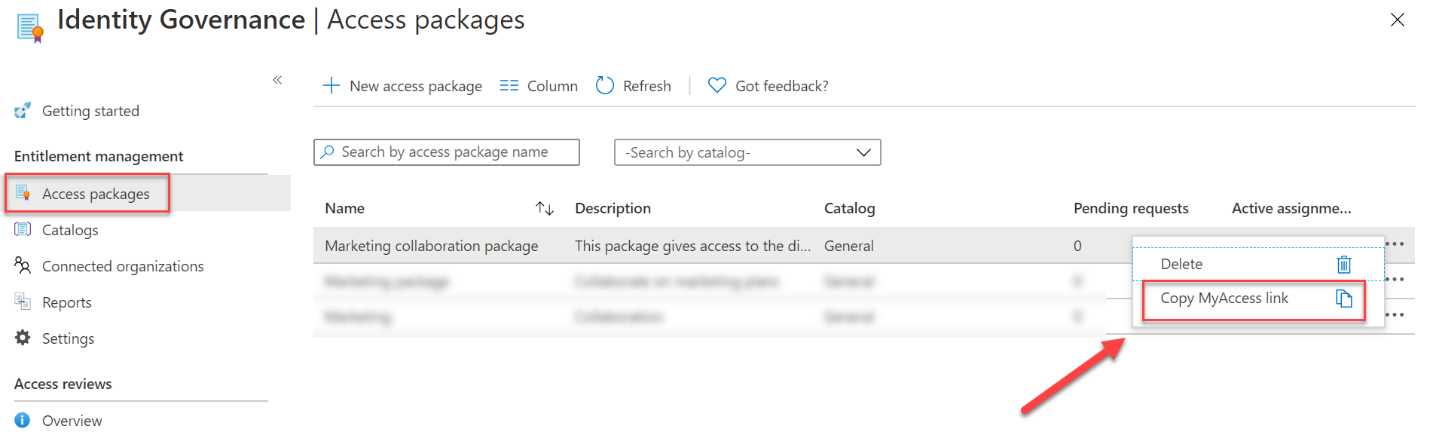
Figure 68: Retrieve package link
The direct link will be displayed:

Figure 69: Copy package link
- Copy this link and paste it in a new browser window. You will now navigate to the My Access page.
- Log in using your guest user account credentials. The Access packages overview page will be displayed, and you will see that the package that we just created is there.
In this demo, we have retrieved the access package. This added the guest user to the required security group and gave the user access to an application. In the next section, we are going to cover how you can add connected organizations.
Adding a connected organization
If you frequently collaborate with guest users from an organization who also have an Azure AD directory or domain, you can add it as a connected organization. The users from that domain or directory can then ask for access to your organization’s resources and applications. By connecting an organization, you are establishing a relationship between these directories in Azure.
For example, let’s say that our organization is collaborating with an organization where users have a user principal name that ends with sjoukjezaal.com. In this case, we can create a connected organization for this collaboration. If we then add this connected organization to an access package, all users with a principal name that matches the policy can request access.
To add a connected organization, we have to take the following steps:
- Again, navigate to the Azure portal by opening https://portal.azure.com/.
- In the left menu, select Azure Active Directory > Identity Governance.
- In the Identity Governance overview blade, click Connected organizations.
- Click + Add connected organization:
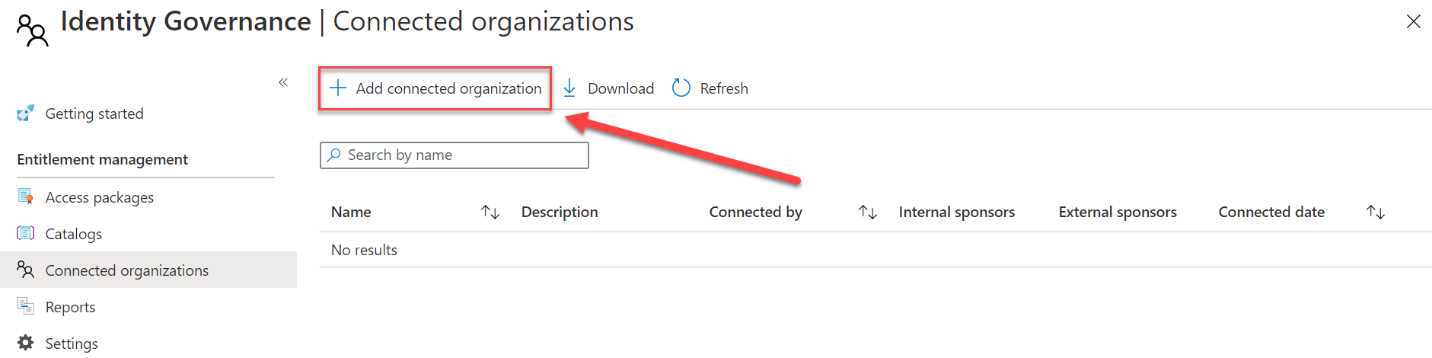
Figure 70: Add new connected organization
- In the first page of the wizard, specify a name and description for the organization:
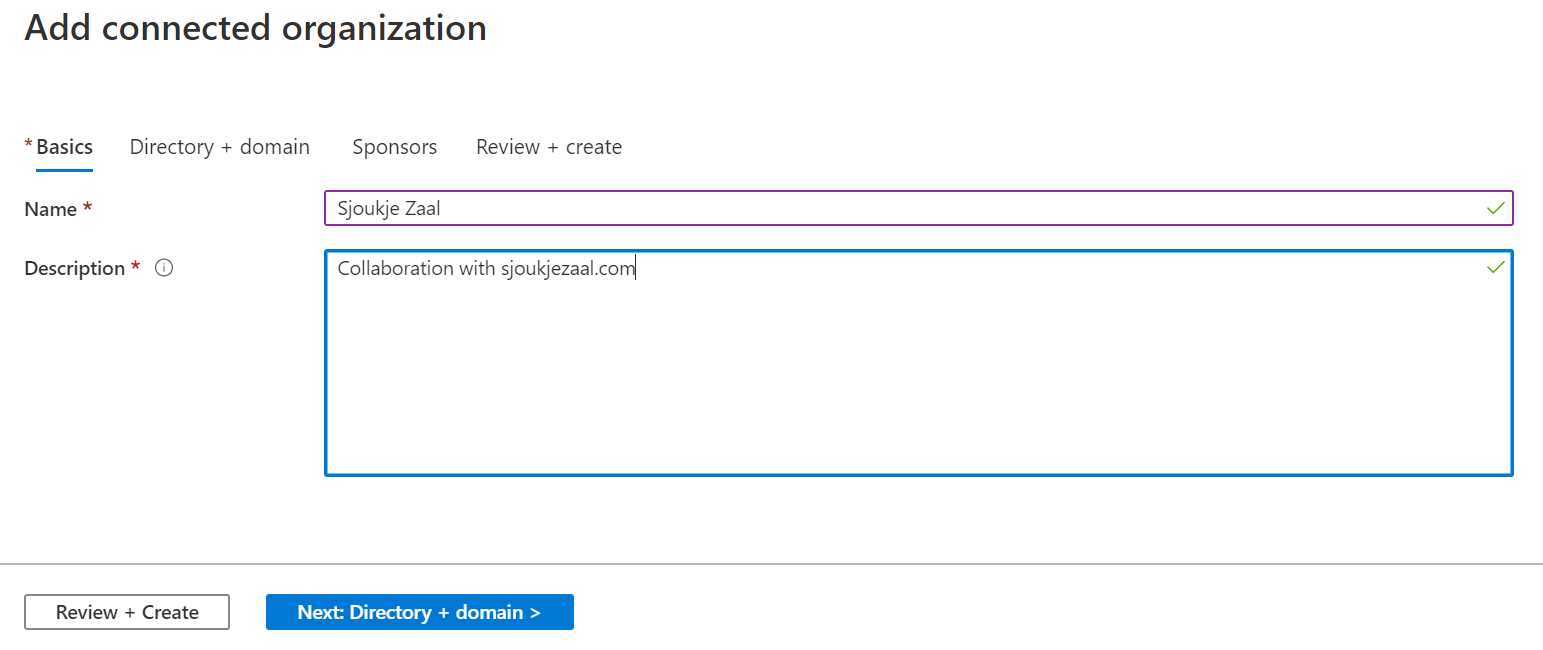
Figure 71: Specify organization name and description
- Click Next: Directory + domain.
- Click Add directory + domain. Fill in the domain name of the organization and click Add:
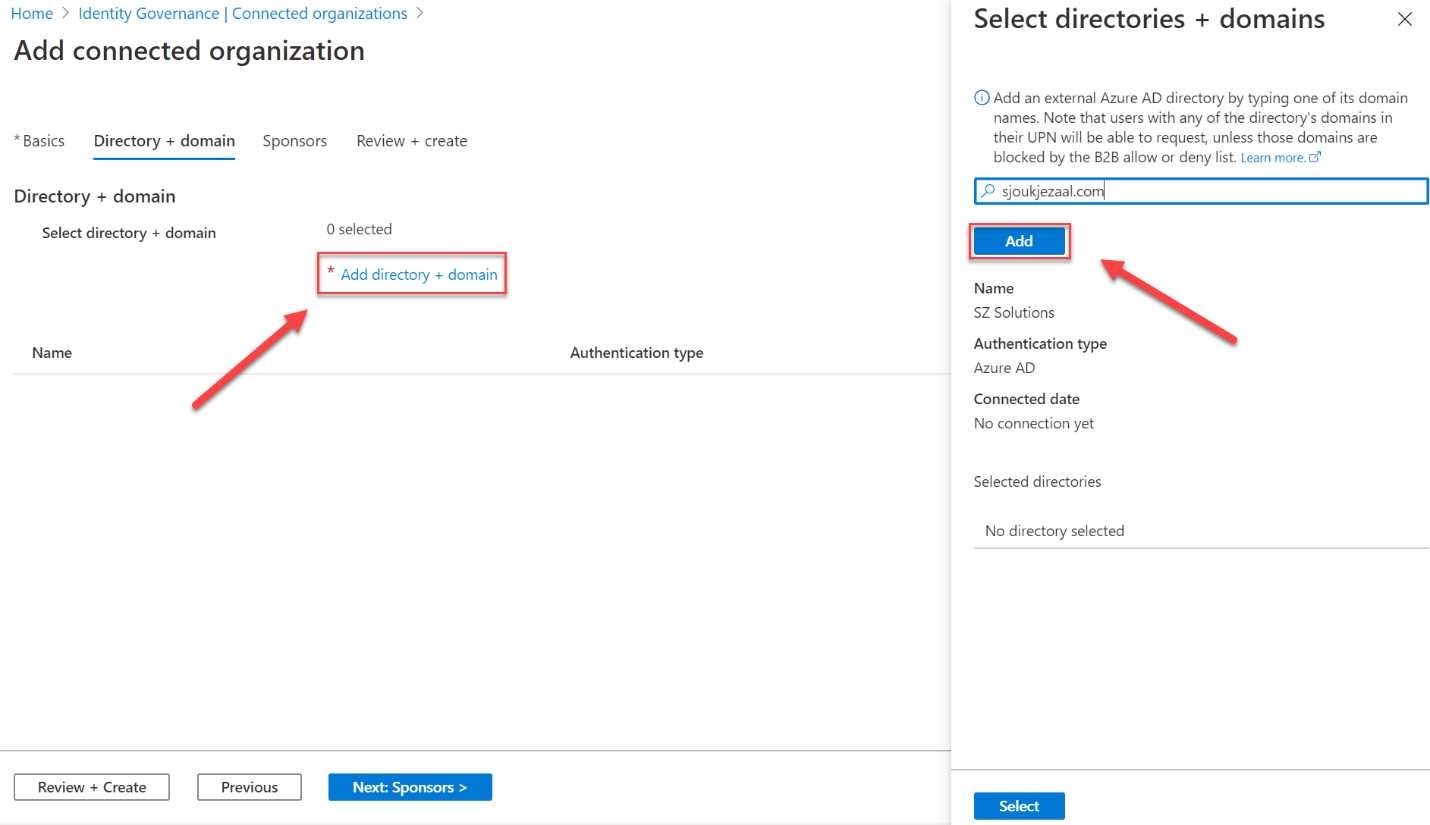
Figure 72: Add the domain name
- Click Select.
Note: All users from the Azure AD directory or domain will be able to request this access package. This includes users in Azure AD from all subdomains associated with the directory, unless those domains are blocked by the Azure AD business-to-business (B2B) allow or deny list.
- Click Next: Sponsors. Sponsors are internal or external users in your Azure AD tenant who are the point of contact for the relationship with the connected organization. External users already need to be added to the directory as a guest user before they can be added as a sponsor. You can select a sponsor or skip this step:
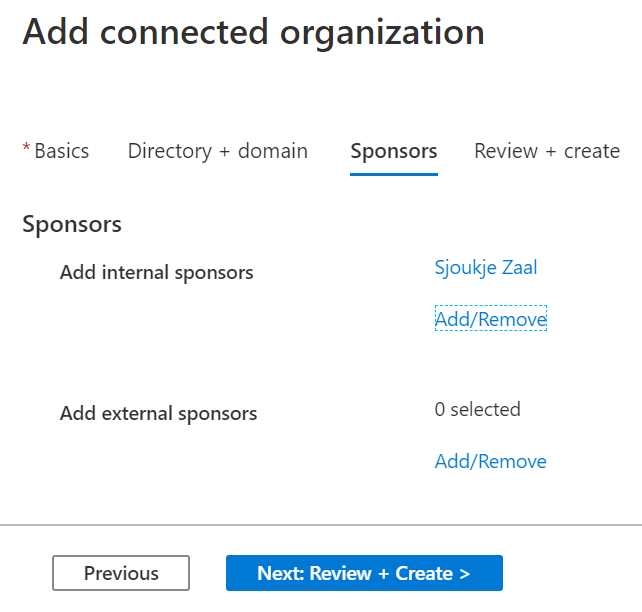
Figure 73: Adding sponsors
- Click Next: Review + Create. A summary of all the settings will be displayed:
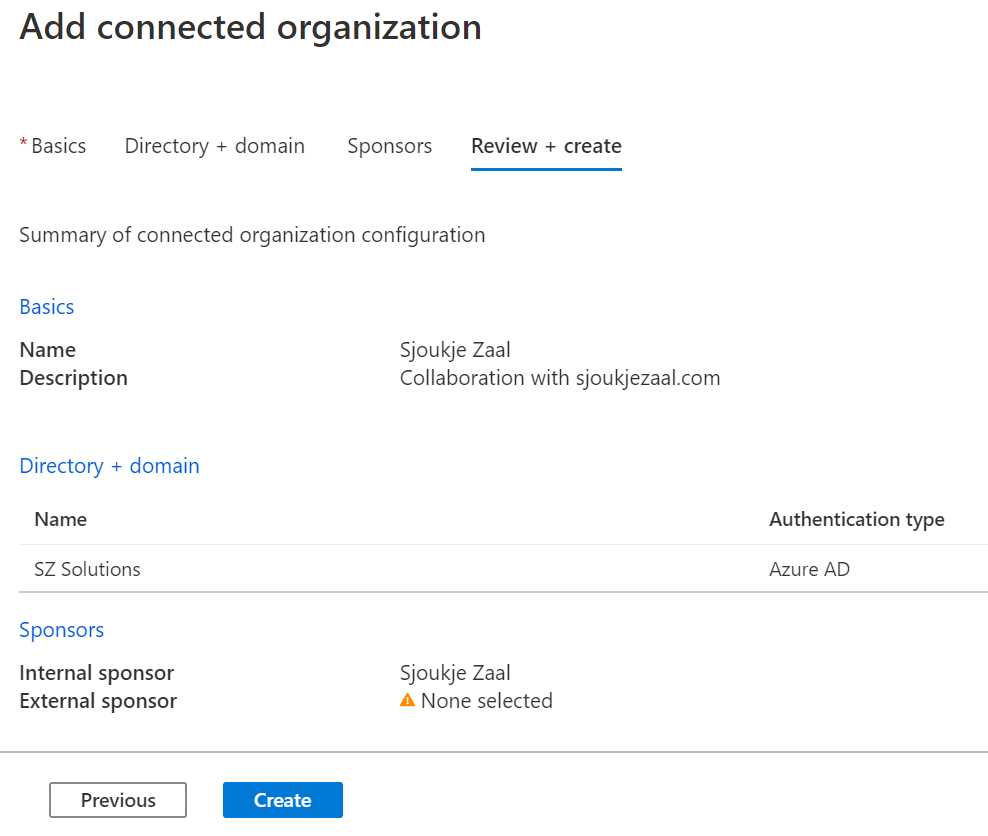
Figure 74: Connected organization summary
- Click Create to create the connected organization in Azure AD.
Now that we added this domain as a connected organization, it can easily be added to all the access packages that are created.
Thus concludes this chapter. We have covered Identity Governance and entitlement management in Azure AD and Azure AD B2B. We created an access package and shared it with a guest user. In the next chapter, we are going to cover how Azure AD is integrated in Office 365.
- 1800+ high-performance UI components.
- Includes popular controls such as Grid, Chart, Scheduler, and more.
- 24x5 unlimited support by developers.