
External Collaboration with Azure AD B2B Succinctly®

CHAPTER 7
Azure AD B2B and Office 365
In this final chapter, we are going to cover how Azure AD B2B is integrated in Office 365. We are going to cover the differences between Azure AD B2B and the default sharing mechanism for SharePoint Online and OneDrive. And last, we are going to create a guest user from a PowerApp that is hosted in SharePoint Online. This PowerApp is calling a Microsoft Flow that will call the function app that we created in Chapter 5 to create the guest user in Azure.
Azure AD B2B integration in Office 365
In Office 365, users are authenticated using Azure AD B2B as well. However, there is a difference for SharePoint Online and OneDrive. These two services have a separate invitation manager by default. Support for external sharing was added to SharePoint Online and OneDrive before Azure AD B2B even existed. Nowadays, millions of users are already using the default sharing mechanism in SharePoint Online and OneDrive.
There are some differences between Azure AD B2B and the default sharing mechanism in SharePoint Online and OneDrive:
- In OneDrive and SharePoint Online, users are added to the directory after they have accepted their invitation. When you use Azure AD B2B, users are added immediately after the invitation is sent to the user.
- Azure AD B2B users can be picked from the SharePoint Online and OneDrive sharing dialog boxes immediately after they are added to the directory. For SharePoint Online and OneDrive, this can only be done after the invitation is redeemed.
- The redemption experience in SharePoint Online and OneDrive is different than their default sharing experiences. This means that if organizations are using more Office 365 services for guest users as well, the guest user will have different experiences across all the different products.
- Licensing works differently in the invitation managers. The SharePoint Online and OneDrive invitation managers don’t have the 1:5 ratio limit that counts for Azure AD B2B. You can add unlimited guest users to SharePoint Online and OneDrive.
To enable Azure AD B2B sharing for your guest users in SharePoint Online and OneDrive, you need to change the setting in the SharePoint admin center. You need to set the external sharing value to Existing guests:
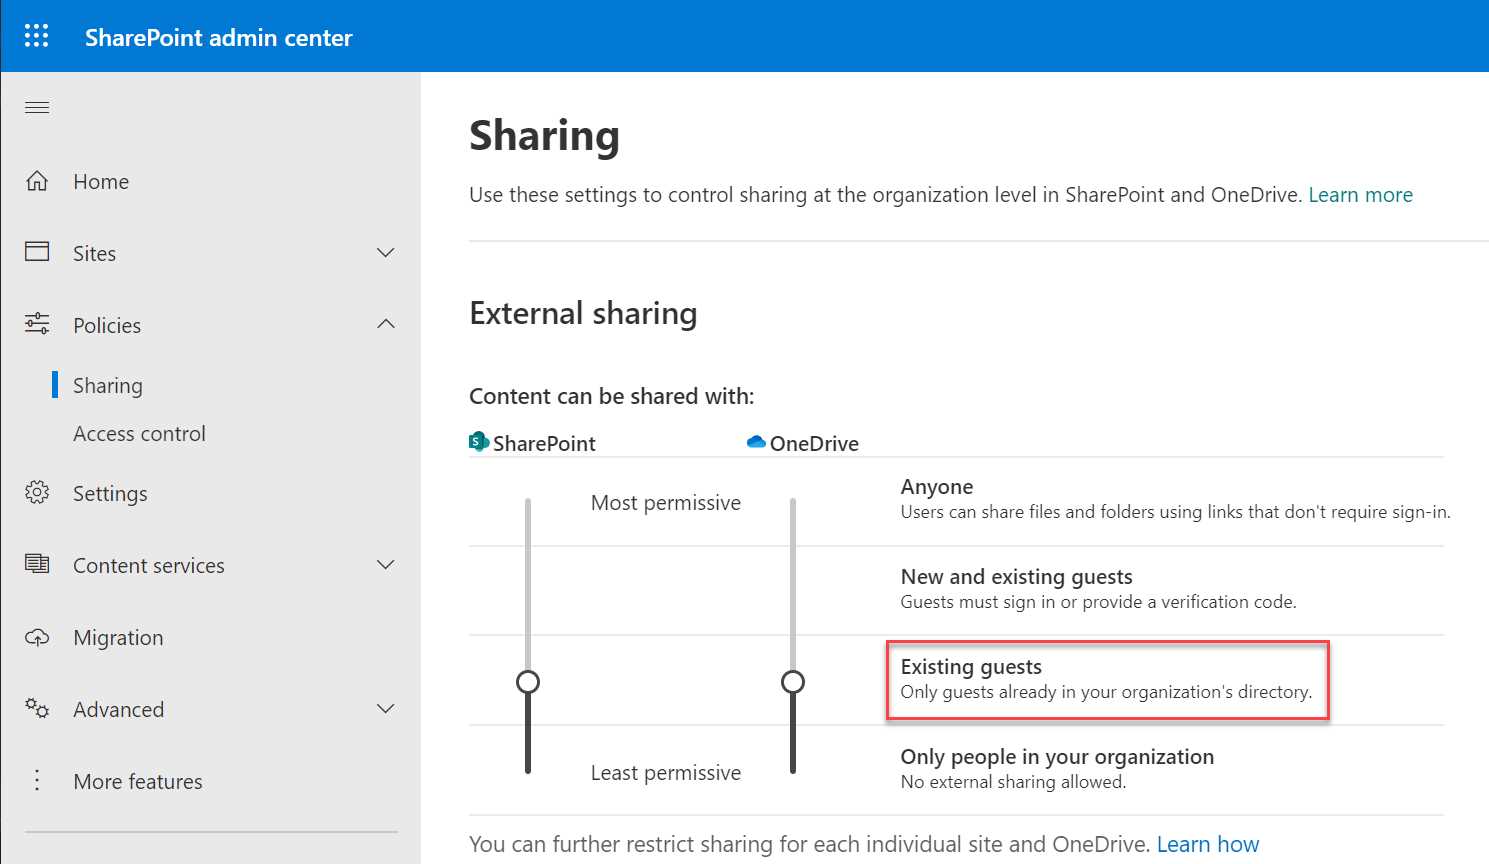
Figure 75: Enable Azure AD B2B in SharePoint Online and OneDrive
In the next section, we are going to create a sample application in PowerApps to add guest users in SharePoint Online.
Creating a guest user from a PowerApp in SharePoint Online
In this demonstration, we are going to create a guest user from a PowerApp in SharePoint Online. The PowerApp is calling Power Automate, which in turn is calling our Azure function that we created in Chapter 5. However, it is possible to call an API directly from PowerApps. I want to use Power Automate to make it clearer how to combine different services for creating robust integration solutions.
Note: For this demonstration, you need a valid Office 365 license to create the complete flow of adding the guest user.
We are first going to create the part that calls the Azure function in Power Automate.
Set up Power Automate
To set up the flow in Power Automate, you have to take the following steps:
- Open Power Automate from Office 365 and select the PowerApp template:
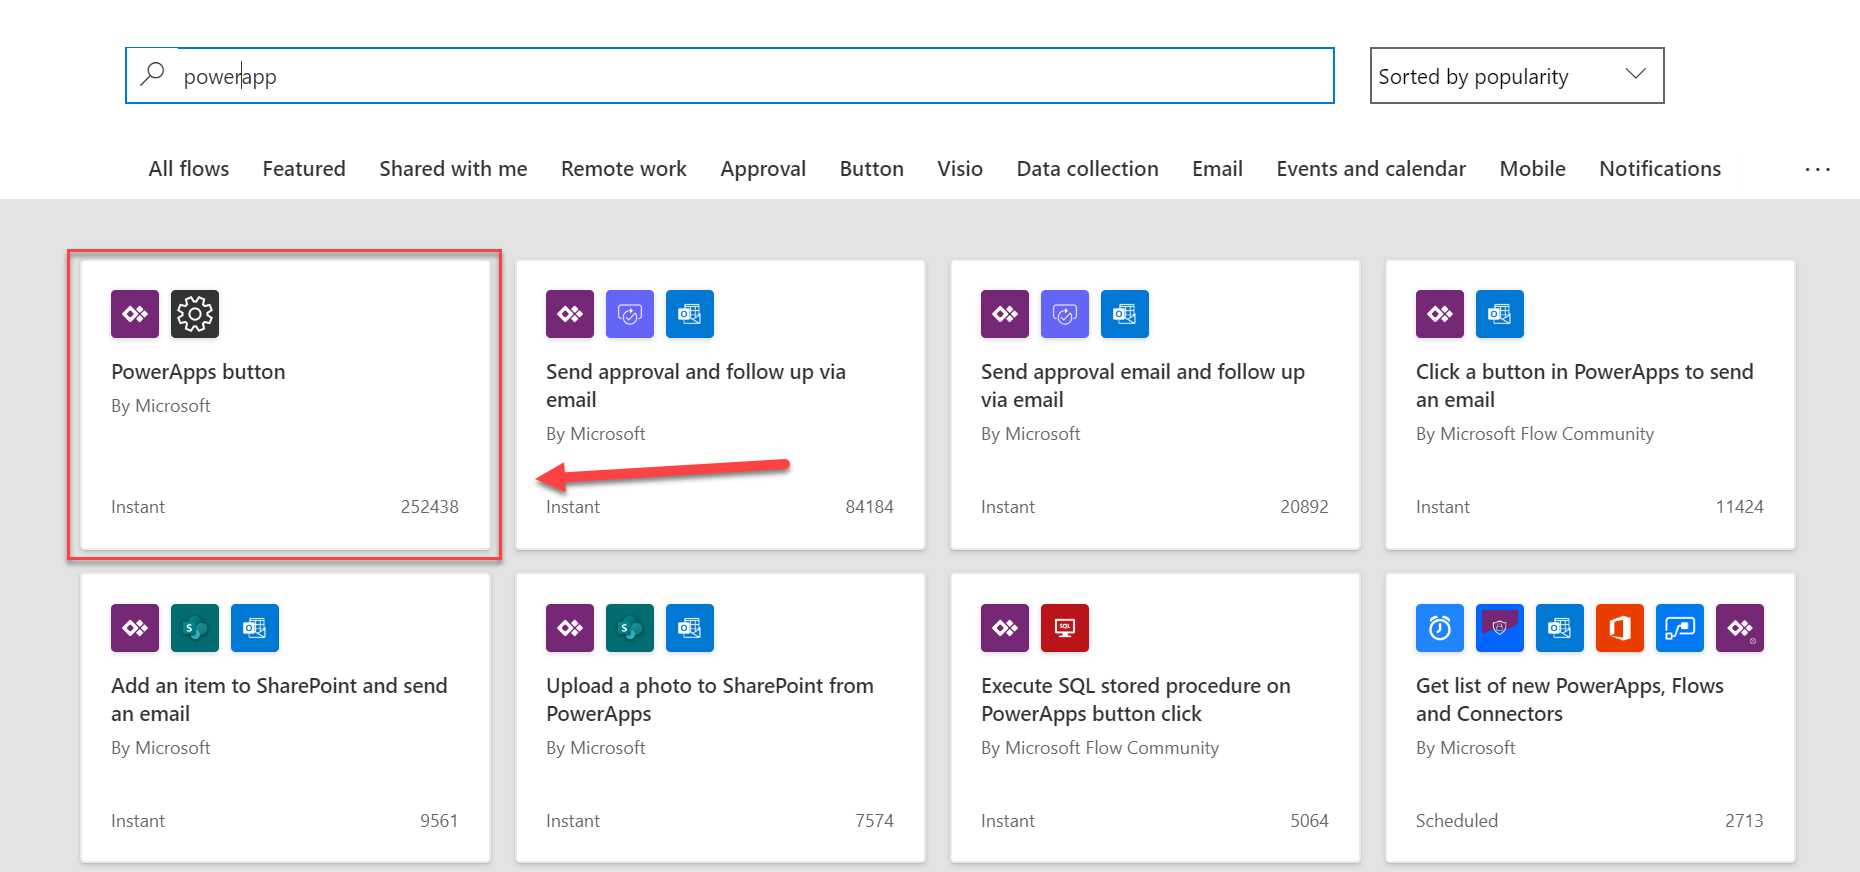
Figure 76: Create a new flow using the PowerApps button
- Log in to the Azure portal, navigate to the Azure function that we deployed in Chapter 5, and copy the full URL to Notepad. From the Azure function resource group, select the App Service:
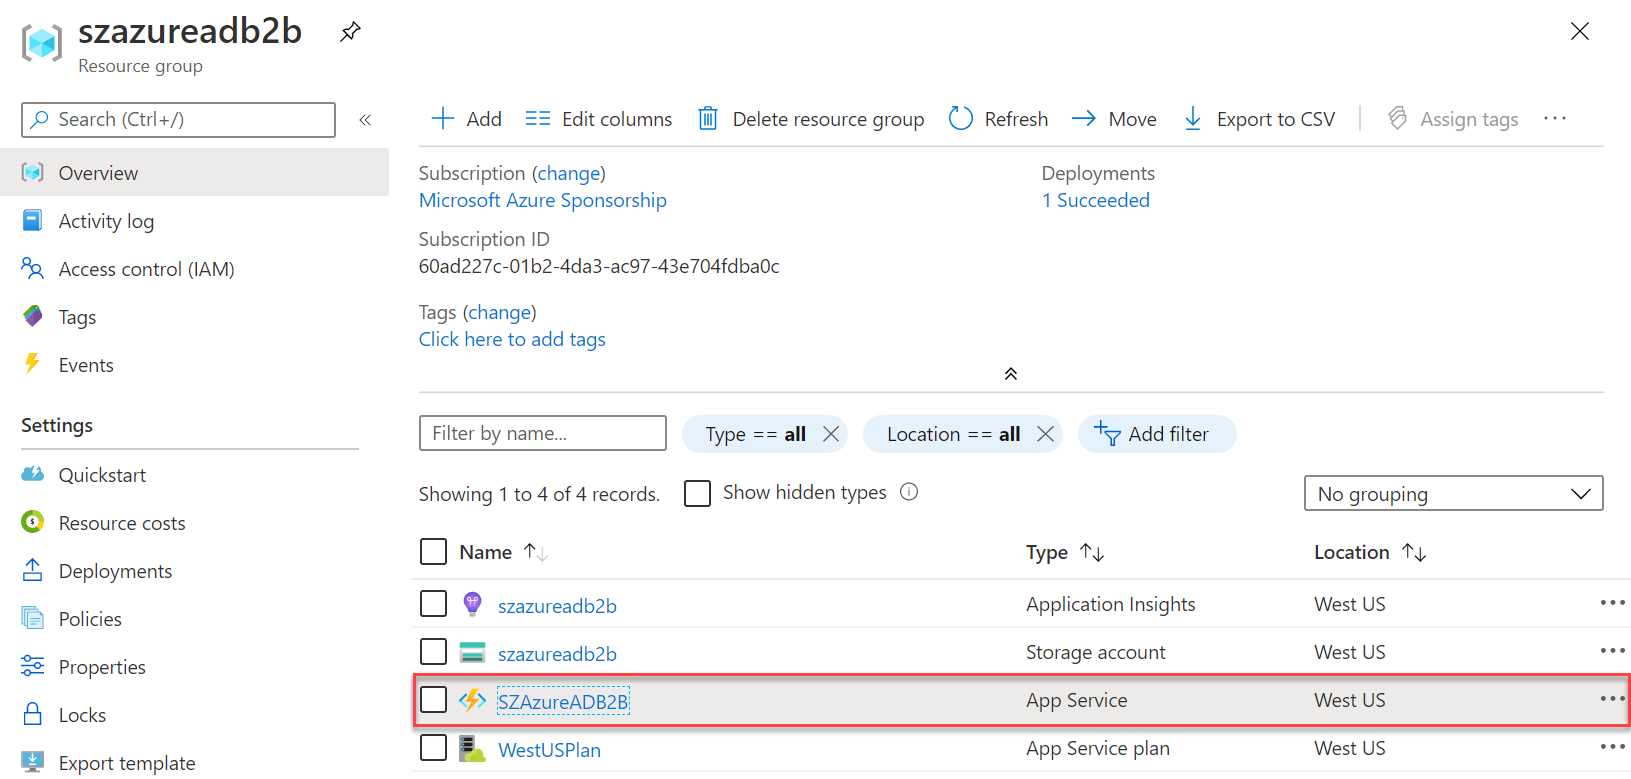
Figure 77: Navigate to the App Service
- Then, in the App Service overview, from the top right, select the URL:
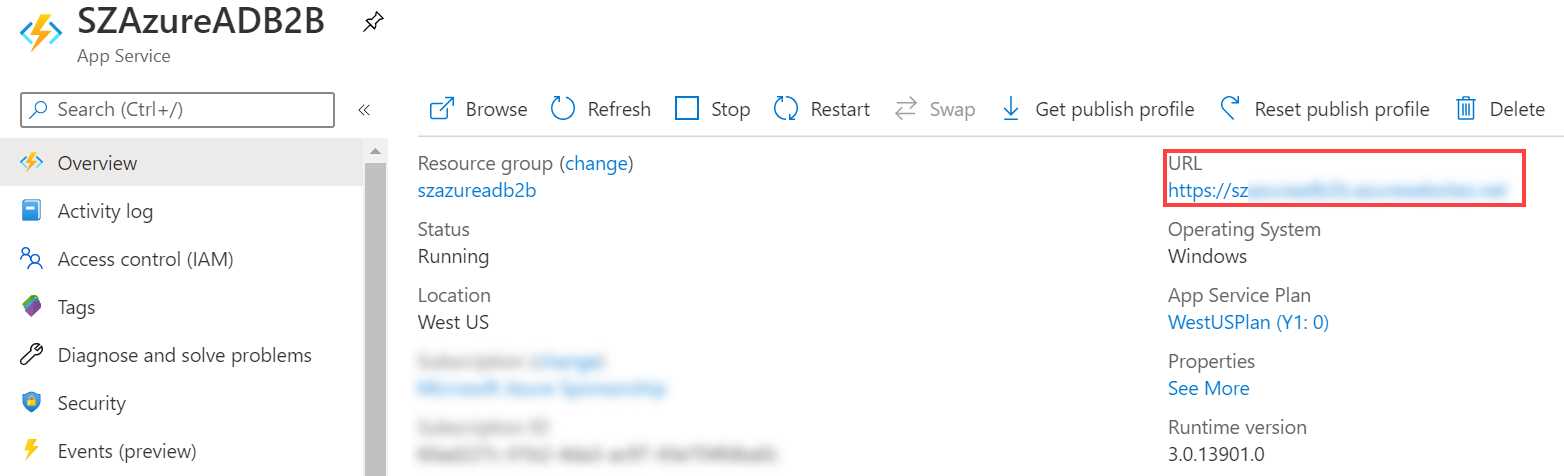
Figure 78: Copy the URL for the function
- Click + New step > Add an action.
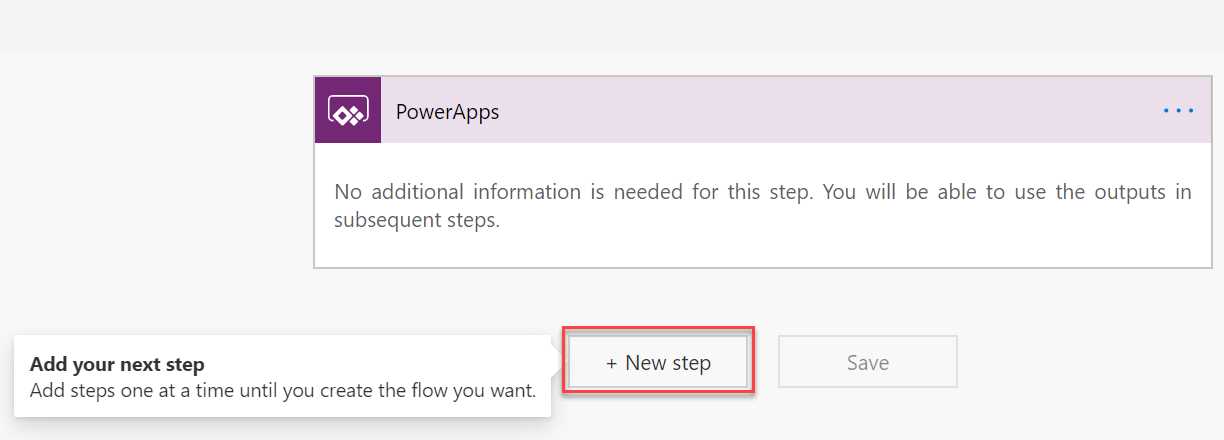
Figure 79: Add a new step to the Power Automate flow
- To pass on the parameters from the PowerApp, add three Initialize Variable actions below the PowerApps action. Give them the following values:
- Rename the action to FirstNameParameter.
- Name: FirstName
- Type: String
- Value: Select Ask in PowerApps, and then a new parameter is created.
- Rename the action to LastNameParameter.
- Name: LastName
- Type: String
- Value: Select Ask in PowerApps, and then a new parameter is created.
- Rename the action to EmailAddressParameter.
- Name: EmailAddress
- Type: String
- Value: Select Ask in PowerApps, and then a new parameter is created.
This will look like the following image:
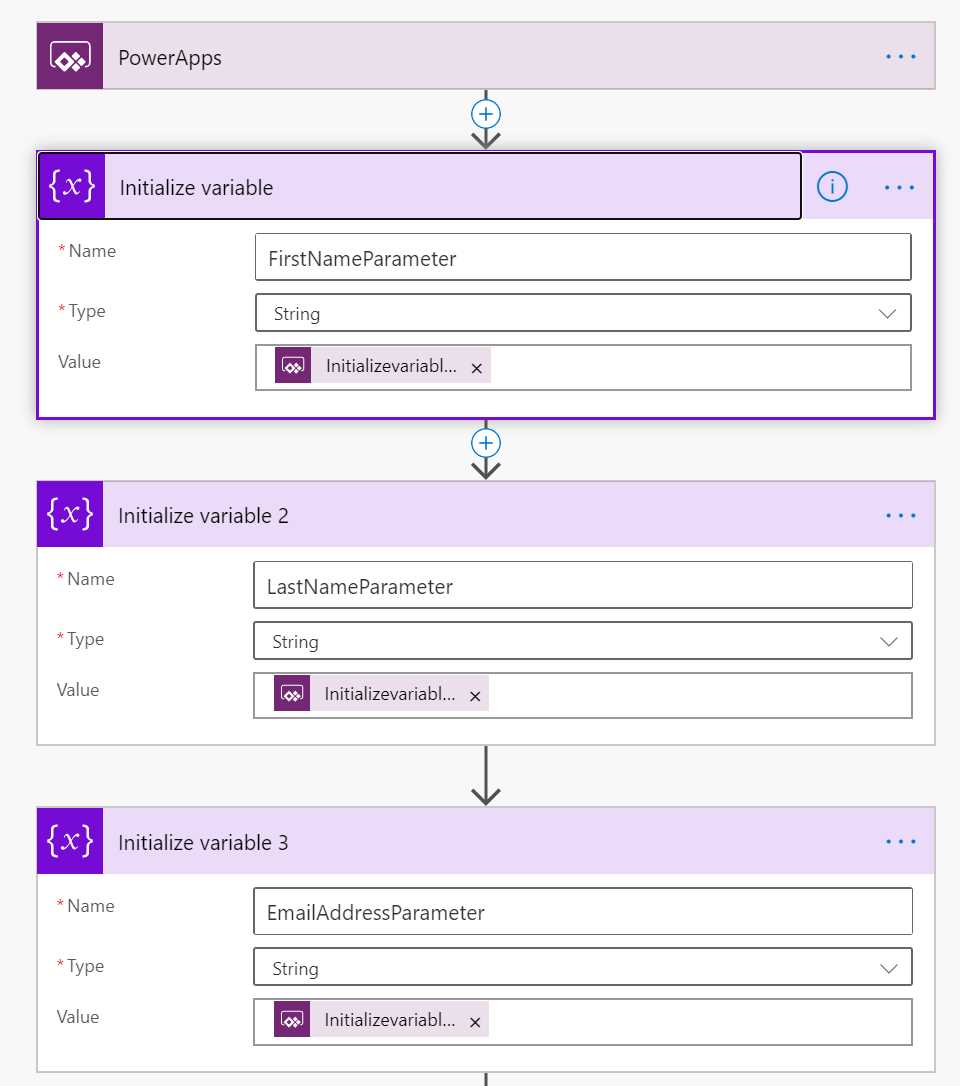
Figure 80: Create three PowerApp variables
- Add a new action and select the HTTP Action. Rename the action as Create Guest User. Add the following values:
- Method: Post
- Uri: https://<your-function-url>/ HttpTriggerCSharp1
- Headers: Content-Type, application/x-www-form-urlencoded
- Body:
Code Listing 8
{ "firstname": @{variables('FirstNameParameter')}, "lastname": @{variables('LastNameParameter')}, "emailaddress": @{variables('LastNameParameter')} } |
- Click Save in the top right corner.
We have finished the Power Automate flow. In the next step, we can create our PowerApp for the input fields.
Create the PowerApp
In this part of the demonstration, we are going to create the PowerApp. Therefore, we have to take the following steps:
- Go to https://web.powerapps.com and log in with your Office 365 credentials. Select the Canvas app from blank template, give the app a name, and select the Phone format:
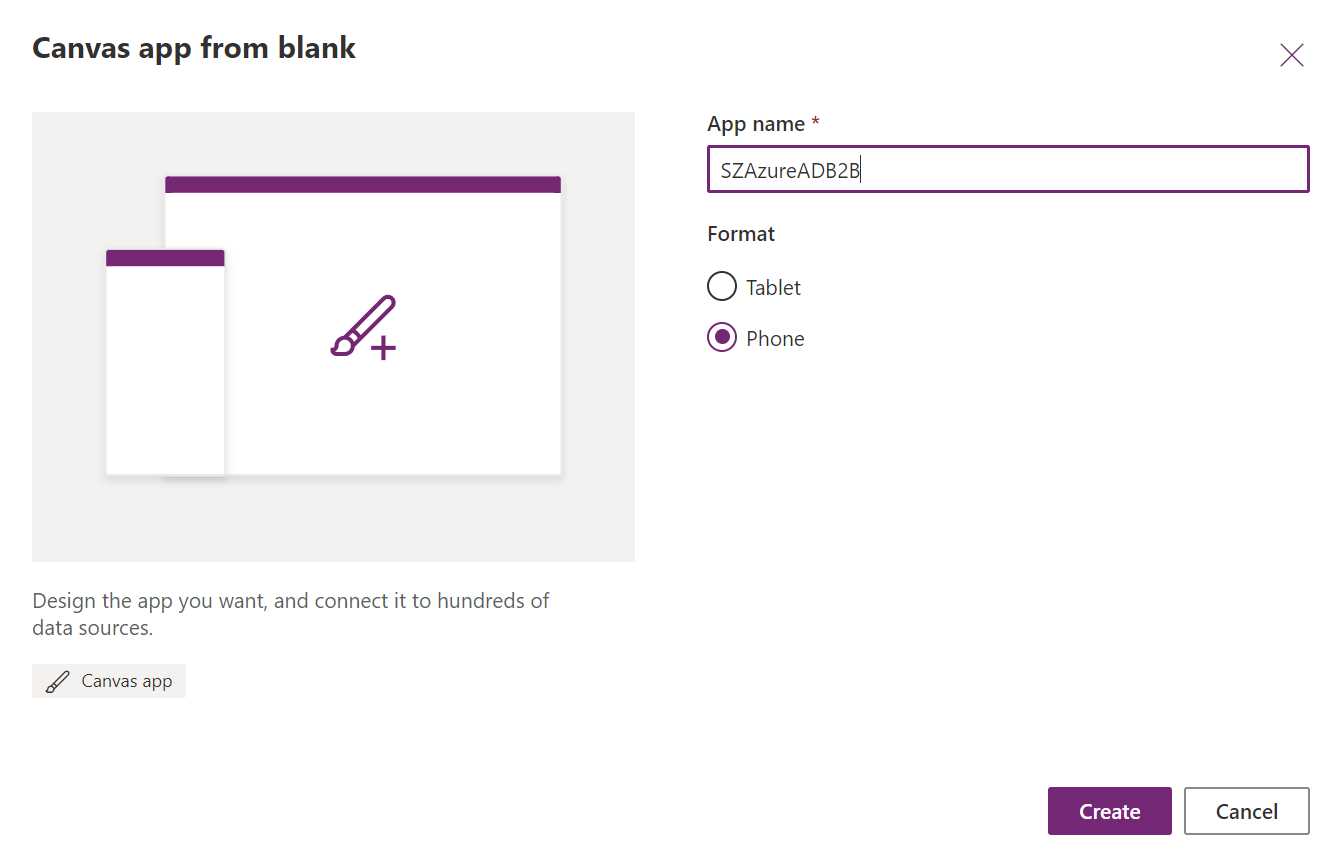
Figure 81: Create a new PowerApp
- Click Create.
- To change the screen size, go to File > Settings > Screen size + orientation, and set the size to 500 × 600:
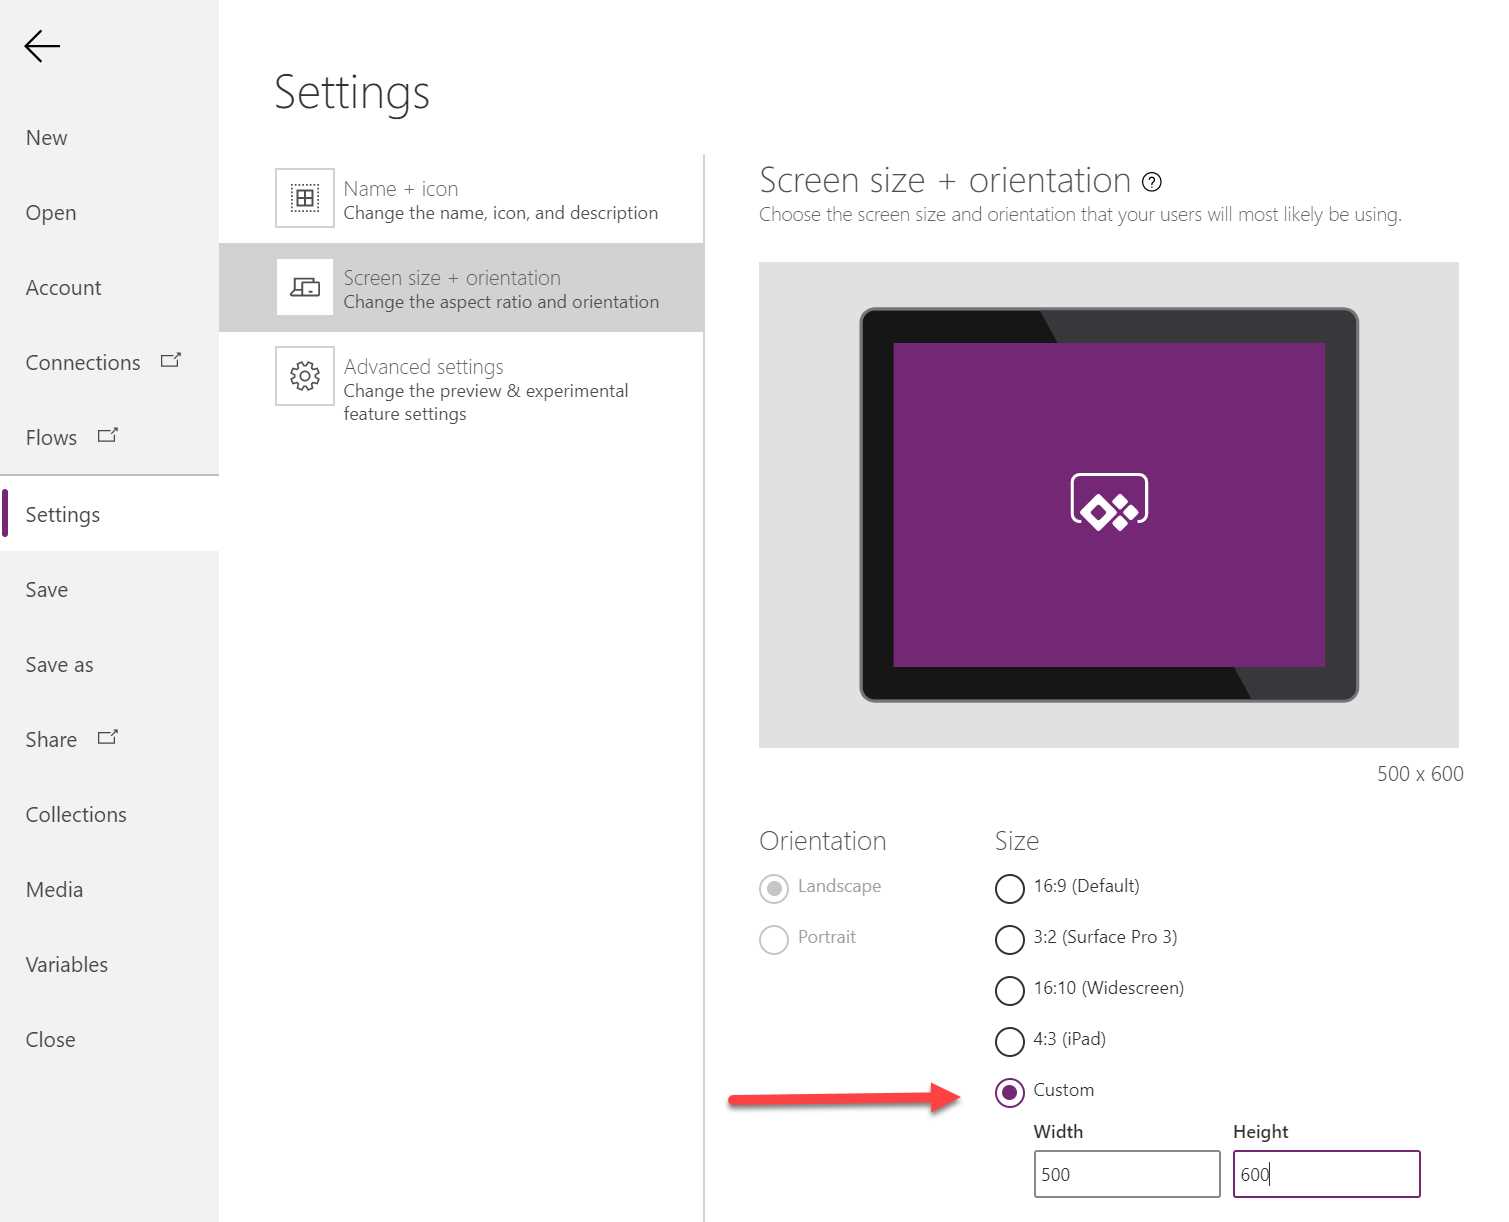
Figure 82: Adjust the screen size
- The Edit screen is displayed. Add the following labels, fields, and button to the canvas:
- Label: Name: LabelFirstname, Text: Firstname *
- TextInput: Name: TextFirstName, clear Text Input
- Label: Name: LabelLastname, Text: Lastname *
- TextInput: Name: TextLastName, clear Text Input
- Label: Name: LabelEmailAddress, Text: Email Address *
- TextInput: Name: TextEmailAddress, clear Text Input
- Button: Name: ButtonAdd, Text: Add Guest User
This will look like the following image:

Figure 83: PowerApp
- Click ButtonAdd and then click Action. Select the flow created in the previous section and associate it with the button:
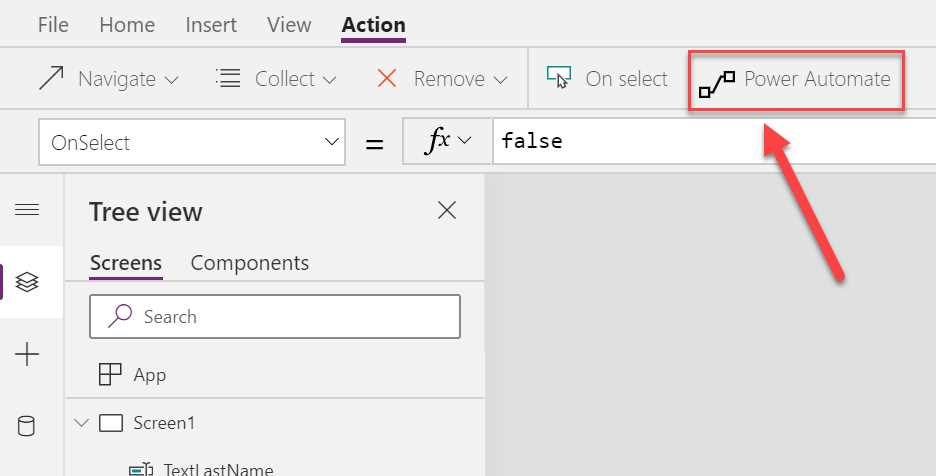
Figure 84: Associate the button with Power Automate
- Select the Power Automate flow that we created in the previous section to associate it with the button.
- In the formula bar, add the following variables to the Run() method to pass the values to the flow:
PowerAppsbutton.Run(TextFirstName.Text, TextLastName.Text, TextEmailAddress.Text)
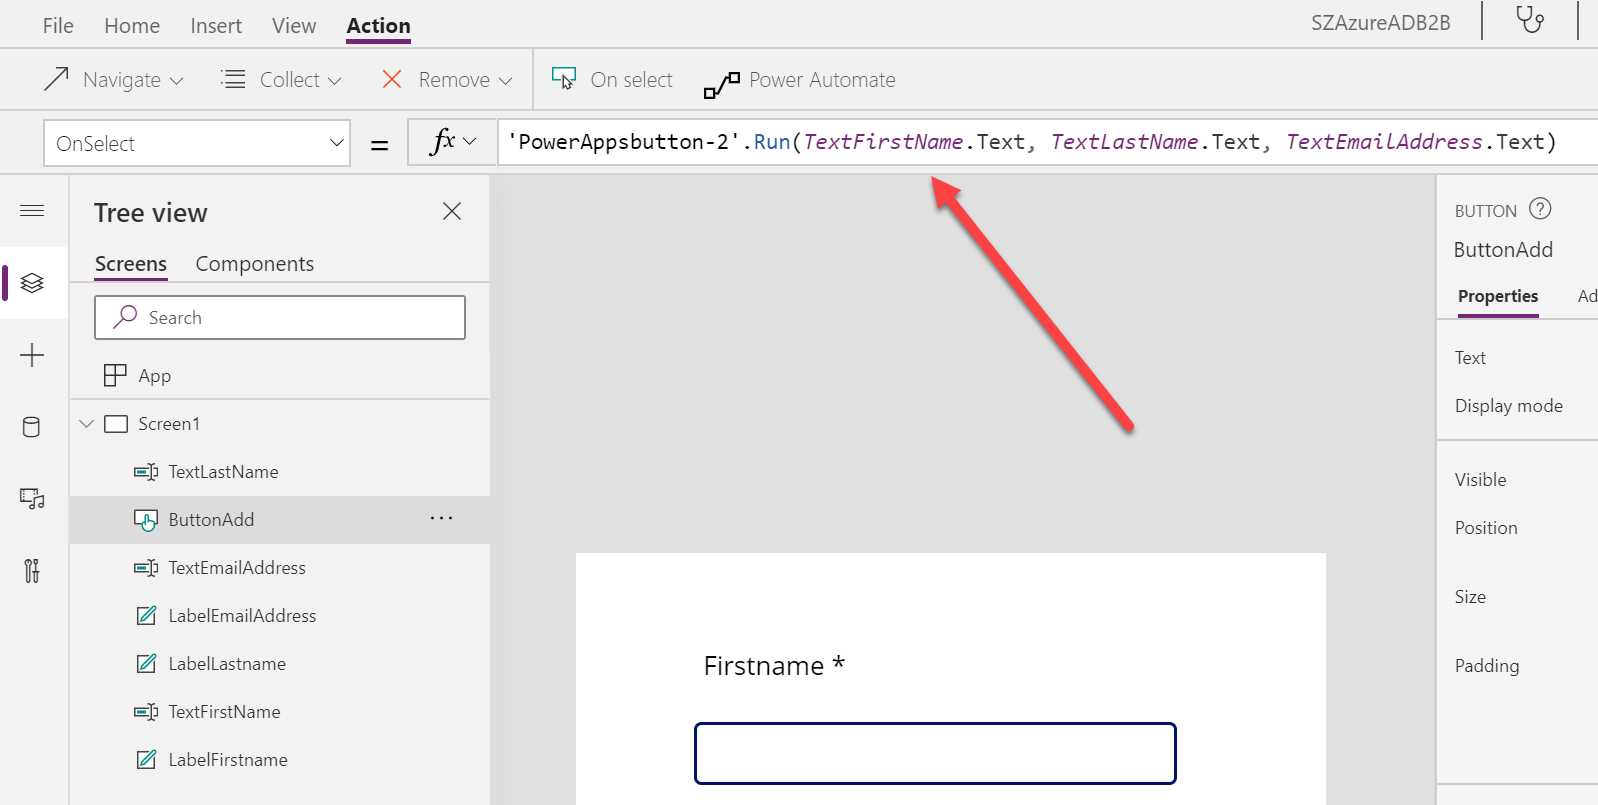
Figure 85: Add the formula for passing on the parameters
- Save the PowerApp. Then copy the Web link or App ID to Notepad:
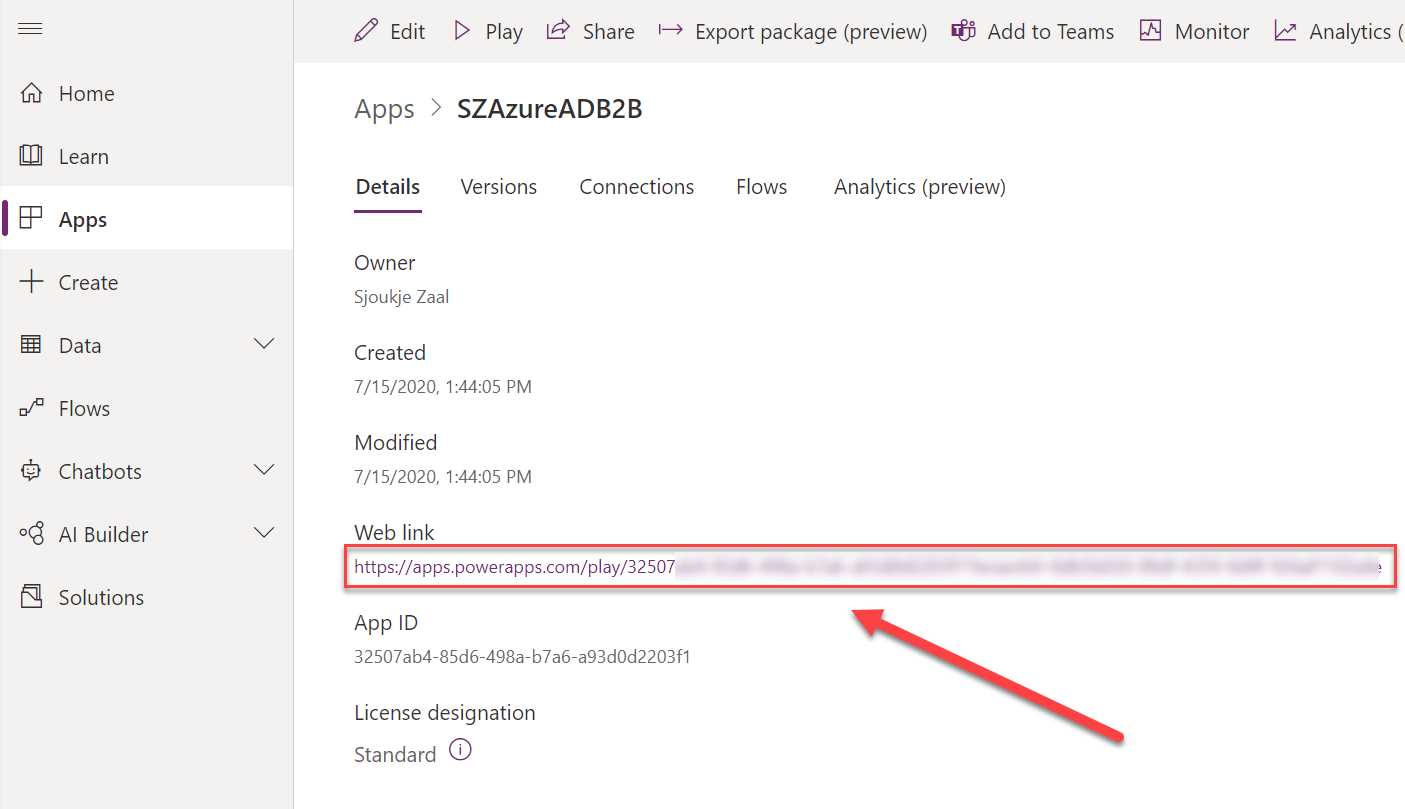
Figure 86: Copy the Web link
We have now created the PowerApp. The next and final step is to add it to a SharePoint Online site.
Adding the PowerApp to a SharePoint Site
The last step is to add the PowerApp to SharePoint so that you can start using it to invite guest users.
- Navigate to a SharePoint Online site.
- Add a PowerApp web part to a SharePoint page. In the settings, add the web link or the app ID, which you copied to Notepad in the previous step. Publish the page. This will look like the following image:
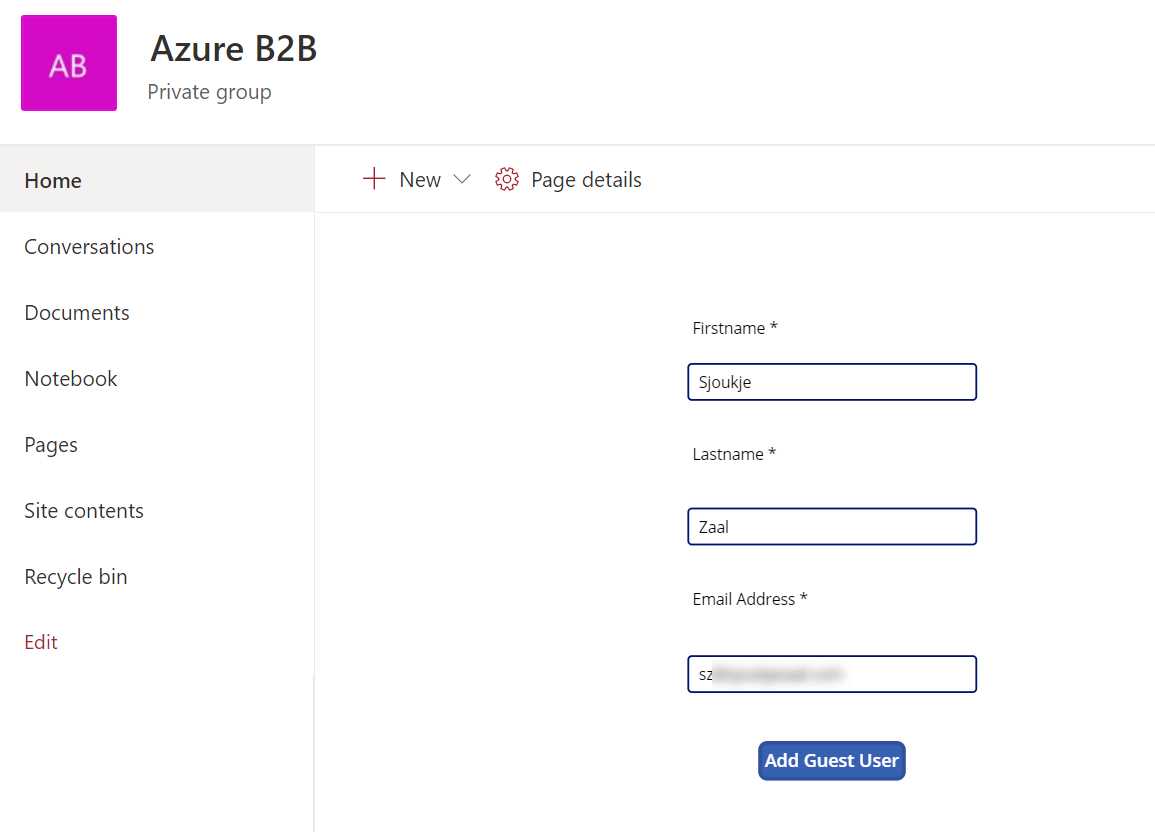
Figure 87: Add the web part to a page
- Fill in the first name, last name, and email address. This will create the guest user in Azure AD.
- Navigate back to Azure AD and go to Users in the left menu. You will see that the guest user is created.
In this last chapter, we have covered how Azure AD is integrated in Office 365. We created a sample application to add guest users from a SharePoint Online site to Azure AD using a PowerApp and a Power Automate flow.
- 1800+ high-performance UI components.
- Includes popular controls such as Grid, Chart, Scheduler, and more.
- 24x5 unlimited support by developers.