
Entity Framework Code First Succinctly®

CHAPTER 5
Writing Data to the Database
Saving, Updating, and Deleting Entities
Saving Entities
Because EF works with POCOs, creating a new entity is just a matter of instantiating it with the new operator. If we want it to eventually get to the database, we need to attach it to an existing context.
var developmentTool = new DevelopmentTool() { Name = "Visual Studio 2012", Language = "C#" }; ctx.Tools.Add(developmentTool); |
New entities must be added to the DbSet<T> property of the same type, which is also your gateway for querying.
Tip: We can only add entities when we have exposed the entity’s type, or a base of it, in our context, as a DbSet<T> property.
However, this new entity is not immediately sent to the database. The EF context implements the Unit of Work pattern, a term coined by Martin Fowler, for which you can read more here: http://martinfowler.com/eaaCatalog/unitOfWork.html. In a nutshell, this pattern states that the Unit of Work container will keep internally a list of items in need of persistence (new, modified, or deleted entities) and will save them all in an atomic manner, taking care of any eventual dependencies between them. The moment when these entities are persisted in Entity Framework Code First happens when we call the DbContext’s SaveChanges method.
var affectedRecords = ctx.SaveChanges(); |
At this moment, all the pending changes are sent to the database. Entity Framework employs a first level (or local) cache, which is where all the “dirty” entities—like those added to the context—sit waiting for the time to persist. The SaveChanges method returns the number of records that were successfully inserted, and will throw an exception if some error occurred in the process. In that case, all changes are rolled back, and you really should take this scenario into consideration.
Updating Entities
As for updates, Entity Framework tracks changes to loaded entities automatically. For each entity, it “knows” what their initial values were, and if they differ from the current ones, the entity is considered “dirty.” A sample code follows.
//load some entity var tool = ctx.Tools.FirstOrDefault();
//change something t.Name += "_changed";
//send changes var affectedRecords = ctx.SaveChanges(); //1 |
As you see, no separate Update method is necessary, since all type of changes (inserts, updates, and deletes) are detected automatically and performed by the SaveChanges method. The SaveChanges method still needs to be called, and it will return the combined count of all inserted and updated entities. If some sort of integrity constraint is violated, then an exception will be thrown, and this needs to be dealt with appropriately.
Upserting Entities
Sometimes you may want to either insert a record or to update it, depending on whether it already exists or not; this is sometimes called UPSERT. Entity Framework Code First offers an interesting method that, from a property of an entity, checks its existence and acts accordingly. This method is AddOrUpdate, and here is a quick example.
ctx.Customers.AddOrUpdate(x => x.Name, new Customer { Name = "Big Customer" }); |
Because there’s a chance that you will be inserting a new record, you must supply all of its required properties, otherwise an error will occur.
Deleting Entities
When you have a reference to a loaded entity, you can mark it as deleted, so that when changes are persisted, EF will delete the corresponding record. Deleting an entity in EF consists of removing it from the DbSet<T> collection.
//load some entity var tool = ctx.Tools.FirstOrDefault();
//remove the entity ctx.Tools.Remove(tool);
//send changes var affectedRecords = ctx.SaveChanges(); //1 |
Of course, SaveChanges still needs to be called to make the changes permanent. If any integrity constraint is violated, an exception will be thrown.
Note: Entity Framework will apply all the pending changes—inserts, updates, and deletes—in an appropriate order, including entities that depend on other entities.
Inspecting the Tracked Entities
We talked about the local cache, and you may have asked yourself where this cache is and what can be done with it.
You access the local cache entry for an entity with the Entry method. This returns an instance of DbEntityEntry, which contains lots of useful information, such as the current state of the entity—as seen by the context—the initial and current values, and so on.
//load some entity var tool = ctx.Tools.FirstOrDefault();
//get the cache entry var entry = ctx.Entry(tool); //get the entity state var state = entry.State; //EntityState.Unchanged //get the original value of the Name property var originalName = entry.OriginalValues["Name"] as String; //Visual Studio 2012 //change something t.Name += "_changed"; //get the current state state = entry.State; //EntityState.Modified //get the current value of the Name property var currentName = entry.CurrentValues["Name"] as String; //Visual Studio 2012_changed |
If you want to inspect all the entries currently being tracked, there is the ChangeTracker property.
//get all the added entities of type Project var addedProjects = ctx.ChangeTracker.Entries() .Where(x => x.State == EntityState.Added).OfType<Project>(); |
Cascading Deletes
Two related tables can be created in the database in such a way that when one record of the parent table is deleted, all corresponding records in the child table are also deleted. This is called cascading deletes.
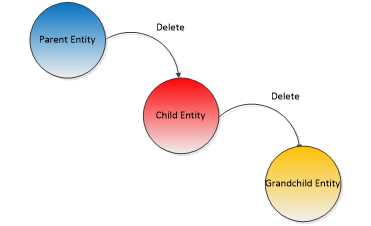
Figure 40: Cascading deletes
This is useful for automatically keeping the database integrity. If the database wouldn’t do this for us, we would have to do it manually, otherwise we would end up with orphan records. This is only useful for parent-child or master-detail relationships where one endpoint cannot exist without the other; not all relationships should be created this way, for example, when the parent endpoint is optional, we typically won’t cascade. Think of a customer-project relationship: it doesn’t make sense to have projects without a customer. On the other hand, it does make sense to have a bug without an assigned developer.
When Entity Framework creates the database, it will create the appropriate cascading constraints depending on the mapping.
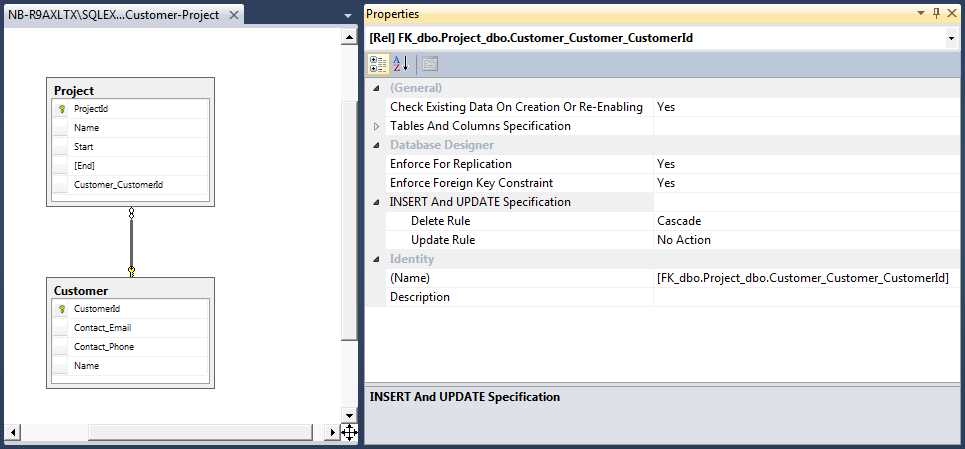
Figure 41: A cascade delete
As of now, EF applies a convention for that, but that can be overridden by fluent mapping.
Table 2: Relationship Cascades
Relationship | Default Cascade |
|---|---|
One-to-One | No. |
One-to-many | Only if the one endpoint is required. |
Many-to-one | No. |
Many-to-many | No. |
We configure the cascading option in fluent configuration like this.
//when deleting a Customer, delete all of its Projects modelBuilder.Entity<Project>().HasRequired(x => x.Customer) .WillCascadeOnDelete(true); //when deleting a ProjectResource, do not delete the Project modelBuilder.Entity<ProjectResource>().HasRequired(x => x.Project) .WithMany(x => x.ProjectResources).WillCascadeOnDelete(false); //when deleting a Project, delete its ProjectResources modelBuilder.Entity<Project>().HasMany(x => x.ProjectResources) .WithRequired(x => x.Project).WillCascadeOnDelete(false); |
Tip: You can have multiple levels of cascades, just make sure you don’t have circular references.
Note: Cascade deletes occur at the database level; Entity Framework does not issue any SQL for that purpose.
Refreshing Entities
When a record is loaded by EF as the result of a query, an entity is created and is placed in local cache. When a new query is executed that returns records that are associated with an entity already in local cache, no new entity is created; instead, the one from the cache is returned. This has a sometimes undesirable side effect: even if something changed in the entities’ record, the local entity is not updated. This is an optimization that Entity Framework does, but sometimes it can lead to unexpected results.
If we want to make sure we have the latest data, we need to force an explicit refresh.
var project = ctx.Projects.Find(1); //time passes…
ctx.Entry(project).Reload(); |
Concurrency Control
Overview
Optimistic concurrency control is a method for working with databases that assumes that multiple transactions can complete without affecting each other; no locking is required. When committing a record, each transaction will check to see if the record has been modified in the database, and will fail. This is very useful for dealing with multiple accesses to data in the context of web applications.
There are two ways for dealing with the situation where data has been changed:
- First one wins: the second transaction will detect that data has been changed, and will throw an exception.
- Last one wins: while it detects that data has changed, the second transaction chooses to overwrite it.
Entity Framework supports both of these methods.
First One Wins
We have an entity instance obtained from the database, we change it, and we tell the EFCF context to persist it. Because of optimistic concurrency, the SaveChanges method will throw a DbUpdateConcurrencyException if the data was changes, so make sure you wrap it in a try…catch.
try { ctx.SaveChanges(); } catch (DbUpdateConcurrencyException) { //the record was changed in the database, notify the user and fail } |
The first one wins approach is just this: fail in case a change has occurred.
Last One Wins
For this one, we will detect that a change has been made, and we overwrite it explicitly.
//assume the operation failed var failed = true; //loop until succeeded do { try { ctx.SaveChanges();
//if succeeded, exit the loop failed = false; } catch (DbUpdateConcurrencyException ex) { var entity = ex.Entries.Single(); //get the current values from the database var databaseValues = entity.GetDatabaseValues(); //set the current database values as the original values //the original values are the ones that will be compared with the current ones entity.OriginalValues.SetValues(databaseValues); } } while (failed); |
Applying Optimistic Concurrency
Entity Framework by default does not perform the optimistic concurrency check. You can enable it by choosing the property or properties whose values will be compared with the current database values. This is done by applying a ConcurrencyCheckAttribute when mapping by attributes.
public class Project { [Required] [MaxLength(50)] [ConcurrencyCheck] public String Name { get; set; } } |
Or in mapping by code.
protected override void OnModelCreating(DbModelBuilder modelBuilder) { modelBuilder.Entity<Project>().Property(x => x.Name).IsConcurrencyToken(); } |
What happens is this: when EF generates the SQL for an UPDATE operation, it will not only include a WHERE restriction for the primary key, but also for any properties marked for concurrency check, comparing their columns with the original values.
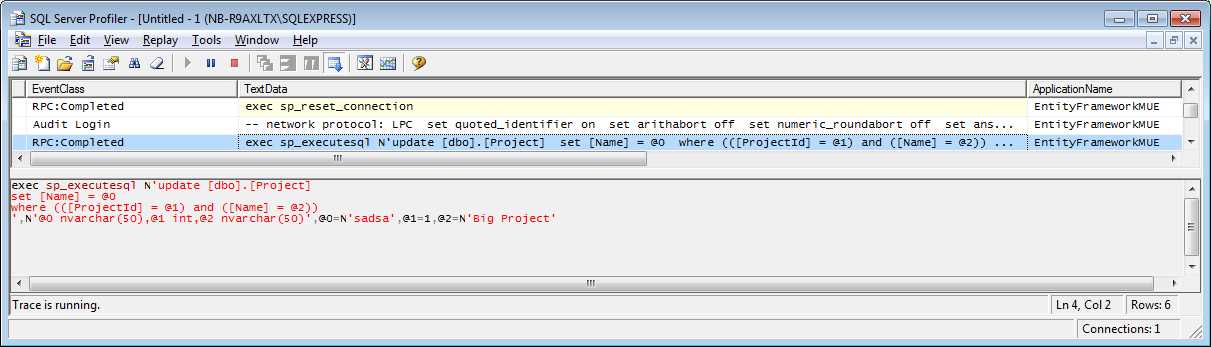
Figure 42: An update with a concurrency control check
If the number of affected records is not 1, this will likely be because the values in the database will not match the original values known by Entity Framework.
SQL Server has a data type whose values cannot be explicitly set, but instead change automatically whenever the record they belong to changes: ROWVERSION. Other databases offer similar functionality.
Because Entity Framework has a nice integration with SQL Server, columns of type ROWVERSION are supported for optimistic concurrency checks. For that, we need to map one such column into our model as a timestamp. First with attributes by applying a TimestampAttribute to a property, which needs to be of type byte array, and doesn’t need a public setter.
[Timestamp] public Byte [] RowVersion { get; protected set; } |
And, for completeness, with fluent configuration.
modelBuilder.Entity<Project>().Property(x => x.RowVersion).IsRowVersion(); |
The behavior of TimestampAttribute is exactly identical to that of ConcurrencyCheckAttribute, but there can be only one property marked as timestamp per entity.
Detached Entities
A common scenario in web applications is this: you load some entity from the database, store it in the session, and in a subsequent request, get it from there and resume using it. This is all fine except that, if you are using Entity Framework Code First, you won’t be using the same context instance on the two requests. This new context knows nothing about this instance. In this case, it is said that the entity is detached in relation to this context. This has the effect that any changes to this instance won’t be tracked and any lazy loaded properties that weren’t loaded when it was stored in the session won’t be loaded as well.
What we need to do is to associate this instance with the new context.
//retrieve the instance from the ASP.NET context var project = HttpContext.Current.Session["StoredProject"] as Project; var ctx = new ProjectsContext(); //attach it to the current context with a state of unchanged ctx.Entry(project).State = EntityState.Unchanged; |
After this, everything will work as expected.
Validation
Validation in Entity Framework Code First always occurs when an entity is about to be saved, which is normally a process triggered by the SaveChanges method. This can be prevented by setting the ValidateOnSaveEnabled property on the context.
//disable validation upon saving ctx.Configuration.ValidateOnSaveEnabled = false; |
We can see if the entries currently tracked by a context are valid by explicitly calling GetValidationErrors.
//all validation errors var allErrors = ctx.GetValidationErrors(); //validation errors for a given entity var errorsInEntity = ctx.Entry(p).GetValidationResult(); |
A validation result consists of instances of DbEntityValidationResult, of which there will be only one per invalid entity. This class offers the following properties.
Table 3: Validation result properties
Property | Purpose |
The entity to which this validation refers to. | |
Indicates if the entity is valid or not. | |
A collection of individual errors. |
The ValidationErrors property contains a collection of DbValidationError entries, each exposing the following.
Table 4: Result error properties
Property | Purpose |
|---|---|
The error message. | |
The name of the property on the entity that was considered invalid (can be empty if what was considered invalid was the entity as a whole). |
If we attempt to save an entity with invalid values, a DbEntityValidationException will be thrown, and inside of it, there is the EntityValidationErrors collection which exposes all DbEntityValidationResult found.
try { //try to save all changes ctx.SaveChanges(); } catch (DbEntityValidationException ex) { //validation errors were found that prevented saving changes var errors = ex.EntityValidationErrors.ToList(); } |
Validation Attributes
Similar to the way we can use attributes to declare mapping options, we can also use attributes for declaring validation rules. A validation attribute must inherit from ValidationAttribute in the System.ComponentModel.DataAnnotations namespace and override one of its IsValid methods. There are some simple validation attributes that we can use out of the box and are in no way tied to Entity Framework.
- Table 5: Validation attributes
Validation Attribute | Purpose |
|---|---|
Compares two properties and fails if they are different. | |
Executes a custom validation function and returns its value. | |
Checks if a string property has a length greater than a given value. | |
Checks if a string property has a length smaller than a given value. | |
Checks if the property’s value is included in a given range. | |
Checks if a string matches a given regular expression. | |
Checks if a property has a value; if the property is of type string, also checks if it is not empty. | |
Checks if a string property’s length is contained within a given threshold. | |
Checks if a string property (typically a password) matches the requirements of the default Membership Provider. |
It is easy to implement a custom validation attribute. Here we can see a simple example that checks if a number is even.
[Serializable] [AttributeUsage(AttributeTargets.Property, AllowMultiple = false, Inherited = true)] public sealed class IsEvenAttribute : ValidationAttribute { protected override ValidationResult IsValid(Object value, ValidationContext validationContext) { //check if the value is not null or empty if ((value != null) && (String.IsNullOrWhiteSpace(value.ToString()) == false)) { TypeConverter converter = TypeDescriptor.GetConverter(value); //check if the value can be converted to a long if (converter.CanConvertTo(typeof(Int64)) == true) { Int64 number = (Int64) converter.ConvertTo(value, typeof(Int64)); //fail if the number is even if ((number % 2) != 0) { return (new ValidationResult(this.ErrorMessage, new String[] { validationContext.MemberName })); } } } return (ValidationResult.Success); } } |
It can be applied to any property whose type can be converted to a long—it probably doesn’t make sense in the case of a Budget, but let’s pretend it does.
[IsEven(ErrorMessage = "Number must be even")] public Int32 Number { get; set; } |
We can also supply a custom validation method by applying a CustomValidationAttribute. Let’s see how the same validation—“is even”—can be implemented using this technique. First, use the following attribute declaration.
[CustomValidation(typeof(CustomValidationRules), "IsEven", ErrorMessage = "Number must be even")] public Int32 Number { get; set; } |
Next, use the following actual validation rule implementation.
public static ValidationResult IsEven(Object value, ValidationContext context) { //check if the value is not empty if ((value != null) && (String.IsNullOrWhiteSpace(value.ToString()) == false)) { TypeConverter converter = TypeDescriptor.GetConverter(value); //check if the value can be converted to a long if (converter.CanConvertTo(typeof(Int64)) == true) { Int64 number = (Int64) converter.ConvertTo(value, typeof(Int64)); //fail if the number is even if ((number % 2) != 0) { return (new ValidationResult("Number must be even", new String[] { context.MemberName })); } } } return (ValidationResult.Success); } |
I chose to implement the validation function as static, but it is not required. In that case, the class where the function is declared must be safe to instantiate (not abstract with a public parameter-less constructor).
Implementing Self Validation
Another option for performing custom validations lies in the IValidatableObject interface. By implementing this interface, an entity can be self-validatable; that is, all validation logic is contained in itself. Let’s see how.
public class Project : IValidatableObject { //other members go here public IEnumerable<ValidationResult> Validate(ValidationContext context) { if (this.ProjectManager == null) { yield return (new ValidationResult("No project manager specified")); } if (this.Developers.Any() == false) { yield return (new ValidationResult("No developers specified")); } if ((this.End != null) && (this.End.Value < this.Start)) { yield return (new ValidationResult("End of project is before start")); } } } |
Wrapping Up
You might have noticed that all these custom validation techniques—custom attributes, custom validation functions, and IValidatableObject implementation—all return ValidationResult instances, whereas Entity Framework Code First exposes validation results as collections of DbEntityValidationResult and DbValidationError. Don’t worry, Entity Framework will take care of it for you!
So, what validation option is best? In my opinion, all have strong points and definitely all can be used together. I’ll just leave some final remarks:
- If a validation attribute is sufficiently generic, it can be reused in many places.
- When we look at a class that uses attributes to express validation concerns, it is easy to see what we want.
- It also makes sense to have general purpose validation functions available as static methods, which may be invoked from either a validation attribute or otherwise.
- Finally, a class can self-validate itself in ways that are hard or even impossible to express using attributes. For example, think of properties whose values depend on other properties’ values.
Transactions
Transactions in Entity Framework Code First come in two flavors:
- Implicit: method SaveChanges creates a transaction for wrapping all change sets that it will send to the database, if no ambient transaction exists; this is necessary for properly implementing a Unit of Work, where either all or no changes at all are applied simultaneously.
- Explicit: Entity Framework automatically enlists in ambient transactions created by TransactionScope.
Ambient transactions are nice because they can be automatically promoted to distributed transactions if any ADO.NET code tries to access more than one database server (or instance in a same physical server) while inside its scope. For that, the Distributed Transaction Coordinator service must be started.
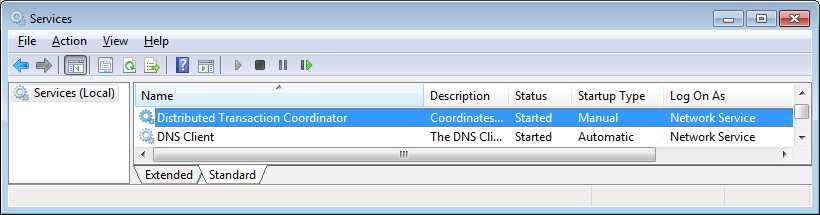
Figure 43: The Distributed Transaction Coordinator service
They are also the standard for transactions in the .NET world, with support that goes from databases to web services.
You should use transactions for primarily two reasons:
- For maintaining consistency when performing operations that must be simultaneously successful (think of a bank transfer where money leaving an account must enter another account).
- For assuring identical results for read operations where data can be simultaneously accessed and possibly changed by third parties.
That’s enough theory. Transaction scopes in .NET are created like this.
using (var tx = new TransactionScope()) { using (var ctx = new ProjectsContext()) { //do changes //submit changes ctx.SaveChanges(); } using (var ctx = new ProjectsContext()) { //do more changes //submit changes ctx.SaveChanges(); } //must be explicitly marked as complete tx.Complete(); } |
This example shows a transaction scope wrapping two contexts. Changes submitted by any of these contexts are only committed if the Complete method is successfully executed, otherwise all changes are rolled back. Because there is no Rollback method, TransactionScope assumes a rollback when its Dispose method is called and Complete is not.
Tip: Always wrap TransactionScope in a using block and keep it as short-lived as possible.
- 1800+ high-performance UI components.
- Includes popular controls such as Grid, Chart, Scheduler, and more.
- 24x5 unlimited support by developers.