
Entity Framework Code First Succinctly®

CHAPTER 3
Database
Configuring the Connection String
Like we saw in the Contexts section of Chapter 2, the DbContext class has some constructors that take as parameters either the name of a connection string that should be present in the configuration file or a full connection string. If the public parameter-less constructor is used, Entity Framework by convention will look for a connection string with the same name of the context class in the configuration file. Let’s see some examples.
public class ProjectsContext : DbContext { public ProjectsContext() { } public ProjectsContext(bool alternateConnection) : base(alternateConnection ? "Name=Succinctly" : "Name=ProjectsContext") { } public ProjectsContext(String nameOrConnectionString) : base(nameOrConnectionString) { } } |
If the first constructor is used, there must be an entry like the following in the configuration file.
<connectionStrings> <add name="ProjectsContext" connectionString="Data Source=.\SQLEXPRESS;Integrated Security=SSPI; Initial Catalog=Succinctly;MultipleActiveResultSets=true" providerName="System.Data.SqlClient"/> </connectionStrings> |
Tip: The actual connection string format and provider name depend on the database engine.
Generating the Database
Explicit Creation
Code First, as its name implies, comes before the database. Nevertheless, we still need it and have to create it. EFCF offers a couple of ways to do just that.
We can check that a database specified by a connection string already exists. We have a method called Exists just for that purpose.
//check if the database identified by a named connection string exists var existsByName = Database.Exists("Name=ProjectsContext"); //check if the database identified by a connection string exists var existsByConnectionString = Database.Exists(@"Data Source=.\SQLEXPRESS;Integrated Security=SSPI;Initial Catalog=Succinctly;MultipleActiveResultSets=true"); |
If we decide that it should be created, we need to start a new context and ask it to do that for us by calling Create.
using (var ctx = new ProjectsContext()) { //create a database explicitly ctx.Database.Create(); } |
It can also be done in a single step with CreateIfNotExists.
using (var ctx = new ProjectsContext()) { //will create the database if it doesn’t already exist var wasCreated = ctx.Database.CreateIfNotExists(); } |
Tip: The user specified by the connection string, which can even be the current Windows user, needs to have access right to create a database.
Tip: If the database already exists, Create will fail, and CreateIfNotExists will return false.
Database Initializers
Another way to have Entity Framework create the database for us is to use what is called a database initializer. This is a class that implements IDatabaseInitializer<T>, which can be associated with a context’s class, and that will perform the initialization. Initialization is the process that creates the database and its tables. Entity Framework Code First comes with some implementations:
- CreateDatabaseIfNotExists<T>: Will only create the database and tables if they don’t already exist; this is the default initializer.
- DropCreateDatabaseAlways<TContext>: Will drop and create the database always, beware!
- DropCreateDatabaseIfModelChanges<TContext>: If the model stored in the database does not match the current context’s, the database will be dropped and recreated (see below).
- MigrateDatabaseToLatestVersion<TContext, TMigrationsConfiguration>: Will run a custom migration for updating the current database to the current model (more on this later).
The first two initializers are self-explanatory. The last two need some explanation.
Each context has a backing model, which represents all the mapped entities, their properties and associations, and how they are tied to the database. When Entity Framework creates the database, it stores this model in a system table called __MigrationHistory.
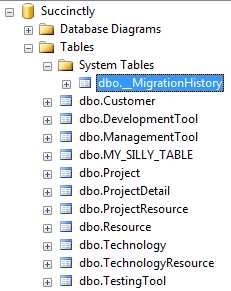
![]()
Figure 23: The __MigrationHistory table
This table only has three columns, whose purpose is the following:
- The MigrationId column says when the database was created.
- The Model column will contain a GZipped representation of the Entity Data Model definition XML (EDMX). Whenever something changes in the model, like adding a new property or a new entity, changing a property’s attributes, this definition will also change.
- The ProductVersion describes the version of Entity Framework and the .NET framework in use.
The DropCreateDatabaseIfModelChanges<TContext> database initializer loads the contents of this table and matches it against the model of the context. If it sees changes, probably because the class model has changed, it drops the database and recreates it.
Tip: Entity Framework will never detect changes in the database, only in code.
The MigrateDatabaseToLatestVersion<TContext, TMigrationsConfiguration> is quite powerful, and because it is also more complex, it will be covered in the Migrations section.
It is certainly possible to roll out our own initializer. For that, we have two options:
- Inherit from an existing initializer: the problem is that the included initializers have a well-defined and unchangeable behavior, and we can’t really change; however, by overriding the Seed method, we can add initial data to the database whenever the initializer is run, but that’s about it.
- Create our own initializer: for that we need to implement IDatabaseInitializer<T>, since there is no base class to inherit from; it’s up to us to do all the work, and it might be cumbersome.
To have initial data created with the database, just override the Seed method of your initializer of choice.
public class CreateProjectsDatabaseWithInitialData : CreateDatabaseIfNotExists<ProjectsContext> { protected override void Seed(ProjectsContext context) { var developmentTool = new DevelopmentTool() { Name = "Visual Studio 2012", Language = "C#" }; var managementTool = new ManagementTool() { Name = "Project 2013", CompatibleWithProject = true }; var testingTool = new TestingTool() { Name = "Selenium", Automated = true };
context.Tools.Add(developmentTool); context.Tools.Add(managementTool); context.Tools.Add(testingTool);
//don’t forget to save changes, as this doesn’t happen automatically context.SaveChanges();
base.Seed(context); } } |
Note: The Seed method is not part of the IDatabaseInitializer<T> contract; if we write our own custom initializer, we need to define and call it explicitly.
While an initializer can be run explicitly on its own, just create an instance of it and call its InitializeDatabase with a context as its argument, it is often useful to associate it with a context’s type, so that whenever a context is built, it will inherit the initializer without further work. This is achieved through the SetInitializer method.
//run the initializer explicitly new CreateDatabaseIfNotExists<ProjectsContext>().InitializeDatabase(ctx); //set an automatic initializer for all instances of ProjectsContext Database.SetInitializer(new CreateDatabaseIfNotExists<ProjectsContext>); //run the initializer configured for this context type, even if it has already run ctx.Database.Initialize(true); |
A good place to put this initialization code is the static constructor for the context. This way, it will run a single time when the first instance of the context is created, and we are sure that it won’t be forgotten.
public class ProjectsContext : DbContext { //the static constructor runs a single time with the first instance of a class static ProjectsContext() { Database.SetInitializer(new CreateDatabaseIfNotExists<ProjectsContext>); } } |
This can also be done through configuration (App.config or Web.config). This has the advantage that the database initialization strategy can be changed without requiring a recompilation of the code.
<configuration> <configSections> <section name="entityFramework" type="System.Data.Entity.Internal.ConfigFile.EntityFrameworkSection, EntityFramework" requirePermission="false" /> </configSections> <entityFramework> <defaultConnectionFactory type="System.Data.Entity.Infrastructure. SqlConnectionFactory, EntityFramework" /> <contexts> <context type="Succinctly.Model.ProjectsContext, Succinctly.Model"> <databaseInitializer type="System.Data.Entity. CreateDatabaseIfNotExists`1[[Succinctly.Model.ProjectsContext, Succinctly.Model]], EntityFramework"> <!-- only required if the initializer constructor takes parameters --> <!-- must follow the order they are specified in the constructor --> <!--parameters> <parameter value="MyConstructorParameter" type="System.Int32"/> </parameters--> </databaseInitializer> </context> </contexts> </entityFramework> </configuration> |
Tip: Notice the somewhat weird syntax that must be used when specifying a generic class’ name.
Finally, you can disable any initializer on your context. If you do so, you are on your own. You may have to create the database and all its objects by yourself using Entity Framework’s functionality. The way to disable initializers is by explicitly setting it to null for a given context.
//disable initializers for all instances of ProjectsContext Database.SetInitializer<ProjectsContext>(null); |
It can also be achieved by configuration.
<entityFramework> <contexts> <context type="Succinctly.Model.ProjectsContext, Succinctly.Model" disableDatabaseInitialization="true" /> </contexts> </entityFramework> |
Tip: Don’t forget, the default initializer is CreateDatabaseIfNotExists<TContext>.
Generating Scripts
If for whatever reason you need to look at and possibly tweak the SQL script that is used to create the database, you can export it into a file; for that, you need to access the ObjectContext of the context.
var octx = (ctx as IObjectContextAdapter).ObjectContext; File.WriteAllText("ProjectsContext.sql", octx.CreateDatabaseScript()); |
Tip: The generated SQL will be specific to the database engine whose provider we are using.
Migrations
We all know that schema and data change over time, be it the addition of another column or a modification in a base record. Entity Framework Code First offers a code-based approach for dealing with these kinds of scenarios. It’s called migrations, which are actually implemented as database initializers and have a base class of MigrateDatabaseToLatestVersion<TContext, TMigrationsConfiguration>.
A migration can be of one of two types:
- Automatic: whenever a change is detected in the model—a property is added or removed, new entities are mapped—Entity Framework Code First migrations will update the database automatically to reflect these changes.
- Versioned or named: explicitly changes the schema—adding columns, indexes or constraints to existing tables, for example—and store a checkpoint, so that it can be rolled back.
As you can see, this is a big improvement over the other database initializers. The database doesn’t need to be dropped when the model changes.
Automatic Migrations
An automatic migration is called by executing the Enable-Migrations PowerShell command on the NuGet console.

Note: You only need to pass the ProjectName parameter if your model is defined in an assembly that is not the startup one.
This command will create a configuration class called Configuration inheriting from DbMigrationsConfiguration to the Migrations folder.

Figure 24: Automatic migration configuration class
The system table __MigrationHistory will be updated to reflect the fact that an automatic migration was created.
![]()
Figure 25: The __MigrationHistory table after an automatic migration was created
Now we can tell Entity Framework to start using this metadata for the database initialization.
Database.SetInitializer( new MigrateDatabaseToLatestVersion<ProjectsContext, Configuration>()); |
To see this in action, we can add a new property to one of our model classes, anything will do.
public class Project { public int? X { get; set; } } |
Tip: Do not add required properties to an existing model, because the migration will fail if the table already has records.
When we instantiate the context and run any query, such as ctx.Projects.ToList(), we won’t notice it, but the database was modified behind the scene.

Figure 26: The modified table after the new column was added
Did you see the new X column? It was created as the result of an automatic migration. The __MigrationHistory table will contain an evidence of it.

Figure 27: The __MigrationHistory table after an automatic migration
Note: Remember that the Model column contains a compressed version of the Entity Definition Model XML.
What if we wanted to remove this new property? We would have two options:
- Remove it from the model and let automatic migrations take care of dropping its column from the database as well.
- Reverting to the initial state of the model.
If we tried option number one, we would get an AutomaticDataLossException.

Figure 28: Exception thrown by automatic migrations
The second option is achieved by running the Update-Database command, but it would yield the same result.

Figure 29: Exception thrown by update-database
Tip: The special keyword $InitialDatabase allows us to go back to the initial version of the model, as it was stored in the __MigrationHistory table.
This is actually the automatic migrations’ way of warning us that we were probably doing something wrong. In this case, we were dropping a column on which we might have valuable data.
If that is not the case, we can tell it to forget about these warnings by going to the Configuration class generated when we enabled the automatic migrations and setting the AutomaticMigrationDataLossAllowed to true in its constructor, next to AutomaticMigrationsEnabled.
public Configuration() { this.AutomaticMigrationsEnabled = true; this.AutomaticMigrationDataLossAllowed = true; } |
Tip: Use AutomaticMigrationDataLossAllowed with care, or you may lose important information.
If we run the same code again, and then look at the database, we will see that effectively the new column has been dropped.

Figure 30: The modified table after the new column was dropped
And it shows up in __MigrationHistory.

Figure 31: The __MigrationHistory table after the revert
Versioned Migrations
The other type of migration offers more fine-grained control, but involves more work. We start by creating a migration with a name that describes our purpose.
![]()
Figure 32: Adding a versioned migration
We now have a new class in the Migrations folder whose name reflects the name passed to Add-Migration and the timestamp of its creation which it inherits from DbMigration.

Figure 33: The versioned migration class
This new class is empty except for two method declarations, which are overridden from the base class.
- Up: will specify the changes that will be applied to the database when this migration is run.
- Down: will contain the reverse of the changes declared in the Up method, for the case when this migration is rolled back.
Note: This class is not specific to any Entity Framework Code First context; it only cares about the database.
Let’s see a simple example.
public partial class AddProjectStatus : DbMigration { public override void Up() { this.AddColumn("dbo.Project", "Status", x => x.Int(nullable: false, defaultValue: 0)); this.CreateIndex("dbo.Project", "Status"); }
public override void Down() { this.DropIndex("dbo.Project", "Status"); this.DropColumn("dbo.Project", "Status"); } } |
As you can see, on the Up method we are doing two things:
- Adding a new column, Status, of type INT, not-nullable, with a default value of 1, to the dbo.Project table.
- Creating an index over this new column.
All operations are reversed in the Down method.
The DbMigration class contains helper methods for most typical database operations, but in case we need something different, we can always use the Sql method.
this.Sql("-- some SQL command"); |
Now that we have this migration, we might as well execute it.

Figure 34: Executing a named migration
The output mentions a Seed method. This method is defined in the Configuration class in the Migrations folder and it is currently empty. On it, you can add any initial data that is required by your business logic.
protected override void Seed(ProjectsContext context) { context.Projects.AddOrUpdate(p => p.Name, new Project { Name = "Big Project", Customer = new Customer { CustomerId = 1 }, Start = DateTime.Now }); } |
Tip: Beware, the Seed method might be called several times, one for each migrations is run, so you must be careful to not insert duplicate data; that’s what the AddOrUpdate method is there for.
Once again, we can see that the __MigrationHistory table was updated.

Figure 35: The __MigrationHistory table after the named migration
Of course, we can always go back to the previous state, or the state identified by any named migration has been run, by using Update-Database.

Figure 36: Returning to the initial database version
If you want to revert to a named migration, just pass its name as a parameter to Update-Database.
![]()
Figure 37: Reverting to a named version
At any time, you can see what migrations have been executed in the database by invoking the Get-Migrations command.
![]()
Figure 38: Listing all applied migrations
- 1800+ high-performance UI components.
- Includes popular controls such as Grid, Chart, Scheduler, and more.
- 24x5 unlimited support by developers.