
Electron Succinctly®

CHAPTER 4
Expanding the App
Quick intro
With the basics covered, let’s now shift our attention and add specific application logic—we’ll see how we can combine that with the code we have written so far.
To correctly exchange information between windows of the same Electron application, we’ll need to use an ipcRenderer (inter-process communication), which basically sends an event with a payload from one window to another—which we can then catch with ipcMain.
You can think of ipcRenderer and ipcMain like WebSockets for Electron. We’ll be using them when adding or updating a new document and reflecting those changes on the main window.
The core logic
In the previous chapter, we created the basic template for the doc.html file with a couple of fields, but we didn’t add any logic.
Before we add any code, let’s have a look how the flow of information will look between the various parts of application, using ipcRenderer and ipcMain.

Figure 3-a: The Flow of Information Between Windows with ipcMain and ipcRenderer
What will happen is that the ipcRenderer.send method on the secondary window (doc.html) will send a message with the document added, and this event will be captured by the ipcMain.on event in main.js. Then, within ipcMain.on, the document is added and its payload is sent to the main window (main.html), and is captured by the ipcRenderer.on event present there.
So, as you can see, the ipcRenderer and ipcMain modules serve as an internal messaging transfer system between the various windows on an Electron application.
With the flow of information clear, we can now add the necessary logic to doc.html; we can add a new document and send the added data back to the main window (main.html).
With Visual Studio Code, open doc.html and add a <script>…</script> section, just before the </form> tag, so we can write some vanilla JavaScript to get the elements from the DOM, and send them using the ipcRenderer.send method.
Listing 3-a: The Initial Logic for doc.html
<!DOCTYPE html> <html lang="en"> <head> <meta charset="UTF-8"> <meta name="viewport" content="width=device-width, initial-scale=1.0"> <meta http-equiv="X-UA-Compatible" content="ie=edge"> <title>Document</title> </head> <body> <form> <div> <label>Document name:</label> <input type="text" id="name" autofocus> <label>Expiration date:</label> <input type="text" id="date"> </div> <button type="submit">Save</button> </form> <script> const electron = require('electron'); const {ipcRenderer} = electron; const form = document.querySelector('form'); form.addEventListener('submit', docSubmit);
function docSubmit(e) { e.preventDefault(); const name = document.querySelector('#name').value; const date = document.querySelector('#date').value; ipcRenderer.send('doc:add', name + '|' + date); } </script> </body> </html> |
On the first two lines, we reference and declare the essential modules and variables we need, such as electron and ipcRenderer.
Then, on the next two lines, we select the form using the standard JavaScript querySelector method, and add an event listener to it when the form is submitted.
The docSubmit method is executed when the form’s submit method is triggered. Within the docSubmit method, the first thing we do is to prevent the default form action—this is why the preventDefault method is called.
We then get the values of the name and date fields by using the querySelector method on each field. Finally, we send those values to main.js using the ipcRenderer.send method.
Retransmitting the response: main.js
Now that we’ve added some logic to doc.html and we’ve managed to send across the information captured from the form, we need to be able to retransmit it to main.html—and for that, we need to capture the message and payload on main.js.
We can do this with the following code, which we can place just before the ready event.
Listing 3-b: Retransmitting the Response (main.js)
ipcMain.on('doc:add', (e, item) => { main.webContents.send('doc:add', item); addDocWin.close(); }); |
Notice that instead of using ipcRenderer, we now use ipcMain.on and listen for the doc:add event. When that occurs, an arrow function with two parameters gets executed—the second parameter being the document (item) that was transmitted.
That item gets then retransmitted to the main window (main.html), which is done by invoking the main.webContents.send method. Once the item has been sent, the secondary window (addDocWin) is closed.
Let’s now add the logic to main.html to receive the message and payload retransmitted.
Receiving the response: main.html
Open the main.html file and add a <script>…</script> section, just before the </body> tag—this is where we will add our code. The main.html file now looks as follows.
Listing 3-c: Receiving the Response (main.html)
<!DOCTYPE html> <html lang="en"> <head> <meta charset="UTF-8"> <meta name="viewport" content="width=device-width, initial-scale=1.0"> <meta http-equiv="X-UA-Compatible" content="ie=edge"> <title>DocExpire</title> </head> <body> <h1>DocExpire</h1> <ul></ul> <script> const electron = require('electron'); const {ipcRenderer} = electron; const ul = document.querySelector('ul'); ipcRenderer.on('doc:add', (e, item) => { const doc = document.createElement('li'); const docText = document.createTextNode(item); doc.appendChild(docText); ul.appendChild(doc); }); </script> </body> </html> |
Just like with the doc.html code, on the first two lines we reference and declare the essential modules and variables we need, such as electron and ipcRenderer.
Then, we reference the ul HTML element by using the querySelector method. Notice that on the HTML markup, we’ve added a ul element, which represents an unordered list of elements—this will contain the document names added through the logic present within doc.html.
After referencing the ul element, we call ipcRenderer.on and listen to the doc:add event.
Once the doc:add event gets triggered, we create a li element node and assign to it the name and date of the document that was created on the secondary window.
With the command line opened, let’s run npm start and test the application. When the application is opened, click on the File menu, and then on the Add Document option.
Then, with the secondary window opened, add the following information, and click Save.
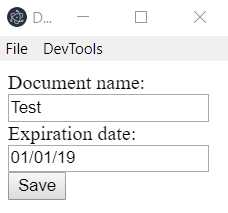
Figure 3-b: Adding a Test Document
The the secondary window will be automatically closed, and on the main window (main.html), we should see the document added to the list. Let’s see if that’s the case.

Figure 3-c: The Test Document Added
The document has been successfully added to the list. This means that the ipcMain and ipcRenderer logic has worked seamlessly.
If you would like to test further, feel free to add some extra sample documents, which should also be added to the list on the main window.
Clearing the document list
Now that we have added sample documents to the list, it’s nice that we have an option to clear that list. To do that, let’s switch back to the main.js file and add some code to the menu template for the Clear Documents option.
Listing 3-d: The Clear Documents Option (main.js)
const mainMenu = [ // … Existing code … { label: 'Clear Documents', click() { main.webContents.send('doc:clear'); } }, // … Existing code … ]; |
Notice that all we’ve done is to add a click event to the Clear Documents option. Inside the event, we execute the main.webContents.send method and specify doc:clear as a parameter, which represents the action.
On the main.html file, let’s add the doc:clear code that will be responsible for clearing the document list—we can do this as follows.
Listing 3-e: The Clear Documents Code (main.html)
<!DOCTYPE html> <html lang="en"> <head> <meta charset="UTF-8"> <meta name="viewport" content="width=device-width, initial-scale=1.0"> <meta http-equiv="X-UA-Compatible" content="ie=edge"> <title>DocExpire</title> </head> <body> <h1>DocExpire</h1> <ul></ul> <script> // … Existing code … ipcRenderer.on('doc:clear', () => { ul.innerHTML = ''; }); </script> </body> </html> |
All we need to do to clear the list of documents is to set the innerHTML property of the ul element to an empty string.
If you close and run again the application by executing npm start from the command line, you should be able to check if this works by adding a few items to the list, and then clicking the Clear Documents option.
Add styling resources
So far, everything that we’ve managed to do works, but it’s not particularly appealing to the eye. Let’s change that by adding a bit of style—we can do that by using the Material Design Lite CCS framework, which is based on Google’s Material Design.
So, go to the Material Design Lite website, click on the Getting Started option, then click on NPM.
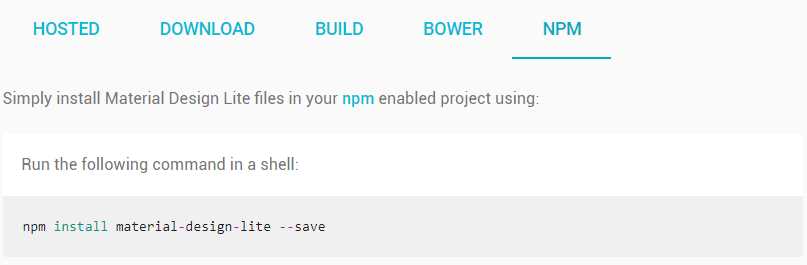
Figure 3-d: The Material Design Lite NPM Option
Then, open the command line and enter the command indicated on the Material Design Lite website.
Listing 3-f: Install Material Design Lite via NPM
npm install material-design-lite –-save |
The reason we have installed the Material Design Lite library files rather than using the hosted version, is that we are building a desktop application, and the app’s resources should reside locally, which is not necessarily the case when building a web app.
So, let’s add the reference to the Material Design Lite library. We can do this as follows, just after the <title>…</title> tags—you’ll see this highlighted in bold in the following code.
Listing 3-g: Adding the (Partially Local) Material Design Library (main.html)
<!DOCTYPE html> <html lang="en"> <head> <meta charset="UTF-8"> <meta name="viewport" content="width=device-width, initial-scale=1.0"> <meta http-equiv="X-UA-Compatible" content="ie=edge"> <title>DocExpire</title> <link rel="stylesheet" href="./node_modules/material-design-lite/material.min.css"> <script src="./node_modules/material-design-lite/material.min.js"></script> <link rel="stylesheet" href="https://fonts.googleapis.com/icon?family=Material+Icons"> </head> |
Notice how we are referencing the local Material Design Lite CSS (material.min.css) and JavaScript (material.min.js) files that were installed using NPM. However, there is still a reference to hosted Google Fonts, which is a requirement for Material Design Lite.
As we are building a desktop application, I suggest that we have all our resources locally, rather than having to depend on a hosted resource. So, to do that, open your browser, paste in the following URL, and then press Enter.
Listing 3-h: The Google Fonts URL
https://fonts.googleapis.com/icon?family=Material+Icons |
This will display the icons.css file in our browser, which we can then download to a local project folder.
![]()
Figure 3-e: Saving the Google Fonts Icon File Locally
Next, copy the URL of the font style itself—which I’ve outlined in red in Figure 3-e, so we can also save a copy of the font locally, to the same folder where the icon.css file will be saved—in my case, to the fonts folder, under the project’s main folder.
You can save this file with the default name given by the browser—which in my case is: flUhRq6tzZclQEJ-Vdg-IuiaDsNc.woff2. Please note that the woff extension stands for Web Open Font Format.
Let’s now update the icon.css file in our fonts folder, to use the local copy of flUhRq6tzZclQEJ-Vdg-IuiaDsNc.woff2 instead of the hosted one—highlighted in bold in the following code listing.
Our local icon.css file should now look as follows.
Listing 3-i: The Local icon.css File with Updated (Local) Fonts
/* fallback */ @font-face { font-family: 'Material Icons'; font-style: normal; font-weight: 400; src: url(flUhRq6tzZclQEJ-Vdg-IuiaDsNc.woff2) format('woff2'); } .material-icons { font-family: 'Material Icons'; font-weight: normal; font-style: normal; font-size: 24px; line-height: 1; letter-spacing: normal; text-transform: none; display: inline-block; white-space: nowrap; word-wrap: normal; direction: ltr; -webkit-font-feature-settings: 'liga'; -webkit-font-smoothing: antialiased; } |
All we need to do now is to replace the hosted reference to the Google Fonts resource on our main.html file, with a local reference to icon.css instead—this is highlighted in bold in the following code.
Listing 3-j: Adding the (Fully Local) Material Design Library (main.html)
<!DOCTYPE html> <html lang="en"> <head> <!-- Previous code goes here --> <link rel="stylesheet" href="./fonts/icon.css"> </head> |
Awesome—we now have almost all the styling we need locally on our project folder, and we do not need to rely on any hosted resources.
There’s one more CSS file that I’d like to use in our application (found here), which we can also download to our local fonts folder.
Styling the app
Now that we have the styling resources that we need in place, let’s add a bit of style to our application.
First, let’s add the styles.css to our main.html file that we just downloaded to our fonts folder—I’ve highlighted this in bold in the following code.
Listing 3-k: Adding styles.css (main.html)
<!DOCTYPE html> <html lang="en"> <head> <!-- Previous code goes here --> <link rel="stylesheet" href="./fonts/styles.css"> </head> |
Next, also within main.html, let’s replace the code corresponding to the <h1>…</h1> tags with the following code.
Listing 3-l: The Main App Bar (main.html)
<header class="demo-header mdl-layout__header mdl-layout__header--scroll mdl-color--grey-100 mdl-color-text--grey-800"> <div class="mdl-layout__header-row"> <span class="mdl-layout-title">Documents to Expire</span> <div class="mdl-layout-spacer"></div> <div class="mdl-textfield mdl-js-textfield mdl-textfield--expandable"> <label class="mdl-button mdl-js-button mdl-button--icon" for="search"> <i class="material-icons">search</i> </label> <div class="mdl-textfield__expandable-holder"> <input class="mdl-textfield__input" type="text" id="search"> <label class="mdl-textfield__label" for="search"> Enter your query... </label> </div> </div> </div> </header> <div class="demo-ribbon"></div> <main class="demo-main mdl-layout__content"> <div class="demo-container mdl-grid"> </div> </main> |
What we are doing here is adding some Material Design classes that will allow us to have a top application bar with a search option, and a content section, which we will use to display results.
Now, let’s wrap this code inside the following <div>.
Listing 3-m: The Main App Bar Wrapped Around a Styled <div> (main.html)
<div class="demo-layout mdl-layout mdl-layout--fixed-header mdl-js-layout mdl-color--grey-100"> <!-- Previous code goes here --> </div> |
Our updated main.html file should now look as follows.
Listing 3-n: The Updated main.html File
<!DOCTYPE html> <html lang="en"> <head> <meta charset="UTF-8"> <meta name="viewport" content="width=device-width, initial-scale=1.0"> <meta http-equiv="X-UA-Compatible" content="ie=edge"> <title>DocExpire</title> <link rel="stylesheet" href="./node_modules/material-design-lite/material.min.css"> <script src="./node_modules/material-design-lite/material.min.js"> </script> <link rel="stylesheet" href="./fonts/icon.css"> <link rel="stylesheet" href="./fonts/styles.css"> </head> <body> <div class="demo-layout mdl-layout mdl-layout--fixed-header mdl-js-layout mdl-color--grey-100"> <header class="demo-header mdl-layout__header mdl-layout__header--scroll mdl-color--grey-100 mdl-color-text--grey-800"> <div class="mdl-layout__header-row"> <span class="mdl-layout-title">Documents to Expire</span> <div class="mdl-layout-spacer"></div> <div class="mdl-textfield mdl-js-textfield mdl-textfield--expandable"> <label class="mdl-button mdl-js-button mdl-button--icon" for="search"> <i class="material-icons">search</i> </label> <div class="mdl-textfield__expandable-holder"> <input class="mdl-textfield__input" type="text" id="search"> <label class="mdl-textfield__label" for="search"> Enter your query... </label> </div> </div> </div> </header> <div class="demo-ribbon"></div> <main class="demo-main mdl-layout__content"> <div class="demo-container mdl-grid"> </div> </main> <ul></ul> </div> <script> const electron = require('electron'); const {ipcRenderer} = electron; const ul = document.querySelector('ul'); ipcRenderer.on('doc:add', (e, item) => { const doc = document.createElement('li'); const docText = document.createTextNode(item); doc.appendChild(docText); ul.appendChild(doc); }); ipcRenderer.on('doc:clear', () => { ul.innerHTML = ''; }); </script> </body> </html> |
If we now run the npm start command through the command line, we should see the following changes to our app’s user interface.
Figure 3-f: Our App’s Cool Looking User Interface, using Material Design Lite
How cool is that? By sprinkling a bit of Material Designed-flavored CSS and some HTML marku, we’ve taken a bare bones and not-so-great-looking application into something that looks much nicer.
Styling the list
Although our app has a bit of style now, we are far from done. If we try now to add a document by clicking on the Add Document option from the File menu—we’ll end up with something that looks like this.
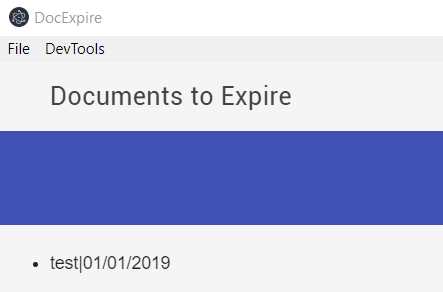
Figure 3-g: A New Document Added to the UI
As you can see, the item added doesn’t seem to fit with the new user interface’s look and feel—let’s fix that.
First, let’s add a quick CSS fix for centering HTML elements. We can add this to the <header> section of the HTML markup as follows.
Listing 3-o: Adding a Style for Centering HTML Elements
<style> .mdl-grid.center-items { justify-content: center; } </style> |
All we are doing is adding a CSS class that we can use to center HTML content.
Next, let’s adjust the HTML content between the <body>…<script> tags as follows.
Listing 3-p: Adjusting the Main Markup
<div class="demo-layout mdl-layout mdl-layout--fixed-header mdl-js-layout mdl-color--grey-100"> <header class="demo-header mdl-layout__header mdl-layout__header--scroll mdl-color--grey-100 mdl-color-text--grey-800"> <div class="mdl-layout__header-row"> <span class="mdl-layout-title">Documents to Expire</span> <div class="mdl-layout-spacer"></div> <div class="mdl-textfield mdl-js-textfield mdl-textfield--expandable"> <label class="mdl-button mdl-js-button mdl-button--icon" for="search"> <i class="material-icons">search</i> </label> <div class="mdl-textfield__expandable-holder"> <input class="mdl-textfield__input" type="text" id="search" onkeyup="searchItems()"> <label class="mdl-textfield__label" for="search"> Enter your query... </label> </div> </div> </div> </header> <div class="demo-ribbon"></div> <main class="demo-main mdl-layout__content"> <div class="demo-container mdl-grid"> <div class="mdl-cell mdl-cell--12-col mdl-cell--hide-tablet mdl-cell--hide-phone"> </div> <div class="demo-content mdl-color--white mdl-shadow--4dp content mdl-color-text--grey-800 mdl-cell mdl-cell--12-col"> <div class="mdl-grid center-items"> <div class="mdl-cell mdl-cell--12-col"> <ul id="ulist" class="demo-list-icon mdl-list"> </ul> </div> </div> </div> </div> </main> </div> |
Notice that the header section is basically the same as it was, with the exception of a onkeyup event on the search field, which is now hooked up to a searchItems function that we’ll create later.
Next, notice the main middle section <main>..</main> that is basically a placeholder for the list of documents—all nicely enhanced with Material Design Lite styles and classes.
I’ve given the <ul> element an id, which will make it easier to reference it in the code that will follow, within the <ul>..</ul> tags, which is where our documents will be displayed, after being created.
For further details about Material Design Lite components and styles, and how to use them, please refer to the official documentation here.
Before we jump into the code that explains how we are going to dynamically add each document between the <ul>…</ul> tags, let me show you how the finished main window UI will look.
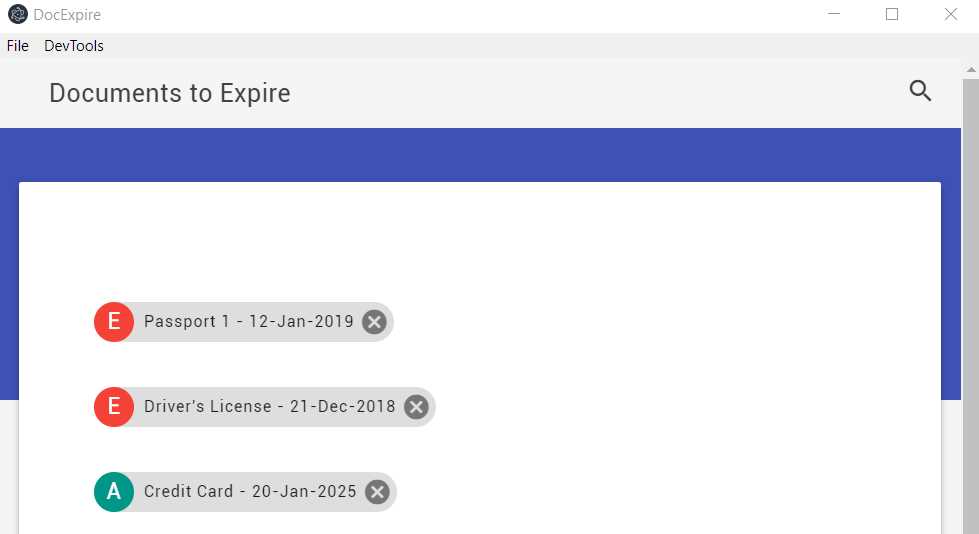
Figure 3-h: The Finished Main Window UI
Notice that all the HTML markup previously described is used to render the main content displayed in the main window’s UI. However, we haven’t yet written any markup or code that allows us to display the three elements shown within the white area seen in Figure 3-h.
The markup for those three elements are going to be dynamically rendered using vanilla JavaScript code—without any specific framework.
Statically rendered chip components
The idea behind any of these elements—which are inspired by Material Design Lite chip components—is that each one represents an important document that has either expired or will expire in the future, which is the whole purpose of the application.
Notice how items that have an expired date are displayed with a red E, meaning expired; and items that have the green A, meaning active (unless you are reading this book on or after January 20, 2025).
Before we can understand how to render these elements dynamically using plain JavaScript, let’s show how we would render one of them using normal HTML markup.
Listing 3-q: Chips HTML Markup
<span class="mdl-chip mdl-chip--contact mdl-chip--deletable"> <span class="mdl-chip__contact mdl-color--teal mdl-color-text--white">A </span> <span class="mdl-chip__text">Passport 1 - 20 Jan 2025</span> <a href="#" class="mdl-chip__action"> <i class="material-icons">cancel</i> </a> </span> |
We can see that the three elements that make up the document are contained within the <span>…</span> tags, and use mainly the mdl-chip CSS class from the Material Design Lite library.
The following diagram shows how this item is formed and which HTML elements compose each of its individual parts.
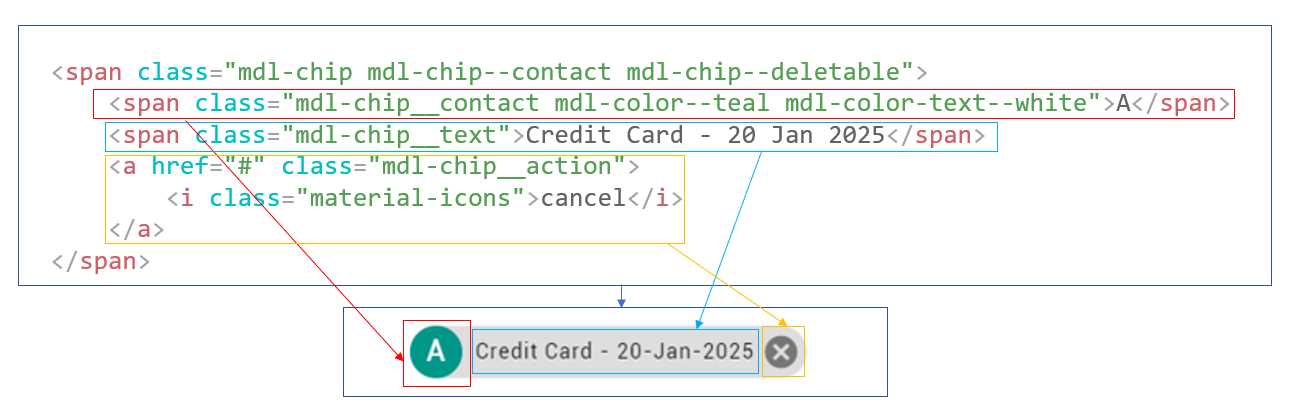
Figure 3-i: The Chip Element HTML Parts
Dynamically rendered chip components
Now, let’s now have a look at the main.html JavaScript code that is responsible for rendering these elements dynamically—we’ll dissect this into smaller parts, so we can understand each step involved.
Listing 3-r: Full main.html Code
const electron = require('electron'); const {ipcRenderer} = electron; const ul = document.querySelector('ul'); function createItemDom(item) { let iparts = item.split('|'); let id = iparts[0].replace(' ', '_').replace('/', '-'); const doc = document.createElement('li'); doc.id = 'li_' + id; doc.className = 'mdl-list__item';
const docText = document.createElement('span'); docText.className = 'mdl-chip mdl-chip--contact mdl-chip--deletable';
let exp = checkExpDate(iparts[1]); const sp1 = document.createElement('span'); sp1.className = (exp == 'A') ? 'mdl-chip__contact mdl-color--teal mdl-color-text--white' : 'mdl-chip__contact mdl-color--red mdl-color-text--white'; const sp1Txt = document.createTextNode(exp); const sp2 = document.createElement('span'); sp2.className = 'mdl-chip__text'; const sp2Txt = document.createTextNode(iparts[0] + ' - ' + iparts[1]); const ar = document.createElement('a'); ar.className = 'mdl-chip__action'; ar.id = 'a_' + id; const ir = document.createElement('i'); ir.className = 'material-icons'; const irTxt = document.createTextNode('cancel'); ir.appendChild(irTxt); ar.appendChild(ir);
sp1.appendChild(sp1Txt); docText.appendChild(sp1); sp2.appendChild(sp2Txt); docText.appendChild(sp2); docText.appendChild(ar); doc.appendChild(docText); ul.appendChild(doc); document.getElementById(ar.id).addEventListener('click', deleteItem); } function deleteItem(e) { let doc = e.target.parentNode.parentNode.parentNode; doc.innerHTML = ''; doc.parentNode.removeChild(doc); } function checkExpDate(dt) { let currentDate = Date.now(); let date = Date.parse(dt); return (!isNaN(date) && currentDate - date < 0) ? 'A' : 'E'; } function searchItems() { let input, filter, ul, li, a, i, txtValue; input = document.getElementById('search'); filter = input.value.toUpperCase(); ul = document.getElementById('ulist'); li = ul.getElementsByTagName('li'); for (i = 0; i < li.length; i ++) { a = li[i].getElementsByTagName('a')[0]; txtValue = (a.textContent || a.innerText) && (a.parentNode.textContent || a.parentNode.innerText).replace('cancel', ''); if (txtValue.toUpperCase().indexOf(filter) > -1) { li[i].style.display = ""; } else { li[i].style.display = "none"; } } } ipcRenderer.on('doc:add', (e, item) => { createItemDom(item); }); ipcRenderer.on('doc:clear', () => { ul.innerHTML = ''; }); |
To get a better understanding, let’s look at what each part of this code does—we’ll start with the main constants.
Listing 3-s: Part 1 - main.html – Declaration Code
const electron = require('electron'); const {ipcRenderer} = electron; const ul = document.querySelector('ul'); |
This first part of the code simply declares the essential required modules and variables: electron, ipcRenderer, and, ul, which refers to the list where the documents will be rendered.
Listing 3-t: Part 2 – main.html – Full createItemDom Code
function createItemDom(item) { let iparts = item.split('|'); let id = iparts[0].replace(' ', '_').replace('/', '-'); const doc = document.createElement('li'); doc.id = 'li_' + id; doc.className = 'mdl-list__item';
const docText = document.createElement('span'); docText.className = 'mdl-chip mdl-chip--contact mdl-chip--deletable';
let exp = checkExpDate(iparts[1]); const sp1 = document.createElement('span'); sp1.className = (exp == 'A') ? 'mdl-chip__contact mdl-color--teal mdl-color-text--white' : 'mdl-chip__contact mdl-color--red mdl-color-text--white'; const sp1Txt = document.createTextNode(exp); const sp2 = document.createElement('span'); sp2.className = 'mdl-chip__text'; const sp2Txt = document.createTextNode(iparts[0] + ' - ' + iparts[1]); const ar = document.createElement('a'); ar.className = 'mdl-chip__action'; ar.id = 'a_' + id; const ir = document.createElement('i'); ir.className = 'material-icons'; const irTxt = document.createTextNode('cancel'); ir.appendChild(irTxt); ar.appendChild(ir);
sp1.appendChild(sp1Txt); docText.appendChild(sp1); sp2.appendChild(sp2Txt); docText.appendChild(sp2); docText.appendChild(ar); doc.appendChild(docText); ul.appendChild(doc); document.getElementById(ar.id).addEventListener('click', deleteItem); } |
The createItemDom function is what does the magic of dynamically rendering the “expiring” or “about to expire” documents.
Listing 3-u: Part 3 – main.html – Partial createItemDom Code
let iparts = item.split('|'); let id = iparts[0].replace(' ', '_').replace('/', '-'); |
The first line basically takes the item parameter—which is literally the data that was saved from the Add Document window, the name of the document, and the expiration date of the document—concatenated with a pipe (|) character and split it into two parts.
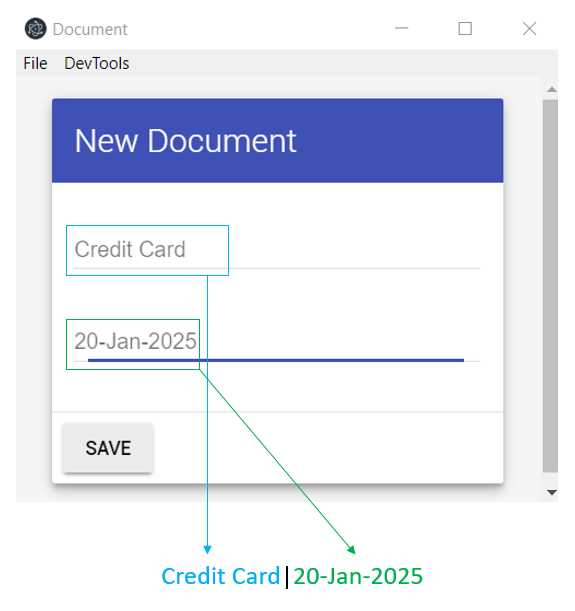
Figure 3-j: The Concatenated Document Data
The second line basically takes the name of the document and replaces any spaces ( ) and slashes (/) found with underscores (_) and dashes (-), in a very basic form of data validation. This will be used to create the id of the HTML element, which is dynamically created from the details received from the Add Document window.
Listing 3-v: Part 4 – main.html – Partial createItemDom Code
const doc = document.createElement('li'); doc.id = 'li_' + id; doc.className = 'mdl-list__item'; |
These lines basically create the <li>…</li> tags that wrap the chip elements described in Figure 3-i. In HTML, each <li> represents an element of a <ul>.
Listing 3-w: Part 5 – main.html – Partial createItemDom Code
const docText = document.createElement('span'); docText.className = 'mdl-chip mdl-chip--contact mdl-chip--deletable'; |
In the two previous lines, we create the main <span> that wraps the element. We can see the main <span> created by those two lines of code, in the following screenshot.
Figure 3-k: The Main <span> of the Chip Element
Let’s continue analyzing the code. Next, we are going to create the Active or Expired <span> of the chip element, as shown in the following code.
Listing 3-x: Part 6 – main.html – Partial createItemDom Code
let exp = checkExpDate(iparts[1]); const sp1 = document.createElement('span'); sp1.className = (exp == 'A') ? 'mdl-chip__contact mdl-color--teal mdl-color-text--white' : 'mdl-chip__contact mdl-color--red mdl-color-text--white'; const sp1Txt = document.createTextNode(exp); |
The first line executes the checkExpDate function, which checks if the date received from the Add Document window has expired or is still active, by comparing it with the current date. We’ll come back to the implementation details of the checkExpDate function later—but in short, it returns an A for active and E for expired.
The document.createElement function creates the element on the DOM—in this case, the <span>.
Next, depending on value returned from the checkExpDate function, we assign the appropriate Material Design Lite CSS class, using a ternary operator conditional statement:
sp1.className = (exp == 'A') ?
'mdl-chip__contact mdl-color--teal mdl-color-text--white' :
'mdl-chip__contact mdl-color--red mdl-color-text--white';
For instance, if the value returned by the checkExpDate function is A, then the <span> would look as follows, and these CSS classes would be applied: mdl-chip__contact mdl-color--teal mdl-color-text--white.
![]()
Figure 3-l: The Active <span> Element
On the other hand, if the value returned by the checkExpDate function is E, then the <span> would look as follows, and these CSS classes would be applied: mdl-chip__contact mdl-color--red mdl-color-text--white.
![]()
Figure 3-m: The Expired <span> Element
Finally, the last line of code adds the text value returned by the checkExpDate function, either A or E to the <span>.
The next lines of code add the main text information to the chip element, which contains the name of the document and the expiration date of the document added through the Add Document window.
Listing 3-y: Part 7 – main.html – Partial createItemDom Code
const sp2 = document.createElement('span'); sp2.className = 'mdl-chip__text'; const sp2Txt = document.createTextNode(iparts[0] + ' - ' + iparts[1]); |
As you can see, a <span> that will contain the text is created, the required CSS class is added, and finally, the text itself is concatenated: first, the name of the document (represented by iparts[0]) and then the expiration date (indicated by iparts[1]).
The next part of the code basically creates the Cancel button, which is going to be used to delete the document, via the <li>…</li> element from the <ul>…</ul> list of elements, as can be seen in the following figure.
![]()
Figure 3-n: The cancel Button
The code first creates a <a> element, and then adds an <i> child element under it.
Listing 3-z: Part 8 – main.html – Partial createItemDom Code
const ar = document.createElement('a'); ar.className = 'mdl-chip__action'; ar.id = 'a_' + id; const ir = document.createElement('i'); ir.className = 'material-icons'; const irTxt = document.createTextNode('cancel'); |
The last part of the code for the createItemDom function is responsible for adding the created HTML elements to the DOM. This is shown in the comments in the following code.
Listing 3-aa: Part 9 – main.html – Partial createItemDom Code
// Adds the <i> element to its parent, the <a> element ir.appendChild(irTxt); ar.appendChild(ir);
// Adds the ‘A’ or ‘E’ <span> element to its parent, the main <span> sp1.appendChild(sp1Txt); docText.appendChild(sp1); // Adds the Name of Expiry Date <span> to its parent, the main <span> sp2.appendChild(sp2Txt); docText.appendChild(sp2); // Adds the <a> element to its parent, the main <span> docText.appendChild(ar); // Adds the main <span>, Chip Element to the <li> element doc.appendChild(docText); // Adds the <li> element to its parent, the <ul> list of elements ul.appendChild(doc); // Adds the event handler when for the cancel button for each element document.getElementById(ar.id).addEventListener('click', deleteItem); |
As you can see, the comment for each section is very descriptive and explains how each element is added to the DOM. The order in which it is done is very important.
Checking dates
A key aspect of being able to render these documents in our application’s UI accordingly is being able to know if a document’s date is still valid, or if it has expired. This is what the checkExpDate function does—let’s have a look at its code.
Listing 3-ab: Part 10 - main.html – checkExpDate Function
function checkExpDate(dt) { let currentDate = Date.now(); let date = Date.parse(dt); return (!isNaN(date) && currentDate - date < 0) ? 'A' : 'E'; } |
The code is very simple. First, we first get the currentDate by calling the Date.now method. Then, we parse the value of the date supplied (dt) when the document was added through the Add Document window, using the Date.parse method
The final part is to check if the parsed date is a number (!isNaN)—and verifying that the currentDate, compared to the document’s date (dt), is in the future—if so, the document is considered active—if not, it is considered expired.
Deleting documents
So far, we have created all the code required to render documents on the main window’s UI (main.html) once those documents have been added through the Add Document window.
However, we still haven’t looked at the code for the deleteItem method that was added as an event handler to the Cancel button of a document. Let’s have a look at the code.
Listing 3-ac: Part 11 - main.html – deleteItem Function
function deleteItem(e) { let doc = e.target.parentNode.parentNode.parentNode; doc.innerHTML = ''; doc.parentNode.removeChild(doc); } |
The method receives an e parameter, which refers to the DOM object that contains the Cancel button icon.
The following diagram shows the relationship between the lines of code of the deleteItem function and the actual HTML markup.
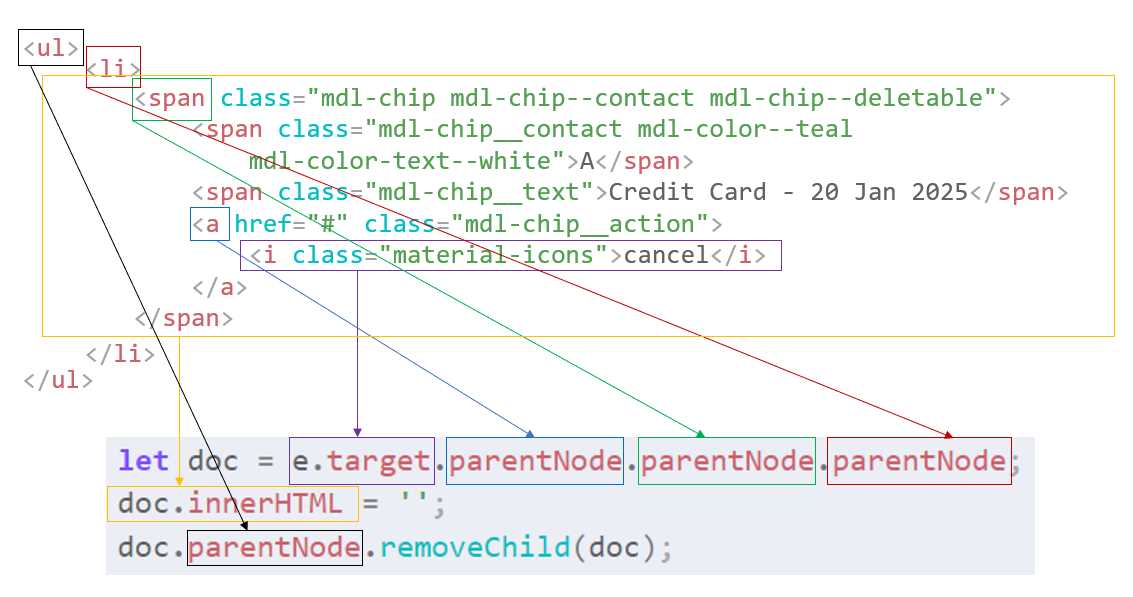
Figure 3-o: The Relationship Between the HTML Markup and the deleteItem Code
As we can see, the e.target.parentNode.parentNode.parentNode object refers to the <li> item, whose content we delete by setting its innerHTML property to an empty string.
Then, we remove the <li> element from the list by referencing the <ul> object, using the doc.parentNode property and invoking the removeChild method.
Searching documents
The final part of the main.html code that we still haven’t talked about is the search functionality—let’s have a look at that now.
Listing 3-ad: Part 12 - main.html – searchItems Function
function searchItems() { let input, filter, ul, li, a, i, txtValue; input = document.getElementById('search'); filter = input.value.toUpperCase(); ul = document.getElementById('ulist'); li = ul.getElementsByTagName('li'); for (i = 0; i < li.length; i ++) { a = li[i].getElementsByTagName('a')[0]; txtValue = (a.textContent || a.innerText) && (a.parentNode.textContent || a.parentNode.innerText).replace('cancel', ''); if (txtValue.toUpperCase().indexOf(filter) > -1) { li[i].style.display = ""; } else { li[i].style.display = "none"; } } } |
What’s going on here? First, we declare the variables we need by referencing key elements within the HTML markup, such as the search box and ulist, which refers to the list of <li> items contained within <ul>…</ul>.
Then, we loop through the list of all the <li> items and get the <a> child element of each <li> item—this is done by invoking li[i].getElementsByTagName('a')[0].
To better understand how the code of the searchItems function works, let’s have a look at the following diagram, which illustrates the parts of the code that relate to the HTML elements.
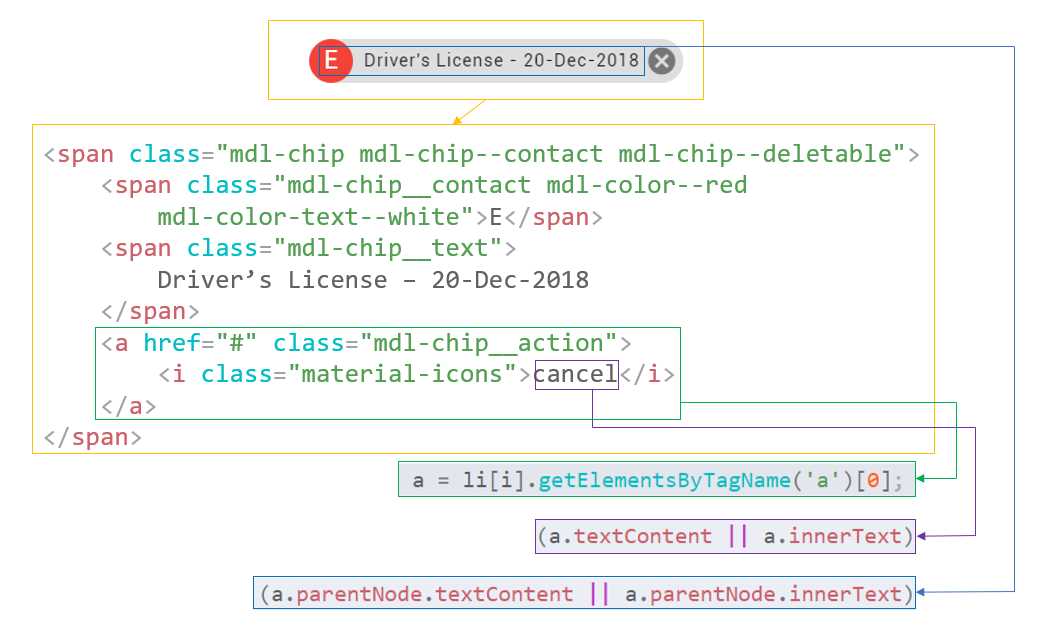
Figure 3-p: The Relationship Between the HTML Markup and the searchItems Code
As we can see in Figure 3-p, we are able to retrieve the displayed text of the items we are looking for by evaluating (a.textContent || a.innerText) and (a.parentNode.textContent || a.parentNode.innerText), and removing any references to the word cancel in the resultant string—which is assigned to the variable txtValue.
The uppercase value of the variable txtValue is then compared against the uppercase value entered through the search field. This is done so that any elements that don’t match the search value entered, are hidden from the <ul> list.
This is achieved by setting the style.display property of any non-matching <li> elements to none—which means any <li> element that doesn’t match the search query is therefore hidden, and not displayed.
So, all the elements of the list are always there—the searchItems function simply hides those that don’t match the search query.
Add Document window facelift
We now have all the code for our main window (main.html) ready. Let’s now make some visual improvements to the Add Document window, doc.html.
I going to place the finished code for the doc.html file in the following code listing, which we can then review in parts.
Listing 3-ae: Finished doc.html
<!DOCTYPE html> <html lang="en"> <head> <meta charset="UTF-8"> <meta name="viewport" content="width=device-width, initial-scale=1.0"> <meta http-equiv="X-UA-Compatible" content="ie=edge"> <title>Document</title> <link rel="stylesheet" href="./node_modules/material-design-lite/material.min.css"> <script src="./node_modules/material-design-lite/material.min.js"> </script> <link rel="stylesheet" href="./fonts/icon.css"> <link rel="stylesheet" href="./fonts/styles.css"> <style> .mdl-layout { align-items: center; justify-content: center; } .mdl-layout__content { padding: 24px; flex: none; } </style> </head> <body> <div class="mdl-layout mdl-js-layout mdl-color--grey-100"> <main class="mdl-layout__content"> <div class="mdl-card mdl-shadow--6dp"> <div class="mdl-card__title mdl-color--primary mdl-color-text--white"> <h2 class="mdl-card__title-text">New Document</h2> </div> <form> <div class="mdl-card__supporting-text"> <div class="mdl-textfield mdl-js-textfield"> <label class="mdl-textfield__label"> Document name: </label> <input class="mdl-textfield__input" type="text" id="name" autofocus> </div> <div class="mdl-textfield mdl-js-textfield"> <label class="mdl-textfield__label"> Expiration date: </label> <input class="mdl-textfield__input" type="text" id="date"> </div> </div> <div class="mdl-card__actions mdl-card--border"> <button class="mdl-button mdl-js-button mdl-button--raised" type="submit"> Save </button> </div> </form> </div> </main> </div> <script> const electron = require('electron'); const {ipcRenderer} = electron; const form = document.querySelector('form'); form.addEventListener('submit', docSubmit);
function docSubmit(e) { e.preventDefault(); const name = document.querySelector('#name').value; const date = document.querySelector('#date').value; ipcRenderer.send('doc:add', name + '|' + date); } </script> </body> </html> |
As you have probably noticed, the <header>…</header> section is pretty much the same as the one from main.html.
The interesting part of the code is actually just after the <body> tag, where I’ve added some Material Design Lite CSS styling to a few <div> sections that make up our document form.
The following diagram, which is easier to follow, illustrates the relationship between the HTML markup and the finished form on the screen.
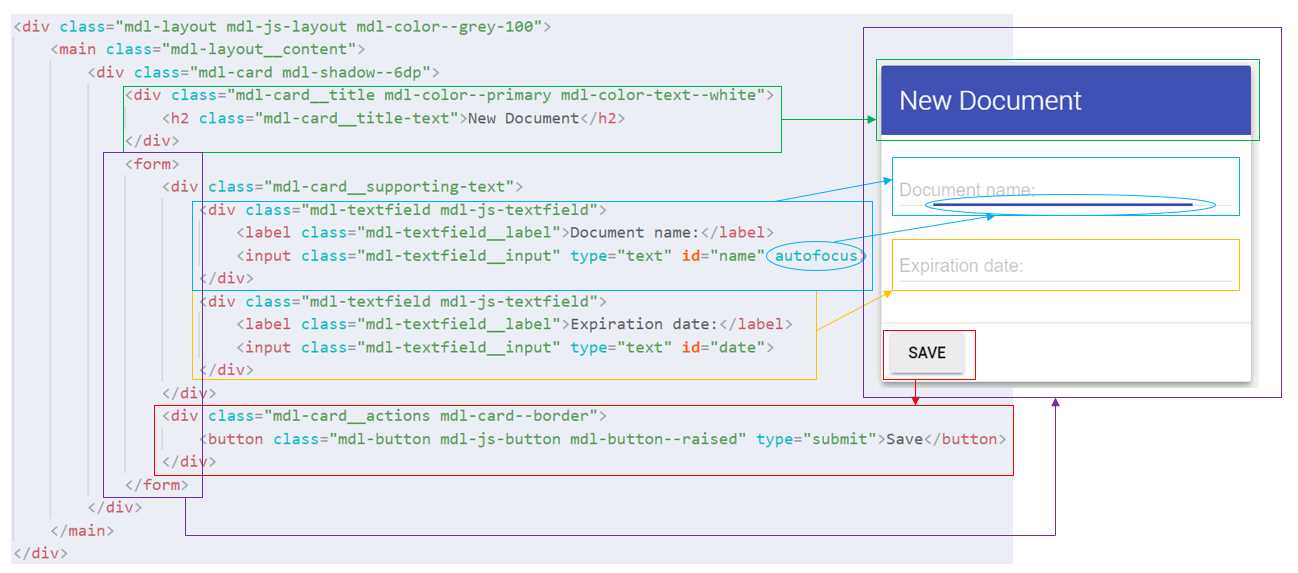
Figure 3-q: The Relationship Between the HTML Markup and the Finished Form
As you can see, each <div> correlates with a section of the finished form. For more information about the Material Design Lite classes used to style each section, please refer to the official documentation here.
With the HTML markup part covered, let’s move on to the JavaScript code. Let ‘s break it into parts to understand it better.
Listing 3-af: Partial doc.html Code
const electron = require('electron'); const {ipcRenderer} = electron; const form = document.querySelector('form'); |
This part of the code is very easy to understand. All we are doing is referencing the electron and ipcRenderer modules—essential for the messaging lifecycle within the application.
Next, we declare a form constant that refers to the form DOM element within the HTML markup. We’ll need to subscribe to its submit event so we can intercept the data and send it over to the ipcMain receiver on main.js, which will relay it to the ipcRenderer on main.html, as described in Figure 3-a.
Following that, we add an event listener to the form object for the submit event, which will trigger the execution of the docSubmit function.
Listing 3-ag: Partial doc.html Code
form.addEventListener('submit', docSubmit); |
Next, let’s have a look at the docSubmit function.
Listing 3-ag: Partial doc.html Code
function docSubmit(e) { e.preventDefault(); const name = document.querySelector('#name').value; const date = document.querySelector('#date').value; ipcRenderer.send('doc:add', name + '|' + date); } |
The code is very simple. We start off by invoking the preventDefault method, which basically means that if the event does not get explicitly handled, its default action should not be taken as it normally would be.
In other words, the HTML form element’s default submit action—which is to send the form details to a web server—will not be executed. Instead, the code that follows the preventDefault method will be executed.
The code that follows the preventDefault method takes the values of the document name and date expiration fields and concatenates them into a single string, which is sent to the listener on main.js, by invoking ipcRenderer.send.
Data validation assumptions
This concludes the code for doc.html. Notice, though, that I haven’t added any code to validate the data entered, for neither the name of the document or the expiration date.
For the sake of simplicity, we will assume that the name of the document will just contain alphanumeric characters and spaces, and the expiration date will be a date formatted using this convention: dd-MMM-yyyy (for example, 25-Mar-2034).
However, you are welcome to expand the doc.html code to add additional logic to validate the name of the document and expiration date.
Adjusting the secondary window
We’ve covered a lot of ground so far in this long chapter, but we’re still not entirely done yet. Before we can close off this chapter, let’s execute the app by running npm start from the command line to see what the app looks like.
Figure 3-r: The App’s Main Window
My app’s main window looks like this. I’ll now click on the Add Document menu option to see how it looks. Here’s what I see.
Figure 3-s: The App’s Secondary Window
That’s interesting, as it seems that the recent UI changes to doc.html don’t fit nicely with the dimensions of the secondary window. How can we fix this?
The fix is quite easy—all we need to do is to change the dimensions of the secondary window when it is opened. Let’s have a look at the existing code that’s responsible for doing this.
Listing 3-ah: addDocumentWindow Function Code – main.js
function addDocumentWindow() { addDocWin = addWindow('doc', {width: 200, height: 300, title: 'Add Document'}); // Garbage collection addDocWin.on('close', () => { addDocWin = null; }); } |
All we need to do inside the addDocumentWindow function of main.js, is to simply adjust the values of the width and height parameters, when invoking the addWindow method. So, let’s adjust them accordingly—the changes are highlighted in bold in the following code.
Listing 3-ai: Adjusted addDocumentWindow Function Code – main.js
function addDocumentWindow() { addDocWin = addWindow('doc', {width: 400, height: 400, title: 'Add Document'}); // Garbage collection addDocWin.on('close', () => { addDocWin = null; }); } |
If I now run the npm start command again to execute the app, I’m able to see a change in the dimensions when clicking on the Add Document menu option.
Figure 3-t: The App’s Secondary Window Adjusted
Awesome—that looks so much better. Now, let’s add some documents to the list. I’ll add the following items, one at a time, through the Add Document window, in this order:
Passport 2 – 24-Dec-2029
Passport 3 – 10-Dec-2029
This is how the list on the main window looks afterwards.
Figure 3-u: Items Added to the Main Window
Nothing unexpected—they have been added to the list in the same sequence we have added them, which is fine, given that this is the logic we have defined within our code.
Personally, what I’d like to see, is the items listed according to their expiration date. So, the item that expires first, should be listed on the top of the list. and so on.
Ordering items by expiration date
Ideally, we want to see every item added to the list ordered by the expiration date. To do this, we need to make some changes to our code. We need to make two small, but important changes to the createItemDom function. I’ve highlighted these two changes in bold in the following code.
Listing 3-aj: Adjusted createItemDom Function Code – main.html
function createItemDom(item) { let iparts = item.split('|'); let id = iparts[0].replace(' ', '_').replace('/', '-'); const doc = document.createElement('li'); doc.id = 'li_' + id; doc.className = 'mdl-list__item';
const docText = document.createElement('span'); docText.className = 'mdl-chip mdl-chip--contact mdl-chip--deletable';
let exp = checkExpDate(iparts[1]); const sp1 = document.createElement('span'); sp1.className = (exp == 'A') ? 'mdl-chip__contact mdl-color--teal mdl-color-text--white' : 'mdl-chip__contact mdl-color--red mdl-color-text--white'; const sp1Txt = document.createTextNode(exp); const sp2 = document.createElement('span'); sp2.className = 'mdl-chip__text'; sp2.setAttribute('data-expires', iparts[1]); const sp2Txt = document.createTextNode(iparts[0] + ' - ' + iparts[1]); const ar = document.createElement('a'); ar.className = 'mdl-chip__action'; ar.id = 'a_' + id; const ir = document.createElement('i'); ir.className = 'material-icons'; const irTxt = document.createTextNode('cancel'); ir.appendChild(irTxt); ar.appendChild(ir);
sp1.appendChild(sp1Txt); docText.appendChild(sp1); sp2.appendChild(sp2Txt); docText.appendChild(sp2); docText.appendChild(ar); doc.appendChild(docText); sortList(ul, doc, Date.parse(iparts[1])); document.getElementById(ar.id).addEventListener('click', deleteItem); } |
Were you able to spot the changes? First, I added a custom data-expires attribute to the <span> element that contains the description of the document being added to the list. We can see it when we inspect the <span> element using Chrome Dev Tools.
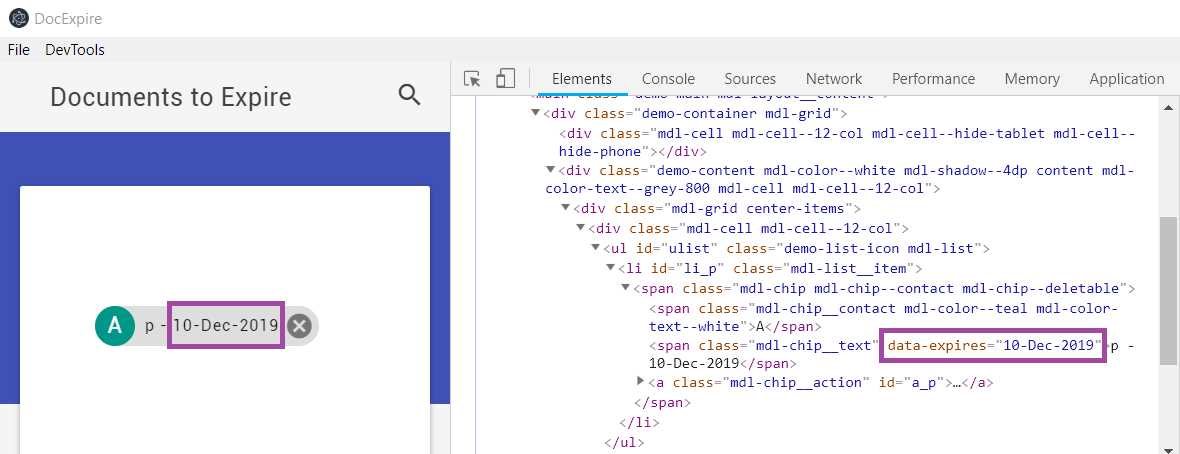
Figure 3-v: Inspecting the data-expires Attribute using Chrome Dev Tools
Secondly, I replaced the following instruction:
// Adds the <li> element to its parent, the <ul> list of elements
ul.appendChild(doc);
With this one:
sortList(ul, doc, Date.parse(iparts[1]));
This code is responsible for inserting the element on the list in the position it corresponds to, given the expiration date mentioned on the data-expires attribute.
This is achieved by executing the logic contained within the sortList function that follows.
Listing 3-ak: sortList Function Code – main.html
function sortList(ul, liitem, date) { let flitem = null; let found = false; let items = document.querySelectorAll('.mdl-chip__text'); for (let i = 0; i < items.length; i++) { cDate = Date.parse(items[i].getAttribute('data-expires')); if (date >= cDate) { cDate = date; } else { flitem = items[i].parentNode.parentNode; found = true; break; } } if (liitem != null) { if (found) { ul.insertBefore(liitem, flitem); } else { ul.appendChild(liitem); } } } |
Let’s have a look at the following diagram to better understand the relationship between the code of this function and the HTML markup.
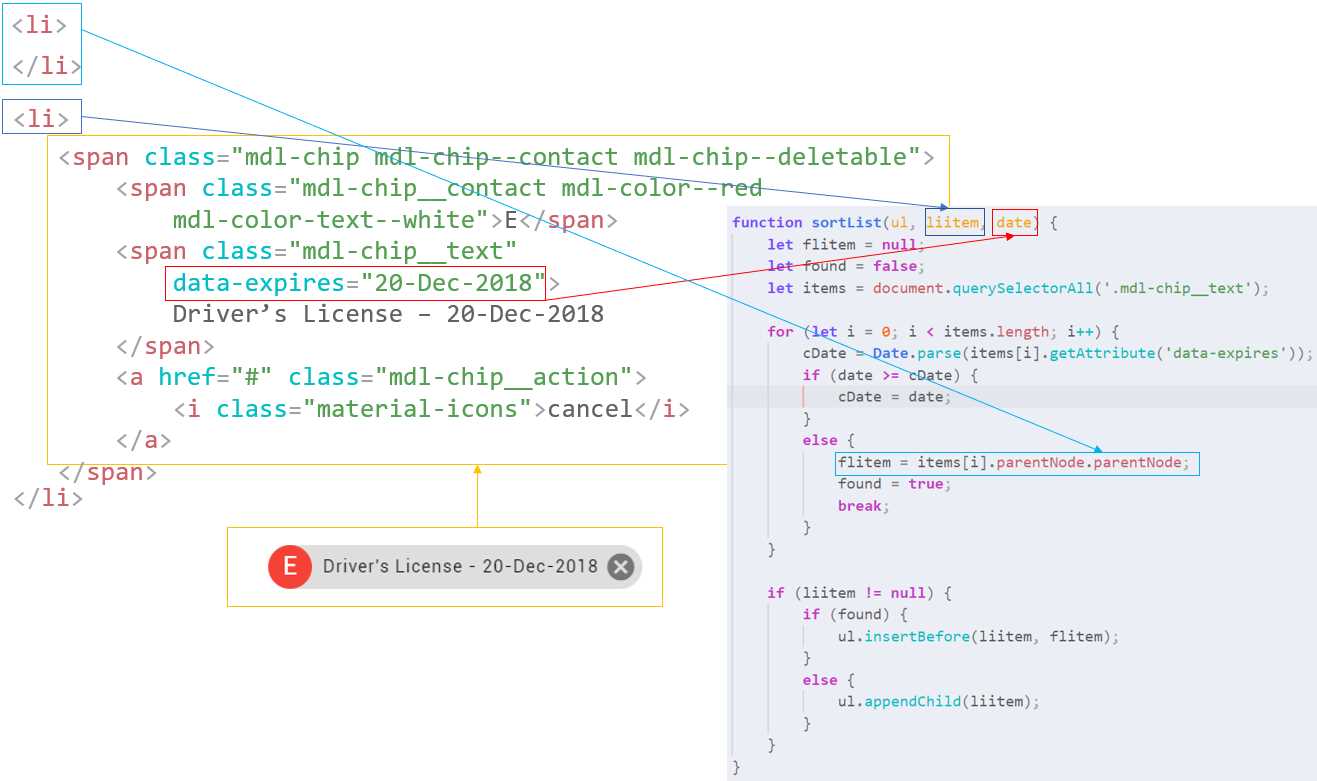
Figure 3-w: sortList Code-Markup Relationship
The sortList function receives three parameters—the first is the <ul> list to which the new document is going to be inserted.
The second parameter is the <li> item that is going to be inserted—in the preceding figure, we can see it highlighted in a dark blue + yellow box.
The third parameter is the expiration date of the document that is going to be inserted (dark blue + yellow box). This date will be compared against the dates (cDate) of each of the items already existing within the <ul> list.
If the expiration date of the document being inserted (date) is before the expiration date of the current <li> item (light blue box) within the loop (cDate), then we obtain a reference to the current <li> item. This is done so that the new item can be inserted before the current one, which is done by invoking the insertBefore method from the ul element.
Before we can test this, we need to do two more things. One is to ensure that all elements added to the list have a deleteItem event handler attached. We can do this by writing the following “fail-safe” function within our main.html code.
Listing 3-al: addDeleteEvents Function Code – main.html
function addDeleteEvents() { let items = document.querySelectorAll('.mdl-chip__action'); for (let i = 0; i < items.length; i++) { items[i].addEventListener('click', deleteItem); } } |
This function simply ensure that all documents added to the list have an event handler attached that can execute the deleteItem method, which is used for removing a specific item from the list.
The second thing is to wire this up within the ipcRendered.on method for the doc:add event. We can do this as follows:
Listing 3-am: Updated ipcRenderer.on Method – main.html
ipcRenderer.on('doc:add', (e, item) => { createItemDom(item); sortList(document.getElementById('ulist')); addDeleteEvents(); }); |
As you can see, all we’ve done is added the calls to the sortList and addDeleteEvents functions after invoking createItemDom.
To test this, run npm start from the command line to execute the program, and enter the following documents in this order, by using the Add Document window:
Passport 1 – 12-Dec-2029
Passport 2 – 24-Dec-2029
Passport 3 – 10-Dec-2029
Passport 4 – 02-Dec-2019
Passport 5 – 09-Dec-2029
Passport 6 – 09-Dec-2019
Passport 7 – 31-May-2020
You should then see the documents added to the main window, as follows.
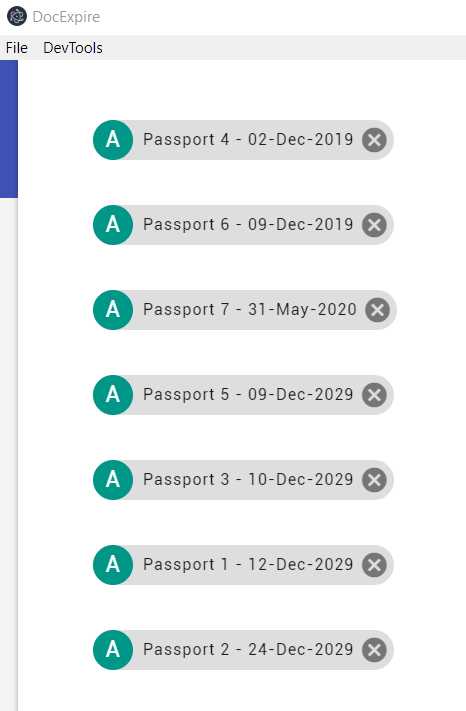
Figure 3-x: sortList Code-Markup Relationship
Notice how the documents have been added to the main window according to their expiration date, which is what we were aiming to achieve.
Recap of the code
We’ve made a lot of changes throughout this chapter, so it’s a good idea to review the final code for the three files that make up our app’s code: main.js, main.html (main window), and doc.html (secondary window).
Listing 3-an: Finished main.js
const electron = require('electron'); const url = require('url'); const path = require('path'); const {app, BrowserWindow, Menu, ipcMain} = electron; let main, addDocWin; // Menu template const mainMenu = [ { label: 'File', submenu:[ { label: 'Add Document', click() { addDocumentWindow(); } }, { label: 'Clear Documents', click() { main.webContents.send('doc:clear'); } }, { // For cloud syncing – for the future label: 'User Details' }, { label: 'Exit App', accelerator: process.platform == 'darwin' ? 'Command+E' : 'Ctrl+E', click() { app.quit(); } } ] } ]; function menuMac() { if (process.platform == 'darwin') { mainMenu.unshift({ label: '' }); } } function enableDevTools() { if (process.env.NODE_ENV === undefined || process.env.NODE_ENV !== 'production') { mainMenu.push({ label: 'DevTools', submenu: [ { label: 'Toggle DevTools', accelerator: process.platform == 'darwin' ? 'Command+T' : 'Ctrl+T', click(i, fw) { fw.toggleDevTools(); } } ] }); } } function displayMenu() { menuMac(); enableDevTools(); // Build the menu from the template const menu = Menu.buildFromTemplate(mainMenu); // Insert the menu into the application Menu.setApplicationMenu(menu); } // Create a new window function addWindow(name, params) { // Create the new window let win = new BrowserWindow(params); // Load the html into the window win.loadURL(url.format({ pathname: path.join(__dirname, name + '.html'), protocol: 'file', slashes: true })); return win; } function addDocumentWindow() { addDocWin = addWindow('doc', {width: 400, height: 400, title: 'Add Document'}); // Garbage collection addDocWin.on('close', () => { addDocWin = null; }); } ipcMain.on('doc:add', (e, item) => { console.log(item); main.webContents.send('doc:add', item); addDocWin.close(); }); // Application ready event app.on('ready', () => { // Create the new window main = addWindow('main', {}); displayMenu(); // Terminating the application main.on('closed', () => { app.quit(); }); }); |
Listing 3-ao: Finished main.html
<!DOCTYPE html> <html lang="en"> <head> <meta charset="UTF-8"> <meta name="viewport" content="width=device-width, initial-scale=1.0"> <meta http-equiv="X-UA-Compatible" content="ie=edge"> <title>DocExpire</title> <link rel="stylesheet" href="./node_modules/material-design-lite/material.min.css"> <script src="./node_modules/material-design-lite/material.min.js"> </script> <link rel="stylesheet" href="./fonts/icon.css"> <link rel="stylesheet" href="./fonts/styles.css"> <style> .mdl-grid.center-items { justify-content: center; } </style> </head> <body> <div class="demo-layout mdl-layout mdl-layout--fixed-header mdl-js-layout mdl-color--grey-100"> <header class="demo-header mdl-layout__header mdl-layout__header--scroll mdl-color--grey-100 mdl-color-text--grey-800"> <div class="mdl-layout__header-row"> <span class="mdl-layout-title">Documents to Expire</span> <div class="mdl-layout-spacer"></div> <div class="mdl-textfield mdl-js-textfield mdl-textfield--expandable"> <label class="mdl-button mdl-js-button mdl-button--icon" for="search"> <i class="material-icons">search</i> </label> <div class="mdl-textfield__expandable-holder"> <input class="mdl-textfield__input" type="text" id="search" onkeyup="searchItems()"> <label class="mdl-textfield__label" for="search"> Enter your query... </label> </div> </div> </div> </header> <div class="demo-ribbon"></div> <main class="demo-main mdl-layout__content"> <div class="demo-container mdl-grid"> <div class="mdl-cell mdl-cell--12-col mdl-cell--hide-tablet mdl-cell--hide-phone"> </div> <div class="demo-content mdl-color--white mdl-shadow--4dp content mdl-color-text--grey-800 mdl-cell mdl-cell--12-col"> <div class="mdl-grid center-items"> <div class="mdl-cell mdl-cell--12-col"> <ul id="ulist" class="demo-list-icon mdl-list"> </ul> </div> </div> </div> </div> </main> </div> <script> const electron = require('electron'); const {ipcRenderer} = electron; const ul = document.querySelector('ul'); function createItemDom(item) { let iparts = item.split('|'); let id = iparts[0].replace(' ', '_').replace('/', '-'); const doc = document.createElement('li'); doc.id = 'li_' + id; doc.className = 'mdl-list__item';
const docText = document.createElement('span'); docText.className = 'mdl-chip mdl-chip--contact mdl-chip--deletable';
let exp = checkExpDate(iparts[1]); const sp1 = document.createElement('span'); sp1.className = (exp == 'A') ? 'mdl-chip__contact mdl-color--teal mdl-color-text--white' : 'mdl-chip__contact mdl-color--red mdl-color-text--white'; const sp1Txt = document.createTextNode(exp); const sp2 = document.createElement('span'); sp2.className = 'mdl-chip__text'; sp2.setAttribute('data-expires', iparts[1]); const sp2Txt = document. createTextNode(iparts[0] + ' - ' + iparts[1]); const ar = document.createElement('a'); ar.className = 'mdl-chip__action'; ar.id = 'a_' + id; const ir = document.createElement('i'); ir.className = 'material-icons'; const irTxt = document.createTextNode('cancel'); ir.appendChild(irTxt); ar.appendChild(ir);
sp1.appendChild(sp1Txt); docText.appendChild(sp1); sp2.appendChild(sp2Txt); docText.appendChild(sp2); docText.appendChild(ar); doc.appendChild(docText); sortList(ul, doc, Date.parse(iparts[1])); document.getElementById(ar.id). addEventListener('click', deleteItem); } function deleteItem(e) { let doc = e.target.parentNode.parentNode.parentNode; doc.innerHTML = ''; doc.parentNode.removeChild(doc); } function checkExpDate(dt) { let currentDate = Date.now(); let date = Date.parse(dt); return (!isNaN(date) && currentDate - date < 0) ? 'A' : 'E'; } function searchItems() { let input, filter, ul, li, a, i, txtValue; input = document.getElementById('search'); filter = input.value.toUpperCase(); ul = document.getElementById('ulist'); li = ul.getElementsByTagName('li'); for (i = 0; i < li.length; i ++) { a = li[i].getElementsByTagName('a')[0]; txtValue = (a.textContent || a.innerText) && (a.parentNode.textContent || a.parentNode.innerText).replace('cancel', ''); if (txtValue.toUpperCase().indexOf(filter) > -1) { li[i].style.display = ""; } else { li[i].style.display = "none"; } } } function sortList(ul, liitem, date) { let flitem = null; let found = false; let items = document.querySelectorAll('.mdl-chip__text'); for (let i = 0; i < items.length; i++) { cDate = Date.parse(items[i]. getAttribute('data-expires')); if (date >= cDate) { cDate = date; } else { flitem = items[i].parentNode.parentNode; found = true; break; } } if (liitem != null) { if (found) { ul.insertBefore(liitem, flitem); } else { ul.appendChild(liitem); } } } function addDeleteEvents() { let items = document.querySelectorAll('.mdl-chip__action'); for (let i = 0; i < items.length; i++) { items[i].addEventListener('click', deleteItem); } } ipcRenderer.on('doc:add', (e, item) => { createItemDom(item); sortList(document.getElementById('ulist')); addDeleteEvents(); }); ipcRenderer.on('doc:clear', () => { ul.innerHTML = ''; }); </script> </body> </html> |
Listing 3-ap: Finished doc.html
<!DOCTYPE html> <html lang="en"> <head> <meta charset="UTF-8"> <meta name="viewport" content="width=device-width, initial-scale=1.0"> <meta http-equiv="X-UA-Compatible" content="ie=edge"> <title>Document</title> <link rel="stylesheet" href="./node_modules/material-design-lite/material.min.css"> <script src="./node_modules/material-design-lite/material.min.js"> </script> <link rel="stylesheet" href="./fonts/icon.css"> <link rel="stylesheet" href="./fonts/styles.css"> <style> .mdl-layout { align-items: center; justify-content: center; } .mdl-layout__content { padding: 24px; flex: none; } </style> </head> <body> <div class="mdl-layout mdl-js-layout mdl-color--grey-100"> <main class="mdl-layout__content"> <div class="mdl-card mdl-shadow--6dp"> <div class="mdl-card__title mdl-color--primary mdl-color-text--white"> <h2 class="mdl-card__title-text">New Document</h2> </div> <form> <div class="mdl-card__supporting-text"> <div class="mdl-textfield mdl-js-textfield"> <label class="mdl-textfield__label"> Document name: </label> <input class="mdl-textfield__input" type="text" id="name" autofocus> </div> <div class="mdl-textfield mdl-js-textfield"> <label class="mdl textfield__label">Expiration date: </label> <input class="mdl-textfield__input" type="text" id="date"> </div> </div> <div class="mdl-card__actions mdl-card--border"> <button class="mdl-button mdl-js-button mdl-button--raised" type="submit"> Save </button> </div> </form> </div> </main> </div> <script> const electron = require('electron'); const {ipcRenderer} = electron; const form = document.querySelector('form'); form.addEventListener('submit', docSubmit);
function docSubmit(e) { e.preventDefault(); const name = document.querySelector('#name').value; const date = document.querySelector('#date').value; ipcRenderer.send('doc:add', name + '|' + date); } </script> </body> </html> |
The full project, along with the package.json file (which includes the references to the project dependencies) can be downloaded here.
If you wish, you may download the full project, unzip it to a specific folder, and then within that folder, run npm install from the command line to install all the project dependencies and Node.js modules required.
Summary
It’s been a long but interesting chapter—we now have our basic Electron application ready. It really doesn’t do much more than add items to a list in an ordered way, which might not seem very exciting.
However, the main objective was to explore how this technology works with a relatively simple example. We’ve see how messages between different windows are sent across, and how the UI is rendered—without worrying about how to integrate external JavaScript frameworks, which would have added unnecessary complexity to this journey.
In the next and final chapter, we are going to explore how to package our application for Windows and conclude with some thoughts on how you can broaden your view going forward with Electron.
- Shared infrastructure for efficient resource management
- Self-service analytics for easy data exploration
- Enhanced security with row-level security and SSO
- Customizable dashboards to meet your specific needs