
.NET 8 and C# 12 Succinctly®

CHAPTER 3
More New .NET 8 Features
We’re not done yet with the new features in .NET 8. There are a few more things we need to talk about that are more suited to a chapter of their own. Starting off this foray into what’s new, let us look at AOT.
AOT support
You are now able to compile your code into native code using native AOT. This allows you to take C# and .NET code and compile it to native code the same way C++, Rust, or Go would compile. This means no .NET dependency, no IL code, and no JIT, making for very fast start up times that are very memory efficient.
AOT stands for ahead-of-time and is the counterpart of JIT, which stands for just-in-time compilation.
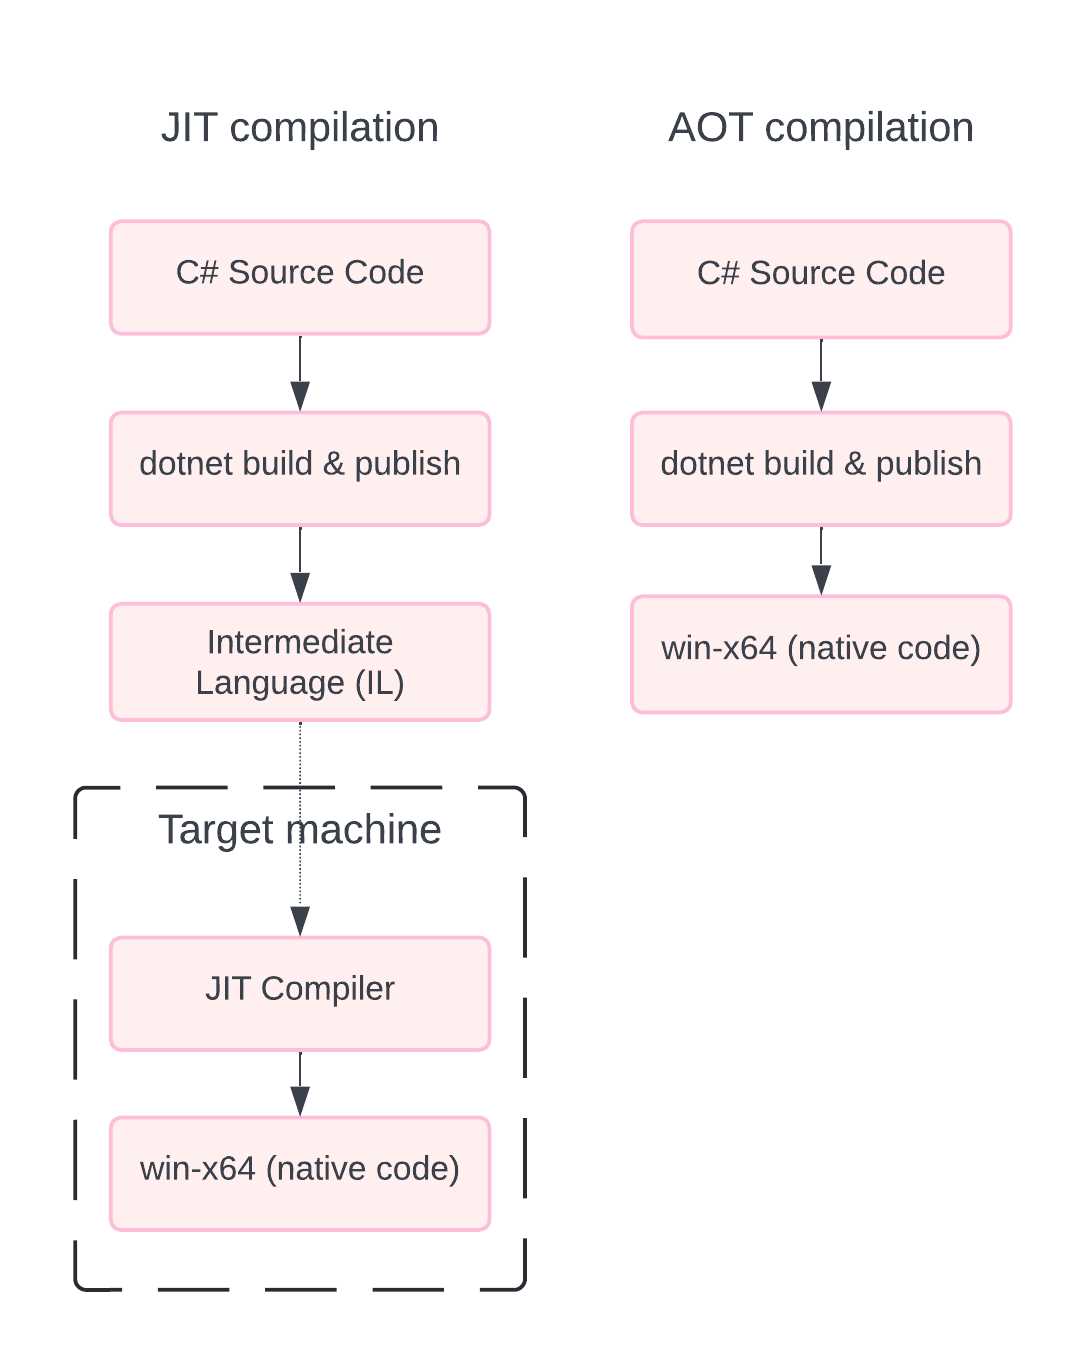
Figure 34: JIT vs. AOT Compilation
From the illustration in Figure 34, you can see how JIT and AOT differ. With AOT, we are generating the native code that runs on the target machine when we compile the application.
With the traditional JIT compiler, the C# code is turned into IL, which is then transformed into native code by the JIT compiler on the target machine.
With .NET 7, Native AOT targeted console-type applications, but with .NET 8, ASP.NET Core 8.0 introduced support for AOT.
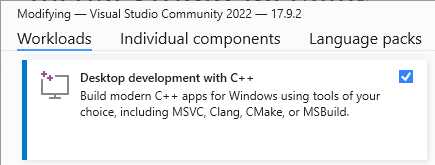
Figure 35: Prerequisite Workload
A prerequisite for AOT is the addition of the desktop development with the C++ workload. You must have this workload installed before continuing.
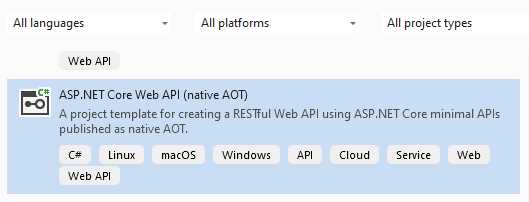
Figure 36: The ASP.NET Core Web API Native AOT Template
Visual Studio now also includes a project template for Native AOT Web APIs. When creating a new AOT Web API project, you will notice a few changes.
Starting with the csproj file, as seen in Code Listing 51, you will notice the inclusion of a <PublishAot> property in the property group.
This is obviously set to true.
Code Listing 51: The csproj File
<Project Sdk="Microsoft.NET.Sdk.Web"> <PropertyGroup> <TargetFramework>net8.0</TargetFramework> <Nullable>enable</Nullable> <ImplicitUsings>enable</ImplicitUsings> <InvariantGlobalization>true</InvariantGlobalization> <PublishAot>true</PublishAot> </PropertyGroup> </Project> |
Another change that you will notice in Code Listing 52 is the new method CreateSlimBuilder in the Program.cs file. This registers the minimal number of services required for our API project.
Code Listing 52: The Program.cs File
using System.Text.Json.Serialization; var builder = WebApplication.CreateSlimBuilder(args); builder.Services.ConfigureHttpJsonOptions(options => { options.SerializerOptions.TypeInfoResolverChain.Insert(0, AppJsonSerializerContext.Default); }); var app = builder.Build(); var sampleTodos = new Todo[] { new(1, "Walk the dog"), new(2, "Do the dishes", DateOnly.FromDateTime(DateTime.Now)), new(3, "Do the laundry", DateOnly.FromDateTime(DateTime.Now.AddDays(1))), new(4, "Clean the bathroom"), new(5, "Clean the car", DateOnly.FromDateTime(DateTime.Now.AddDays(2))) }; var todosApi = app.MapGroup("/todos"); todosApi.MapGet("/", () => sampleTodos); todosApi.MapGet("/{id}", (int id) => sampleTodos.FirstOrDefault(a => a.Id == id) is { } todo ? Results.Ok(todo) : Results.NotFound()); app.Run(); public record Todo(int Id, string? Title, DateOnly? DueBy = null, bool IsComplete = false); [JsonSerializable(typeof(Todo[]))] internal partial class AppJsonSerializerContext : JsonSerializerContext { } |
You will also notice, by looking at Code Listing 52, that we have a partial class called AppJsonSerializerContext that is registered with the ConfigureHttpJsonOptions. This allows the data to be serializable without using reflection and allows us to execute it without using a JIT compiler.
Due to the fact that native code has to be generated, some things, such as reflection-based JSON serialization, will not work with AOT.
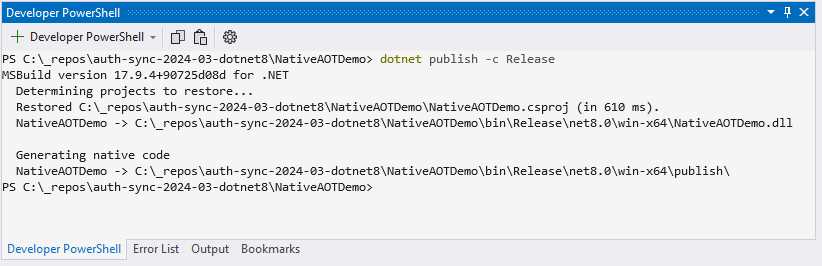
Figure 37: Running dotnet publish
If we have to run dotnet publish -c Release in the terminal in Visual Studio, you will notice that it generates native code, as seen in Figure 37.
When we look at the published files (see Figure 38), you will notice that it contains a single executable file that is self-contained, because it has been ahead-of-time compiled into native code.

Figure 38: The Published Files
Seeing as Native AOT applications don’t use JIT when the application runs, these apps can run in restricted environments where JIT isn’t allowed. You can also publish an app using a specific runtime identifier.
Publishing an app for Windows as a native AOT app, you can run dotnet publish -r win-x64 -c Release.
Publishing an app for Linux as a native AOT app, you can run dotnet publish -r linux-arm64 -c Release.
Just note that you can’t publish cross-platform using AOT. When compiling on Windows, the app is native Windows x64 code. When compiling on Linux, your .exe will not run on Windows.
AOT advantages
AOT has a number of advantages:
- Improvement in startup performance.
- Smaller app size, since it’s not JIT.
- Consumes less memory, saving us money when running in the cloud.
AOT disadvantages
AOT also has a few disadvantages:
- As there is no JIT, all native code must be generated at compile time.
- Reflection is not available, which required us to add extra code to serialize JSON data.
- Compile time is longer.
- We require platform-specific tools, such as the C++ tools on Windows.
- No cross-platform publishing means AOT apps are not portable.
- Dependencies must also be AOT-compatible.
When to use AOT
So, how do you know when to use AOT applications? Well, the short answer is: when you create cloud-native APIs. This will allow for increased performance, utilizing fewer resources.
New exception handling in ASP.NET Core 8
Exception handling is something with which all developers are very familiar. When something exceptional happens in your code—something that you didn’t expect—you need to handle that. ASP.NET is no exception. While exception handling in ASP.NET was possible before, it required you to write your own middleware in order to handle it correctly.
With .NET 8, Microsoft has now given developers the ability to have an exception handler class, specifically made for exception handling, that you can add to your pipeline. To illustrate this, I will create a very simple Web API project, as seen in Code Listing 53.
Code Listing 53: A Basic Web API Project
var builder = WebApplication.CreateBuilder(args); var app = builder.Build(); app.MapGet("/api/gettasks", () => { throw new InvalidProgramException("Something went wrong"); }); app.Run(); |
I am simply throwing an exception when the /gettasks endpoint is called. I also have a .http file that allows me to test my API inside Visual Studio. The code is illustrated in Code Listing 54.
Code Listing 54: The .http File
@ExceptionHandlingDemo_HostAddress = http://localhost:5105 GET {{ExceptionHandlingDemo_HostAddress}}/api/gettasks Accept: application/json ### |
Your port might be different from mine, but you can configure this in the debug properties if you like. Speaking of the debug properties, you can find these under the Debug menu in Visual Studio, as seen in Figure 39.
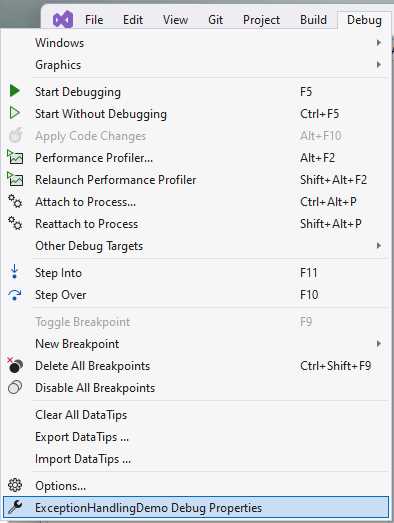
Figure 39: Finding the Debug Properties
Clicking on the menu called Debug Properties will display the Launch Profiles window.
Note: It seems strange that a menu called Debug Properties would launch a window called Launch Profiles. Just be aware of this disconnect in the naming. It might be a bug in Visual Studio.
As seen in Figure 40, the Launch Profiles window allows you to specify the app URL. You can also uncheck the Launch browser option (as I have done) to run the API without opening a browser window.
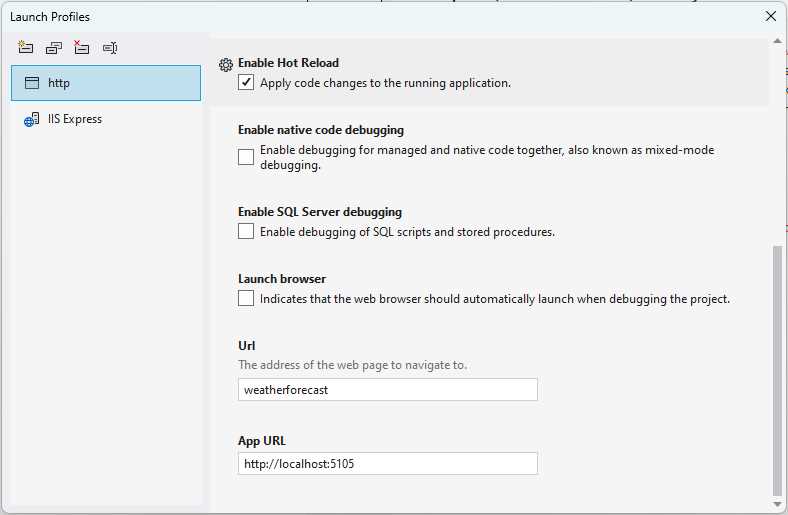
Figure 40: Launch Profiles
Running my API and sending a request to my /gettasks endpoint results in the exception, as seen in Figure 41.
This response window is quite rich in the information it returns. You can see the raw response, the headers, and the request that resulted in the exception.
But while the default is fine, we might want to handle exceptions on our own—and this is where the exception handler class comes into play.
IExceptionHandler is a new interface that allows developers to handle exceptions from a known location. Implementations of IExceptionhandler are registered by calling IServiceCollection.AddExceptionHandler<T>.
If you register multiple implementations, they are called in the order they’re registered. Once an exception handler handles a request, you can return true to stop processing, or false to continue processing.
Any exceptions not handled by the exception handler will then fall back to the default behavior from middleware.
Let’s see how to implement this in our project by looking at some code.
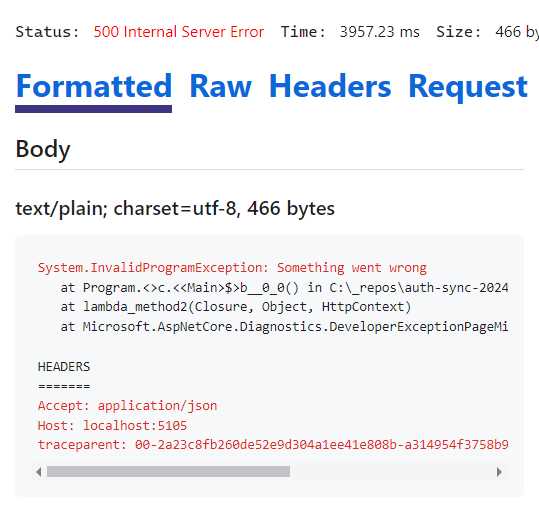
Figure 41: The Request Exception
Have a look at the code in Code Listing 55. This gives us a lot of control over the exceptions we handle in our application. You will notice that I simply return true, which will stop the processing right there.
Code Listing 55: Our CustomExceptionHandler Class Implementing IExceptionHandler
using Microsoft.AspNetCore.Diagnostics; namespace ExceptionHandlingDemo; public class CustomExceptionHandler : IExceptionHandler { public async ValueTask<bool> TryHandleAsync(HttpContext httpContext, Exception ex, CancellationToken cancellationToken) { httpContext.Response.StatusCode = 500; httpContext.Response.ContentType = "text/plain"; await httpContext.Response.WriteAsync($"Custom Exception Handler: {ex.Message}"); return true; } } |
Now that we have our custom exception handler, we need to add it to our services, as seen in Code Listing 56.
Code Listing 56: Modifying the Program.cs File
|
var builder = WebApplication.CreateBuilder(args); builder.Services.AddExceptionHandler<CustomExceptionHandler>(); var app = builder.Build(); app.UseExceptionHandler(_ => { }); app.MapGet("/api/gettasks", () => { throw new InvalidProgramException("Something went wrong"); }); app.Run(); |
You will notice that AddExceptionHandler is a new API, and we just pass it the CustomExceptionHandler class. In effect, this adds our IExceptionHandler implementation to the services. These implementations are then used by the exception handler middleware to handle unexpected exceptions.
We then add the middleware by adding the code app.UseExceptionHandler(_ => { }); to the Program.cs file. You should notice the _ => {} configuration lambda here; this is because the middleware is supposed to look for the CustomExceptionHandler we created, but it doesn’t. If you used app.UseExceptionHandler();, you will immediately see an error when running your application. This is because UseExceptionHandler doesn’t assume that if we have AddExceptionHandler, that it must use our custom IExceptionHandler implementation.
You can view the discussion on GitHub here.
As a workaround for this error, we just use the empty configuration lambda using the _ discards. If we wanted to, we could configure options here for our custom exception handler. For this example, however, we just pass in the empty configuration lambda.
Running the API again and calling our /gettasks endpoint, we will see the exception handled by our custom exception handler, as expected (see Figure 42).
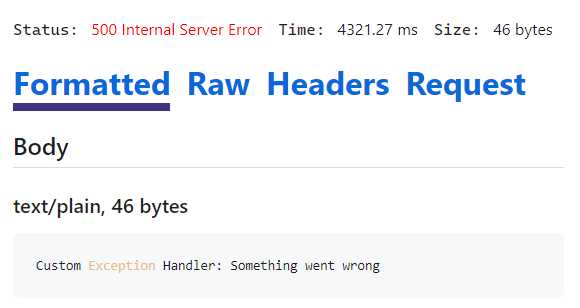
Figure 42: The Custom Exception Handler in Action
And that’s all there is to it. This is the new exception handling capability in ASP.NET Core 8, allowing developers to streamline and enhance error management within their applications. Exception handling is critical to any robust application. In ASP.NET Core 8, IExceptionHandler improves this significantly. It allows for cleaner, more maintainable code.
Bearer tokens in .NET 8 Identity
Thinking about modern .NET applications, identity and auth in .NET have been, to put it mildly, somewhat painful. In .NET 8, however, Microsoft set out to improve identity and auth. Suffice it to say, it has gotten a lot better in .NET 8.
Code Listing 57: A Basic Web API
var builder = WebApplication.CreateBuilder(args); var app = builder.Build(); app.Run(); |
Looking at Code Listing 57, we will start off with the simplest code possible.
We are going to turn something really simple into the code in Code Listing 58, which has identity and auth in it.
Code Listing 58: The Completed Web API Code
using System.Security.Claims; using Microsoft.AspNetCore.Identity; using Microsoft.AspNetCore.Identity.EntityFrameworkCore; using Microsoft.EntityFrameworkCore; var builder = WebApplication.CreateBuilder(args); builder.Services.AddAuthentication() .AddBearerToken(IdentityConstants.BearerScheme); builder.Services.AddAuthorizationBuilder(); builder.Services.AddDbContext<AppDbContext>(options => options.UseSqlite("Datasource=adminapp.db")); builder.Services.AddIdentityCore<AdminUser>() .AddEntityFrameworkStores<AppDbContext>() .AddApiEndpoints(); var app = builder.Build(); app.MapIdentityApi<AdminUser>(); app.MapGet("/", (ClaimsPrincipal user) => $"Welcome {user.Identity!.Name}") .RequireAuthorization(); app.Run(); class AdminUser : IdentityUser { } class AppDbContext : IdentityDbContext<AdminUser> { public AppDbContext(DbContextOptions<AppDbContext> options) : base(options) { } } |
Let’s start breaking this down. You will notice the following code, class AdminUser : IdentityUser { }, which is just my user that extends the IdentityUser class.
The next thing I’m going to do is wire up some services.
As seen in Code Listing 59, I have an extract of the code in Code Listing 58. Here, I am starting off by adding AddAuthentication(), which registers services required by authentication services, and then adding AddBearerToken, which adds bearer token authentication.
Note that this is not a JSON web token, but it is still a self-contained, stateless bearer token.
Next, we add AddAuthorizationBuilder(), which adds authorization services to the IServiceCollection. From an auth perspective, that’s all I needed to do.
Code Listing 59: Wiring Up Services
builder.Services.AddAuthentication() .AddBearerToken(IdentityConstants.BearerScheme); builder.Services.AddAuthorizationBuilder(); |
To store the user data, I will be using Entity Framework Core and SQLite as the provider. In .NET 8, Entity Framework is really fast, a perfectly viable solution for your requirements. First, we need to add some NuGet packages:
- Microsoft.AspNetCore.Identity.EntityFrameworkCore
- Microsoft.EntityFrameworkCore.Sqlite
- Microsoft.EntityFrameworkCore.Design
We add the design NuGet package because we are going to be working with migrations. We now need to add a DbContext, which we add as seen in Code Listing 60, extending the IdentityDbContext class using the AdminUser as the user.
Code Listing 60: Adding the DB Context
class AppDbContext : IdentityDbContext<AdminUser> { public AppDbContext(DbContextOptions<AppDbContext> options) : base(options) { } } |
In Code Listing 61, we register the DbContext to use SQLite as the provider, with a data source called adminapp.db.
Code Listing 61: Registering DB Context Services
builder.Services.AddDbContext<AppDbContext>(options => options.UseSqlite("Datasource=adminapp.db")); builder.Services.AddIdentityCore<AdminUser>() .AddEntityFrameworkStores<AppDbContext>() .AddApiEndpoints(); |
After registering the DbContext, we add identity with AddIdentityCore, using AdminUser. We also add AddEntityFrameworkStores(), which adds the Entity Framework implementation of identity information stores.
We then use AddApiEndpoints() to add configuration and services required to support IdentityApiEndpointRouteBuilderExtensions.
Code Listing 62 illustrates the game-changing code in this project of ours. Before .NET 8, if you wanted to have registration endpoints, login endpoints, or refresh token endpoints, you had to manually map these. That is no longer required. Now, all you need to do is call MapIdentityApi and specify the user object—and that’s it.
Code Listing 62: Adding MapIdentityApi
var app = builder.Build(); app.MapIdentityApi<AdminUser>(); app.MapGet("/", (ClaimsPrincipal user) => $"Welcome {user.Identity!.Name}") .RequireAuthorization(); app.Run(); |
This will go ahead and add all those endpoints for you. To illustrate an endpoint that requires authorization, I am adding authorization to the root that simply returns a welcome message to an authenticated user.
To see this in action, we need to run our migrations. Do this by running dotnet build to check if the build succeeds and then run dotnet ef migrations add InitialCreate to add the migrations, as seen in Figure 43.
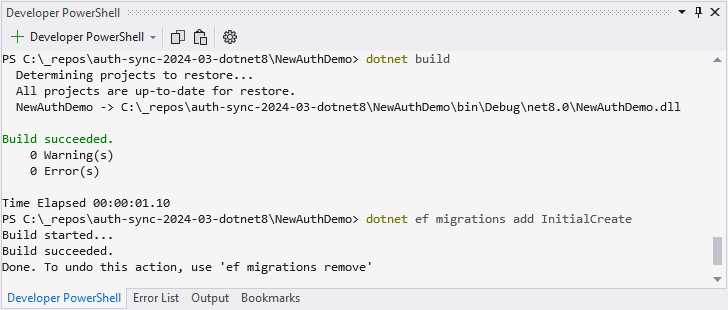
Figure 43: Adding Migrations
If you receive an error message stating, Could not execute because the specified command or file was not found, try running dotnet tool install --global dotnet-ef. After that has completed, try running dotnet ef migrations add InitialCreate again.
Lastly, to create your SQLite file, run dotnet ef database update, as seen in Figure 44.
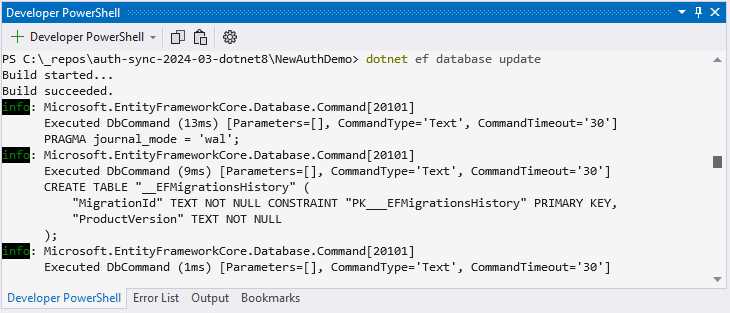
Figure 44: Creating the SQLite File
We are now ready to run our API and test the endpoints using Postman.
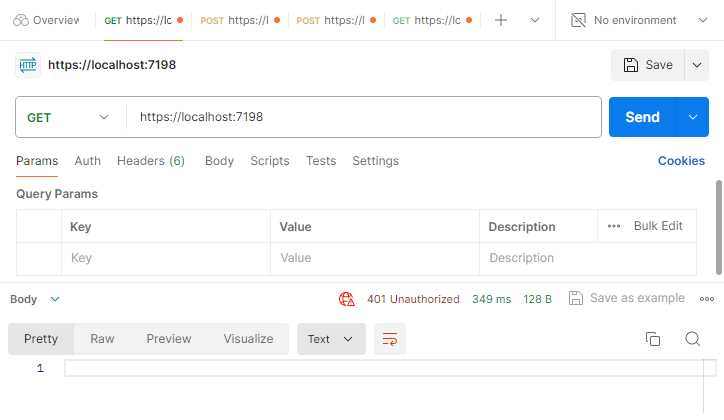
Figure 45: Trying to Access API Unauthorized
Looking at Figure 45, if I try to call the API, I will get a 401 Unauthorized response. I have to obtain a bearer token first, and in order to get a bearer token, I need to register.
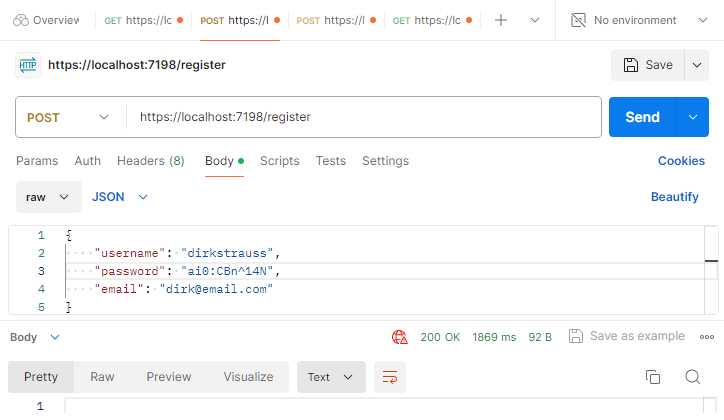
Figure 46: Calling the Register Endpoint
As seen in Figure 46, call the /register endpoint using the JSON in Code Listing 63.
Code Listing 63: The Register JSON
{ "username": "dirkstrauss", "password": "ai0:CBn^14N", "email": "[email protected]" } |
This will register me here as a user in my API. Looking at my SQLite table in Figure 47, I can see that my user has been registered successfully with all the information provided.
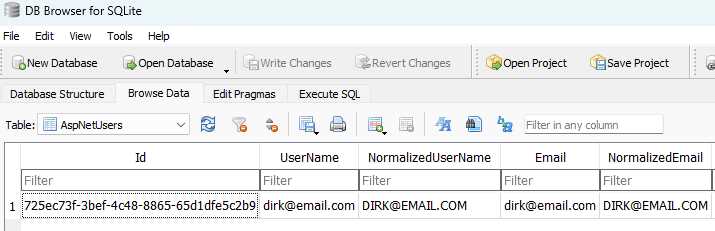
Figure 47: The Registered User
After registering, I can attempt to obtain a bearer token from my /login endpoint, as seen in Figure 48.
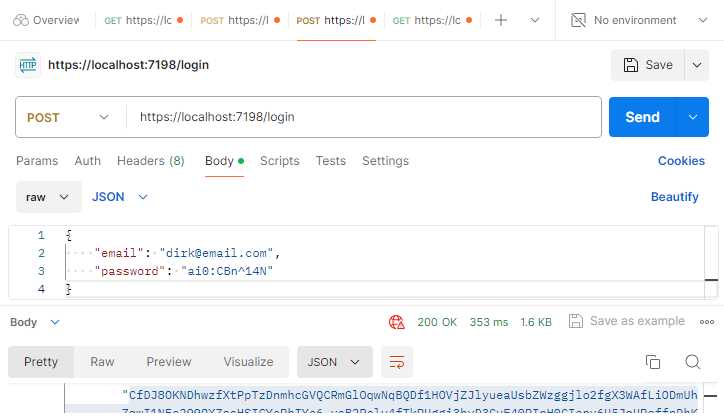
Figure 48: Calling the Login Endpoint
If my username and password are correct, I will receive a 200 OK response, and I will receive a bearer token and a refresh token, as seen in Code Listing 64.
Code Listing 64: The Login Response
{ "tokenType": "Bearer", "accessToken": "CfDJ8OKNDhwzfXtPpTzDnmhcGVTqch0Me2U8UB_bc-wd-H2Xg", "expiresIn": 3600, "refreshToken": "012QZDywGuk3qP-eSZ8apG0D4DEg06tcykxqH16-KiEs7dgg" } |
I can use the bearer token in the next step.
Note: The bearer token and refresh token in Code Listing 64 have been edited to be shorter. This was to display the response neatly in the code block. In reality, the tokens returned are much longer.
I then try to call my root endpoint again, only this time, I add the bearer token to the Auth tab in Postman. As seen in Figure 49, I received a successful welcome response back.
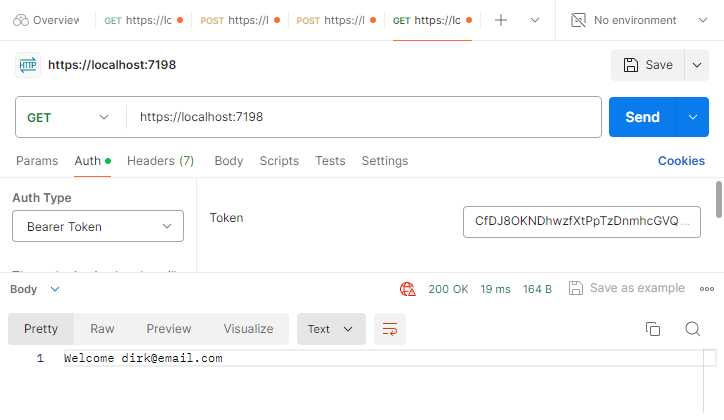
Figure 49: Calling the Root Endpoint Again
It is also important to note that when calling the endpoint using the bearer token, I am not making any calls back to the database to validate that token. This is because it is a stateless, self-contained token.
The last thing I want to touch on is the refresh token. The purpose of the refresh token in Code Listing 64 is to be stored locally on the client. It can then be used when the bearer token has expired.
This means that I can go to the /refresh endpoint and do an HTTP POST using the JSON in Code Listing 65.
Code Listing 65: Calling the Refresh API
|
"refreshToken": "012QZDywGuk3qP-eSZ8apG0D4DEg06tcykxqH16-KiEs7dgg" } |
If it is a valid refresh token, then it will return a new bearer and refresh token for me. If you are interested in seeing what endpoints are available, place your mouse cursor on MapIdentityApi and press Ctrl+F12.
You will see the following endpoints:
- /register
- /login
- /refresh
- /confirmEmail
- /resendConfirmationEmail
- /forgotPassword
- /resetPassword
- /manage/2fa
- /manage/info
This makes it extremely easy to set up authorization and identity on any app. This is not exclusive to minimal web APIs.
Data annotations updates
There are a few new data annotation attributes added to .NET 8. As you know, data annotations are used mainly for validation purposes, and in this example, I will be using an API to call endpoints that validate the models in my project.
As seen in Code Listing 66, I have a controller that calls out to a few APIs. The model is validated, and if valid, just returns an Ok result.
If, however, the model is invalid, it means that one of the validations applied by the data annotation attributes caught an invalid input.
We will be looking at the following data annotations:
- Range
- Length
- AllowedValues
- DeniedValues
- Base64
I am also going to use an .http file to test my API endpoints.
Code Listing 66: The Demo Controller
using DataAnnotationsDemo.Models; using Microsoft.AspNetCore.Mvc; namespace DataAnnotationsDemo.Controllers; [ApiController] [Route("[controller]")] public class DemoController : Controller { [HttpPost("rangedemo")] public IActionResult RangeDemo([FromBody] RangeExampleModel body) => !ModelState.IsValid ? BadRequest(ModelState) : Ok(body); [HttpPost("lengthdemo")] public IActionResult LengthDemo([FromBody] LengthExampleModel body) => !ModelState.IsValid ? BadRequest(ModelState) : Ok(body); [HttpPost("allowedvaluesdemo")] public IActionResult AllowedValuesDemo([FromBody] AllowedValuesExampleModel body) => !ModelState.IsValid ? BadRequest(ModelState) : Ok(body); [HttpPost("deniedvaluesdemo")] public IActionResult DeniedValuesDemo([FromBody] DeniedValuesExampleModel body) => !ModelState.IsValid ? BadRequest(ModelState) : Ok(body); [HttpPost("base64demo")] public IActionResult Base64Demo([FromBody] Base64ExampleModel body) => !ModelState.IsValid ? BadRequest(ModelState) : Ok(body); } |
Code Listing 67 shows the code to test the various endpoints. The code in the following .http file will all validate successfully. Therefore, if you run the project and call these endpoints, you will receive an Ok result.
Code Listing 67: The .http File
@DataAnnotationsDemo_HostAddress = http://localhost:5053 POST {{DataAnnotationsDemo_HostAddress}}/demo/rangedemo Content-Type: application/json { "threshold": 50 } ### POST {{DataAnnotationsDemo_HostAddress}}/demo/lengthdemo Content-Type: application/json { "testresults": [ 2, 5, 7 ] } ### POST {{DataAnnotationsDemo_HostAddress}}/demo/allowedvaluesdemo Content-Type: application/json { "countryiso": "USA" } ### POST {{DataAnnotationsDemo_HostAddress}}/demo/deniedvaluesdemo Content-Type: application/json { "countryiso": "USA" } ### POST {{DataAnnotationsDemo_HostAddress}}/demo/base64demo Content-Type: application/json { "systeminput": "rtdfghjuytrfvcxs8796" } |
Range attribute with minimum and maximum exclusive
The Range attribute now allows you to set exclusive bounds on the range being validated. From the code in Code Listing 68, you will see that I have a range of 20 to 80 set with the MinimumIsExclusive and MaximumIsExclusive set to true.
What this means is that I do not want to accept 20 as the lower value in the range, and I do not want to accept 80 as my upper value. The valid values are, therefore, any values between 20 and 80, excluding 20 and 80.
This is why { "threshold": 50 } will validate, while { "threshold": 20 } and any value lower, as well as { "threshold": 80 } and any value higher, will fail validation.
If you wanted to include 20 but exclude 80, you would set MinimumIsExclusive = false while keeping MaximumIsExclusive unchanged.
Code Listing 68: Range Attribute with Minimum and Maximum Validation
using System.ComponentModel.DataAnnotations; namespace DataAnnotationsDemo.Models; public class RangeExampleModel { [Range(20, 80, MinimumIsExclusive = true, MaximumIsExclusive = true)] public int Threshold { get; set; } } |
Simple and effective. I’m not sure how much mileage this attribute will get, but it is nice to have the option to include or exclude the lower or upper bounds of the range values.
Length attribute
Keeping in the same vein when it comes to validation attributes, we now have a Length attribute, as seen in Code Listing 69.
Code Listing 69: Length Validation Attribute
using System.ComponentModel.DataAnnotations; namespace DataAnnotationsDemo.Models; public class LengthExampleModel { [Length(1, 3)] public ICollection<int> TestResults { get; set; } = Array.Empty<int>(); } |
Here I want to validate the length of my collection of test results. I no longer need to chain MinLength and MaxLength, for example [MinLength(1), MaxLength(3)], to make this work. I can now simply state [Length(1, 3)] and be done with it. Also note that the parameters for the Length(a, b) attribute are always inclusive.
AllowedValues attribute
As seen in Code Listing 70, you’ve guessed it, we have the AllowedValues attribute. This allows you to be explicit with which values you will allow.
Code Listing 70: Allowed Values Attribute
using System.ComponentModel.DataAnnotations; namespace DataAnnotationsDemo.Models; public class AllowedValuesExampleModel { [AllowedValues("USA", "GBR", "ZAF")] public string CountryISO { get; set; } = string.Empty; } |
This means that the API will only accept the following values:
- { "countryiso": "USA" }
- { "countryiso": "GBR" }
- { "countryiso": "ZAF" }
Anything else will fail validation, for example, passing ZAR instead of ZAF. ZAR is the currency code for South Africa, while ZAF is the ISO country code.
DeniedValues attribute
Going hand-in-hand with AllowedValues is the DeniedValues attribute. As seen in Code Listing 71, you can be just as explicit with values that you do not want to allow.
Code Listing 71: Denied Values Attribute
using System.ComponentModel.DataAnnotations; namespace DataAnnotationsDemo.Models; public class DeniedValuesExampleModel { [DeniedValues("US", "ZAR")] public string CountryISO { get; set; } = string.Empty; } |
This is very handy for a variety of applications. In this example, only, { "countryiso": "US" } and { "countryiso": "ZAR" } will fail validation. Everything else is permitted.
Base64String attribute
The last validation attribute is the Base64String attribute. This validates that the string passed is a valid Base64 representation.
Code Listing 72: Base64 String Validation Attribute
using System.ComponentModel.DataAnnotations; namespace DataAnnotationsDemo.Models; public class Base64ExampleModel { [Base64String] public string SystemInput { get; set; } = string.Empty; } |
A point to note here is that this does not determine that a string is a valid Base64 string that can be decoded into something. In other words, if we decode SGVsbG8gd29ybGQ=, we will get Hello world. If, however, if we try to decode rtdfghjuytrfvcxs8796, it will decode to gibberish.
All that the Base64String attribute does is check that the string contains valid Base64 characters (A-Z, a-z, 0-9, +,/,=).
In conclusion
.NET 8 brings with it so many new features and enhancements, it’s difficult to collect them all in a single book. We haven’t even started looking in depth at the performance improvements in .NET 8. That alone is significant.
If you want to read more about the topic of performance, have a look at this article by Stephen Toub.
With the advent of AI and the expectation of AGI soon afterwards, you might be wondering if your profession is in danger. I take solace in the fact that AI currently needs specific instructions in order to deliver the best results.
As developers, we all know that walking on water and developing an application perfectly from a customer’s specification is possible if both are frozen. While this might be true for now, with AI serving as a supplementary assistant to humans, this dynamic may soon change.
We need to remember that AI is but a machine capable of extrapolating the most likely answer based on terabytes of data collected (or gorged on, if you like) during its training. LLMs drive artificial intelligence, and companies spend eye-watering amounts of money on training and running the hardware needed to make these machines work. But the human mind, which is capable of feelings, emotions, and opinions, derives answers to problems elegantly with relatively little information.
Now, I am not a doomsayer at all. I, too, have used and continue to use AI in my daily life. I also have a Copilot subscription, but I was surprised when I watched the recent interview between Microsoft’s Satya Nadella and Joanna Stern for The Wall Street Journal. Satya Nadella mentioned Copilot+ PCs. These PCs will contain NPUs that will drive AI features on device.
These Copilot+ PCs will have a feature called Recall that will allow users to search over their entire history. It will do this by continually taking screenshots of your desktop and then using generative AI and the NPU to process this data and make it searchable right on your device.
Note: Recall can be restricted from specific websites or apps and always lives on your machine locally. Therefore, the promise is that it can be trusted. Whether this trust will materialize with consumers is a different story altogether.
Artificial intelligence, warts and all, can also significantly benefit humanity. DeepMind AI set out to solve an impossible problem in biology, the protein problem. 3D mapping of a single protein, the building blocks of life, could take years to complete. What DeepMind did was create an AI that could solve the protein problem in a fraction of the time.
They then set it loose on the 200 million proteins that are known to science. Using traditional methods, according to DeepMind CEO Demis Hassabis, this would have taken a billion years to solve. DeepMind took only a year, after which they made their protein database public as a gift to humanity.
While we need to resign ourselves to the fact that AI is here to stay, we as a species have something that no machine will ever have. That is the thirst for, and attainment of, knowledge. The very fact that you are reading this book is a testament to that pursuit of knowledge, driven by an innate desire to learn.
While it is true that AI may assist us, challenge our beliefs, and even change how we as humans live and work, it will never and should never replace our quest for knowledge. As I write these final lines, I am encouraged that our journey of learning is far from over: there will be a .NET 9, and a .NET 10, and so on.
Our future is bright—not because of the tools we use or the solutions we create, but because of the minds that wield them. The human spirit’s quest for knowledge is uniquely and profoundly human.
Therefore, dear reader, I thank you for reading this book and allowing me to learn alongside you.
- 1800+ high-performance UI components.
- Includes popular controls such as Grid, Chart, Scheduler, and more.
- 24x5 unlimited support by developers.