
.NET 8 and C# 12 Succinctly®

CHAPTER 1
Introducing .NET 8
Microsoft began working on .NET in 1998, and it has since evolved into a tour de force among developers worldwide. From its birth in 2002, .NET has advanced to keep up with the changing demands of the IT landscape, much like biological species evolve to adapt to their surroundings. Introduced as the .NET Framework, it offered a rich set of libraries and tools, becoming popular with an army of software developers globally.
In 2016, entering the .NET Core years, Microsoft announced the open-source, cross-platform implementation of the .NET Framework, refactored and renamed .NET Core. For us old enough to remember the first incarnations of the .NET Framework, the idea of .NET Core seemed almost magical. Enabling developers to build and run apps on Windows, macOS, and Linux, .NET Core quickly gained adoption in the industry.

Figure 1: The Jump in Versions
Microsoft finally unified the .NET ecosystem with the release of .NET 5 in 2020. Looking at Figure 1, you will notice that there seems to be a jump between .NET Core 3.1 and .NET 5. Version 4 was skipped to avoid confusion with the .NET Framework versions. Microsoft touted .NET 5.0 as a single, unified platform that would replace .NET Core, Xamarin, and the .NET Framework.
.NET Core 1.0 was released in 2016 and heralded the start of what we know today as .NET 8. Before this release, developers were accustomed to the .NET Framework, released in the early 2000s. It was closed-source and only ran on Windows. .NET Core was the first .NET version to run across platforms and is an open-source project.
.NET Core saw many releases between 2016 and 2018, culminating in the release of .NET Core 3.1 in 2019. .NET Core 3.1 was a long-term support version, with support for it ending in December 2022.
Many companies developed software on .NET Core 3.1 due to its long-term support status. It was, therefore, a very popular version of .NET Core. Then, in 2020, Microsoft surprised us all with the release of .NET 5.0. Support for .NET 5.0 ended in May 2022.
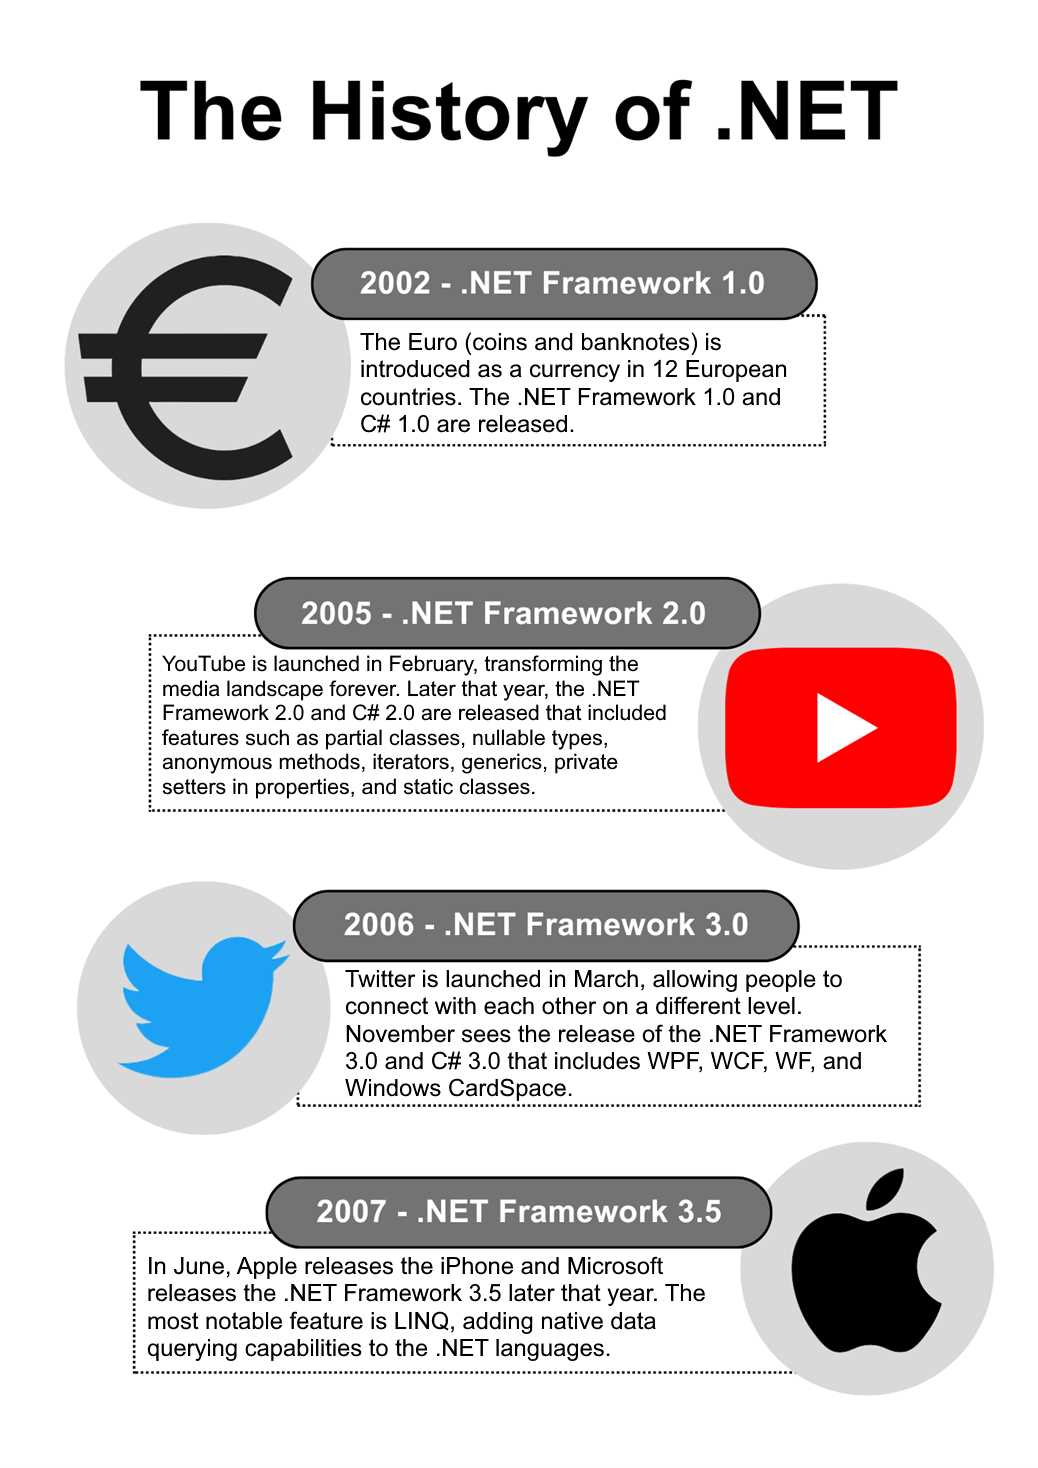
Figure 2: .NET 2002 to 2007
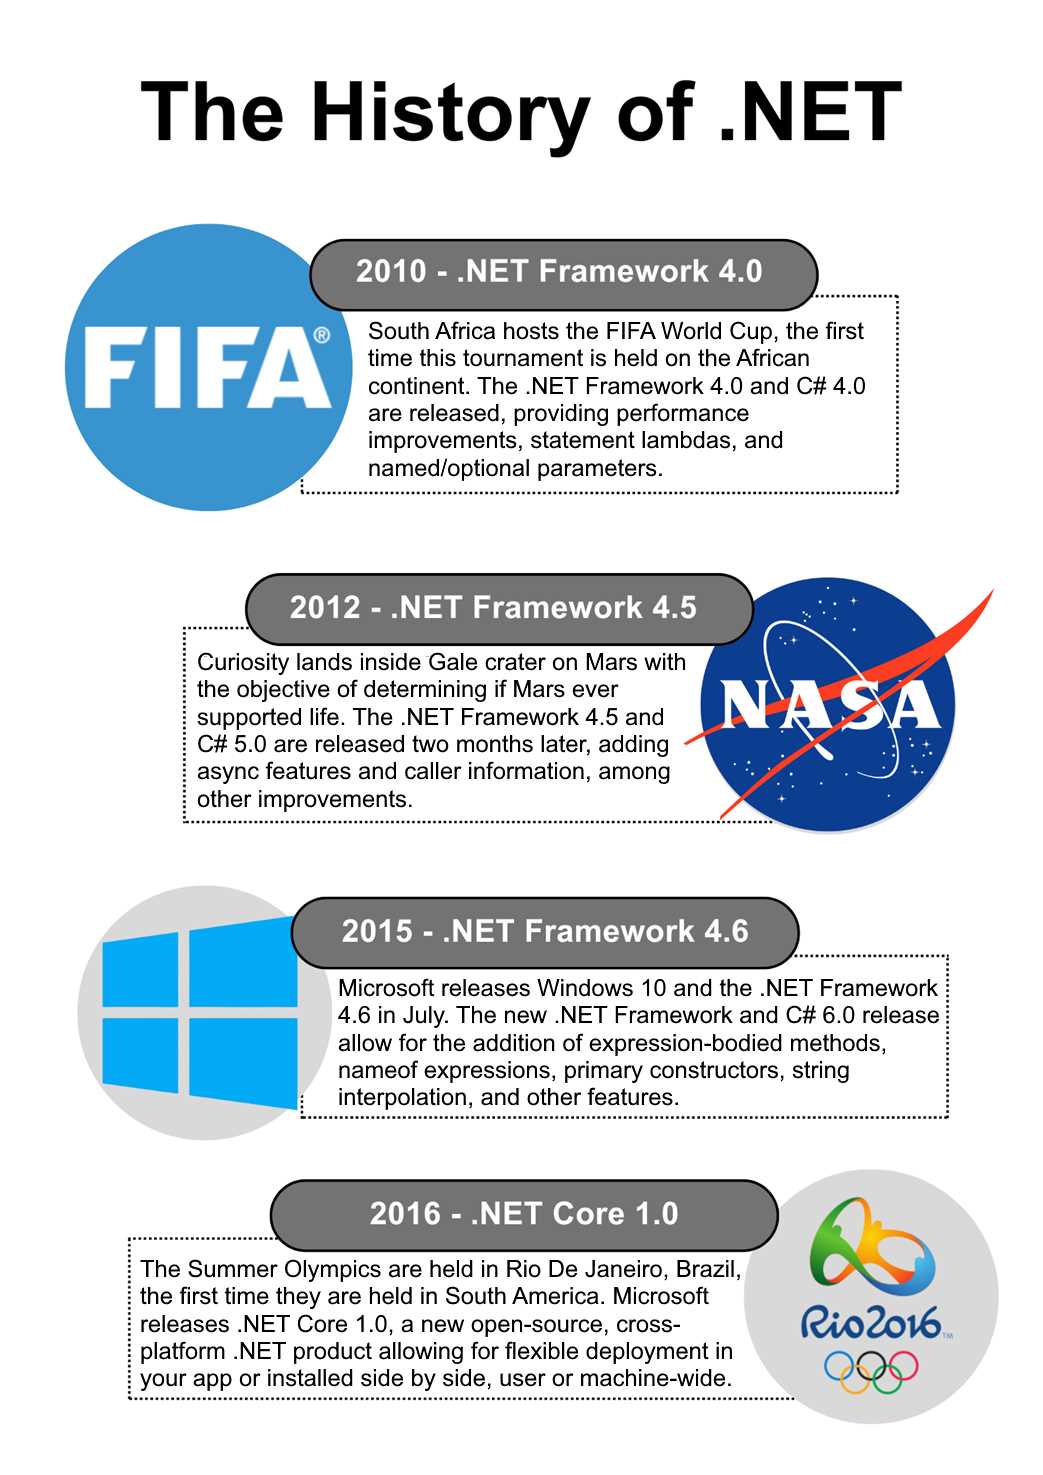
Figure 3: .NET 2010 to 2016
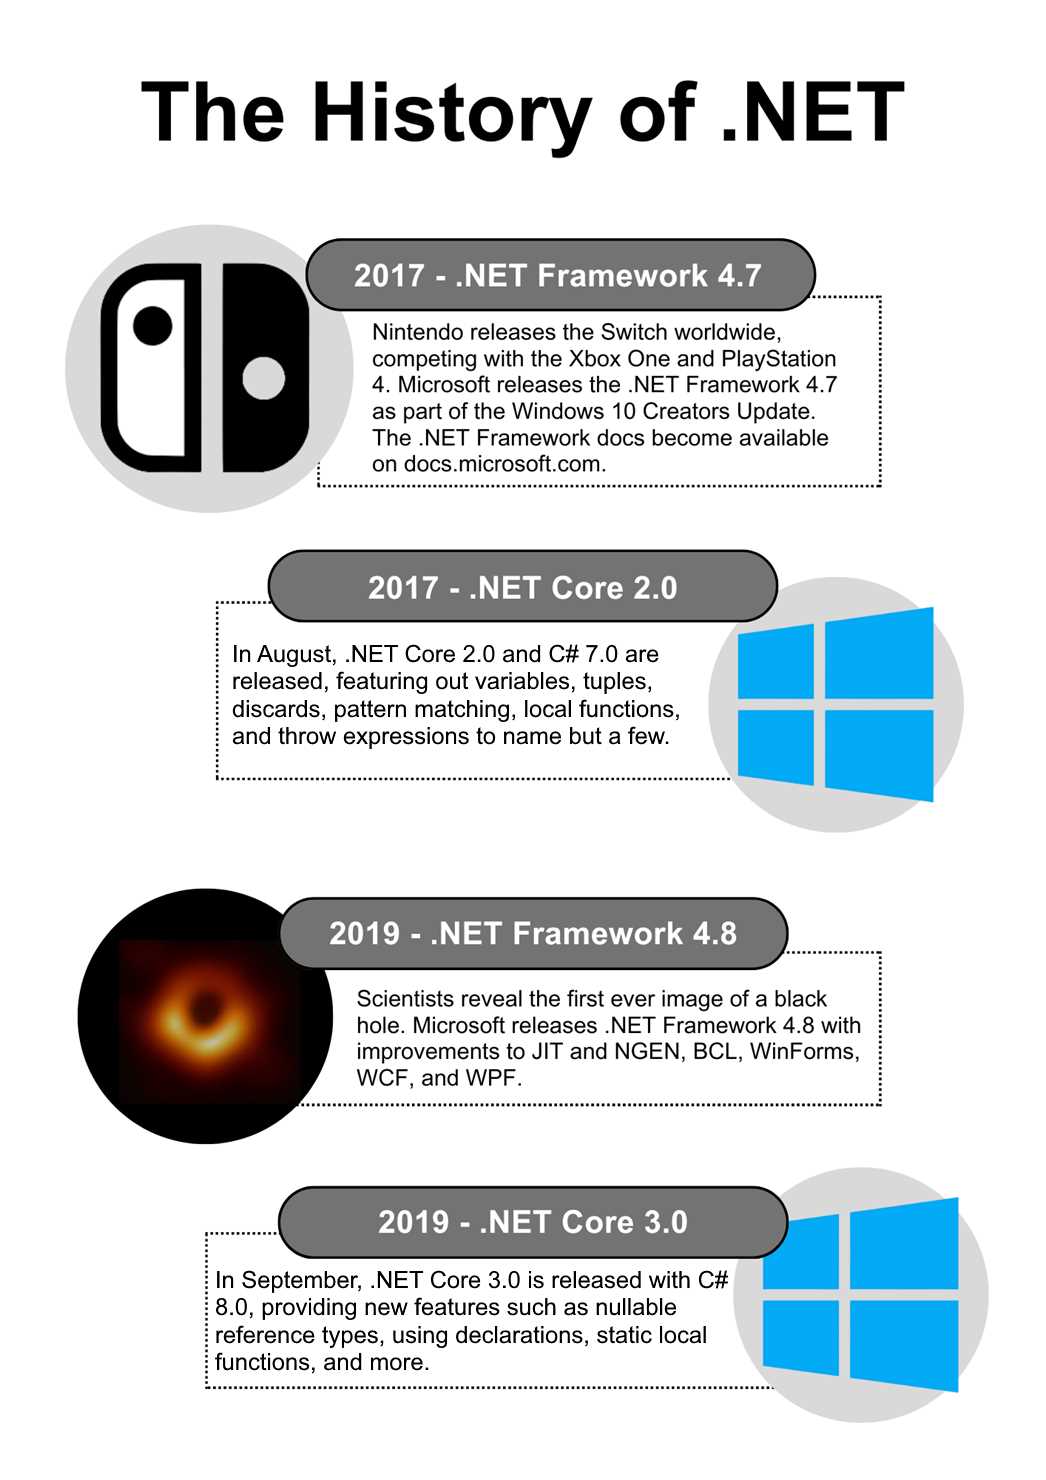
Figure 4: .NET 2017 to 2019
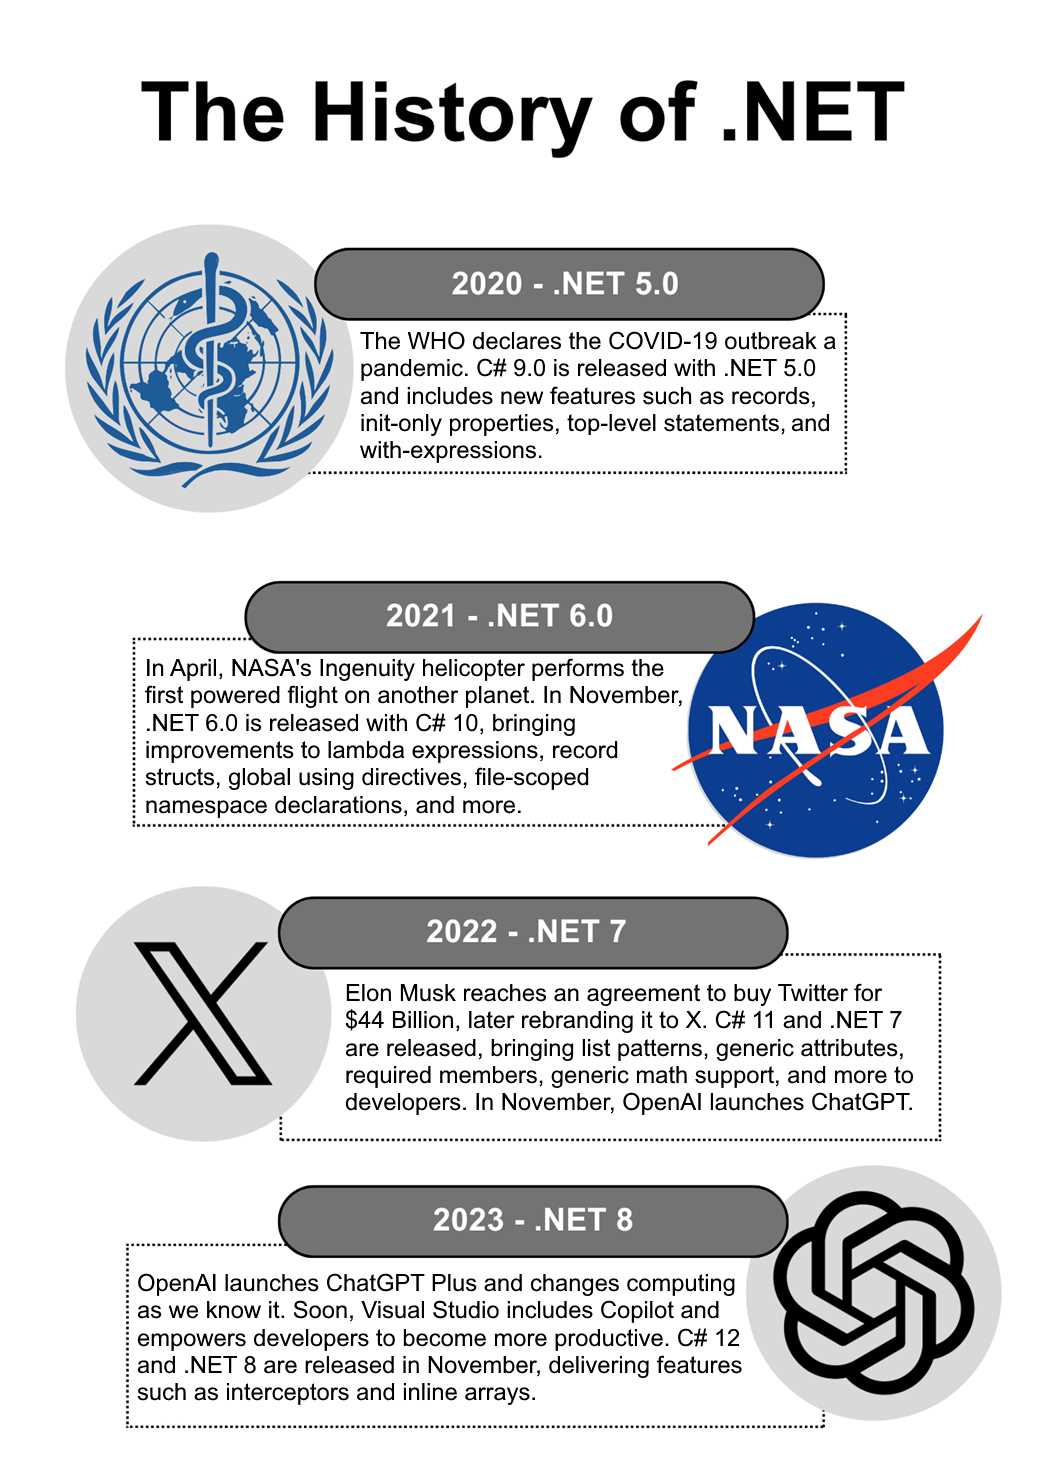
Figure 5: .NET 2020 to 2023
In November 2021, Microsoft released .NET 6.0, with long-term support until December 2024. This introduced a host of new features and realized the unification of the various .NET platforms into a single .NET version.
The standard term support release of .NET 7.0 in November 2022 brought us closer to where we are today: with a unified .NET that supports cross-platform application development. It allows developers to create a host of different applications, from desktop apps to cloud apps, web applications, Unity games, mobile applications, and AI apps. With the release of MAUI, we can create cross-platform, native UI applications. The unification of .NET means that we now have a single BCL (or base class library) and SDK.
With the release of .NET 8 in November 2023, we now have a long-term support version of .NET until November 2026. For companies that never upgraded their software to .NET 7, take note that the end of support for .NET 6 was November 2024. If your company implements stringent change control processes, it would be prudent to start planning the implementation of .NET 8 across your applications early.
Let’s have a look at the support windows for .NET next.
The support window
By now, most of your applications should be on .NET 6. However, I have come across a few applications myself that are still stuck on .NET Core 3.1—most notably, an institution in Johannesburg that is currently running their software, used to manage the compliance of financial professionals across South Africa, on .NET Core 3.1.
I use the word “stuck” carefully here. It’s not that the company that developed the software has neglected to upgrade the version of .NET—the issue is that the company using the software refuses to incur additional cost to have the .NET version upgraded.
Note: You will incur some cost by upgrading your .NET version, since the software needs to be tested thoroughly after an upgrade to ensure the stability of the codebase.
If you are on the fence, however, see when your implemented .NET version support ends.
Table 1: Release and End-of-Support Dates
Version | Original Release | Release Type | End of Support |
|---|---|---|---|
.NET 8 | Nov. 14, 2023 | LTS | Nov. 10, 2026 |
.NET 7 | Nov. 8, 2022 | STS | May 14, 2024 |
.NET 6 | Nov. 8, 2021 | LTS | Nov. 12, 2024 |
By looking at Table 1, you can determine when support for the version of .NET implemented by your software ends. If your software does not implement at least .NET 6, then you need to upgrade your software.
Table 2 outlines the version of .NET or .NET Core and when support ended.
Table 2: Out of Support Versions
Version | Original Release | End of Support |
.NET 5 | Nov. 10, 2020 | May 10, 2022 |
.NET Core 3.1 | Dec. 3, 2019 | Dec. 13, 2022 |
.NET Core 3.0 | Sept. 23, 2019 | Mar. 3, 2020 |
.NET Core 2.2 | Dec. 4, 2018 | Dec. 23, 2019 |
.NET Core 2.1 | May 30, 2018 | Aug. 21, 2021 |
.NET Core 2.0 | Aug. 14, 2017 | Oct. 1, 2018 |
.NET Core 1.1 | Nov. 16, 2016 | June 27, 2019 |
.NET Core 1.0 | June 27, 2016 | June 27, 2019 |
When we talk about long-term support (LTS) and standard-term support (STS), we are referring to two very distinct release cadences. The cadences are defined as follows:
- Long-term support: Supported for three years after initial release.
- Standard-term support: Supported for 18 months after initial release.
You will notice that odd-numbered releases are STS releases, and even-numbered releases are LTS releases. Therefore, you can also say that:

Figure 6: Cheeky Bit of Code
In all seriousness, the release cadence enables developers and businesses to plan ahead when it comes to their development roadmaps. To qualify for support, you need to install the latest patch update. This means that if you are running .NET 6, you must ensure that .NET 6.0.x is installed as a first step.
It is worth noting the following servicing policies, which are the same for LTS and STS releases.
Preview
Preview releases are usually offered to developers for testing. This is done ahead of the final release, but they are not supported by Microsoft.
Go-live
These releases are supported by Microsoft in production. Go-live releases are release candidate builds and are usually released just before the generally available (GA) releases.
Active support
During this support period, updates are provided to improve functionality and mitigate any security vulnerabilities. When it comes to functional improvements, these could typically include fixes to resolve reported crashes, performance issues, bugs, and adding support for new hardware platforms or operating system versions.
Maintenance support
At this stage, .NET releases are only updated to mitigate security vulnerabilities. The last six months of any release (LTS and STS) are considered the maintenance support period. Once the maintenance support period is over, the release is considered out of support.
End of life
When a release reaches end of life, Microsoft no longer provides fixes or updates for the release. If you use .NET versions that have reached end of life, your software and your data are at risk.
What’s changed in .NET 8
.NET 8 will be supported for three years due to its long-term support release.
Note: You can download .NET 8 here.
This makes it worth your while to upgrade now. If you need a little more convincing, consider the following changes and improvements.
The .NET runtime
There have been many improvements made to performance (reminiscent of the .NET 7 release), garbage collection, and the core and extension libraries. I want to highlight just a few of them.
Garbage collection
The .NET 8 release includes the capability to adjust the memory limit on the fly. In cloud-service scenarios, demand can sometimes increase suddenly and then drop back down again. The cost effectiveness of these services is measured in how well they can scale up and down the resource consumption to meet the fluctuations on demand.
I would argue that scaling down is as important as scaling up as demand fluctuates. This means that when a decrease in demand is detected, a resource can scale down its consumption by reducing its memory limit.
Before .NET 8, however, this scaling down would fail because the garbage collector was not aware of any changes and might allocate more memory than the new limit. By calling GC.RefreshMemoryLimit(), you can update the garbage collection to the new limit.
There are, however, some limitations of which to take note:
- On 32-bit platforms, a new heap hard limit can’t be established by .NET if there isn’t already one.
- The GC.RefreshMemoryLimit() call might fail and return a non-zero status code. This happens because the scale-down is considered too aggressive and does not leave enough memory for the garbage collection to work with. In this case, calling GC.Collect(2, GCCollectionMode.Aggressive) might solve the issue by shrinking the current memory usage, allowing you to call GC.RefreshMemoryLimit() again.
- Scaling up the memory limit beyond what the garbage collector believes the startup process can handle allows the GC.RefreshMemoryLimit() to succeed, but it will not use more memory than what the garbage collector perceives as the limit.
The following code in Code Listing 1 illustrates setting the heap hard limit to 100 MiB (mebibytes).
Code Listing 1: Setting the Heap Hard Limit
internal class Program { static void Main(string[] args) { AppContext.SetData("GCHeapHardLimit", (ulong)100 * 1024 * 1024); GC.RefreshMemoryLimit(); } } |
If this hard limit is invalid, the GC.RefreshMemoryLimit() will throw an InvalidOperationException. An invalid hard limit can be, for example, when the hard limit that will be set by the refresh is lower than what’s already committed.
Core .NET libraries
There are many improvements and additions in the core .NET libraries. Some of these improvements were made to the following features.
Serialization
A few serialization and deserialization improvements have been made to System.Text.Json in .NET 8. I will not discuss all of them, but here are some of the more interesting improvements and additions.
Handling missing members
One of the features that I am quite excited about is the ability to handle missing members during deserialization.
Usually, if you receive a JSON payload, you deserialize this into a POCO (plain old CLR object). If your JSON payload contains properties that are missing in your POCO when you deserialize the JSON, they are just ignored.
.NET 8 allows you to specify that all members must exist in the payload; otherwise, a JsonException will be thrown. Consider Code Listing 2.
Code Listing 2: Deserializing POCO with Missing Property
|
{ static void Main(string[] args) { var pers = JsonSerializer.Deserialize<Person>("""{"Name": "John" ,"Age": 44, "YearOfBirth" : 1980 }"""); Console.WriteLine(pers?.Name); Console.ReadLine(); } } public class Person { public string Name { get; set; } public int Age { get; set; } } |
Here, we are deserializing a JSON payload that includes a value for YearOfBirth that the Person POCO does not contain.

Figure 7: Deserialization Results of Person
After deserialization, we can see that the Person class only contains values for Age and Name, because these are the only properties it contained. But our payload contained an additional value for YearOfBirth, which was just ignored.
Now consider Code Listing 3.
Code Listing 3: Annotating the POCO
internal class Program { static void Main(string[] args) { try { var pers = JsonSerializer.Deserialize<Person>("""{"Name": "John" ,"Age": 30, "YearOfBirth" : 1980 }"""); Console.WriteLine(pers?.Name); } catch (JsonException ex) { Console.WriteLine(ex.Message); } Console.ReadLine(); } } [JsonUnmappedMemberHandling(JsonUnmappedMemberHandling.Disallow)] public class Person { public string Name { get; set; } public int Age { get; set; } } |
Notice that I have added the JsonUnmappedMemberHandling attribute and specified that it should be disallowed.

Figure 8: JsonUnmappedMemberHandling Result
If we run the CodeSamples console application a second time, the JsonException will be thrown and handled by the try catch, as seen in Code Listing 3.
The other option is to set the attribute to JsonUnmappedMemberHandling.Skip, but this is the default behavior anyway, so it wouldn’t make much sense to add it (unless you want to be explicit in your code).
Naming policies
I don’t think I can love a feature more than I love this feature: new naming policies for the JsonNamingPolicy class. These are (I kid you not) snake_case and kebab-case property name conversions. Consider the code in Code Listing 4.
Code Listing 4: JSON Naming Policies
|
{ static void Main(string[] args) { Student student = new() { Name = "Wile E. Coyote", Age = 74, SchoolName = "Acme Code School", SchoolAddress = "1234 Desert Road, Arizona" }; var options = new JsonSerializerOptions { PropertyNamingPolicy = JsonNamingPolicy.KebabCaseLower, }; string json = JsonSerializer.Serialize(student, options); } } public class Student : Person { public required string SchoolName { get; set; } public required string SchoolAddress { get; set; } } [JsonUnmappedMemberHandling(JsonUnmappedMemberHandling.Disallow)] public class Person { public string Name { get; set; } public int Age { get; set; } } |
You will notice that we specify KebabCaseLower in the JsonSerializerOptions. Running the code and inspecting the resultant JSON, you will see that SchoolName and SchoolAddress have been kebab-cased, as seen in Figure 9.

Figure 9: Kebab Case
Go ahead and change the JsonNamingPolicy from KebabCaseLower to SnakeCaseLower and run the code again.
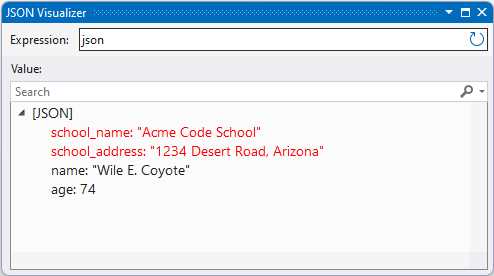
Figure 10: Snake Case
You will see that snake casing has been applied to SchoolName and SchoolAddress. The following naming policies are available for the JsonNamingPolicy class:
- CamelCase
- KebabCaseLower
- KebabCaseUpper
- SnakeCaseLower
- SnakeCaseUpper
I love the flexibility that this offers developers when deciding on a JSON naming policy.
Read-only properties
Deserializing into read-only properties is now possible. Consider the code in Code Listing 5. I have a StockItem class with a read-only property for Pricing. The property defaults to 15 percent and a Quantity of 1.
Code Listing 5: Deserializing into Read-Only Properties in .NET 7
internal class Program { static void Main(string[] args) { StockItem? stockItem = JsonSerializer.Deserialize<StockItem>(""" {"StockCode": "1234", "Pricing":{"MarkupPercentage": 17, "Quantity": 7} } """); var json = JsonSerializer.Serialize(stockItem); } } public class StockItem { public required string StockCode { get; set; }
public PricingData Pricing { get; } = new() { MarkupPercentage = 15, Quantity = 1 }; } public class PricingData { public required int MarkupPercentage { get; set; } public required int Quantity { get; set; } } |
Running the code using .NET 7, the JSON payload deserialized into the StockItem class specifies a MarkupPercentage of 17 percent and a Quantity of 7.

Figure 11: Results from Setting Read-Only Properties in .NET 7
Looking at the results in Figure 11, you will notice that the deserialized JSON produces a StockItem object that ignored the 17 percent and Quantity of 7 set in the JSON. In .NET 8, however, we can tell it to populate the read-only property MarkupPercentage by setting the JsonObjectCreationHandling attribute to Populate, as seen in Code Listing 6.
Code Listing 6: Modifying the StockItem Class
[JsonObjectCreationHandling(JsonObjectCreationHandling.Populate)] public class StockItem { public required string StockCode { get; set; }
public PricingData Pricing { get; } = new() { MarkupPercentage = 15, Quantity = 1 }; } |
Go ahead and run the code again and take a look at the stockItem variable, as seen in Figure 12.

Figure 12: The Read-Only Properties Have Been Set
Looking at the variable, you will notice that the MarkupPercentage and Quantity values have been set to what was contained in the JSON payload. I have to admit that I am not sure whether I like this behavior.
You can read more about populating initialized properties here.
Time abstraction
With .NET 8, we get a new time provider class, System.TimeProvider, and an ITimer interface, System.Threading.ITimer. Let’s see how to use them and how to test time-dependent code. I have a service called TaskRunnerService that simply returns the duration of the elapsed time, as seen in Code Listing 7.
Code Listing 7: The TaskRunnerService Class
public class TaskRunnerService { private readonly TimeProvider _timeProvider; public TaskRunnerService(TimeProvider timeProvider) => _timeProvider = timeProvider; public TimeSpan MorningTaskRunner() { var startTime = _timeProvider.GetTimestamp(); Task.Delay(5000).Wait(); var endTime = _timeProvider.GetTimestamp(); var duration = _timeProvider.GetElapsedTime(startTime, endTime);
return duration; } } |
Next, I have a service called TimeService that checks to see if the current time is in the morning, as seen in Code Listing 8.
Code Listing 8: The TimeService Class
public class TimeService { private readonly TimeProvider _timeProvider; public TimeService(TimeProvider timeProvider) => _timeProvider = timeProvider; public bool RunMorningTasks() { var currentTime = _timeProvider.GetLocalNow(); return currentTime.Hour <= 11; } } |
I then created an API that checks if the current time is in the morning, and if so, it runs the TaskRunnerService. To use these services, I need to add them to the Program class of the API, as seen in Code Listing 9. I also want to use the new TimeProvider class, so I need to add this service, too.
Code Listing 9: The Program Class
|
{ public static void Main(string[] args) { var builder = WebApplication.CreateBuilder(args); // Add services to the container. builder.Services.AddSingleton(TimeProvider.System); builder.Services.AddSingleton<TimeService>(); builder.Services.AddSingleton<TaskRunnerService>(); builder.Services.AddControllers(); builder.Services.AddEndpointsApiExplorer(); builder.Services.AddSwaggerGen(); var app = builder.Build(); // Configure the HTTP request pipeline. if (app.Environment.IsDevelopment()) { app.UseSwagger(); app.UseSwaggerUI(); } app.UseHttpsRedirection(); app.UseAuthorization(); app.MapControllers(); app.Run(); } } |
My TimeController contains the GET endpoint RunMorningTasks that does all the work. You will see this code in Code Listing 10. First, the API checks to see if it is morning, and if so, runs the TaskRunnerService.
Code Listing 10: The RunMorningTasks API
[ApiController] [Route("api/[action]")] public class TimeController : Controller { private readonly TimeService _timeService; private readonly TaskRunnerService _taskRunnerService; public TimeController(TimeService timeService, TaskRunnerService taskRunnerService) { _timeService = timeService; _taskRunnerService = taskRunnerService; } [HttpGet] [ActionName("RunMorningTasks")] public IActionResult Get() { var isMorning = _timeService.RunMorningTasks(); if(isMorning) { var duration = _taskRunnerService.MorningTaskRunner(); return Ok($"Ran morning tasks - duration {duration}"); }
return Ok("Morning tasks not scheduled to run"); } } |
Looking back to the code for the TaskRunnerService in Code Listing 7, you will notice that I use the new TimeProvider class to get the duration of the running task.
Note: Imagine replacing Task.Delay(5000).Wait() in Code Listing 7 with a long-running task.
The TaskRunnerService uses GetTimeStamp, provided by the TimeProvider, to give you a system-based, high-frequency time stamp designed for small time-interval measurements with high accuracy.
Using TimeProvider also gives you access to GetElapsedTime, which calculates the difference between the start and end times very precisely in a high-frequency scenario.
The reason for this high level of accuracy is because GetTimeStamp actually works with your machine to return the exact time stamp. This is much more accurate than what the DateTime class can provide.
Calling the API, as seen in Figure 13, will run the TaskRunnerService, because it is still morning where I live.

Figure 13: Calling RunMorningTasks API
Let us think about unit testing our TimeService. The TimeProvider class comes in handy here, too. Consider the unit test seen in Code Listing 11. In it, I am able to override the GetUtcNow method, as well as override the LocalTimeZone property. I kept the overridden GetUtcNow method as is (using UtcNow), but you can supply hard-coded values instead of specifying _utc.Year, _utc.Month, and so on.
What I did do, however, was override the LocalTimeZone property with a new time zone.
Code Listing 11: The TimeProvider Unit Test
namespace CodeTests { [TestClass] public class TimeServiceTest { public class TimeProviderMorning : TimeProvider { private readonly DateTimeOffset _utc; public TimeProviderMorning() => _utc = DateTimeOffset.UtcNow; public override DateTimeOffset GetUtcNow() => new(_utc.Year, _utc.Month, _utc.Day, _utc.Hour, _utc.Minute, _utc.Second, TimeSpan.Zero); public override TimeZoneInfo LocalTimeZone => TimeZoneInfo.FindSystemTimeZoneById("Pacific Standard Time"); } [TestMethod] public void CanMorningServiceRun() { var timeProviderMorning = new TimeProviderMorning(); var timeService = new TimeService(timeProviderMorning); var canRunMorningTasks = timeService.RunMorningTasks(); Assert.IsTrue(canRunMorningTasks); } } } |
Setting the time zone to PST will return true when running the test, as seen in Figure 14. It is currently very early morning in Los Angeles.

Figure 14: Passing Test with PST
Changing the time zone to CST paints a different picture when it comes to our unit test. Modify the TimeProviderMorning class, as seen in Code Listing 12, by specifying the time zone as China Standard Time.
Code Listing 12: Modified TimeProviderMorning Class
public class TimeProviderMorning : TimeProvider { private readonly DateTimeOffset _utc; public TimeProviderMorning() => _utc = DateTimeOffset.UtcNow; public override DateTimeOffset GetUtcNow() => new(_utc.Year, _utc.Month, _utc.Day, _utc.Hour, _utc.Minute, _utc.Second, TimeSpan.Zero); public override TimeZoneInfo LocalTimeZone => TimeZoneInfo.FindSystemTimeZoneById("China Standard Time"); } |
Running the unit test again results in a failed test, as seen in Figure 15.

Figure 15: Failing Test Results
In fact, if you debug the unit test and placed a break point on the return statement, you will see that the current time is UTC+08:00, which is China Standard Time.

Figure 16: Debugging the RunMorningTasks Method
It’s always a challenge to handle date and time in software development, especially when dealing with multiple time zones. Sprinkle a little bit of daylight savings time in this mix, and you have a tough cookie to chew on.
Using the new TimeProvider class isn’t a magic bullet. It is, however, a welcome new feature to .NET, helping developers deal with time- and date-dependent code, especially when using unit tests.
Randomness
With the release of .NET 8, Microsoft introduced two brand-new methods on the Random class that are extremely fast and memory-efficient. First, let’s have a look at the Shuffle method. As seen in Code Listing 13, we are passing an array of strings to the Shuffle method of the Random class.
Code Listing 13: The Shuffle Method
var cities = new[] { "Raleigh", "Tampa", "Los Angeles", "New York", "Chicago" }; Random.Shared.Shuffle(cities); foreach (var c in cities) { Console.WriteLine(c); } |
As can be expected, this will shuffle the cities in the array and output them in a random order. Taking a peek at the Shuffle method, you will notice the following, as seen in Code Listing 14.
Code Listing 14: Peeking Inside the Shuffle Method
public void Shuffle<T>(T[] values) { ArgumentNullException.ThrowIfNull(values); Shuffle(values.AsSpan()); } public void Shuffle<T>(Span<T> values) { int n = values.Length; for (int i = 0; i < n - 1; i++) { int j = Next(i, n); if (j != i) { T temp = values[i]; values[i] = values[j]; values[j] = temp; } } } |
The Shuffle method accepts an array or a Span. If you pass it an array, it will be changed to a Span anyway, before being shuffled. This makes it extremely efficient, as it performs an in-place shuffle of the respective data structures, instead of returning a new array or Span.
Therefore, keep this in mind if you have created code that shuffles large arrays, as this might give you a performance boost.
The second new method we will look at is the GetItems method. Take a look at the code in Code Listing 15. Here, we are telling .NET to use our cities array and return to us a random array of length 10, containing the city names in our cities array.
Code Listing 15: Using GetItems
var cities = new[] { "Raleigh", "Tampa", "Los Angeles", "New York", "Chicago" }; var generatedCities = Random.Shared.GetItems<string>(cities, 10); foreach (var c in generatedCities) { Console.WriteLine(c); } |
Running the code in Code Listing 15 results in the output seen in Figure 17.
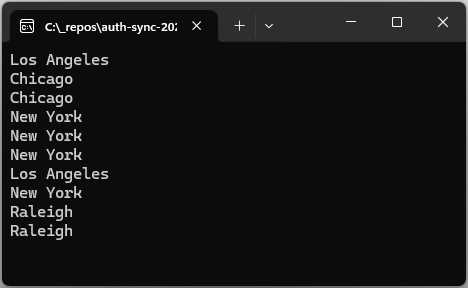
Figure 17: The GetItems Result
The GetItems method does not create any new city names but merely returns to us an array with the names in our cities array.
This feature might not be useful for most applications, but it can be very useful in specialized systems, such as those in machine learning.
Lastly, I want to have a look at the RandomNumberGenerator class. You will notice that this class also gets the Shuffle and GetItems methods and does the same thing as the Random class, but with cryptographically secure randomness.
More interestingly, the RandomNumberGenerator class has two new methods, called GetHexString and GetString, as seen in Code Listing 16.
The GetHexString method will randomly generate a cryptographically secure string of 25 characters in length, which you can use to create unpredictable IDs (for example).
The GetString method accepts a string of characters and a length and returns a cryptographically secure random string of characters (based on the characters you provided as parameter) of the length you specified.
Code Listing 16: The RandomNumberGenerator Class
var hexStr = RandomNumberGenerator.GetHexString(25); // 9CDCD0C99A7E471DE5F4D2E0F var genString = RandomNumberGenerator.GetString("bcdefgBCDEFG0123456789=><!@#$%^*()-+&", 15); // G#7cg-g9g5g=b16 |
A word of caution, though: while this can be very useful in many areas of your code, do not rely solely on this for generating passwords. While the returned random string is generated in a cryptographically secure manner, it is very easy to generate a weak password. This is especially true if the length you provide is small, and the characters you provide do not strike a nice balance among lowercase, uppercase, and special characters.
Performance-focused types
As with .NET 7, Microsoft has focused on performance with the release of .NET 8. There are some nice improvements out of the box, as well as some new types that you can use in your code. A little later on, we will look at benchmarking some of this code. For now, let’s just have a look at the new types.
FrozenSet and FrozenDictionary
In the .NET 8 System.Collections.Frozen namespace, we now have two new collection types: FrozenDictionary<TKey, Tval> and FrozenSet<T>. Once created, you cannot make changes to any keys or values. As you can imagine, this leads to faster read operations using TryGetValue(), for example. With a long-lived service, types like these are really useful because they are populated on first use and persisted for the service duration.
Code Listing 17: Using the FrozenSet
var lst = new List<string> { "John", "Mark", "Jane", "Jeremy", "Daton", "Sally", "Mary" }; var frozenSet = lst.ToFrozenSet(); var willTheRealJeremyPleaseStandup = frozenSet.Contains("Jeremy"); |
Taking a look at the ToFrozenSet method in Code Listing 17, for example, the code is not particularly mind-blowing in and of itself. You will get what you expect here, which is a frozen set containing the names of the people in the list provided.
What I do find interesting is what’s underneath. As mentioned before, this frozen set cannot be modified. You can see this behavior if you look at a subset of the code contained in the FrozenSet class, as seen in Figure 18. The FrozenSet class implements the ISet Interface.

Figure 18: The Unsupported ISet Implementations
The FrozenSet does not, however, support the methods of ISet that mutate data. Because FrozenSet implements the ISet interface, and because ISet defines the number of methods a set should have, the FrozenSet must provide an implementation for all the methods of ISet, even the unsupported methods. Because the FrozenSet is designed to be immutable, it simply throws a NotSupportedException in the implementation.
You can even test this by casting the instance of the FrozenSet to an ISet<string>, as seen in Figure 19, and trying to add some data. Slim Shady will remain seated and hidden, because trying to add to the set throws the exception.

Figure 19: Mutating Will Throw an Exception
You might be wondering why the FrozenSet class even implements ISet if it doesn’t support all the operations of a set. This is because ISet<T> also contains a number of useful methods for querying a set, such as Contains. Therefore, FrozenSet implements ISet so that it can provide implementations for these methods.
The FrozenDictionary works in exactly the same manner, as seen in Code Listing 18.
Code Listing 18: The FrozenDictionary
var dictionary = new Dictionary<string, int> { { "John", 38 }, { "Mark", 42 }, { "Jane", 24 }, }; var frozenDictionary = dictionary.ToFrozenDictionary(); |
This time, the FrozenDictionary implements the IDictionary interface. Similarly, it needs to add the implementations of the interface it implements and does so by throwing a NotSupportedException for all the methods that would mutate the data.
SearchValue<T>
.NET 8 now also includes a new SearchValues<T> type. Methods such as MemoryExtensions.ContainsAny, which checks to see if a value is contained in a collection, have been modified to add new overloads to accept an instance of this new type.
This means that you can now do what you see in Code Listing 19. I have created an instance of SearchValues<char>, but you can also have an instance of SearchValues<byte>.
Code Listing 19: The New SearchValues Type
var strSear = @"<>:""/\|?*"; SearchValues<char> illegalChars = SearchValues.Create(strSear); var fileName = @"Important_|_File.txt"; var illegal = fileName.AsSpan().ContainsAny(illegalChars); // illegal = true |
You might be wondering why this new type matters. Well, as it turns out, when you create an instance of this type, everything that is required to optimize subsequent searches is derived. Having all this work done up front means a performance boost for your code.
In fact, just have a look at the .NET Runtime repo on GitHub and search for the term SearchValue. You will see that Microsoft is using the new SearchValue type quite a bit.

Figure 20: The .NET Runtime Using SearchValues
This means that your code will also get this performance improvement for free, just by upgrading to .NET 8.
Extension libraries
.NET 8 has also given some love to extension libraries. You might have heard about keyed dependency injection (DI), where you use keys to register and read DI services. Secondly, the IHostedLifecycleService has been extended to include additional methods to give you more options for execution. The System.Numerics.Tensors NuGet package has also been updated to include the new TensorPrimitives namespace. This adds support for tensor operations. Tensor primitives optimize data-intensive workloads used in AI and machine learning.
Keyed DI services
As you know, the DI service is a way to register and retrieve services from the dependency injection container. Now, with keyed dependency injection, you can do this using keys. This allows you to register and inject multiple services of the same type using a unique key for each. Some of the new APIs include the following:
- The interface IKeyedServiceProvider.
- The attribute ServiceKeyAttribute, used to inject the key used for registration/resolution in the constructor.
- The attribute FromKeyedServicesAttribute, used to specify which keyed service to use in the service constructor parameter.
- New extension methods for IServiceCollection to support keyed services.
- The ServiceProvider implementation of IKeyedServiceProvider.
The easiest way to illustrate keyed dependency injection is through the use of minimal APIs. I admit that I haven’t found myself gravitating towards using minimal APIs on a regular basis, but for this explanation, they’re perfect.
Note: I have included the minimal API code illustrated here in the project KeyedDemoMinimal, but I have also added this code to an API project called KeyedDemo that uses controllers. You can find all this code in the GitHub repository that comes with this book.
The code in Figure 20 illustrates the use of keyed DI services. It might make a little more sense when viewed in a code editor, as the code is a little bit squished on the page. If you prefer using controllers instead, there is sample code for that, too.
The code contains an interface called IGreeter that is used to provide the contract for two services, FormalGreeterService and InformalGreeterService. I then have two other services, called CustomerService and FriendsService.
Adding the services to the DI container is done in the usual manner for the Customer and FriendsService, but for the FormalGreeterService and InformalGreeterService, I provide each with a key.
These keys allow me to reference each service uniquely and provide API endpoints that make use of the key to provide the appropriate service. You can see this in the api/GreetFriendSpecific and api/GreetCustomerSpecific endpoints.
Code Listing 20: The Keyed DI Minimal API
var builder = WebApplication.CreateBuilder(args); // Add services to the container. builder.Services.AddEndpointsApiExplorer(); builder.Services.AddSwaggerGen(); builder.Services.AddKeyedSingleton<IGreeter, FormalGreeterService>("customers"); builder.Services.AddKeyedSingleton<IGreeter, InformalGreeterService>("friends"); builder.Services.AddSingleton<CustomerService>(); builder.Services.AddSingleton<FriendsService>(); var app = builder.Build(); // Configure the HTTP request pipeline. if (app.Environment.IsDevelopment()) { app.UseSwagger(); app.UseSwaggerUI(); } app.UseHttpsRedirection(); app.MapGet("api/GreetCustomer", (CustomerService customer) => customer.Greet()); app.MapGet("api/GreetFriend", (FriendsService friend) => friend.Greet()); app.MapGet("api/GreetFriendSpecific", ([FromKeyedServices("friends")] IGreeter greet, string friendName) => greet.Greeting($"Hey {friendName}. Nice to see you.")); app.MapGet("api/GreetCustomerSpecific", (HttpContext httpContext, string customerName) => httpContext.RequestServices .GetRequiredKeyedService<IGreeter>("customers") .Greeting($"Good day {customerName}. How many I assist you?")); app.Run(); public class CustomerService([FromKeyedServices("customers")] IGreeter greeter) { public string Greet() => greeter.Greeting("Good day, can I be of service?"); } public class FriendsService(IServiceProvider serviceProvider) { public string Greet() => serviceProvider.GetRequiredKeyedService<IGreeter>("friends").Greeting("Hello buddy!"); } public interface IGreeter { string Greeting(string message); } public class FormalGreeterService : IGreeter { public string Greeting(string message) => $"Formal greeting: {message}"; } public class InformalGreeterService : IGreeter { public string Greeting(string message) => $"Informal greeting: {message}"; } |
But hold on a minute—didn’t I say that keyed DI allows you to register and inject multiple services of the same type using a unique key for each? Well, yes, I did, and you can do this by adding the keyed services seen in Code Listing 21 to your DI container.
Code Listing 21: Adding Keyed Services of the Same Type
builder.Services.AddKeyedSingleton<IGreeter, FormalGreeterService>("ceo"); builder.Services.AddKeyedSingleton<IGreeter, FormalGreeterService>("cto"); |
I am giving the service a different key: one for CEO, and one for CTO. Now I can go ahead and add the following API endpoints, as illustrated in Code Listing 22.
Code Listing 22: API Endpoints
app.MapGet("api/GreetCEO", ([FromKeyedServices("ceo")] IGreeter greet) => greet.Greeting($"Good day Mr CEO. How many I assist you?")); app.MapGet("api/GreetCTO", ([FromKeyedServices("cto")] IGreeter greet) => greet.Greeting($"Good day Mr CTO. How many I assist you?")); |
I can now call the services by using their keys. While the implementation of the services does not differ, the idea is that you can register the exact same service with different keys and still have valid code.
Options validation
Validating your application settings is a very useful feature in .NET. In fact, being able to check that settings are within specific ranges, of a specific value or enum, allows for explicit control over the settings that your application needs to perform optimally. Before .NET 8, this options validation used reflection. This kind of reflection on application startup will generally cause your application to start slower.
With the release of .NET 8, Microsoft gave us a brand-new source generator that will generate code upfront to perform this validation.
Note: While the validation code is generated at compile time, it is worth noting that the actual validation still happens at runtime.
Therefore, instead of using reflection, it uses the generated validation code, which is optimized by Microsoft’s source generators. You can be sure that they spent a lot of time creating generators that will generate the most optimized and high-performance code possible. Let’s have a look at a concrete example of how this would work.
Looking at Code Listing 23, I have an appsettings.json file that has a section called ApiOptions. These are the settings that I want to validate.
Code Listing 23: The appsettings.json File
{ "ApiOptions": { "NotificationType": "Email", "NotificationEmailAddress": "[email protected]", "Attempts": 2 }, "Logging": { "LogLevel": { "Default": "Information", "Microsoft.AspNetCore": "Warning" } }, "AllowedHosts": "*" } |
I then created a class called ApiConfigOptions, which you can see in Code Listing 24. This class contains properties for each setting. You will notice that at the end of the class, I have added another partial class called ApiConfigOptionsValidation, which implements IValidateOptions<ApiConfigOptions> without implementing a Validate method.
Code Listing 24: The Validation Class
using System.ComponentModel.DataAnnotations; using Microsoft.Extensions.Options; namespace OptionsValidatorDemo { enum NotificationType { Email, Sms, Push } public class ApiConfigOptions { public const string SectionName = "ApiOptions"; [EnumDataType(typeof(NotificationType) , ErrorMessage = "Invalid notification type defined.")] public required string NotificationType { get; init; } [Required] [RegularExpression(@"^[a-zA-Z0-9._%+-]+@[a-zA-Z0-9.-]+\.[a-zA-Z]{2,}$" , ErrorMessage = "Invalid notification email address defined")] public required string NotificationEmailAddress { get; init; } [Required] [Range(1, 3 , ErrorMessage = "The value for Attempts is outside the valid range.")] public required int Attempts { get; init; } } [OptionsValidator] public partial class ApiConfigOptionsValidator : IValidateOptions<ApiConfigOptions> {
} } |
I didn’t have to implement a Validate method because I decorated the partial class with an [OptionsValidator] attribute. Placing your mouse on the ApiConfigOptionsValidator class and hitting F12 will allow you to navigate to a file called Validators.g.cs, where you can see the generated code. It will not make much sense to illustrate the generated code here in a code block, but I want to highlight some areas of this generated code with some images from the file.

Figure 21: Generated Validation Code Comments
You can see from Figure 21 that Microsoft is explicitly stating that the ValidationContext is used in such a way as to never call reflection. Do yourself a favor and take a look at the generated code. It’s fascinating to see what was generated, and how this changes as you add more properties to the ApiConfigOptions class.
Lastly, we want to validate the settings and call the API endpoint. In the Program.cs file, you can see that I have registered a configuration instance for the ApiConfigOptions class. I have also added the IValidateOptions service to the DI container as a singleton.
With this in place, I can add the code to access the options object and set it to a variable called settingOptions. It is at this point that your code will execute the generated code to perform options validation.
Code Listing 25: Validating and Calling the API
using Microsoft.Extensions.Options; using OptionsValidatorDemo; var builder = WebApplication.CreateBuilder(args); var cfg = builder.Configuration; // Add services to the container. builder.Services .Configure<ApiConfigOptions>(cfg.GetSection(ApiConfigOptions.SectionName)); builder.Services .AddSingleton<IValidateOptions<ApiConfigOptions>, ApiConfigOptionsValidator>(); builder.Services.AddEndpointsApiExplorer(); builder.Services.AddSwaggerGen(); var app = builder.Build(); // Configure the HTTP request pipeline. if (app.Environment.IsDevelopment()) { app.UseSwagger(); app.UseSwaggerUI(); } app.UseHttpsRedirection(); var settingOptions = app.Services.GetRequiredService<IOptions<ApiConfigOptions>>().Value; app.MapGet("api/sendnotification", () => { var notificationType = settingOptions.NotificationType; return Enum.TryParse<NotificationType>(notificationType, out var type) ? type switch { NotificationType.Email => "Sending email notification", NotificationType.Sms => "Sending sms notification", NotificationType.Push => "Sending push notification", _ => "Invalid notification type", } : "Notification not sent due to undefined notification type"; }) .WithName("SendNotification") .WithDescription("Send notification to the user") .WithOpenApi(); app.Run(); |
If any of the setting values in the appsettings.json file are incorrect according to the constraints set in the validator class, you will see an exception. Compare Code Listing 23 to Code Listing 26. You will notice that I have modified the value for Attempts to a value beyond the allowed range set on the Attempts property in the ApiConfigOptions class.
Code Listing 26: The Modified Settings
{ "ApiOptions": { "NotificationType": "Email", "NotificationEmailAddress": "[email protected]", "Attempts": 20 }, "Logging": { "LogLevel": { "Default": "Information", "Microsoft.AspNetCore": "Warning" } }, "AllowedHosts": "*" } |
Run your API and have a look at the result. The validation kicks in, and the error message informs you that the value specified for this property is not valid.
If, however, you opt to inject your IOptions object on your API endpoints, you will not get an error when the application starts, but rather on the API call. A good suggestion would be to create a health check endpoint to validate your settings.
Code Listing 27 illustrates how you might achieve this. A way to validate your settings is, more often than not, a good idea. This is especially true if you have production code that needs a quick and easy way to check that the basics are still correct after a deployment. Sometimes the fog of war tends to allow mistakes to slip in, and a way to validate that your API is still healthy quickly is to include some sort of check.
Code Listing 27: Adding a Settings Validation Endpoint
using System.Text.Json; using Microsoft.Extensions.Options; using OptionsValidatorDemo; var builder = WebApplication.CreateBuilder(args); var cfg = builder.Configuration; // Add services to the container. builder.Services .Configure<ApiConfigOptions>(cfg.GetSection(ApiConfigOptions.SectionName)); builder.Services .AddSingleton<IValidateOptions<ApiConfigOptions>, ApiConfigOptionsValidator>(); builder.Services.AddEndpointsApiExplorer(); builder.Services.AddSwaggerGen(); var app = builder.Build(); // Configure the HTTP request pipeline. if (app.Environment.IsDevelopment()) { app.UseSwagger(); app.UseSwaggerUI(); } app.UseHttpsRedirection(); app.MapGet("api/sendnotification", (IOptions<ApiConfigOptions> opt) => { var notificationType = opt.Value.NotificationType; return Enum.TryParse<NotificationType>(notificationType, out var type) ? type switch { NotificationType.Email => "Sending email notification", NotificationType.Sms => "Sending sms notification", NotificationType.Push => "Sending push notification", _ => "Invalid notification type", } : "Notification not sent due to undefined notification type"; }) .WithName("SendNotification") .WithDescription("Send notification to the user") .WithOpenApi(); // Validate settings. app.MapGet("api/validatesettings", (IOptions<ApiConfigOptions> opt) => { var options = new JsonSerializerOptions { WriteIndented = true }; try { return JsonSerializer.Serialize(new { status = "OK", settings = opt.Value }, options); } catch (Exception ex) { return JsonSerializer.Serialize(new { status = "ERROR", error = ex.Message }, options); } }) .WithName("ValidateSettings") .WithDescription("Perform a Check On The App Settings") .WithOpenApi(); app.Run(); |
I have digressed a bit on the options validation feature in .NET 8. However you decide to implement options validation, .NET 8 allows your code to do this in a more flexible, manageable, and high-performance manner than the previous reflected code in previous .NET versions.
LoggerMessageAttribute constructors
When it comes to logging, the LoggerMessageAttribute offers additional overloads on its constructor. In previous versions of .NET, you had to take an all-or-nothing approach. Either you had to use the parameterless constructor, or you had to choose to supply all the required parameters for event ID, log level, and message.
Code Listing 28: LoggerMessageAttribute Constructor Overloads
public LoggerMessageAttribute(LogLevel level, string message); public LoggerMessageAttribute(LogLevel level); public LoggerMessageAttribute(string message); |
As seen in Code Listing 28, developers have more options when specifying the required parameters due to these overloads. If you don’t, for example, specify an event ID, one will be automatically generated.
C# 12
Most excitingly of all, C# 12 shipped with .NET 8. The following new features were included in C#12:
- Primary constructors
- Collection expressions
- Ref readonly parameters
- Default lambda parameters
- Alias any type
- Inline arrays
- Experimental attribute
- Interceptors
We will have a closer look at these in the next chapter.
.NET Aspire
You might have heard about .NET Aspire if you watched any of the dotnet conf or Build content online. .NET Aspire is available by including a collection of NuGet packages that handle specific cloud-native concerns. Currently in preview, it is available with .NET 8. Microsoft describes .NET Aspire as an “opinionated” (which makes no sense to me, so I prefer “highly directive”), cloud-ready stack for building observable, production-ready, distributed applications.
Simply put, if you are creating distributed applications, .NET Aspire will solve a lot of your pain points. The main problem with many small distributed applications is that we want to have them all talk to each other, both locally in the dev environment and when we deploy them. This is what .NET Aspire aims to solve.
This book is too short to go into an in-depth explanation of .NET Aspire, which deserves a book on its own. If you want to learn more about .NET Aspire, head over to the .NET Aspire documentation.
In conclusion
This chapter introduced us to some of the goodies in .NET 8, and there is a lot that I have left out. There is ASP.NET Core with improvements to Blazor, SignalR, minimal APIs, Native AOT, Kestrel, authentication, and authorization. There is .NET MAUI, which includes new functionality for controls as well as performance enhancements. EF Core made improvements to complex type objects, collections of primitive types, raw SQL queries, tracked-entity access, and much more. Windows Forms got some love, too, as well as Windows Presentation Foundation, which now has the ability to use hardware acceleration and also has a new OpenFolderDialog control.
Buckle up and hold on to your seat, as this train is just gaining traction. Next up, we will have a look at C# 12 and all the new features introduced.
- 1800+ high-performance UI components.
- Includes popular controls such as Grid, Chart, Scheduler, and more.
- 24x5 unlimited support by developers.