
.NET 7 and C# 11 Succinctly®

CHAPTER 3
ASP.NET Core 7
Chances are, you will work with ASP.NET Core at some point in your career. Whether this is developing a website or an API, ASP.NET Core is at play here. Due to the importance of ASP.NET Core, Microsoft has added a large number of features to the ASP.NET Core platform. Let’s look at some of these through the lens of .NET 7.
How does ASP.NET Core fit into the whole .NET ecosystem?
When we talk about ASP.NET Core, we talk about a methodology. In other words, we are referring to a few things combined. As illustrated in Figure 27, ASP.NET Core comprises a core platform and the specific technology you use for your application.
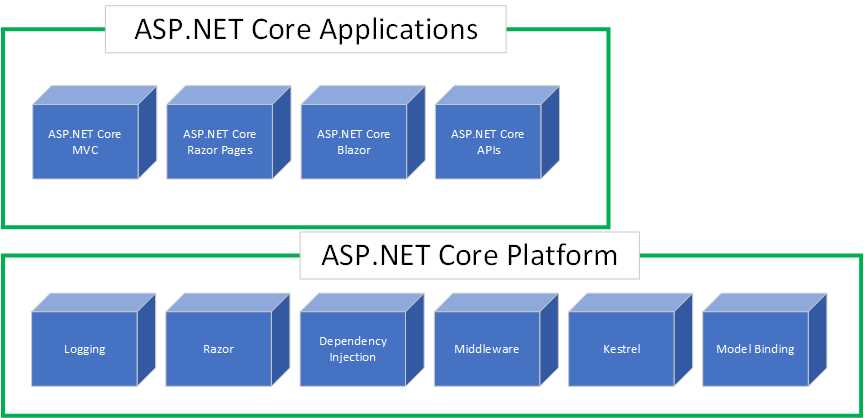
Figure 27: ASP.NET Core
The components in the core platform, such as middleware, logging, Razor pages, etc., make up the building blocks of this shared platform. On top of this core platform sit various frameworks developers can use to create applications.
This, in essence, is what ASP.NET Core looks like. You can’t use one of the application frameworks without one or more core platform components. Of course, the illustration in Figure 27 oversimplifies ASP.NET Core to a large extent. It is just a high-level overview of what ASP.NET Core is.
Let’s have a look at some of the new features of ASP.NET Core 7.
New features in ASP.NET Core 7
In this section, we’ll look at several new features in ASP.NET Core 7 while discussing a few in detail later in the chapter.
HTTP/2 WebSocket support and performance improvements
.NET 7 introduces WebSockets over HTTP/2 support for Blazor WebAssembly, the JavaScript client, and the Kestrel web server. Being able to use WebSockets over HTTP/2 allows developers to take advantage of new features such as:
· Header compression.
· Multiplexing, reducing the time and resources across multiple server requests.
.NET 7 introduced a significant re-architecture of how Kestrel processes HTTP/2 requests. These performance improvements result in ASP.NET Core applications with busy HTTP/2 connections experiencing reduced CPU usage while enjoying a higher throughput.
HTTP/3 improvements
ASP.NET Core brings improvements to HTTP/3, specifically:
· HTTP/3 is no longer experimental and is fully supported in ASP.NET Core.
· Kestrel support for HTTP/3 is improved, including performance and feature parity with HTTP/1.1 and HTTP/2.
· Full support for UseHttps(ListenOptions, X509Certificate2) is provided with HTTP/3.
HTTP/3 support has been added on HTTP.sys and IIS.
Tip: HTTP.sys is an alternative web server to the Kestrel server. It offers some features not available with Kestrel. HTTP.sys is a web server for ASP.NET Core that only runs on Windows.
.NET 7 also reduces HTTP/3 allocations. If you are interested in seeing some of these improvements, log in to GitHub, navigate to https://github.com/dotnet/aspnetcore, and then search the repository issues for the following pull items:
· 42685
· 42708
· 42760
Output caching
Output caching stores responses from your web application and allows ASP.NET Core to serve them from a cache, instead of computing them each time. It differs from response caching in the following ways:
· You can configure the caching behavior on the server.
· You can programmatically invalidate cache entries.
· The risks of cache stampede and thundering herd are mitigated by resource locking.
· The server can return a 304 Not Modified HTTP status instead of a cached response body.
· The cache storage medium is extensible.
Output caching is new middleware in ASP.NET Core 7.
Rate limiting
ASP.NET Core 7 applications can now configure rate-limiting policies and attach those policies to endpoints in your application.
Request decompression
Request decompression is also new middleware in ASP.NET Core 7. It allows API endpoints to accept requests with compressed content. Using the Content-Encoding HTTP header, compressed request content can be automatically identified and decompressed. This means that developers do not need to write custom code to handle compressed requests.
Improvements to hot reload
Hot reload in .NET 6 significantly improved the developer workflow when debugging applications. Referring to the Hot Reload section in this article, in .NET 7, hot reload will be present for Blazor WebAssembly, allowing developers to:
· Add new types.
· Add nested classes.
· Add static and instance methods to existing types.
· Add static fields and methods to existing types.
· Add static lambdas to existing types.
· Add lambdas that capture this to existing methods that already captured this previously.
Rate limiting
There might be situations where applications come under extremely heavy load. This increases the possibility that the application would simply go down because it can’t handle the increased load. The increase in load could be accidental or on purpose. An accidental load increase could result from a faulty script that repeatedly makes requests to an API endpoint. On the other hand, a malicious actor could willfully make multiple requests to your application to bring down the site.
Rate limiting in ASP.NET Core 7 allows developers to mitigate these issues:
· Your application can limit the number of requests in a given time.
· Any requests above the limit will not be handled.
· Developers can specify rate limiting globally or on a per-user basis.
Developers can also create combinations, such as rate limiting the application to a thousand requests per minute, but only a hundred requests per minute, per user.
Rate limiting allows developers to protect the application out of the box without adding any additional services. This prevents accidental or intentional abuse of the web application or API. Rate limiting comes in the form of middleware and works through policies attached to endpoints. This allows developers to specify different policies for different endpoints, which in turn allows the implementation of different limits to each endpoint.
ASP.NET Core 7 comes with several built-in rate limiter types. These are:
· Fixed window limit: For example, 10 requests per minute.
· Sliding window limit: Allowing a certain number of requests per segment of the window.
· Concurrency limit: Specifying how many concurrent requests are allowed.
· Token bucket limit: A more complex version of the sliding window limit that allows bursts of requests.
As mentioned earlier, any requests that exceed your limit will be rejected. It is, however, possible to set up rate limiting to queue some requests that go above the PermitLimit you set by using the QueueLimit option. This, in essence, delays the requests instead of rejecting them immediately.
Using a fixed window limit
Let’s look at a code example implementing rate limiting. For this example, illustrated in Code Listing 41, I have just used the boilerplate code for the Weather Forecast API in Visual Studio. I am not using top-level statements or minimal APIs.
Tip: You can find the full source code for this book on GitHub.
I create a constant string for the rate limit policy name in the Program class. Here, I simply called it fixed.
I then add rate limiting to the services collection by:
· Specifying builder.Services.AddRateLimiter.
· Adding a fixed window limiter, AddFixedWindowLimiter, specifying the policy name.
· Providing options for the Window and PermitLimit options.
In this rate limiter, I will allow only four requests to be made in a time span of 20 seconds.
I then need to enable the rate limiting middleware by adding app.UseRateLimiter(), and l specify that I require rate limiting on my endpoints with app.MapControllers().RequireRateLimiting(FIXED_RATE_LIMIT_POLICY), passing in the name of the policy I want to apply.
I am using MapControllers here, but I could also be more specific if I wanted.
Code Listing 41: Adding a Fixed Window Limiter
public class Program { const string FIXED_RATE_LIMIT_POLICY = "fixed"; public static void Main(string[] args) { var builder = WebApplication.CreateBuilder(args); builder.Services.AddControllers(); builder.Services.AddEndpointsApiExplorer(); builder.Services.AddSwaggerGen(); // Fixed rate limit. builder.Services.AddRateLimiter(_ => _ .AddFixedWindowLimiter(policyName: FIXED_RATE_LIMIT_POLICY, options => { options.PermitLimit = 4; options.Window = TimeSpan.FromSeconds(20); })); var app = builder.Build(); if (app.Environment.IsDevelopment()) { app.UseSwagger(); app.UseSwaggerUI(); } // Enable rate limiting middleware. app.UseRateLimiter(); app.UseHttpsRedirection(); app.UseAuthorization(); app.MapControllers().RequireRateLimiting(FIXED_RATE_LIMIT_POLICY); app.Run(); } } |
Running the application in Swagger, I can execute the GET request for the /WeatherForecast API endpoint, as seen in Figure 28.
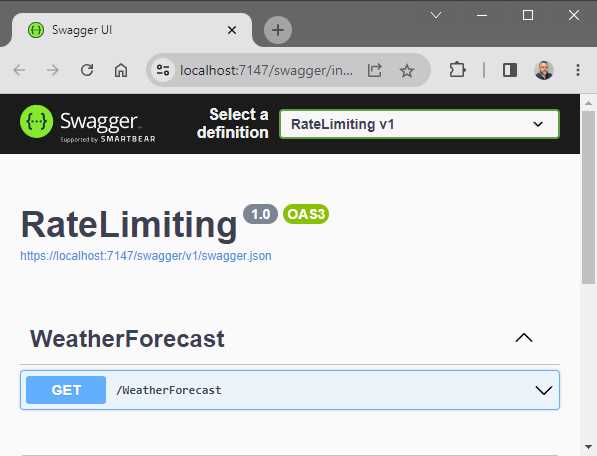
Figure 28: The GET Request in Swagger
When sending a GET request via Swagger to the WeatherForecast API, I receive the response shown in Figure 29.
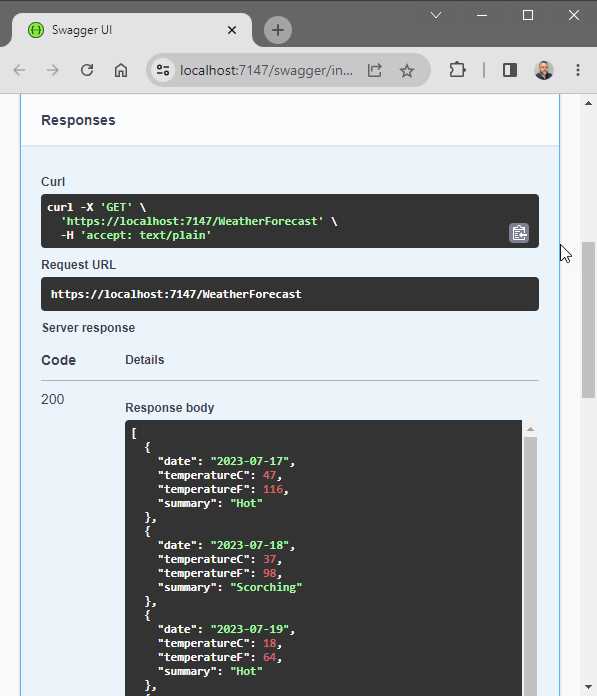
Figure 29: The GET Request Response
The response from the GET request is what we would expect. To hit the rate limit set by the PermitLimit option (which we specified as a value of 4), we will receive a 503 response status on the fifth request, as seen in Figure 30.
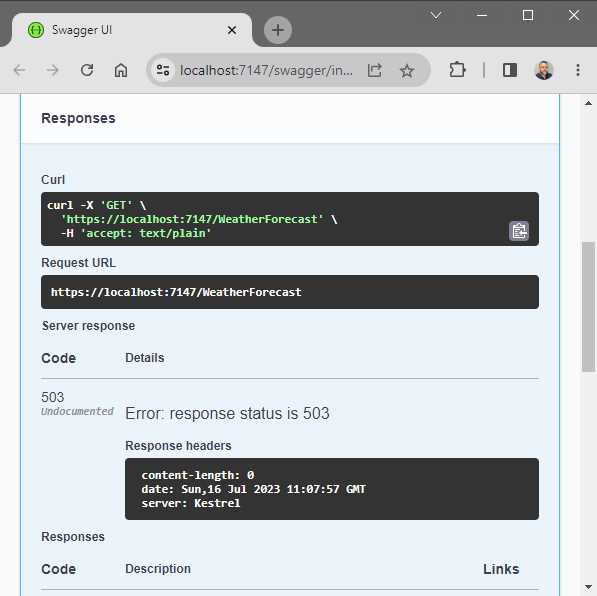
Figure 30: The Fifth GET Request is Rate Limited
This is because we performed more than four requests in the specified 20-second window. When the 20-second window has passed, we will receive a response again when performing the same GET request.
Enabling the queue
You will remember that it is possible to set up rate limiting to queue some requests that go above the PermitLimit you set by using the QueueLimit option. This, in essence, delays the requests instead of rejecting them immediately. To implement this, we need to modify our rate limiter slightly, as illustrated in Code Listing 42.
Code Listing 42: Enabling the Queue Limit
public class Program { const string FIXED_RATE_LIMIT_POLICY = "fixed"; public static void Main(string[] args) { var builder = WebApplication.CreateBuilder(args); builder.Services.AddControllers(); builder.Services.AddEndpointsApiExplorer(); builder.Services.AddSwaggerGen(); // Fixed rate limit. builder.Services.AddRateLimiter(_ => _ .AddFixedWindowLimiter(policyName: FIXED_RATE_LIMIT_POLICY, options => { options.PermitLimit = 4; options.Window = TimeSpan.FromSeconds(20); options.QueueProcessingOrder = QueueProcessingOrder.OldestFirst; options.QueueLimit = 2; })); var app = builder.Build(); if (app.Environment.IsDevelopment()) { app.UseSwagger(); app.UseSwaggerUI(); } // Enable rate limiting middleware. app.UseRateLimiter(); app.UseHttpsRedirection(); app.UseAuthorization(); app.MapControllers().RequireRateLimiting(FIXED_RATE_LIMIT_POLICY); app.Run(); } } |
For this to work, add the statement using System.Threading.RateLimiting, and add options.QueueProcessingOrder = QueueProcessingOrder.OldestFirst and options.QueueLimit = 2 to your rate limiter.
This will queue two requests, after which my rate limiter will process them from oldest to newest.
Running your API with the QueueLimit enabled and performing five GET requests will cause the API call to wait instead of returning a 503 response.

Figure 31: GET Request Queued
After the time has passed, the API will return a response. If I had to open three browser windows, hit the rate limit on the first browser that queues the fifth request, and perform a new GET request in the second browser, the QueueLimit of 2 will be full. If I perform a new GET request in the third browser, that request will return a 503.
This is because my queue limit has been reached, and any further requests will be rejected.
Concurrency limit
Another option is to use the concurrency limiter, as illustrated in Code Listing 43.
Code Listing 43: Using the Concurrency Limiter
|
{ const string CONCURRENT_RATE_LIMIT_POLICY = "concurrent"; public static void Main(string[] args) { var builder = WebApplication.CreateBuilder(args); builder.Services.AddControllers(); builder.Services.AddEndpointsApiExplorer(); builder.Services.AddSwaggerGen(); // Concurrent rate limit. builder.Services.AddRateLimiter(_ => _ .AddConcurrencyLimiter(policyName: CONCURRENT_RATE_LIMIT_POLICY, options => { options.PermitLimit = 4; options.QueueProcessingOrder = QueueProcessingOrder.OldestFirst; options.QueueLimit = 2; })); var app = builder.Build(); if (app.Environment.IsDevelopment()) { app.UseSwagger(); app.UseSwaggerUI(); } // Enable rate limiting middleware. app.UseRateLimiter(); app.UseHttpsRedirection(); app.UseAuthorization(); app.MapControllers().RequireRateLimiting(CONCURRENT_RATE_LIMIT_POLICY); app.Run(); } } |
This will limit the number of concurrent requests. As you can see, it is very similar to the fixed rate limiter.
I add the concurrent rate limiter to the services collection by:
· Specifying builder.Services.AddRateLimiter.
· Adding a concurrency limiter, AddConcurrencyLimiter, specifying the policy name.
· Specifying through the options that I only want to allow four concurrent requests to happen at the same time.
To apply this rate limiter, I add app.MapControllers().RequireRateLimiting(CONCURRENT_RATE_LIMIT_POLICY) to the MapControllers() method.
Global rate limiting
As the code in Code Listing 44 illustrates, applying a global rate limiter is possible.
Code Listing 44: Adding Global Rate Limiting
public class Program { public static void Main(string[] args) { var builder = WebApplication.CreateBuilder(args); builder.Services.AddControllers(); builder.Services.AddEndpointsApiExplorer(); builder.Services.AddSwaggerGen(); // Global rate limiting. builder.Services.AddRateLimiter(opt => { opt.RejectionStatusCode = 429; opt.GlobalLimiter = PartitionedRateLimiter.Create<HttpContext, string>( httpContext => RateLimitPartition.GetFixedWindowLimiter( partitionKey: httpContext.User.Identity?.Name ?? httpContext.Request.Headers.Host.ToString(), factory: partition => new FixedWindowRateLimiterOptions { AutoReplenishment = true, PermitLimit = 4, QueueLimit = 0, Window = TimeSpan.FromSeconds(20) })); }); var app = builder.Build(); if (app.Environment.IsDevelopment()) { app.UseSwagger(); app.UseSwaggerUI(); } // Enable rate limiting middleware. app.UseRateLimiter(); app.UseHttpsRedirection(); app.UseAuthorization(); app.MapControllers(); app.Run(); } } |
This means that we don’t need to specify that we want to use it on a specific endpoint. I specify that I want to set a global rate limiter, and I can set that global limiter to any of the rate limiters. In Code Listing 44, this is set to a fixed window limiter.
I am also specifying via the options that I only want to allow four requests in the time span of 20 seconds. This fixed window limiter is slightly different from the one we created previously in Code Listing 41. I am specifying here that I want to apply this rate limiter per username with httpContext.User.Identity?.Name. If not authenticated, then I want to use the hostname with httpContext.Request.Headers.Host.ToString().
Because I am creating a global rate limiter, I also do not need to apply it specifically, meaning I can simply use app.MapControllers(). I have also specified that when a request is rejected, the API needs to return a 429 Too Many Requests status.

Figure 32: Too Many Requests for Global Rate Limiter
Running the API and performing five GET requests within the 20-second window will return the status 429, as seen in Figure 32.
Chaining rate limiters
Lastly, I want to have a look at chaining rate limiters. In Code Listing 45, I created a chained rate limiter by using CreateChained and adding two rate limiters.
Code Listing 45: Chaining Rate Limiters
|
{ public static void Main(string[] args) { var builder = WebApplication.CreateBuilder(args); builder.Services.AddControllers(); builder.Services.AddEndpointsApiExplorer(); builder.Services.AddSwaggerGen();
// Chaining rate limiters. builder.Services.AddRateLimiter(opt => { opt.GlobalLimiter = PartitionedRateLimiter.CreateChained<HttpContext>( PartitionedRateLimiter.Create<HttpContext, string>( httpContext => RateLimitPartition.GetFixedWindowLimiter( partitionKey: httpContext.User.Identity?.Name ?? httpContext.Request.Headers.Host.ToString(), factory: partition => new FixedWindowRateLimiterOptions { AutoReplenishment = true, PermitLimit = 100, QueueLimit = 0, Window = TimeSpan.FromMinutes(1) })), PartitionedRateLimiter.Create<HttpContext, string>( httpContext => RateLimitPartition.GetFixedWindowLimiter( partitionKey: httpContext.User.Identity?.Name ?? httpContext.Request.Headers.Host.ToString(), factory: partition => new FixedWindowRateLimiterOptions { AutoReplenishment = true, PermitLimit = 1000, QueueLimit = 0, Window = TimeSpan.FromHours(1) }))); }); var app = builder.Build(); if (app.Environment.IsDevelopment()) { app.UseSwagger(); app.UseSwaggerUI(); } // Enable rate limiting middleware. app.UseRateLimiter(); app.UseHttpsRedirection(); app.UseAuthorization(); app.MapControllers(); app.Run(); } } |
The first rate limiter tells ASP.NET Core that I only want to allow 100 requests per minute. I do this by specifying the PermitLimit = 100 and the Window = TimeSpan.FromMinutes(1).
The second rate limiter specifies that I only want to allow 1,000 requests in a single hour. I do this by specifying PermitLimit = 1000 and Window = TimeSpan.FromHours(1).
Therefore, my API can handle bursts of requests but still limit the total number of requests to whatever the second rate limiter allows. My API will then apply the combination of the two rate limiters that I have specified.
Output caching
ASP.NET Core provides developers with various options when it comes to caching. These caching options have also been around for quite some time. These are:
· In-memory cache
· Distributed cache
· Response cache
· Output caching (new in .NET Core 7)
In-memory cache and distributed cache are server-side options. The client does not know about these. Let’s have a look at these in more detail.
In-memory cache
The simplest of the caching mechanisms is in-memory cache. Here we simply store the data in the memory of the server. In-memory cache is key-value based. Based on the key, we can return a value stored previously from the cache. Due to the in-memory nature of this cache, this caching mechanism might not work as you expect when using multiple servers, unless you set up server affinity. In situations like this, using a distributed cache, such as Redis, is recommended.
Distributed cache
Multiple servers can access a shared, distributed cache. It, therefore, does not matter if the same server handles the request. Each server has access to the same shared data.
Response cache
When we use response caching, it relies on enabling the client to cache server responses based on specific HTTP cache headers. Sometimes this approach does not work with UI applications such as MVC-based pages because browsers typically set request headers that can prevent caching.
Output caching
Output caching is now available with ASP.NET Core 7. Output caching solves the problem with response caching because it caches the HTTP response on the server. It, therefore, does not rely on the headers of the request. As mentioned earlier, response caching is partly controlled by the client. With output caching, the server is in control of deciding if a cached response is sent back. In ASP.NET Core 7, you can enable output caching through middleware.
This means that the first request received is handled as usual. When a new request is received, the server can decide if a cached response is returned. This reduces the load on the server. Various options are available with output caching to control how the cached responses are stored. Different values can be stored based on a parameter value, query value, header value, and so on.
Let's look at some code to demonstrate how to implement output caching. It’s a bit difficult to illustrate output caching in a book, so you need to run the code to see output caching in action.
Code Listing 46: Add Output Caching
public class Program { public static void Main(string[] args) { var builder = WebApplication.CreateBuilder(args); // Add services to the container. builder.Services.AddControllers(); builder.Services.AddEndpointsApiExplorer(); builder.Services.AddSwaggerGen(); // Add output cache in the services collection. builder.Services.AddOutputCache(opt => { opt.DefaultExpirationTimeSpan = TimeSpan.FromSeconds(5); }); var app = builder.Build(); // Configure the HTTP request pipeline. if (app.Environment.IsDevelopment()) { app.UseSwagger(); app.UseSwaggerUI(); } app.UseHttpsRedirection(); app.UseAuthorization(); // Add middleware for output caching. app.UseOutputCache(); // Add CacheOutput for output caching to work. app.MapControllers().CacheOutput(); app.Run(); } } |
The code in Code Listing 46 adds output caching to the services collection with a DefaultExpirationTimeSpan of five seconds. This means the API returns the cached response when a request comes in within this five-second time.
Secondly, I must add the middleware app.UseOutputCache() for the output cache to work. Output caching is now configured but will not work until you add CacheOutput() on the endpoint MapControllers().
Running the API, you will see the Swagger page (Figure 33) where you can test the API.
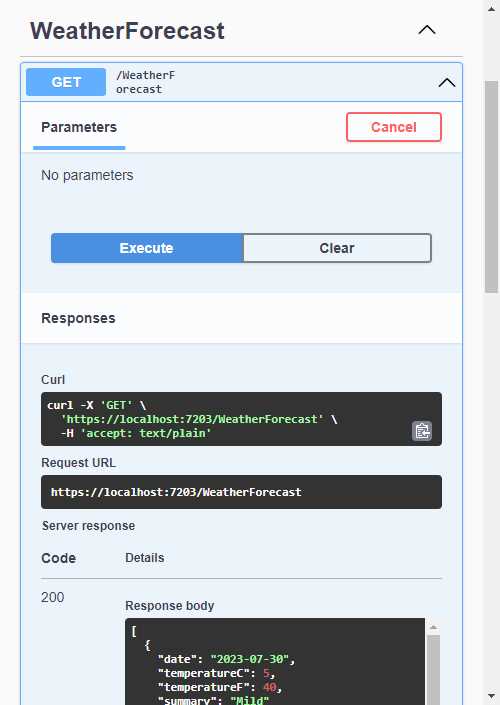
Figure 33: Testing Output Caching in Swagger
Clicking on the Execute button will hit the WeatherForecast controller on the first request. As seen in Figure 34, you will see the controller hit on the first request if you place a breakpoint as illustrated.
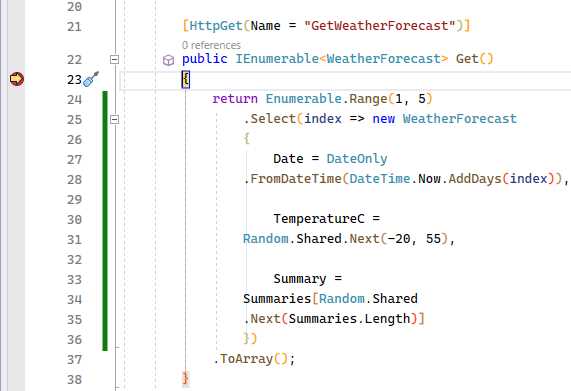
Figure 34: The WeatherForecast Controller Breakpoint
Subsequent requests within five seconds won't hit the controller. Once the five seconds are over, the controller is hit again.
This approach is a broad one because of how we configured output caching. This results in all controllers caching their responses. We can be more granular when configuring how output caching works.
Imagine that we want to cache the output based on the forecast days, which will be specified in the query string. In Code Listing 47, notice that I have added a policy to vary the cached responses by the query string days.
Code Listing 47: Configure Caching by Query Strings
|
{ public static void Main(string[] args) { var builder = WebApplication.CreateBuilder(args); // Add services to the container. builder.Services.AddControllers(); builder.Services.AddEndpointsApiExplorer(); builder.Services.AddSwaggerGen(); // Add output cache in the services collection. builder.Services.AddOutputCache(opt => { opt.DefaultExpirationTimeSpan = TimeSpan.FromSeconds(5); }); var app = builder.Build(); // Configure the HTTP request pipeline. if (app.Environment.IsDevelopment()) { app.UseSwagger(); app.UseSwaggerUI(); } app.UseHttpsRedirection(); app.UseAuthorization(); // Add middleware for output caching. app.UseOutputCache(); // Add CacheOutput for output caching to work. app.MapControllers().CacheOutput(policy => { policy.SetVaryByQuery("days"); policy.Expire(TimeSpan.FromSeconds(5)); }); app.Run(); } } |
I also need to modify the controller action, as seen in Code Listing 48, to use the days I pass it to return the forecast for the days specified.
Code Listing 48: Specify Forecast Days
[HttpGet(Name = "GetWeatherForecast")] public IEnumerable<WeatherForecast> Get(int days) { return Enumerable.Range(1, days).Select(index => new WeatherForecast { Date = DateOnly.FromDateTime(DateTime.Now.AddDays(index)), TemperatureC = Random.Shared.Next(-20, 55), Summary = Summaries[Random.Shared.Next(Summaries.Length)] }) .ToArray(); } |
This means that if I run the API and call it using the URL https://localhost:7203/weatherforecast?days=2, I receive the following response, as seen in Code Listing 49.
Code Listing 49: Returning a Two-Day Forecast
[ { "date": "2023-07-30", "temperatureC": -6, "temperatureF": 22, "summary": "Mild" }, { "date": "2023-07-31", "temperatureC": 43, "temperatureF": 109, "summary": "Balmy" } ] |
If I call a six-day forecast using the URL https://localhost:7203/weatherforecast?days=6, I receive the response illustrated in Code Listing 50. Note that the summary values don’t make sense when taking the temperatures into consideration, but this is not important in this example.
Code Listing 50: Returning a Six-Day Forecast
[ { "date": "2023-07-30", "temperatureC": 2, "temperatureF": 35, "summary": "Warm" }, { "date": "2023-07-31", "temperatureC": -18, "temperatureF": 0, "summary": "Hot" }, { "date": "2023-08-01", "temperatureC": 25, "temperatureF": 76, "summary": "Cool" }, { "date": "2023-08-02", "temperatureC": 42, "temperatureF": 107, "summary": "Cool" }, { "date": "2023-08-03", "temperatureC": -7, "temperatureF": 20, "summary": "Bracing" }, { "date": "2023-08-04", "temperatureC": 32, "temperatureF": 89, "summary": "Mild" } ] |
The difference is that both requests are cached based on the query string days. Subsequent requests within five seconds using the two-day and six-day forecasts return the cached response.
What are minimal APIs?
With .NET 7, there have been some changes to minimal APIs. Introduced in .NET 6, minimal APIs allow developers to create APIs without the notion of controllers. Think of minimal APIs as a model for creating smaller APIs using only a few lines of code.
Minimal APIs rely on top-level statements, and as developers started becoming used to this minimal approach to creating APIs, a few things were still missing. Microsoft, therefore, started maturing the platform to what we now have in .NET 7.
The three main new features are:
· Endpoint filters
· Route groups
· Typed results
Endpoint filters are a way to execute code before and after the logic of the endpoint handler. The filter logic can inspect and change parameters, and using endpoint filters is helpful for things such as logging or validation.
Logically, if you have multiple endpoints, you will need to use endpoint filters on each one. This might result in repeated code, which is why route groups have been introduced. Route groups are used to group endpoints with a common prefix, resulting in less duplication of code.
Let’s have a closer look at using minimal APIs with endpoint filters and route groups.
Endpoint filters
In Code Listing 51, I have created a very minimal (see what I did there?) API that returns a collection of movies from a repository I created.
Code Listing 51: The Movie Repository Minimal API
|
var builder = WebApplication.CreateBuilder(args); // Add services to the container. builder.Services.AddAuthorization(); builder.Services.AddScoped<IMovieRepository, MovieRepository>(); builder.Services.AddEndpointsApiExplorer(); builder.Services.AddSwaggerGen(); var app = builder.Build(); // Configure the HTTP request pipeline. if (app.Environment.IsDevelopment()) { app.UseSwagger(); app.UseSwaggerUI(); } app.UseHttpsRedirection(); app.UseAuthorization(); app.MapGet("/movies", (IMovieRepository movieRepo) => { return movieRepo.GetAllMovieItems(); }); app.Run(); |
Running the minimal API and calling the movies endpoint returns the movies in my repository, as seen in Code Listing 52.
Code Listing 52: The Returned Movie Collection
[ { "title": "Movie 1", "description": "Movie 1 description.", "watched": true }, { "title": "Movie 2", "description": "Movie 2 description.", "watched": false }, { "title": "Movie 3", "description": "Movie 3 description.", "watched": true }, { "title": "Movie 4", "description": "Movie 4 description.", "watched": false } ] |
Let’s extend this with an endpoint filter by adding the AddEndpointFilter method, as seen in Code Listing 53. The EndpointFilterInvocationContext context gives us access to the HTTP context, which then allows us to access the request.
Code Listing 53: Adding an Endpoint Filter
app.MapGet("/movies", (IMovieRepository movieRepo) => { return movieRepo.GetAllMovieItems(); }).AddEndpointFilter(async (context, next) => { app.Logger.LogInformation($"Request {context.HttpContext.Request.Path} processed at {DateTime.Now}"); var result = await next(context); app.Logger.LogInformation($"Request {context.HttpContext.Request.Path} processed at {DateTime.Now}"); return result; }); |
I have added logging by including the lines of code seen in Code Listing 54.
Code Listing 54: Adding Logging
builder.Logging.ClearProviders(); builder.Logging.AddConsole(); builder.Logging.AddDebug(); |
The complete code is illustrated in Code Listing 55.
Code Listing 55: The Complete Code
using MinimalAPIs.Model; var builder = WebApplication.CreateBuilder(args); // Add services to the container. builder.Services.AddAuthorization(); builder.Services.AddScoped<IMovieRepository, MovieRepository>(); builder.Services.AddEndpointsApiExplorer(); builder.Services.AddSwaggerGen(); builder.Logging.ClearProviders(); builder.Logging.AddConsole(); builder.Logging.AddDebug(); var app = builder.Build(); // Configure the HTTP request pipeline. if (app.Environment.IsDevelopment()) { app.UseSwagger(); app.UseSwaggerUI(); } app.UseHttpsRedirection(); app.UseAuthorization(); app.MapGet("/movies", (IMovieRepository movieRepo) => { return movieRepo.GetAllMovieItems(); }).AddEndpointFilter(async (context, next) => { app.Logger.LogInformation($"Request {context.HttpContext.Request.Path} processed at {DateTime.Now}"); var result = await next(context); app.Logger.LogInformation($"Request {context.HttpContext.Request.Path} processed at {DateTime.Now}"); return result; }); app.Run(); |
The endpoint filter will now add a log entry before execution. Then, await next executes the next filter (if any), and I write to the log again after that.
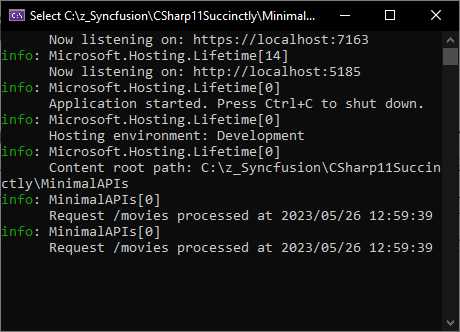
Figure 35: The Log Output
When I run the API and execute the request, the log entries are seen in the console window, as seen in Figure 35. The endpoint filter is therefore working correctly, adding log entries to the configured logging providers.
In Code Listing 56, I have added a POST to create movies in the movie repository. This MapPost endpoint also implements an endpoint filter.
Code Listing 56: Adding a POST Request
using MinimalAPIs.Model; var builder = WebApplication.CreateBuilder(args); // Add services to the container. builder.Services.AddAuthorization(); builder.Services.AddScoped<IMovieRepository, MovieRepository>(); builder.Services.AddEndpointsApiExplorer(); builder.Services.AddSwaggerGen(); builder.Logging.ClearProviders(); builder.Logging.AddConsole(); builder.Logging.AddDebug(); var app = builder.Build(); // Configure the HTTP request pipeline. if (app.Environment.IsDevelopment()) { app.UseSwagger(); app.UseSwaggerUI(); } app.UseHttpsRedirection(); app.UseAuthorization(); app.MapGet("/movies", (IMovieRepository movieRepo) => { return movieRepo.GetAllMovieItems(); }).AddEndpointFilter(async (context, next) => { app.Logger.LogInformation($"Request {context.HttpContext.Request.Path} processed at {DateTime.Now}"); var result = await next(context); app.Logger.LogInformation($"Request {context.HttpContext.Request.Path} processed at {DateTime.Now}"); return result; }); app.MapPost("/movies", (MovieItem movieItem, IMovieRepository movieRepo) => { if (movieItem is null) return Results.BadRequest(); if (string.IsNullOrEmpty(movieItem.Title)) return Results.BadRequest(); movieRepo.AddMovieItem(movieItem); return Results.Ok(); }).AddEndpointFilter(async (context, next) => { app.Logger.LogInformation($"POST Request {context.HttpContext.Request.Path} processed at {DateTime.Now}"); var result = await next(context); app.Logger.LogInformation($"POST Request {context.HttpContext.Request.Path} processed at {DateTime.Now}"); return result; }); app.Run(); |
Rerunning the API and adding a movie will, as expected, log the information to the console.
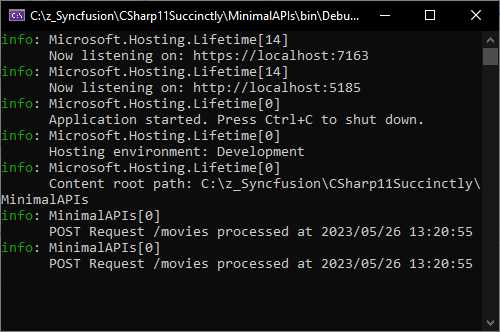
Figure 36: The Log Output for the POST
The problem, however, is that now we have repeated code because we have two endpoint filters. We have one on the GET request, and another on the POST request.
Let’s improve the code by adding the generic AddEndpointFilter implementation. This is illustrated in Code Listing 57, where I have added AddEndpointFilter<MinimalAPILogFilter>() to my MapGet and MapPost. This tells my API that I want to use my MinimalAPILogFilter as an endpoint filter.
Code Listing 57: Adding the Generic AddEndpointFilter Implementation
using MinimalAPIs; using MinimalAPIs.Model; var builder = WebApplication.CreateBuilder(args); // Add services to the container. builder.Services.AddAuthorization(); builder.Services.AddScoped<IMovieRepository, MovieRepository>(); builder.Services.AddEndpointsApiExplorer(); builder.Services.AddSwaggerGen(); builder.Logging.ClearProviders(); builder.Logging.AddConsole(); builder.Logging.AddDebug(); var app = builder.Build(); // Configure the HTTP request pipeline. if (app.Environment.IsDevelopment()) { app.UseSwagger(); app.UseSwaggerUI(); } app.UseHttpsRedirection(); app.UseAuthorization(); app.MapGet("/movies", (IMovieRepository movieRepo) => { return movieRepo.GetAllMovieItems(); }).AddEndpointFilter<MinimalAPILogFilter>(); app.MapPost("/movies", (MovieItem movieItem, IMovieRepository movieRepo) => { if (movieItem is null) return Results.BadRequest(); if (string.IsNullOrEmpty(movieItem.Title)) return Results.BadRequest(); movieRepo.AddMovieItem(movieItem); return Results.Ok(); }).AddEndpointFilter<MinimalAPILogFilter>(); app.Run(); |
The MinimalAPILogFilter is a custom class that contains my logging code inside the delegate. You can see the code for my custom class in Code Listing 58. It implements the IEndpointFilter interface and contains the logging logic in the InvokeAsync method.
Dependency injection provides access to the logger, which I inject via the LoggingFilter constructor.
Code Listing 58: The Custom MinimalAPILogFilter Class
namespace MinimalAPIs; public class LoggingFilter : IEndpointFilter { protected readonly ILogger _logger; protected LoggingFilter(ILoggerFactory loggerFac) { _logger = loggerFac.CreateLogger<LoggingFilter>(); } public virtual async ValueTask<object?> InvokeAsync(EndpointFilterInvocationContext context, EndpointFilterDelegate next) { _logger.LogInformation($"Request {context.HttpContext.Request.Path} processed at {DateTime.Now}"); var result = await next(context); _logger.LogInformation($"Request {context.HttpContext.Request.Path} processed at {DateTime.Now}"); return result; } } class MinimalAPILogFilter : LoggingFilter { public MinimalAPILogFilter(ILoggerFactory loggerFac) : base(loggerFac) { } } |
Lastly, I created a derived class called MinimalAPILogFilter that I use in the generic AddEndpointFilter implementation.
Running the API and performing a GET or a POST request still logs to the console as expected, as seen in Figure 37.

Figure 37: The Console Log Output Still Works
Creating a custom class is quite convenient and reduces the repeated code we need to write to implement endpoint filters. However, having to configure each endpoint to use the generic AddEndpointFilter implementation might become a bit of a pain.
It is now possible to use route groups. Let’s see how that works next.
Route groups
Using a common prefix, we can now group routes. On this group level, we can add code that is then applied to all the endpoints contained in that group.
Consider the code illustrated in Code Listing 59.
Code Listing 59: Adding Route Groups
using MinimalAPIs.Model; var builder = WebApplication.CreateBuilder(args); // Add services to the container. builder.Services.AddAuthorization(); builder.Services.AddScoped<IMovieRepository, MovieRepository>(); builder.Services.AddEndpointsApiExplorer(); builder.Services.AddSwaggerGen(); builder.Logging.ClearProviders(); builder.Logging.AddConsole(); builder.Logging.AddDebug(); var app = builder.Build(); // Configure the HTTP request pipeline. if (app.Environment.IsDevelopment()) { app.UseSwagger(); app.UseSwaggerUI(); } app.UseHttpsRedirection(); app.UseAuthorization(); var groupedLogging = app.MapGroup("/api").AddEndpointFilter(async (context, next) => { app.Logger.LogInformation($"Request {context.HttpContext.Request.Path} processed at {DateTime.Now}"); var result = await next(context); app.Logger.LogInformation($"Request {context.HttpContext.Request.Path} processed at {DateTime.Now}"); return result; }); groupedLogging.MapGet("/movies", (IMovieRepository movieRepo) => { return movieRepo.GetAllMovieItems(); }); groupedLogging.MapPost("/movies", (MovieItem movieItem, IMovieRepository movieRepo) => { if (movieItem is null) return Results.BadRequest(); if (string.IsNullOrEmpty(movieItem.Title)) return Results.BadRequest(); movieRepo.AddMovieItem(movieItem); return Results.Ok(); }); app.Run(); |
I created a variable called groupedLogging, which is of type RouteGroupBuilder, and assigned a MapGroup that specifies /api. This means that all endpoints starting with /api will get this configuration.
Lastly, I have to modify my endpoints using app.MapGet and app.MapPost to groupedLogging.MapGet and groupedLogging.MapPost.
This means I no longer need to apply the endpoint filter on each endpoint individually.
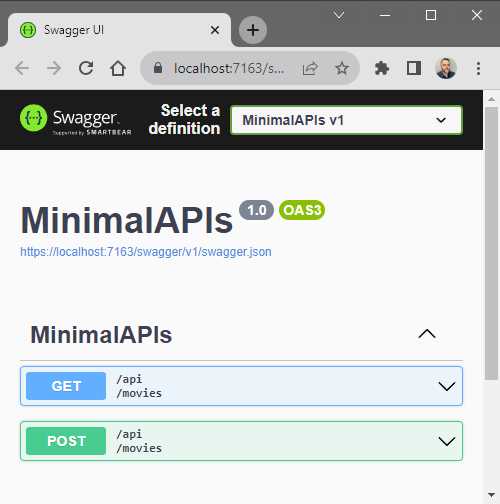
Figure 38: Swagger now Shows /api/movies
Running my API and looking at the endpoints in Swagger, you will notice that my endpoint now says /api/movies, as seen in Figure 38.
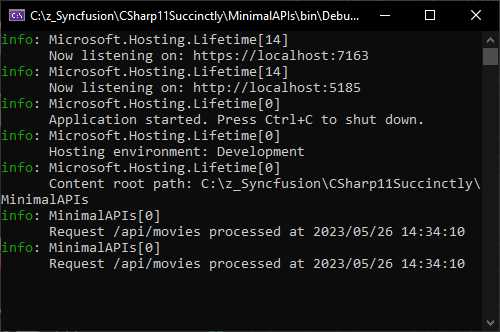
Figure 39: The Console Log Displaying the Log Information
Executing either a GET or POST request still logs the information to my console as before. This means that the endpoint filter is still working as expected.
Using static abstract interface members
I found some interesting examples on the internet of using static abstract interfaces. Earlier in the book, we had a look at Generic Math support and how static abstract interface members enable this feature. I mentioned that we would look at how you can apply this in a real-world situation. Minimal APIs provide an opportunity to illustrate how static abstract interface members can be used to make life much easier.
Using Minimal APIs does not necessarily mean I need to keep all my logic in the Program.cs file. In fact, I want to keep my Program.cs file as lean as possible. For this reason, I am restructuring my Minimal API into something more manageable. To accomplish this, I am creating classes that simplify my endpoints.
Code Listing 60: The IEndpoint Interface
namespace MinimalAPIsStaticAbstrInterfMembers; public interface IEndpoint { static abstract string Pattern { get; } static abstract HttpMethod Method { get; } static abstract Delegate Handler { get; } } |
You will see an Interface in Code Listing 60 that uses a few static, abstract Interface members. It contains properties for a Pattern (which is the path to the endpoint); a Method property that specifies GET, POST, PUT, and so on; and lastly, there is a Delegate, which is the handler that tells my API how to handle the request it receives.
Code Listing 61: MapEndPoint Extension Method
namespace MinimalAPIsStaticAbstrInterfMembers; public static class EndpointExtensions { public static IEndpointRouteBuilder MapEndPoint<T>(this IEndpointRouteBuilder app) where T : IEndpoint { app.MapMethods( T.Pattern , new[] { T.Method.ToString() } , T.Handler ); return app; } } |
In Code Listing 61, you see an extension method that maps my endpoint. This extension method has a constraint on T to ensure that it implements IEndpoint. It then maps the Pattern, Method, and Handler and returns an IEndpointRouteBuilder.
Code Listing 62: Get Movies Endpoint Class
using MinimalAPIs.Model; namespace MinimalAPIsStaticAbstrInterfMembers; public class GetMoviesEndpoint : IEndpoint { public static string Pattern => "movies"; public static HttpMethod Method => HttpMethod.Get; public static Delegate Handler => GetMovies;
private static IResult GetMovies(IMovieRepository repo) { return Results.Ok(repo.GetAllMovieItems()); } } |
I can now create a GetMoviesEndpoint class (Code Listing 62) that implements the IEndpoint interface and returns the movies in the movie repository.
The Program.cs file in Code Listing 63 is much cleaner because I do not have to keep the minimal API logic in here. I am now able to call my endpoints by using app.MapEndPoint and provide it with the endpoint class created earlier.
I am now in a position to structure my minimal API more efficiently, which allows me to better manage my endpoint logic.
Code Listing 63: A Cleaner Program.cs Class
using MinimalAPIs.Model; namespace MinimalAPIsStaticAbstrInterfMembers; public class Program { public static void Main(string[] args) { var builder = WebApplication.CreateBuilder(args); // Add services to the container. builder.Services.AddAuthorization(); builder.Services.AddScoped<IMovieRepository, MovieRepository>(); builder.Services.AddEndpointsApiExplorer(); builder.Services.AddSwaggerGen(); var app = builder.Build(); // Configure the HTTP request pipeline. if (app.Environment.IsDevelopment()) { app.UseSwagger(); app.UseSwaggerUI(); } app.UseHttpsRedirection(); app.UseAuthorization(); app.MapEndPoint<GetMoviesEndpoint>(); app.Run(); } } |
This was made possible by using static abstract interface members, keeping my code more succinct and structured.
In conclusion
This chapter focused on ASP.NET Core 7. The features introduced make developers' lives much easier. .NET 7, however, has so much more to offer. Without writing a single line of code, you can optimize your codebase by upgrading to .NET 7.
In the next section, we will briefly look at LINQ and JSON serialization improvements. There are many more bundled with .NET 7, but it would take a book on its own to outline all the performance improvements available.
- 80+ high-performance ASP.NET Core controls, including DataGrid, Charts, and Scheduler.
- Lightweight and responsive.
- Modular and touch-friendly.
- Built-in themes.