
.NET MAUI Succinctly®

CHAPTER 10
Managing the App Lifecycle
The application lifecycle involves events such as startup, suspend, and resume. Every platform manages the application lifecycle differently, so implementing platform-specific code in iOS, Android, Tizen, Mac Catalyst, and Windows projects requires some effort.
Luckily, .NET MAUI allows you to manage the app lifecycle in a unified way and takes care of performing the platform-specific work on your behalf. This chapter provides a quick explanation of the app lifecycle and how you can easily manage your app’s behavior.
Note: The app lifecycle in .NET MAUI is very different from Xamarin.Forms. Do not expect similarities in how you handle events. It is worth mentioning that in .NET MAUI, you have even more granularity of control over the application events.
Introducing the App class
The App class is a singleton class that inherits from Application and is defined inside the App.xaml.cs file. It can be thought of as an object that represents your application running and includes the necessary infrastructure to handle resources, navigation, and the application lifecycle. If you need to store some data in variables that should be available to all pages in the application, you can expose static fields and properties in the App class.
At a higher level, the App class exposes some fundamental members that you might need across the whole app lifecycle: the MainPage property you assign with the root page of your application, and methods you use to manage the application lifecycle, which are described in the next section.
Managing the app lifecycle
In .NET MAUI, the object that handles the application lifecycle is called Window. When the application starts up, an instance of this class is created. Such an instance also allows you to subscribe to events that represent moments of the lifecycle, summarized in Table 9.
Table 9: Events in the application lifecycle
Event | Description |
|---|---|
Created | Raised after the native window (or page for mobile apps) has been created. The cross-platform window will have a handler to the native one, but it might not be visible yet. |
Activated | Raised when the window (or page for mobile apps) has been activated and focused. |
Deactivated | Raised when the window, or page for mobile apps, has lost focus (though it might still be visible). |
Stopped | Raised when the window, or page for mobile apps, is no longer visible. |
Resumed | Raised when an app resumes after being stopped. This event can only be raised if the Stopped event was previously raised. |
Destroying | Raised when the native window (or page) is being destroyed and deallocated. |
There are two ways to handle the app lifecycle events: overriding the CreateWindow method in the App class, and subclassing the Window class. Both methods are described next.
Overriding the CreateWindow method
The MAUI runtime invokes a method called CreateWindow to generate an instance of the Window class when the application starts up. You can override this method to subscribe to the app lifecycle events. Code Listing 37 shows an example.
Code Listing 37
namespace Chapter10_AppLifecycle; public partial class App : Application { public App() { InitializeComponent(); MainPage = new AppShell(); } protected override Window CreateWindow(IActivationState activationState) { Window window = base.CreateWindow(activationState); window.Created += (sender, eventArgs) => { // take actions here... }; window.Activated += (sender, eventArgs) => { // take actions here... }; return window; } } |
What you need to do is subscribe to one or more of the app events. As an example, the preceding code starts listening to the Created and Activated events (see Table 9). You will need to add your own logic to every event handler you subscribe to, based on the type of event. For instance, if you were subscribing to the Destroying event, in the event handler, you could write code that stores the states of the app and its data.
Subclassing the Window class
An alternative to handling events in the App class directly is creating a class that derives from Window and overrides the methods that represent events. As normally happens with naming conventions in .NET, event names are preceded by the On prefix, so you will have OnCreated, OnActivated, OnStopped, and so on.
Code Listing 38 shows an example of subclassing the Window class.
Code Listing 38
namespace Chapter10_AppLifecycle { public class MyWindow: Window { public MyWindow(): base() { } public MyWindow(Page page): base(page) { } protected override void OnCreated() { base.OnCreated(); } protected override void OnActivated() { base.OnActivated(); } } } |
Like the technique discussed in the previous section, the example only shows how to override two events, but you will be able to handle one or more events, depending on your requirements. Add your own logic inside each event handler.
At this point, the App class needs to create an instance of the Window object via the new MyWindow class. This can be accomplished by overriding the CreateWindow method as follows:
protected override Window
CreateWindow(IActivationState activationState)
{
MyWindow window = (MyWindow)base.CreateWindow(activationState);
return window;
}
The two techniques, handling events in the App and subclassing the Window class, are equally good, so the choice is completely up to you. I personally prefer to handle events in the App class just because of how I am used to organizing my code.
Tips about native event handlers and custom events
The events described in this section are common to all the supported platforms and can be handled in a cross-platform approach. Behind the scenes, they map native events that you can fully handle in the MauiProgram class.
The following code shows how you can handle native events by invoking the ConfigureLifecycleEvents method, which requires a using Microsoft.Maui.LifecycleEvents; directive:
public static MauiApp CreateMauiApp()
{
var builder = MauiApp.CreateBuilder();
builder
.UseMauiApp<App>()
.ConfigureFonts(fonts =>
{
fonts.AddFont("OpenSans-Regular.ttf",
"OpenSansRegular");
fonts.AddFont("OpenSans-Semibold.ttf",
"OpenSansSemibold");
}).
ConfigureLifecycleEvents(events =>
{
#if ANDROID
events.AddAndroid(android =>
android.OnBackPressed((activity) =>
{ return false; }));
#endif
});
return builder.Build();
}
Using preprocessor directives, you can configure events only for the desired platform. The list of native events is extremely long for Android, iOS, and Windows. Moreover, the native approach is not the target of this book, so you are encouraged to read through the documentation if you plan to have deeper control over lifecycle events. You will also find explanations about defining and registering custom events, which still happens via the ConfigureLifecycleEvents method.
Sending and receiving messages
In Xamarin.Forms, you used a static class called MessagingCenter to send messages that subscribers receive and then perform an action, based on a publisher/subscriber model. In .NET MAUI, this class is no longer supported. You use a class called WeakReferenceMessenger. This class is not part of the .NET base library but is provided by a NuGet package called CommunityToolkit.Mvvm, which is backed by Microsoft. The purpose of this library is to simplify the implementation of the Model-View-ViewModel pattern by offering objects that are common to this pattern.
The first thing you need to do is install this package in the sample .NET MAUI project. Figure 64 shows how the library appears in the NuGet Package Manager user interface.

Figure 64: Installing the CommunityToolkit.Mvvm library
Once the package is installed, you are ready to start with some considerations about messages in .NET MAUI. Then, you will be able to implement your own messages.
Implementing broadcast messages
In .NET MAUI, messages are represented by a class that derives from ValueChangedMessage<T>, where T is the data type that you want to exchange with subscribers. A message is sent via the Send method of the WeakReferenceMessenger class. This is a singleton class, and its instance is exposed by the Default property. Subscribers register for messages via the Register method, which allows for taking actions when a message is intercepted. When subscribers are done, they should explicitly unregister from messages, which is accomplished via the Unregister method. Before writing code, add two new folders to the project, called Messages and ViewModels.
Defining a message
Supposing you want to send a message when a viewmodel needs to notify subscribers that an action has been completed, you first need to create a message class. So, add a new folder called Messages to the project. Then, add a new class file called ActionExecutedMessage.cs to the new folder. Code Listing 39 shows the code for the new class.
Code Listing 39
using CommunityToolkit.Mvvm.Messaging.Messages; namespace Chapter10_AppLifeCycle.Messages { public class ActionExecutedMessage : ValueChangedMessage<bool> { public ActionExecutedMessage(bool value) : base(value) { } } } |
In .NET MAUI, a message is not a string. Instead, it is a .NET type represented by the ValueChangedMessage<T> class, also exposed by the CommunityToolkit.Mvvm library. Every message class inherits from ValueChangedMessage<T>. You decide the data type that you want to handle. In this case, it is bool, because this is enough to understand if a button has been clicked (true) or not (false). However, you can definitely pass complex types depending on how structured the information you want to send from the message class to subscribers is. It is necessary to implement an empty constructor that invokes its base implementation.
Defining a viewmodel
The next step is implementing a viewmodel, where you will also see the message in action. Add a new folder called ViewModels to the project, then add a new class file called BroadcastMessageViewModel.cs to the new folder. Finally, add the code shown in Code Listing 40.
Code Listing 40
using CommunityToolkit.Mvvm.Messaging; using Chapter10_AppLifeCycle.Messages; namespace Chapter10_AppLifeCycle.ViewModels { public class BroadcastMessageViewModel { public Command ActionCommand { get { return new Command(() => { WeakReferenceMessenger. Default.Send(new ActionExecutedMessage(true)); }); } } } } |
This is a very simple class with only one command, which is enough for demonstration purposes. The ActionCommand property will later be bound to a button in the UI. When invoked, it sends a broadcast message. This is accomplished by invoking the Send method over a single instance of the WeakReferenceMessenger class, represented by the Default property. The method takes a message as an argument, and the constructor needs you to supply the value that you want to be sent to subscribers along with the message. Here, the code is sending true, so that callers understand that an alert will be displayed. Again, remember that you can implement and send instances of more complex types depending on the structure of your information.
Tip: While the implementation of broadcast messages is completely different in .NET MAUI, notice how the commanding implementation remains exactly the same.
Defining a new page and registering for messages
Because the purpose of the sample code is to demonstrate how to show an alert via messages, add a new content page called BroadcastMessagesPage.xaml to the project. At this point, add the following XAML code as the page content:
<VerticalStackLayout VerticalOptions="Center"
HorizontalOptions="Center">
<Button x:Name="Button1"
Text="Click here!" WidthRequest="100"
HeightRequest="40" Command="{Binding ActionCommand}"/>
</VerticalStackLayout>
In the code-behind file, add the code shown in Code Listing 41.
Code Listing 41
using CommunityToolkit.Mvvm.Messaging; using Chapter10_AppLifeCycle.Messages; using Chapter10_AppLifeCycle.ViewModels; namespace Chapter10_AppLifeCycle; public partial class BroadcastMessagePage : ContentPage { private BroadcastMessageViewModel ViewModel { get; set; } public BroadcastMessagePage() { InitializeComponent(); ViewModel = new BroadcastMessageViewModel(); BindingContext = ViewModel; WeakReferenceMessenger.Default.Register<ActionExecutedMessage> (this, ButtonTapped); } private async void ButtonTapped(object recipient, ActionExecutedMessage message) { await DisplayAlert("Info", "You clicked the button!", "OK"); } protected override void OnDisappearing() { WeakReferenceMessenger.Default.Unregister<ActionExecutedMessage> (this); base.OnDisappearing(); } } |
In the constructor of the page, a new instance of the BroadcastMessageViewModel class is created and assigned to the page as the data source (BindingContext). The page also subscribes to messages of type ActionExecuteMessage, without knowing who the sender is. Registering to a message is accomplished via the Register method of the WeakReferenceMessenger class, which takes the message type as the generic type parameter, plus the instance of the subscriber (this) and a method that contains the action to take when the message is intercepted. In this case, the action is handled by the ButtonTapped method, which is responsible for displaying an alert. In the current example, the alert is displayed regardless of the message value, but in real-world scenarios, you might want to decide what to do based on the actual value. Finally, notice how the Unregister method of the WeakReferenceMessenger class allows for unsubscribing from message notifications. The only method argument is the instance of the subscriber object, this in this case. This is an important step required to avoid memory leaks.
Assigning the page to the Shell
After implementing all the necessary code, you can assign the new page to the Shell so that it is available in the navigation bar. As with the other topics, this is not mandatory in your projects, but it is good for the demonstration purposes of this book. In the AppShell.xaml file, replace the code that displays a page with the following:
<ShellContent
Title="Message"
ContentTemplate="{DataTemplate local:BroadcastMessagePage}"
Route="BroadcastMessagePage" />
Now you are ready to run the sample project.
Running the code
If you run the sample project, you will see how the alert appears when you click the button (see Figure 65). This means that the button invoked the action from the data-bound command, which sent a broadcast message that was received by the user interface.
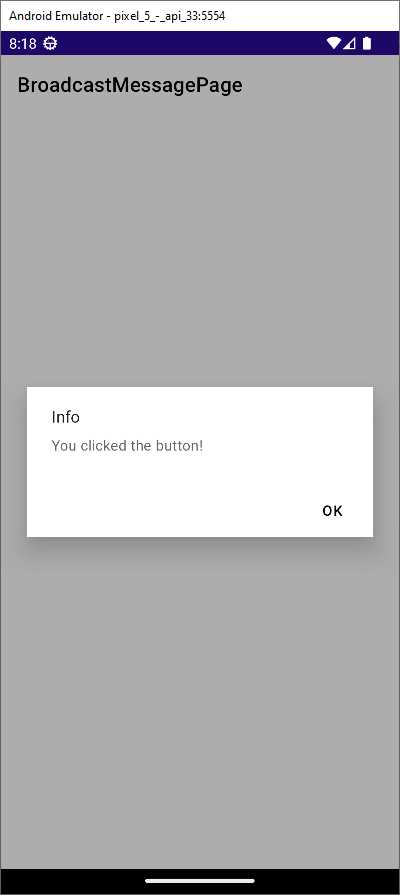
Figure 65: The message was received and the UI is reacting
As you have seen, broadcast messages in .NET MAUI are very different from Xamarin.Forms, and require a more complex implementation, but the benefit is that you can pass complex types as parameters.
Chapter summary
Managing the application lifecycle can be very important, especially when you need to get and store data at application startup or suspension. .NET MAUI prevents the need to write platform-specific code, offering a cross-platform solution through handling events inside the App class or by subclassing the Window class. Not only is this a powerful feature, but it really simplifies your work as a developer.
Finally, you have seen a new way to implement broadcast messages via the WeakReferenceMessenger class, which is useful with logic decoupled from the user interface.
- An ever-growing .NET MAUI control suite with rich feature sets.
- DataGrid, Charts, ListView, Scheduler, and more.
- Active community and dedicated support.
- Phone, tablet, and desktop support.