
.NET MAUI Succinctly®

CHAPTER 1
Getting Started with .NET MAUI
Before you start writing mobile apps with .NET MAUI, you first need to understand the state of mobile app development today, and how this technology fits into it. You also need to set up your development environment to be able to build, test, debug, and deploy your apps to Android, iOS, Mac, and Windows devices.
This chapter introduces .NET MAUI along with the tools and hardware you need for real-world development, and provides a high-level overview of the technology that prepares you for the next chapters.
Note: In this book, I will refer to the technology as .NET MAUI, or simply MAUI, interchangeably.
Introducing .NET MAUI
.NET MAUI stands for Multi-platform App UI, and it is a Microsoft technology for the development of native apps for iOS, Android, macOS, Tizen, and Windows from one shared C# codebase.
.NET MAUI is part of .NET and can be considered the successor of Xamarin.Forms. However, it is not just an evolution of Xamarin.Forms. .NET MAUI is a completely new technology written from scratch, providing better performance, code organization, and ease of development. If you have already worked with Xamarin.Forms, you will see how .NET MAUI fully allows you to reuse your existing skills and experience with only a few upgrades.
The last chapter of this book provides input on migrating Xamarin.Forms projects to MAUI, but while reading you will understand on your own that Microsoft has built the new technology keeping in mind that migration should be affordable.
The main goal of .NET MAUI, like it was for Xamarin.Forms, is making it easier for .NET developers to build native apps for Android, iOS, macOS, Tizen, and Windows by reusing their existing C# skills and knowledge. The reason behind this goal is simple: building apps for Android requires you to know Java and Android Studio or Eclipse; building apps for iOS requires you to know Objective-C or Swift and Xcode; building apps for Windows requires you to know C# and Visual Studio.
Regardless of whether you are an experienced or beginner .NET developer, getting to know all the possible platforms, languages, and development environments is extremely difficult, and costs are extremely high.
From a development point of view, .NET MAUI wraps native APIs into managed objects. The biggest benefit of MAUI is that you write code once, and it will run on all the supported platforms at no additional cost. Accessing native, platform-specific objects and APIs is possible in several ways, all discussed in the next chapters, but it requires some extra work.
Additionally, MAUI integrates with the Visual Studio IDE on Windows, but being part of .NET means it’s possible to develop applications on different systems.
This book focuses on .NET MAUI with Visual Studio 2022 on Windows. Due to the announcement of the retirement of Visual Studio for Mac, you could consider using Visual Studio Code with the .NET MAUI extension if you do not work on Windows. However, different tools and systems will not be covered in this book. The technical concepts for .NET MAUI certainly apply regardless of the IDE you use, though.
Supported platforms
Out of the box, .NET MAUI allows creating apps for Android, iOS, Tizen, macOS, and Windows from a single C# codebase. There are important considerations that need to be made at this point:
· .NET MAUI can target macOS via Mac Catalyst. This is bridge software that makes it possible to bring apps for the iPad to macOS.
· In addition to Mac Catalyst, your Mac needs the .NET MAUI runtime components.
· Tizen is an operating system backed by Samsung and based on Linux, which has the purpose of empowering different kinds of devices.
· For Windows, .NET MAUI targets this system via Windows UI Library 3 (WinUI in short), the most recent framework for building applications for Windows 10 and 11. So, references to Windows in this book actually relate to WinUI.
In the next section you will learn how to install and configure all the necessary tools to work with .NET MAUI.
Setting up the development environment
In order to build native mobile apps with .NET MAUI, you need either Windows 10 or Windows 11 as your operating system and Microsoft Visual Studio 2022 as your development environment.
Note: The minimum required version of Visual Studio 2022 for MAUI development is 17.3.0, but it is recommended that you keep your development environment up to date with the latest version.
You can download and install the Visual Studio 2022 Community edition for free and get all the necessary tools for MAUI development.
When you start the installation, you will need to select the .NET Multi-platform App UI development workload in the Visual Studio Installer (see Figure 1).

Figure 1: Installing .NET MAUI development tools
When you select this workload, the Visual Studio Installer will download and install all the necessary tools to build apps for Android, iOS, Tizen, and Windows. iOS requires additional configuration, described in the next section.
For Windows development, you will need additional tools and SDKs, which you can get by also selecting the Universal Windows Platform development workload. If you select the Individual components tab, you will be able to check if Android and Windows emulators have been selected or make a choice manually (see Figure 2).
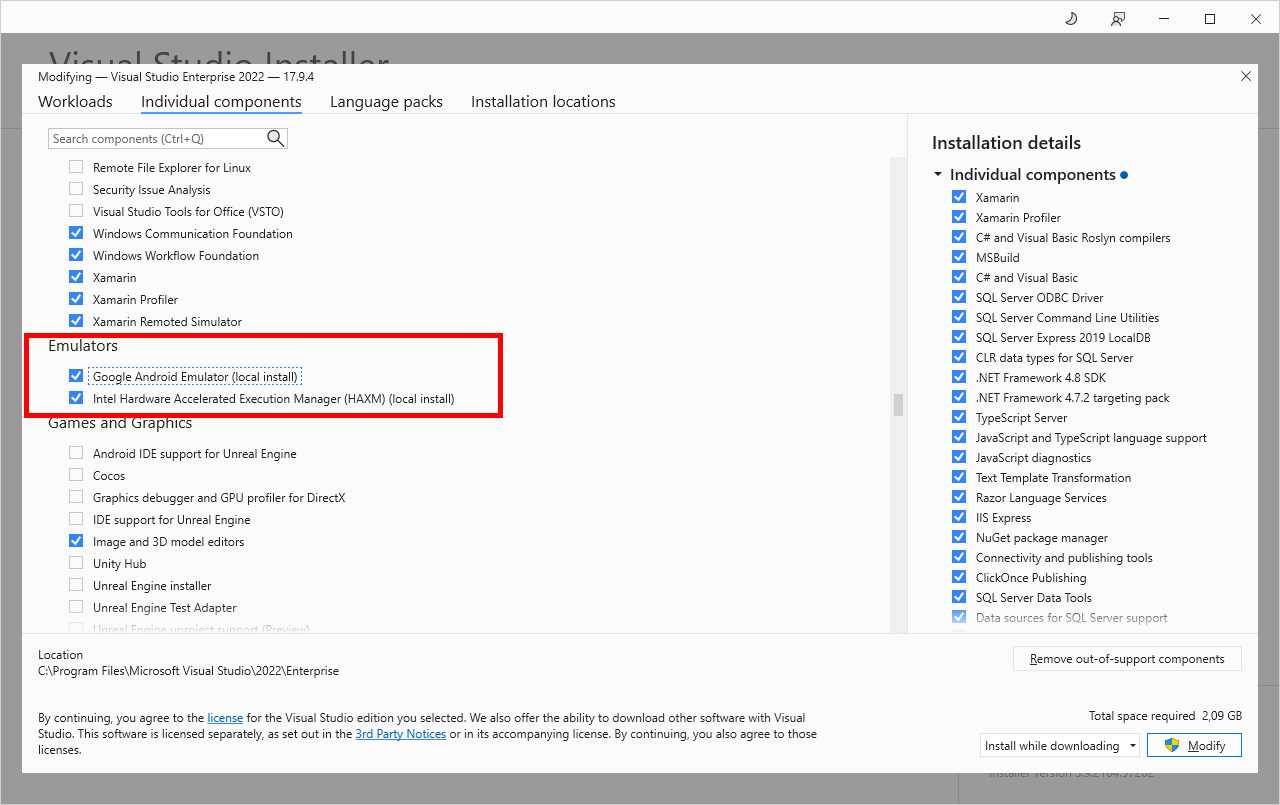
Figure 2: Selecting emulators
Whether you use Visual Studio 2022, Visual Studio for Mac, or both, I suggest you install the Google Android Emulator, which has an identical appearance and behavior on both systems.
Configuring a Mac
Apple’s policies establish that a Mac computer is required to build apps for macOS, iOS, and tvOS. This is because only the Xcode development environment and the Apple SDKs are allowed to run the build process. A Mac is also needed for code signing, setting up profiles, and publishing an app to the App Store. You can use a local Mac in your network, which also allows you to debug and test apps on a physical device, or a remote Mac. In both cases, macOS must be configured with the following software requirements:
· macOS High Sierra (10.13) or later.
· Xcode and Apple SDKs, which you get from the App Store for free. Xcode also includes Mac Catalyst, so you can target macOS computers easily.
· .NET 8 and the .NET MAUI workload. Visual Studio 2022 will take care of installing the required components on the remote Mac on your behalf.
To connect Visual Studio 2022 to a Mac and enable builds for iOS and Mac Catalyst, you do not need to have a .NET MAUI solution opened. You can simply select Tools > iOS > Pair to Mac. In the Pair to Mac dialog (see Figure 3), select the Mac computer you wish to connect to and, when prompted, enter the access credentials.

Figure 3: Pairing Visual Studio to a Mac
Visual Studio will first check if all the required components are installed and, if not, will try to install .NET 8 and the .NET MAUI workload remotely (see Figure 4).

Figure 4: Visual Studio installs .NET MAUI components remotely
If Visual Studio 2022 encounters any problems while installing the .NET MAUI components to the remote Mac, you can solve the problem manually. On macOS, your first need to download and install the .NET 8 SDK. Second, you need to install the .NET MAUI workload by typing the following command inside an instance of the terminal:
> sudo dotnet workload install maui --source https://api.nuget.org/v3/index.json
Every time you compile a .NET MAUI project, Visual Studio needs to be connected to a Mac to launch the Xcode compiler and SDKs. The official MAUI repository has a specific page that will help you configure a Mac. I recommend you read it carefully, especially because it explains how to configure profiles and certificates and how to use Xcode to perform preliminary configurations.
Creating .NET MAUI solutions
Assuming that you have installed and configured your development environment, the next step is opening Visual Studio to see how you create .NET MAUI solutions and what these solutions consist of. In the Start window, click Create new project. When the Create a new project dialog appears, enter MAUI in the search box to quickly filter the list of project templates. This will restrict the list of project templates to MAUI only.
The project templates of interest are .NET MAUI App, which is the first in the list (see Figure 5), .NET MAUI Blazor App, and .NET MAUI Class Library.
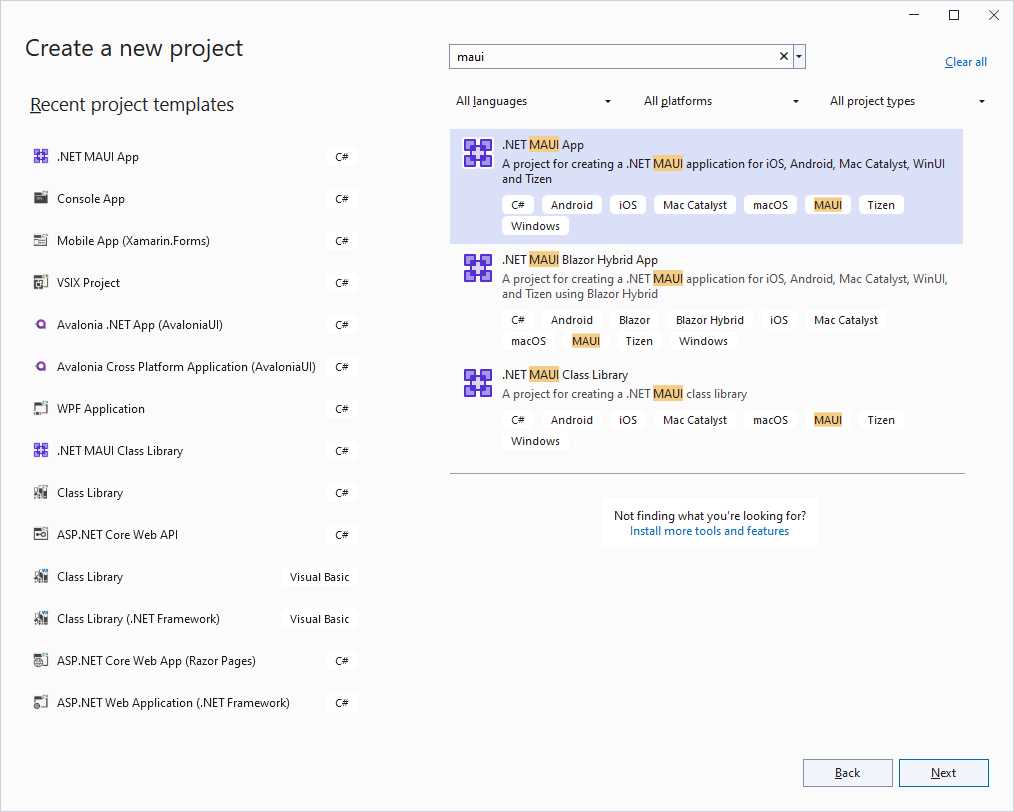
Figure 5: Project templates for .NET MAUI
Descriptions of the project templates follow:
· .NET MAUI App: This is the most commonly used project template, and the one you will use when following the explanations in this book. It allows for creating cross-platform projects targeting Android, iOS, Tizen, macOS, and Windows.
· .NET MAUI Blazor Hybrid App: This project template allows for embedding Blazor apps into .NET MAUI. This is related to a very specific scenario—hosting a Blazor app within a virtual browser inside a MAUI page—and will not be covered in this book.
· .NET MAUI Class Library: This project template can be used to create reusable class libraries on top of .NET 8 that can be shared across MAUI projects.
Select the .NET MAUI App template and click Next. In the next screen, Visual Studio will ask you to specify a project name and a location. Provide a name of your choice or leave the default name and then click Next.
The last step in the project creation is the selection of the target .NET version. Make sure you select .NET 8, as this is the most recent version at the time of writing.
Note: If you come from the Xamarin.Forms world, you know that Visual Studio asks you to specify which kind of UI structure to use in the project, such as flyout page, tabbed page, or blank. In .NET MAUI this is not the case because, as you will see shortly, the project template automatically generates the user interface based on the shell.
When the project is ready, you will notice one page called MainPage.xaml along with its code-behind file, and a new file called MauiProgram.cs. These are part of a new project system that represents crucial differences between MAUI and Xamarin.Forms, and that deserves a dedicated section.
Understanding the project system
The structure of a .NET MAUI solution is relatively simple, and it certainly is the biggest difference that experienced Xamarin.Forms developers will notice. The new project system is shown in Figure 6 through the Solution Explorer.

Figure 6: The project system in .NET MAUI
In the root folder, you find the following files:
· App.xaml with its C# code-behind file. This contains resources that are shared across the project and the startup objects.
· AppShell.xaml with its C# code-behind file. This file contains the definition of the Shell, an object discussed in Chapter 6 that provides common navigation infrastructure.
· MainPage.xaml with its C# code-behind. This is a default page that you can use to start developing your app.
· MauiProgram.cs. This is the main entry point of a MAUI project and is discussed at the end of this chapter.
The Platforms folder contains platform-specific subfolders that contain code and metadata that will only work on the related platform, and that .NET MAUI automatically resolves at runtime. The Resources folder is organized into the AppIcon, Fonts, Images, Raw, Splash, and Styles subfolders.
Tip: There is a crucial difference from Xamarin.Forms here. In .NET MAUI, you add resources to one shared place. This saves time when adding resources and maintaining the project. In Xamarin.Forms, you had to add the same resources to all the projects in the solution, sometimes with the differentiations required by each platform.
The AppIcon folder contains the application icon in .svg format. .NET MAUI supports the .svg file format without the need of third-party libraries. The Fonts folder contains font files. The Images folder contains image files required by your app. The Raw folder is the place where you add any raw resources that you want to include in your app (such as document files). The Splash folder contains the splash screen for the app, in .svg format. The Styles folder contains reusable XAML styles, which will be discussed in Chapter 7.
Before having a look at the platform-specific subfolders, it is a good idea to understand how to set project properties.
Configuring project properties
One of the advantages in .NET MAUI is that you can configure the output for each targeted platform in one place instead of dealing with multiple projects. To accomplish this, right-click the project name in Solution Explorer and select Properties. This will open the project properties user interface.
There are dozens of properties you can set, but only the most relevant are presented here. Under the Application tab, you can set the target platform for each system, as shown in Figure 7.

Figure 7: Assigning target frameworks
Here you can specify the target framework, which is based on .NET 8 for now, and the minimum OS version. For Android, you can also specify the minimum API level. API level 21 matches Android 5.0. In general, unless you have specific requirements, you can leave the default target frameworks unchanged. You can then move to the MAUI Shared tab (see Figure 8), where you can specify some app metadata like the name, version, and unique identifier for the stores.

Figure 8: Assigning cross-platform project properties
In the Application ID text box, replace companyname with your name. By convention, application unique identifiers have the following form:
com.companyname.projectname
where com. is fixed. You should always follow this convention.
Configuring Android properties
At the bottom of the tab list on the left side, you will find the Android tab (see Figure 9).

Figure 9: The Android options
It is composed of three configuration areas: Manifest, Options, and Package Signing. The manifest is represented by the AndroidManifest.xml file located in the Platforms\Android subfolder, and Visual Studio provides a dedicated editor, which you access by clicking the hyperlink that you see at the top of Figure 9. The manifest editor looks like the image in Figure 10.

Figure 10: Setting metadata in the Android manifest
The Android manifest is very important. In it you specify your app’s metadata, such as name, version number, icon, and permissions the user must grant to the application. The information you supply in the Android manifest is also important for publication to Google Play.
For example, the package name uniquely identifies your app package in the Google Play Store and, by convention, it follows the same naming described in the shared properties. The version name is your app version, whereas version number is a single-digit string that represents updates. For instance, you might have version name 1.0 and version number 1, version name 1.1 and version number 2, version name 1.2 and version number 3, and so on.
The Install location option allows you to specify whether your app should be installed only in the internal storage or if memory cards are allowed, but remember that starting from Android 6.0, apps can no longer be installed onto a removable storage device. In the Minimum Android version dropdown list, you can select the minimum Android version you want to target.
In the Options group, you will be able to manage debugging and build options. However, I will not walk through all the available options here. It is worth highlighting the Use Fast Deployment option though, which is enabled by default. When enabled, deploying the app to a physical or emulated device will only replace changed files. The Package Signing group allows you to sign the .apk (Android Package Kit) binary with KeyStore detail. This is also covered in the official documentation.
Configuring iOS properties
The last tab is for the iOS properties. Among all the properties, the most important is the Bundle Signing (see Figure 11). You use the iOS Bundle Signing properties to specify the identity that the Apple tools must use to sign the app package and to specify the provisioning profile that is used to associate a team of developers to an app identifier.
Configuring signing identities and profiles is particularly important when preparing an app for publishing.

Figure 11: The iOS properties with focus on bundle signing
With the Automatic Provisioning option, you just need to enter the Apple ID associated with an active Apple Developer account and Visual Studio will generate all the provisioning profiles for you.
Click the Manage Accounts hyperlink and submit your Apple ID. Figure 12 shows how you supply your Apple ID and choose an identity.

Figure 12: Configuring automatic provisioning
With the Manual Provisioning option, you will be able to adjust your settings manually. As you can imagine, Visual Studio can detect available signing identities and provisioning profiles only when connected to a Mac because this information is generated via Xcode.
The Android subfolder
The Android subfolder contains code and resources specific to Android devices, such as the MainActivity.cs file that represents the startup activity for the Android app generated by MAUI. In Android, an activity can be thought of as a single screen with a user interface, and every app has at least one.
In this file, Visual Studio adds startup code that you should not change. The MainApplication.cs file represents the main entry point with an instance of the MauiProgram class, which is discussed later in this chapter. The AndroidManifest.xml file represents the Android manifest described previously. The Resources folder is also very important because it allows you to include platform-specific resources.
Note: The same concepts apply to the Tizen subfolder.
The iOS and MacCatalyst folders
For iOS and Mac Catalyst, the project uses the iOS and MacCatalyst subfolders. The AppDelegate.cs file contains the MAUI initialization code and should not be changed. In the Info.plist (property list) file (see Figure 13), and through each tab, you can configure your app metadata, the minimum target version, supported devices and orientations, capabilities (such as Game Center and Apple Maps integration), and other advanced features.
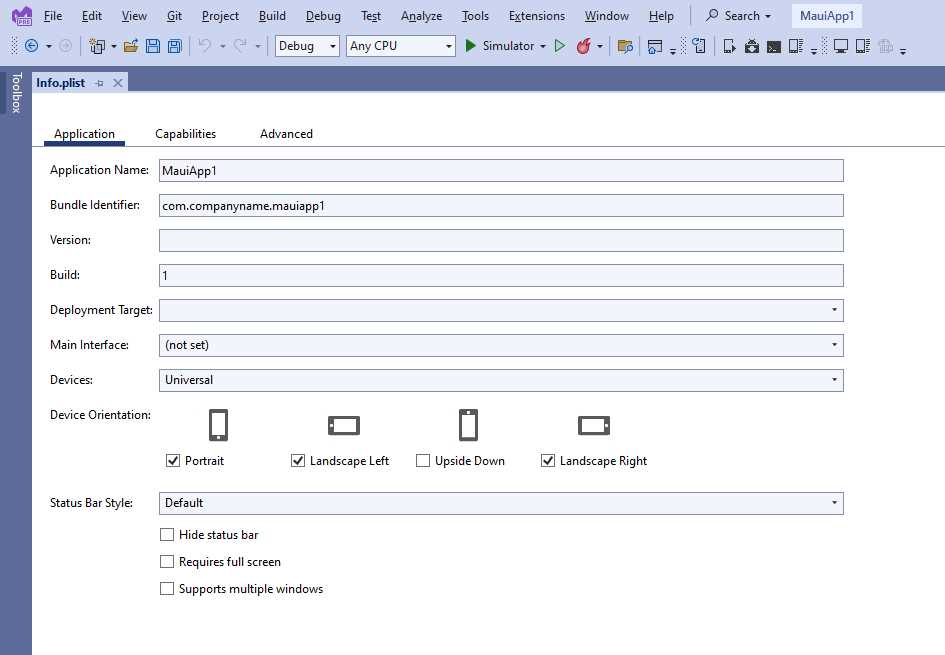
Figure 13: The Info.plist editor
The Info.plist file represents the app manifest in iOS, and therefore, is not related to only .NET MAUI. In fact, if you have experience with Xcode and native iOS development, you already know this file. The Info.plist reference will help you understand how to properly configure this file, especially for advanced features. You will need to set it for both iOS and Mac Catalyst if you intend to target both platforms.
The Windows folder
The Windows folder contains files that are related to the WinUI code generation to support Windows 10 and 11. In the App.xaml.cs file, you can see initialization code that you must not change. What you will need to configure instead is the application manifest, which you can edit by double-clicking the Package.appxmanifest file in Solution Explorer.
This allows you to configure app metadata (see Figure 14), visual assets such as icons and logos, and capabilities. These include permissions you need to specify before testing and distributing your apps, and Windows will ask the user for confirmation before accessing resources that require permission.
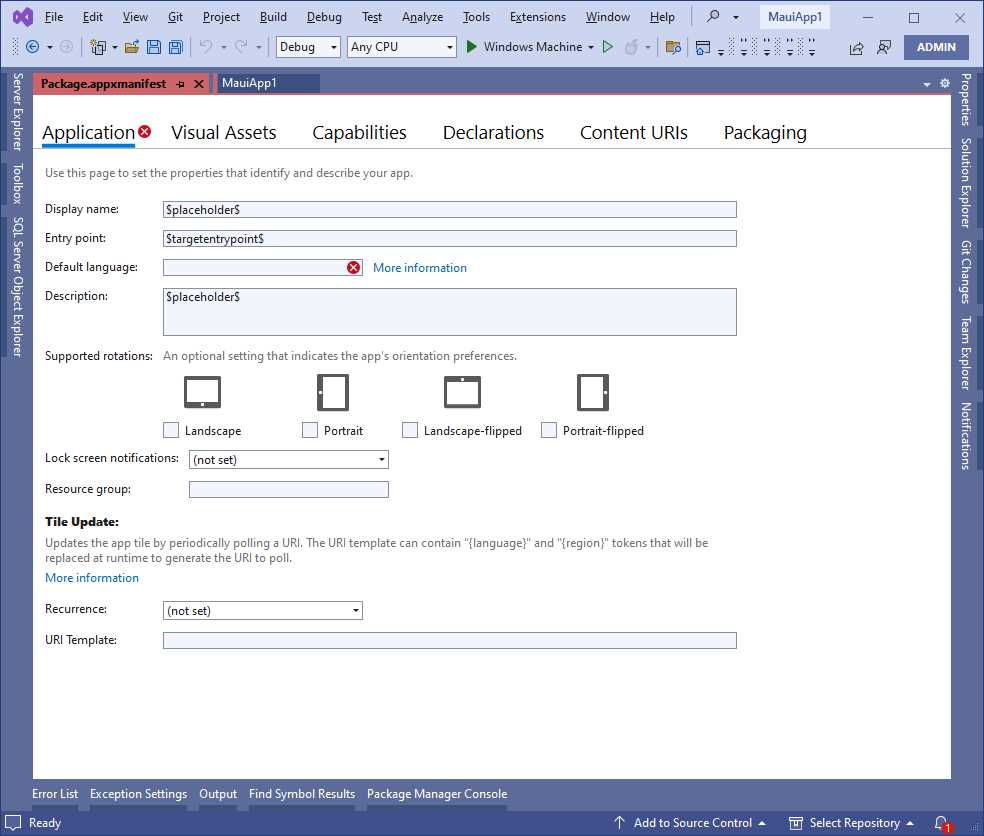
Figure 14: Editing WinUI metadata
The official WinUI documentation explains how to configure other options. However, remember that you need a paid subscription to the Windows Store in order to fill in the Packaging settings that you provide when preparing for publishing.
The MauiProgram class
The MauiProgram class represents the entry point of a MAUI project, and its code is shown in Code Listing 1.
Code Listing 1
public static class MauiProgram { public static MauiApp CreateMauiApp() { var builder = MauiApp.CreateBuilder(); builder .UseMauiApp<App>() .ConfigureFonts(fonts => { fonts.AddFont("OpenSans-Regular.ttf", "OpenSansRegular"); fonts.AddFont("OpenSans-Semibold.ttf", "OpenSansSemibold"); }); #if DEBUG builder.Logging.AddDebug(); #endif return builder.Build(); } } |
The MauiProgram class defines one static method called CreateMauiApp that returns an object of type MauiApp. This one represents a running instance of the application. In order to return an instance of this object, the code invokes the MauiApp.CreateBuild method, which first returns an object of type MauiAppBuilder. This object exposes methods that you can invoke to configure the app. For instance, the ConfigureFonts method you see in Code Listing 1 is used to register fonts.
Tip: Fonts, like handlers and image sources, can be configured in the MauiProgram class once, without the need to do it for every platform like you had to do in Xamarin.Forms.
Once resources have been registered, the Build method of the MauiAppBuilder class is invoked to return an instance of the MauiApp class. The CreateMauiApp method is then invoked by each platform’s startup code. Notice how a debug logger is used when the debug configuration is detected. This is useful to send logging messages to the Output window of Visual Studio.
Debugging and testing applications locally
Starting apps built with .NET MAUI for debugging and testing is easy. You simply select one of the supported platforms from the standard toolbar, and then you select the target device and press F5, as shown in Figure 15.

Figure 15: Selecting target platform and devices for debugging
You have two options:
· Expand the Framework group and select the target platform you want to debug for. This will use the default device or simulator, and it is the only option you have for debugging on Windows.
· Expand the group of each platform and select one of the connected devices or installed simulators.
Do not forget to rebuild your solution before debugging for the first time. When you start an app for debugging, Visual Studio will build your solution and deploy the app package to the selected physical device or emulator.
When the app starts (either on a physical device or an emulator), Visual Studio attaches an instance of the debugger, and you will be able to use all the well-known, powerful debugging tools of the IDE, including (but not limited to) breakpoints, data tips, tool windows, watch windows, and more.
Figure 16 shows the previously created blank app running on iOS and Android platforms within the respective emulators. Notice how in the background Visual Studio shows the Output window where you receive messages from the debugger; you will be able to use all the other debugging tools similarly.

Figure 16: An app built with MAUI running on Android and iOS
As you can imagine, in order to build the iOS app, Visual Studio was connected to a Mac and launched the Apple SDKs.
Setting up the iOS Simulator
Unlike the Android and Windows emulators that run locally on your Windows development machine, the iOS Simulator runs on your Mac. However, in Visual Studio 2022, you can mirror the Simulator to Windows.
In VS 2022, open Tools > Options > Xamarin > iOS Settings, and select the Remote Simulator to Windows option. At the time of writing, this option is still located under the Xamarin settings.
Running apps on physical devices
Visual Studio can easily deploy an app package to physical Windows and Android devices connected to a Windows PC. For Android, you first need to enable developer mode, which you accomplish by following these steps:
- Open the Settings app.
- Select the About item.
- In the list that appears, locate the OS build number and tap it seven times.
At this point, you can simply plug your device into the USB port of your PC and Visual Studio will immediately recognize it. It will be visible in the list of available devices.
For Windows, you need to enable developer mode as well. To accomplish this, follow these steps:
- Open the Start menu.
- Search for Developer Settings and double-click it to open.
- Turn on the Developer Mode option.
- Click Yes to accept the warning message, which informs you that untrusted code will be able to run on your machine.
Then you will be able to plug your devices into the USB port of your PC, and Visual Studio will recognize them as available target devices.
For Apple mobile devices, you need to connect your iPhone or iPad to your Mac computer and make them discoverable through Xcode. Then, when you start debugging from Visual Studio, your app will be deployed to the iPhone or iPad through the Mac.
Tips about publishing apps
The software development lifecycle is made of different phases, such as design, development, test, and deployment. This book mostly focuses on development and cannot go into the details of publishing apps to stores due to the length and complexity of the topic.
The .NET MAUI documentation has a section called Publish that walks through all the necessary steps to publish apps to the different supported platforms. Just remember that you need paid accounts on the various stores to submit your apps.
Chapter summary
This chapter introduced the .NET MAUI platform and its goals, describing the required development tools and an overview of a MAUI solution, covering the platform properties and their most important settings.
You have also seen how to start an app for debugging using emulators. Now that you have an overview of .NET MAUI and the development tools, the next step is understanding what is at its core: sharing code across platforms.
- An ever-growing .NET MAUI control suite with rich feature sets.
- DataGrid, Charts, ListView, Scheduler, and more.
- Active community and dedicated support.
- Phone, tablet, and desktop support.