
.NET MAUI Succinctly®

CHAPTER 9
Accessing Platform-Specific APIs
You have seen what .NET MAUI offers in terms of features that are available on each supported platform, walking through pages, layouts, and controls that expose properties and capabilities that will run on Android, iOS, Tizen, Mac Catalyst, and Windows.
Though this simplifies cross-platform development, it is not always enough to build real-world applications. In fact, especially with mobile apps, you will need to access sensors, the file system, the camera, and the network; send push notifications; and more. Each operating system manages these features with native APIs that cannot be shared across platforms and, therefore, that .NET MAUI cannot map into cross-platform objects.
Luckily, MAUI provides multiple ways to access platform-specific APIs that you can use to access practically everything on each platform. Thus, there is no limit to what you can do with this technology. To access platform features, you will need to write C# code in each platform folder. This is what this chapter explains, together with all the options you have to access iOS, Android, Tizen, Mac Catalyst, and Windows APIs from your shared codebase.
The DeviceInfo class and the OnPlatform method
The Microsoft.Maui.Devices namespace exposes an important class called DeviceInfo. This class allows you to detect the platform your app is running on, and the device type (tablet, phone, or desktop). This class is particularly useful when you need to adjust the user interface based on the platform.
The following code demonstrates how to take advantage of the DeviceInfo.Current property, which represents a singleton instance of the class, to detect the running platform and make UI-related decisions based on its value:
// Label1 is a Label view in the UI
if (DeviceInfo.Current.Platform == DevicePlatform.Android)
Label1.Text = "I'm running on Android";
else if (DeviceInfo.Current.Platform == DevicePlatform.iOS)
Label1.Text = "I'm running on iOS";
else if (DeviceInfo.Current.Platform == DevicePlatform.MacCatalyst)
Label1.Text = "I'm running on Mac Catalyst";
else if (DeviceInfo.Current.Platform == DevicePlatform.Tizen)
Label1.Text = "I'm running on Tizen";
else if (DeviceInfo.Current.Platform == DevicePlatform.WinUI)
Label1.Text = "I'm running on WinUI";
DevicePlatform is of the same-named type and can be easily compared against specific constants—iOS, Android, macOS, Tizen, WinUI, MacCatalyst, tvOS, and UWP—that represent the supported platforms.
Tip: It is not possible to use a switch statement here, because this expects a constant value, but DevicePlatform is a type, not a constant.
The DeviceInfo.Idiom property allows you to determine if the current device the app is running on is a phone, tablet, or desktop computer, and returns one of the values from the DeviceIdiom enumeration:
if (DeviceInfo.Current.Idiom == DeviceIdiom.Tablet)
Label1.Text = "I'm running on a tablet";
if (DeviceInfo.Current.Idiom == DeviceIdiom.Desktop)
Label1.Text = "I'm running on a desktop computer";
if (DeviceInfo.Current.Idiom == DeviceIdiom.Watch)
Label1.Text = "I'm running on a wearable device";
if (DeviceInfo.Current.Idiom == DeviceIdiom.Phone)
Label1.Text = "I'm running on a phone";
if (DeviceInfo.Current.Idiom == DeviceIdiom.TV)
Label1.Text = "I'm running on a tv";
if (DeviceInfo.Current.Idiom == DeviceIdiom.Unknown)
Label1.Text = "Unknown device";
You can also decide how to adjust UI elements based on the platform and idiom in XAML. The following code demonstrates how to adjust the Padding property of a page, based on the platform.
<ContentPage xmlns="http://schemas.microsoft.com/dotnet/2021/maui"
xmlns:x="http://schemas.microsoft.com/winfx/2009/xaml"
Padding="{OnPlatform '0',
iOS='0,20,0,0',
Android='0,10,0,0',
MacCatalyst='0,5,0,5'}"
x:Class="NativeAccess.MainPage">
With the OnPlatform tag, you can specify a different property value based on the same values of the DevicePlatform structure. Differently from Xamarin.Forms, you no longer need to specify the x:TypeArguments attribute to represent the .NET type for the property, because this is inferred by Visual Studio. Similarly, you can also work with OnIdiom and the DeviceIdiom structure in XAML.
Tip: In iOS, it is best practice to set a page padding of 20 from the top, like in the previous snippet. If you don’t do this, your page will overlap the system bar.
if (DeviceInfo.Current.DeviceType == DeviceType.Virtual)
Label1.Text = "I'm on a simulator";
Understanding the device type is especially useful at debugging time.
Device-based localization
It is easy to implement UI localization based on the device settings by combining the FlowDirection property of each view with the Microsoft.Maui.ApplicationModel.AppInfo class, as follows:
FlowDirection = AppInfo.RequestedLayoutDirection.ToFlowDirection();
Suppose you are assigning FlowDirection on a page; this will allow you to apply UI localization settings to the whole page. The RequestedLayoutDirection property retrieves the settings for the device, but it needs the invocation of the ToFlowDirection method to convert the data into an object of type FlowDirection. In addition to XAML, you can also work with this property in C# code.
Invoking platform-specific code
Most of the time, apps need to offer interaction with the device hardware, sensors, system apps, and file system. Accessing these features from shared code is not possible because their APIs have unique implementations on each platform.
.NET MAUI provides a simple solution to this problem that relies on partial classes, each providing the platform-specific implementation of a task. This will be demonstrated shortly. For the sake of consistency, this section discusses the same example provided by the documentation, with some more considerations, including differences with Xamarin.Forms.
Implementing platform-specific code
Suppose you want to retrieve the current orientation of the device. This is handled from each system with unique APIs, so it cannot be done cross-platform directly.
The first thing you need to do is create a shared, partial class with members that will have a platform-specific implementation. Having that said, add to the project the code shown in Code Listing 31.
Code Listing 31
namespace NativeAccess { public enum DeviceOrientation { Undefined, Landscape, Portrait } public partial class DeviceOrientationService { public partial DeviceOrientation GetOrientation(); } } |
The key point is the DeviceOrientationService class, which is declared as partial. It defines a partial method called GetOrientation, so the compiler expects a full definition somewhere else. The platform-specific implementations will return a value from the custom DeviceOrientation enumeration.
The next step is adding platform-specific implementations of the class. When you need to implement platform-specific code, you add code files to the folder that represents the platform. For example, you will need to add a new class to the Android folder that looks like the code shown in Code Listing 32.
Code Listing 32
using Android.Content; using Android.Runtime; using Android.Views; namespace NativeAccess { public partial class DeviceOrientationService { public partial DeviceOrientation GetOrientation() { IWindowManager windowManager = Android.App.Application.Context .GetSystemService(Context.WindowService) .JavaCast<IWindowManager>(); SurfaceOrientation orientation = windowManager.DefaultDisplay.Rotation; bool isLandscape = orientation == SurfaceOrientation.Rotation90 || orientation == SurfaceOrientation.Rotation270; return isLandscape ? DeviceOrientation.Landscape : DeviceOrientation.Portrait; } } } |
Tip: Partial classes must be defined inside the same namespace. For this reason, ensure that you change the namespace in the platform code to match the namespace in the shared partial class. In the current example, the namespace must be NativeAccess.
The focus here is more about the way invoking platform code works, rather than the description of every possible API. For now, what you need to know is that the code retrieves the instance of the current window converted into an object of type IWindowManger, and this allows for retrieving the rotation on Android devices via the SurfaceOrientation object.
Similarly, you will need to write code that retrieves the orientation on iOS. To accomplish this, add a new class to the iOS folder of the project and insert the code shown in Code Listing 33.
Code Listing 33
using UIKit; namespace NativeAccess { public partial class DeviceOrientationService { public partial DeviceOrientation GetOrientation() { UIInterfaceOrientation orientation = UIApplication.SharedApplication.StatusBarOrientation; bool isPortrait = orientation == UIInterfaceOrientation.Portrait || orientation == UIInterfaceOrientation.PortraitUpsideDown; return isPortrait ? DeviceOrientation.Portrait : DeviceOrientation.Landscape; } } } |
Remember the consideration about namespace naming. One of the ways to retrieve the device orientation on iOS is understanding the orientation of the system status bar, which is returned by the UIApplication.SharedApplication.StatusBarOrientation property. The logic then decides which value of the DeviceOrientation enumeration to return, based on the status. Both implementations of the partial class are returning a value from DeviceOrientation, satisfying the requirement of the base class definition.
Consuming platform-specific code
Consuming platform-specific code is extremely simple. Where needed, you declare an instance of the partial class and invoke its members as you would normally. The following is an example of the DeviceOrientationService class defined previously:
DeviceOrientationService deviceOrientationService =
new DeviceOrientationService();
DeviceOrientation orientation =
deviceOrientationService.GetOrientation();
At runtime, the proper implementation is automatically resolved and invoked, depending on the platform.
Differences with Xamarin.Forms
It is interesting to highlight the differences with Xamarin.Forms concerning the invocation of platform-specific code. In MAUI’s predecessor, you have to define an interface with members that will be implemented by the individual platform projects.
Then, in the Android, iOS, and UWP projects, you need to write classes that implement the interface, consume native APIs, and are decorated with the Dependency attribute at the namespace level so that they can be resolved at runtime.
Finally, it is necessary to work with dependency injection to use the code by invoking the Get method of the DependencyService class, passing the interface as the type parameter, like in the following line:
var someData = DependencyService.Get<ICustomInterface>().DoSomething();
If you compare the MAUI approach with the Xamarin.Forms approach, the new one is definitely much easier and cleaner.
Wrapping native APIs: Platform integration
When accessing native APIs, most of the time, your actual need is to access features that exist cross-platform, but with APIs that are totally different from one another. For example, iOS, Android, Mac, and Windows devices all have a camera, a GPS sensor that returns the current location, and so on.
For scenarios in which you need to work with capabilities that exist cross-platform, you can leverage a set of cross-platform APIs included in the platform integration group. If you come from Xamarin.Forms, you might have worked with the Xamarin.Essentials library. If this is the case, platform integration in .NET MAUI can be considered the evolution of Xamarin.Essentials. However, there is no additional library, and everything you need is included in the MAUI codebase.
In this section, you will learn about some of the objects most commonly used in many applications, and you will learn about getting started with this area of .NET MAUI so that it will be easier to continue your studies with the help of the documentation.
Checking the network connection status
Tip: On Android, you need to enable the ACCESS_NETWORK_STATE permission in the project manifest.
One of the most common requirements in mobile apps is checking for the availability of a network connection. With .NET MAUI, this is very easy:
if (Connectivity.Current.NetworkAccess == NetworkAccess.Internet)
{
// Internet is available
}
The Connectivity class from the Microsoft.Maui.Networking namespace provides everything you need to detect network connection and state. It is exposed as a singleton instance via the Current property. The NetworkAccess property returns the type of connection with a value from the NetworkAccess enumeration: Internet, ConstrainedInternet, Local, None, or Unknown.
The ConnectionProfiles property from the Connectivity class allows you to understand, in more detail, the type of connection, as demonstrated in the following example:
IEnumerable<ConnectionProfile> profiles =
Connectivity.Current.ConnectionProfiles;
if (profiles.Contains(ConnectionProfile.WiFi))
{
// WiFi connection
}
This is very useful because it allows us to understand the following type of connections: WiFi, Ethernet, Cellular, Bluetooth, and Unknown. The Connectivity class also exposes the ConnectivityChanged event, which is raised when the status of the connection changes. You can declare a handler in the usual way:
Connectivity.Current.ConnectivityChanged += Connectivity_ConnectivityChanged;
Then you can leverage the ConnectivityChangedEventArgs object to understand what happened, and react accordingly:
private async void Connectivity_ConnectivityChanged(object sender,
ConnectivityChangedEventArgs e)
{
if (e.NetworkAccess != NetworkAccess.Internet)
{
await DisplayAlert("Warning", "Limited internet connection", "OK");
// Do additional work to limit network access...
}
}
As you can see, this feature simplifies one of the most important tasks an app must do that otherwise would be done by writing specific code for each platform.
Opening URIs
It is common to include hyperlinks within the user interface of an app. .NET MAUI provides the Browser class, which makes it simple to open URIs inside the system browser. You use it as follows:
await Browser.OpenAsync("https://www.microsoft.com");
It is also possible to specify a preference about how to open the browser by passing a value from the BrowserLaunchMode enumeration as follows:
await Browser.OpenAsync("https://www.microsoft.com",
BrowserLaunchMode.SystemPreferred);
External forces the app to launch the default browser app, whereas SystemPreferred opens the browser that is preferred by the system. When you use the latter, you can even customize the browser appearance by passing an instance of the BrowserLaunchOptions class as follows:
Uri uri = new Uri("https://www.microsoft.com");
BrowserLaunchOptions options = new BrowserLaunchOptions()
{
LaunchMode = BrowserLaunchMode.SystemPreferred,
TitleMode = BrowserTitleMode.Show,
PreferredToolbarColor = Colors.Blue,
PreferredControlColor = Colors.Green
};
TitleMode allows you to show or hide the browser title bar, whereas PreferredToolBarColor and PreferredControlColor allow you to select a color for the toolbar and control bar, respectively.
MAUI also offers the Launcher singleton class, which allows for opening any kind of URI with the system default app. For example, the following code opens the default email client:
string uri = "mailto://[email protected]";
var canOpen = await Launcher.Default.CanOpenAsync(uri);
if (canOpen)
await Launcher.Default.OpenAsync("mailto://[email protected]");
It is good practice to check if the system supports opening the specified URI via the CanOpenAsync method; if this returns true, you can then invoke OpenAsync to open the specified URI inside the default system app.
You can use the Launcher class to open other apps on the device, but this is not covered here. Refer to the documentation for this particular scenario.
Sending SMS messages
Sending SMS messages is straightforward with .NET MAUI. Look at the following code:
public async Task SendSms(string messageText, string[] recipients)
{
var message = new SmsMessage(messageText, recipients);
await Sms.Default.ComposeAsync(message);
}
The SmsMessage class needs the message text and a list of recipients in the form of an array of string objects. Then, the ComposeAsync from the Sms singleton class will open the system UI for sending messages. Without this API, this would require working with platform code and with several different implementations. With MAUI, you accomplish the same result with two lines of code.
More platform integration
As you can imagine, it is not possible to provide examples for all the features wrapped by the platform integration APIs inside a book of the Succinctly series. The complete list of features with examples is available in the official documentation page, which is regularly updated when new releases are out.
Working with native views
In previous sections, you looked at how to interact with native Android, iOS, and Windows features by accessing their APIs directly in C# code or through plugins. In this section, you will see how to use native views in .NET MAUI, which is extremely useful when you need to extend views provided by .NET MAUI, or when you wish to use native views that .NET MAUI does not wrap into shared objects out of the box.
Working with handlers
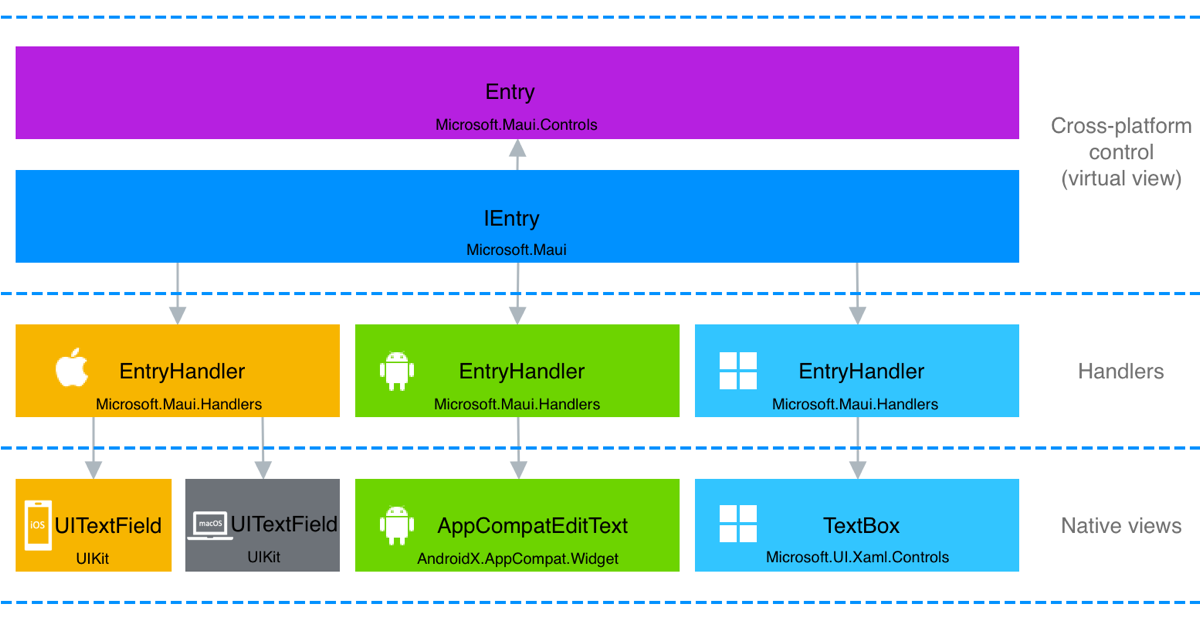
Handlers are classes that .NET MAUI uses to access and render native views, and that bind MAUI’s views and layouts (discussed in Chapters 4 and 5) to their native counterparts. For example, the Label view discussed in Chapter 4 maps to a LabelHandler class that MAUI uses to render the native UILabel, TextView, and TextBlock views on iOS, Android, and Windows, respectively. Handlers are important because you can use them to access the full set of features of native views, overriding and customizing the behavior, look, and features of views themselves.
If you worked with Xamarin.Forms in the past, you could accomplish the same result by implementing custom renderers, which provide similar results in terms of customization but are much more complex to implement. As you will see in the next paragraphs, handlers in MAUI provide a much simpler way to access views’ native features. Before starting with handlers in practice, it is important to understand how they work behind the scenes.
Architecture of handlers
Controls in .NET MAUI have an interface representation that provides abstract access to the control. For instance, a Button is backed by an IButton interface. Such interfaces are also referred to as virtual views, and they are mapped to native controls via handlers. Figure 63, taken from the official Microsoft documentation, shows how handlers map native controls to cross-platform controls with the support of virtual views.

Figure 63: Handler architecture (Source: Microsoft)
In practice, you access handlers via their interface (IButton in the case of the Button). This creates a reference to the native view through a managed object. Handlers expose the full set of native features and API of a view so that you have total control over the user interface. In the next sections, you will learn how to access native features via handlers and all the aforementioned concepts will be clarified.
Tip: The documentation also shows the full list of controls based on handlers.
Customizing views via handlers
Suppose you want to implement automatic control selection on Entry views every time they receive focus. This is not possible from the shared code; the only way to do it is to leverage the native views’ features. Code Listing 34 shows how to accomplish this by leveraging the EntryHandler class.
Code Listing 34
void ModifyEntry() { Microsoft.Maui.Handlers.EntryHandler. Mapper.AppendToMapping("AutoSelectOnFocus", (handler, view) => { #if ANDROID handler.PlatformView.SetSelectAllOnFocus(true); #elif iOS handler.PlatformView.PerformSelector(new ObjCRuntime .Selector("selectAll"), null, 0.0f); #elif WINDOWS handler.PlatformView.SelectAll(); #endif }); } |
The following is a list of key points in the preceding code:
· The Microsoft.Maui.Handlers namespace exposes handler objects that you can use.
· In this case, the EntryHandler is used.
· The Mapper property, of type IPropertyMapper, allows for adding or changing the behavior of a feature by making it possible to access the virtual view for the current handler.
· The AppendToMapping method extends control mapping by adding a virtual property to the view via its first argument, while the second argument is an Action that allows you to invoke the API from the native view. The first argument is important because it represents a key that you can use to modify the mapping you added.
· The handler and view variables have a reference to the handler of the native view and to the cross-platform control, respectively.
Note: You can invoke the PrependToMapping method instead of AppendToMapping when you want to modify the mapping for a handler before mappings to the cross-platform control are applied. Similarly, you can invoke ModifyMapping to modify an existing mapping.
The PlatformView property of the handler class exactly represents the native view, and it allows for invoking its native APIs. By using preprocessor directives, you can invoke the proper native code, depending on the platform your app is running on.
On Android, autoselection is performed by invoking the SetSelectAllOnFocus method. On iOS, autoselection can be done by invoking the PerformSelector method and passing the area to be selected. On Windows, the invocation of SelectAll will autoselect the text.
Obviously, much more complex customizations are possible via handlers, but you should already have an idea of how simpler it is working with handlers in MAUI, compared to custom renderers in Xamarin.Forms. The preceding example will affect the default Entry view and all its instances in your page. You can restrict the handler’s behavior to custom objects. For example, you can create a custom entry like this:
public class AutoSelectEntry: Entry
{
}
And then you can apply the autoselection to this type only, by adding an if block as follows:
void ModifyEntry()
{
Microsoft.Maui.Handlers.EntryHandler.
Mapper.AppendToMapping("AutoSelectOnFocus", (handler, view) =>
{
if (view is AutoSelectEntry)
{
#if ANDROID
handler.PlatformView.SetSelectAllOnFocus(true);
#elif iOS
handler.PlatformView.PerformSelector(new ObjCRuntime
.Selector("selectAll"), null, 0.0f);
#elif WINDOWS
handler.PlatformView.SelectAll();
#endif
}
});
}
This will still work because the AutoSelectEntry view relies on the EntryHandler and its PlatformView implementation.
Understanding handler events
Handlers have a lifecycle represented by the following two events:
· HandlerChanging, which is fired when a new handler is being created for a MAUI control and when an existing handler is being removed from a MAUI control
· HandlerChanged, which is fired when a MAUI control has been created. This ensures that a handler for the specified control is available.
These events are important because their handler methods can be the place to subscribe to native views’ events. The following code demonstrates how to subscribe to the FocusChange event of the native Android text box:
private void Entry_HandlerChanged(object sender, EventArgs e)
{
#if ANDROID
((sender as Entry).Handler.PlatformView as
Android.Views.View).FocusChange += OnFocusChange;
#endif
}
Notice how the code only works with the platform specified via the preprocessor directives. The instance of the native view is retrieved via a double conversion: the first conversion is from the native View instance into a PlatformView object (which was explained previously), and the second conversion is converting the PlatformView into the actual view, an Entry in this case.
In the same code block, an event handler for the FocusChange event is specified. An example of the event handler is provided as follows:
private void OnFocusChange(object sender, EventArgs e)
{
var nativeView = sender as
AndroidX.AppCompat.Widget.AppCompatEditText;
if (nativeView.IsFocused)
nativeView.SetBackgroundColor(Colors.LightGray.ToPlatform());
else
nativeView.SetBackgroundColor(Colors.Transparent.ToPlatform());
}
This is just an example, and the logic inside the event handler is completely up to you, but the relevant point here is that the sender object represents an instance of the native view. In the case of an Entry, it is the AppCompatEditText.
The subscription to the FocusChange event has been done when the HandlerChanged event has been fired. This means that you can subscribe to native views’ events when such an event is raised. On the other side, you need to unsubscribe from the same events when the handler is being removed, and this can be done when the HandlerChanging event is fired. The following is an example:
private void Entry_HandlerChanging(object sender,
HandlerChangingEventArgs e)
{
if (e.OldHandler != null)
{
#if ANDROID
(e.OldHandler.PlatformView as Android.Views.View).
FocusChange -= OnFocusChange;
#endif
}
}
Notice how the HandlerChangingEventArgs class exposes a property called OldHandler, which is not null when the handler is being removed. In this case, you can unsubscribe from the selected events. The way you connect the HandlerChanging and HandlerChanged event handlers to the view is always the same, so in your XAML code you can assign the events with their handlers as follows:
<Entry HandlerChanging="Entry_HandlerChanging"
HandlerChanged="Entry_HandlerChanged" />
It is quite common to interact with native views’ events because this gives you a lot of control over the view lifecycle, and .NET MAUI provides you with a convenient way to do this that simplifies event handling on all the supported platforms.
Tips about partial classes
Handlers are incredibly powerful and not easy to summarize in a few paragraphs. In this chapter, you have discovered how to take advantage of handlers to customize the mapping of native views, but there is more. For example, you can write more advanced, yet cleaner code using partial classes, where you can have event handlers on one side and behavioral change on the other side.
Note: If you are considering migrating a Xamarin.Forms project to MAUI, the hardest part will be migrating custom renderers to handlers. You will learn more about migration in Chapter 11, but in the meantime, keep in mind the importance of understanding handlers if you plan to move existing code to .NET MAUI.
Introducing platform-specifics
.NET MAUI provides platform-specifics, which allow for consuming features that are available only on specific platforms. Platform-specifics represent a limited number of features, but they allow you to work without using handlers.
Note: Platform-specifics do not represent features that are available cross-platform. They instead provide quick access to features that are available only on specific platforms. A platform-specific might be available on iOS, while the same platform-specific might not exist for Android and Windows. At the time of this writing, platform-specifics are not available for Tizen, Mac Catalyst, and tvOS.
For instance, suppose you are working on an iOS app and you want the separator of a ListView to be full width (which is not the default). With platform-specifics, you just need the code shown in Code Listing 35.
Code Listing 35
<?xml version="1.0" encoding="utf-8" ?> <ContentPage xmlns="http://schemas.microsoft.com/dotnet/2021/maui" xmlns:x="http://schemas.microsoft.com/winfx/2009/xaml" x:Class="NativeAccess.PlatformSpecificsiOSPage" xmlns:iOS="clr-namespace:Microsoft.Maui.Controls.PlatformConfiguration.iOSSpecific;assembly=Microsoft.Maui.Controls" Title="PlatformSpecificsiOSPage"> <VerticalStackLayout> <ListView iOS:ListView.SeparatorStyle="FullWidth" x:Name="ListView1"> <!-- Bind your data and add a data template here... --> </ListView> </VerticalStackLayout> </ContentPage> |
In the case of iOS, you need to import the Microsoft.Maui.Controls.PlatformConfiguration.iOSSpecific namespace. Then you can use attached properties provided by this namespace on the view of your interest. In the example shown in Code Listing 37, the attached property ListView.SeparatorStyle allows you to customize the separator width.
Platform-specifics can also be used in C# code. In this case, you need two using directives to import the Microsoft.Maui.Controls.PlatformConfiguration and Microsoft.Maui.Controls.PlatformConfiguration.iOSSpecific. Then you can invoke the On method on the view of your interest, passing the target platform and supplying the platform-specific implementation you need.
The following code provides an example that represents the same scenario seen in Code Listing 36, but in C# code:
this.ListView1.On<iOS>().SetSeparatorStyle(SeparatorStyle.FullWidth);
Platform-specifics work the same way on Android and Windows. In the case of Android, the namespace you import is Microsoft.Maui.Controls.PlatformConfiguration.AndroidSpecific (for both XAML and C#), whereas for Windows the namespace is Microsoft.Maui.Controls.PlatformConfiguration.WindowsSpecific.
Code Listing 36 shows an example of Android platform-specifics that allow you to enable fast scrolling on a ListView.
Code Listing 36
<?xml version=”1.0” encoding=”utf-8” ?> <ContentPage xmlns="http://schemas.microsoft.com/dotnet/2021/maui" xmlns:x="http://schemas.microsoft.com/winfx/2009/xaml" x:Class="NativeAccess.PlatformSpecificsAndroidPage" xmlns:android="clr-namespace:Microsoft.Maui.Controls.PlatformConfiguration.AndroidSpecific;assembly=Microsoft.Maui.Controls" Title="PlatformSpecificsAndroidPage"> <VerticalStackLayout> <ListView android:ListView.IsFastScrollEnabled="true"/> </VerticalStackLayout> </ContentPage> |
The documentation provides lists of built-in platform-specifics for iOS, Android, and Windows.
Tip: A platform-specific for one platform will simply be ignored on other platforms.
Chapter summary
Applications often need to work with features that you can only access through native APIs. .NET MAUI provides access to the entire set of native APIs on iOS, Android, and Windows via several options. With the DeviceInfo class, you can get information on the current system from your shared code. By implementing an abstract class on multiple platforms, you can resolve cross-platform abstractions of platform-specific code in your shared code.
With platform integration, you have ready-to-use cross-platform abstractions for the most common scenarios, such as accessing sensors, network information, settings, and battery status.
You can also leverage handlers to change the look and feel of your views, and you can use platform-specifics to quickly implement a few features that are available only on specific platforms. Each platform also manages the app lifecycle with its own APIs.
Fortunately, .NET MAUI has a cross-platform abstraction that makes it simpler, as explained in the next chapter.
- An ever-growing .NET MAUI control suite with rich feature sets.
- DataGrid, Charts, ListView, Scheduler, and more.
- Active community and dedicated support.
- Phone, tablet, and desktop support.