
.NET MAUI Community Toolkit Succinctly®

CHAPTER 7
Creating the User Interface with C# Markup
In every development platform based on XAML, the declarative markup is not the only way to create the user interface. Everything you do in XAML can also be done in C#. Although this might not be very common, there are situations in which you might need to add views to the visual tree at runtime depending on some conditions. Building the user interface with C# can be tricky, especially when you need to set up data-bindings and especially because of the way the C# syntax works. In order to simplify creating the user interface with C#, Microsoft has been working on an API called C# Markup, which provides a new, fluent syntax you can use to define views, their properties, and their interaction behaviors more easily and in a more elegant way. This API is offered by the .NET MAUI Community Toolkit and is the topic of this chapter.
Note: C# Markup for mobile development was first introduced with the Xamarin Community Toolkit. If you had a chance to work with it, you will be immediately familiar with C# Markup in the .NET MAUI Community Toolkit.
Introducing C# Markup
C# Markup is a set of fluent APIs that simplifies the way developers can create the user interface in C# with the help of new extension methods and using a syntax based on lambda expressions. In the ecosystem of the .NET MAUI Community Toolkit, C# Markup is provided by a separate project available on GitHub that produces the CommunityToolkit.Maui.Markup NuGet package. You will need to install this package in your projects before using this feature. It is also worth mentioning that C# Markup is an independent feature, which means that you do not need to install the .NET MAUI Community Toolkit NuGet package also.
Note: C# Markup is the only feature from the .NET MAUI Community Toolkit that is not included in the official sample project, so a new project will be created in the next sections. In addition, the focus of this chapter is using C# Markup, not walking through the library design and implementation.
Before creating a project with more detailed explanations about C# Markup, it is a good idea to discuss some short examples. In the following code, the first Label is defined in C# using the regular syntax, whereas the second Label is defined using C# Markup.
var label1 = new Label { FontAttributes = FontAttributes.Bold,
HorizontalOptions = LayoutOptions.Center,
HorizontalTextAlignment = TextAlignment.Center,
};
var label2 = new Label().Bold().Center().TextCenter();
As a general rule, C# Markup is based on extension methods that represent property assignments. As you can see, with this approach the code you write is shorter and cleaner, yet easy to understand. In the case of properties that support multiple values from an enumeration, such as HorizontalTextAlignment of type TextAlignment, there are extension methods that match the enumeration, such as TextStart and TextEnd. In the next example, you can see how a CollectionView is defined at runtime and how its ItemsSource property is bound to some data.
var dataView = new CollectionView();
dataView.SetBinding(CollectionView.ItemsSourceProperty,
new Binding(nameof(ViewModel.ObjectCollection)));
Data binding is assigned via the SetBinding method, which takes the target dependency property as the first argument, and an object of type Binding that points to the data source as the second argument. With C# Markup, the code could be rewritten as follows.
var dataView = new CollectionView().Bind(CollectionView.ItemsSourceProperty,
nameof(ViewModel.RegistrationCode));
As you can see, the expression is simplified by the Bind extension method, which also avoids the need to explicitly declare an instance of the Binding type as the second argument. The benefits of using C# Markup to define some user interface in code-behind should be clearer now, but they will be even clearer with a sample project.
Creating a sample project
Note: This ebook requires you to already have a basic knowledge of .NET MAUI, including how to create MAUI projects, so this will not be explained here.
Note: The complete code for the sample is available on GitHub.
In Visual Studio 2022, create a new MAUI app project with a name of your choice. If you want to be consistent with the companion project, you can use MarkupExample. When the project is ready, the first thing you need to do is install the CommunityToolkit.Maui.Markup package from NuGet (see Figure 38).
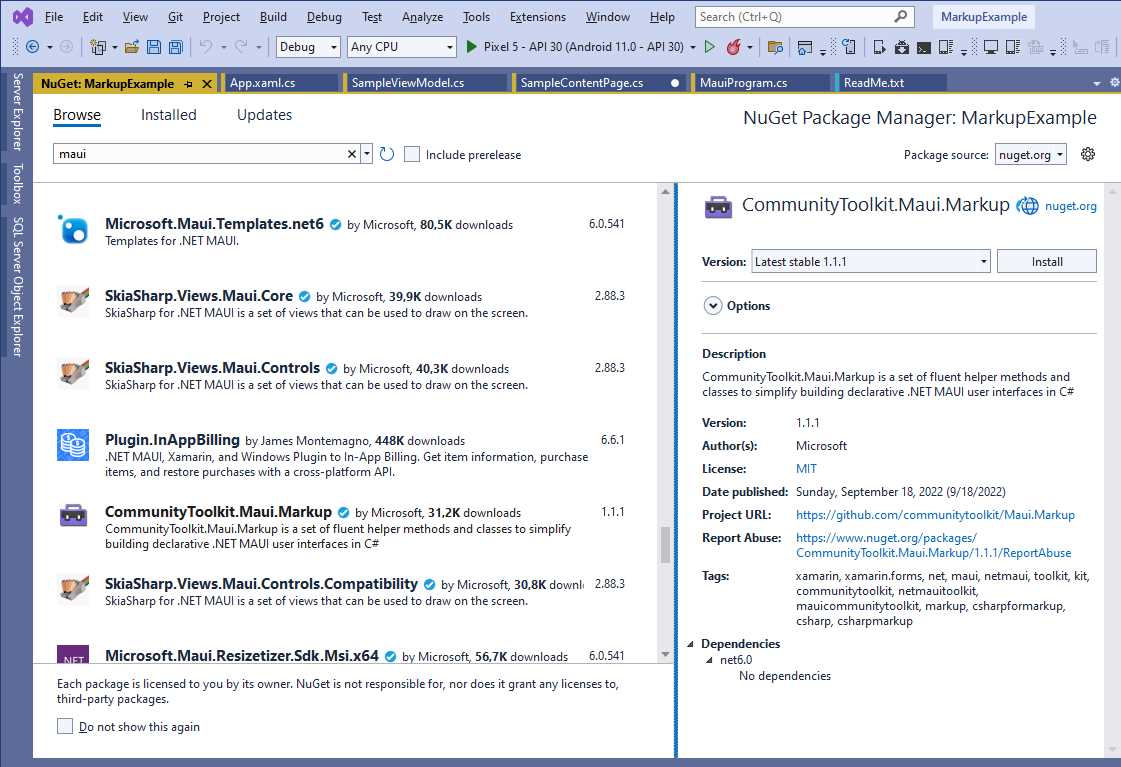
Figure 38: Installing the Required NuGet Packages
Once the package has been installed, you need to enable the Community Toolkit. This is accomplished by invoking the UseMauiCommunityToolkitMarkup method in the MauiProgram class, as follows.
var builder = MauiApp.CreateBuilder();
builder.UseMauiApp<App>().UseMauiCommunityToolkitMarkup()
This is an extension method that you invoke on the instance of the MauiAppBuilder class, responsible for enabling and handling services used in the app. The final step to set up the sample project is adding a new ContentPage based on C# only. To accomplish this, right-click the project name in Solution Explorer and then select Add New Item. In the Add New Item dialog (see Figure 39), select the .NET MAUI ContentPage (C#) and assign SampleContentPage.cs as the file name.
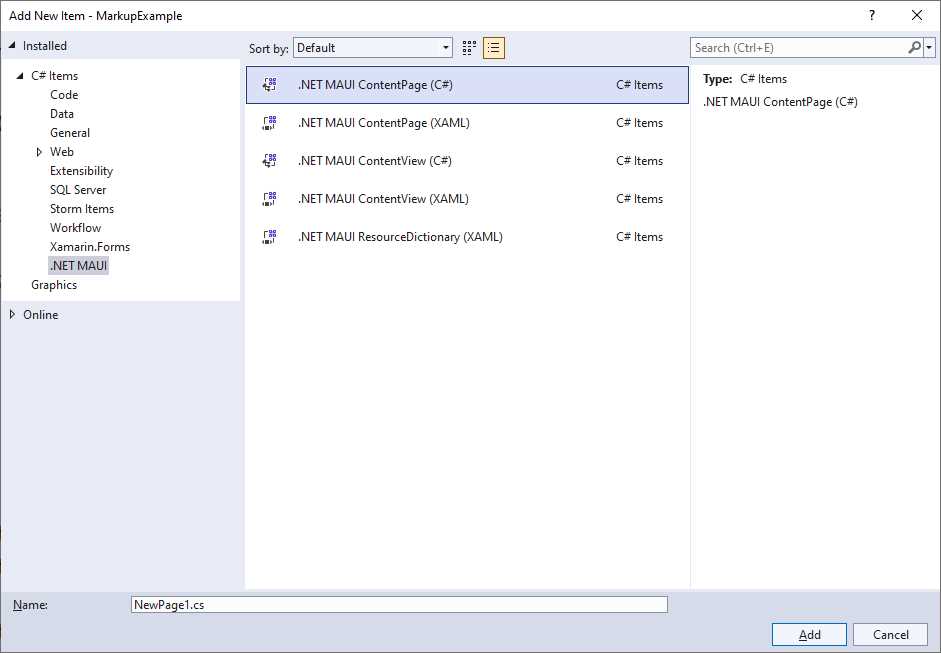
Figure 39: Adding a C# ContentPage
Click Add when ready. When the new file is added, you can start writing some user interface with C# Markup.
Using C# Markup
The sample project discussed in this chapter is based on an example provided by the official documentation. However, some edits are required because the example does not show the viewmodel definition and because some margins also need to be adjusted. The final result to be achieved is very simple, but it gives you enough understanding of the power of C# Markup. It’s shown in Figure 40.

Figure 40: The User Interface Created with C# Markup
The example binds an Entry to a property called RegistrationCode, defined inside a class called SampleViewModel. In order to make the official example work, you could add the following simple class to the project.
namespace MarkupExample
{
public class SampleViewModel
{
public string RegistrationCode { get; set; }
}
}
In the SampleContentPage class, it is first necessary to add the following property and its instance.
private SampleViewModel ViewModel { get; set; }
public SampleContentPage()
{
ViewModel = new SampleViewModel();
The user interface is defined inside the class’s constructor, but this is only to make the example easier. Going step by step, the first part of the code defines a Grid as the content of the page.
Content = new Grid
{
RowDefinitions = Rows.Define(
(Row.TextEntry, 36)),
ColumnDefinitions = Columns.Define(
(Column.Description, Star),
(Column.Input, Stars(2))),
The Define extension method on the Rows and Columns collections simplifies the way you declare rows and columns. In this case, there is one row and two columns. The position is expressed via named values of the Row and Column enumerations, defined as follows.
enum Row { TextEntry }
enum Column { Description, Input }
The reason for this is just to use some named values that are easier to understand, instead of plain integers. Continuing with the Grid definition, the code declares its Children object and starts with these lines:
Children =
{
new Label()
.Text("Code:")
.Row(Row.TextEntry).Column(Column.Description),
The Label is fully defined via C# Markup, with the Text, Row, and Column extension methods that assign the text and the position in the Grid (row and column) respectively. The second part of the user interface is the Entry and is declared as follows.
new Entry
{
Keyboard = Keyboard.Numeric,
BackgroundColor = Colors.AliceBlue,
}.Row(Row.TextEntry).Column(Column.Input)
.FontSize(15).Placeholder("Enter number").TextColor(Colors.Black)
.Height(44).Margin(5, 5).Bind(Entry.TextProperty,
nameof(ViewModel.RegistrationCode))
Notice how properties for which there are no C# Markup methods are still assigned the usual way, and then methods are invoked. Row and Column set the position inside the Grid; FontSize sets the size of the typeface; Placeholder assigns the placeholder text; TextColor sets the foreground color; Height assigns the height for the Entry; Margin sets the horizontal and vertical margins, and finally Bind establishes data binding between the view and the data source.
Tip: The Margin method as two overloads: the one used in the current example takes two double values as the parameters, for the horizontal and vertical margins. The second overload takes an object of type Thickness, like you would do in XAML.
The closing lines for the sample class are the following.
}
}.Margin(10);
}
Notice how a margin is applied to the Grid via C# Markup. Before running the project, you need to change the startup page in the App.xaml.cs file by assigning the MainPage property as follows:
MainPage = new SampleContentPage();
If you now run the application, you will get the result shown in Figure 40.
Working with styles
Views expose the Style extension method, which allows for assigning a style via C# Markup. Suppose you want to create a style that renders labels as hyperlinks. If you look at the Styles.cs file of the companion sample project, you will see how to declare styles with the C# Markup syntax. For example, consider the style defined in Code Listing 7.
Code Listing 7
public class Styles { static Style<Label> link;
public static Style<Label> Link => link ??= new Style<Label>( (Span.FontSizeProperty, 14), (Span.TextColorProperty, Colors.CornflowerBlue), (Span.TextDecorationsProperty, TextDecorations.Underline) ); } |
C# Markup allows for declaring styles by defining static properties of type Style<T>, where T is the target type for the style. In the previous code, the style is applied to Label objects and it simplifies the way properties are assigned with the desired value. You then apply a style by invoking the Style extension method as follows.
new Label().Style(Styles.Link)
More C# Markup
Including the full reference for C# Markup in an ebook of the Succinctly series is not possible, so, as I mentioned at the beginning of this chapter, you can read the official documentation to get the complete information. However, as a developer, you can also look into the source code of the CommunityToolkit.Maui.Markup library. File names help identify the target of the extension methods. For instance, the BindableObjectExtensions.cs file contains extension methods that extend objects of type BindableObject; VisualElementExtensions.cs contains extension methods that extend objects of type VisualElement, and so on. This work will not only give you the full list of fluent APIs available, but it will also give you a different point of view in writing C# code with the most modern syntax.
Chapter summary
C# Markup is a new set of fluent APIs that simplify the way developers can create the user interface in C#. New extension methods and a syntax based on lambda expressions provide a more convenient and elegant way to design views and assign their properties, as well as implement their interaction behaviors via events. These capabilities are now available via the CommunityToolkit.Maui.Markup NuGet package and will really boost the way you create the UI in C#, especially when you need to add views at runtime.
- An ever-growing .NET MAUI control suite with rich feature sets.
- DataGrid, Charts, ListView, Scheduler, and more.
- Active community and dedicated support.
- Phone, tablet, and desktop support.