
Docker Succinctly®

CHAPTER 5
Orchestrating Systems with Docker
Orchestrating multicontainer solutions
When you break down a large application into smaller parts with each part running in a separate container, you’ll need a way for containers to work together. That’s called orchestration. Orchestration requires a framework that allows communication between containers, configuration of how containers need to be connected, scheduling for container creation, monitoring of health, and scaling. There are external platforms for container orchestration—Mesos and Kubernetes are popular—but Docker has orchestration built into the platform.
In this chapter, we’ll look at Docker networking, which is a virtual networking layer that underpins communication between containers. With Docker networks you can segregate traffic on your host, allowing you to isolate groups of containers while allowing them to talk to each other. For defining the relationships between containers, we’ll look at Docker Compose, which is a client-side tool that works with the Docker service API.
The other side of orchestration is managing containers across multiple hosts, as you would do in a production environment in order to provide scale and reliability. We’ll cover that in Chapter 6, Clustering Hosts with Docker Swarm, and we’ll see how to apply what we learn in this chapter to a cluster of Docker hosts.
Docker networks
Docker is the platform for your application runtime, and it controls how your container interacts with resources from the host. You can set memory and CPU restrictions on containers, and when your app runs it only sees the resources allocated to it. At the network level, Docker creates a bridge network on your host. A bridge network gives every container its own IP address, and it allows communication between containers and also between containers and the host.
Note: There are other types of networks supported by Docker. The bridge network is for working with containers on a single host. The overlay network is for working with containers that run across multiple hosts. There is also a plugin system that lets you use third-party network types.
Creating a network in Docker is easy. Bridge networks are the default, which means you simply need to give the network a name, as in Code Listing 49.
Code Listing 49: Creating a Bridge Network
$ docker network create ch05 ffe636469bc2820e19438f09c9fe484e129879e37c7f93059b7d7fa03ae164fe |
As usual, when you create an object, Docker responds with a large ID that you can use to refer to the object (or you can refer to the object by its name as well). The bridge network is created with a designated IP address range, and every container in the network will have a dedicated IP address in that range. This is the simplest way to connect containers. In Code Listing 50, we start an Nginx container in the background that joins the new network.
Code Listing 50: Running a Container in the Network
$ docker container run -d --name webcontainer --network ch05 nginx:alpine |
The --network option tells Docker to join this container into the ch05 network we’ve created, which means it will get an IP address from the network’s range. Note that we haven’t published port 80 on the container, so we can’t browse to localhost to see the site, but we can browse to the container’s IP address.
We can get the IP address either by inspecting the container or the network. The network inspect command in Code Listing 51 lists all the containers in the network and their IP addresses.
Code Listing 51: Inspecting the Network
$ docker network inspect ch05 [ { "Name": "ch05", "Id": "ffe636469bc2820e19438f09c9fe484e129879e37c7f93059b7d7fa03ae164fe", "Scope": "local", "Driver": "bridge", ... "Containers": { "e7c511c50943853a9307b859f5290f08ce208380e459d17a858dad6f995ee250": { "Name": "webcontainer", "EndpointID": "a65f4cb72fb3c28452fbde375b9a0224605daf89501d0d9e26b2788d03137aa9", "MacAddress": "02:42:ac:14:00:02", "IPv4Address": "172.20.0.2/16", "IPv6Address": "" } }, "Options": {}, "Labels": {} } ] |
The subnet range for this network is 172.20.0.0, and it’s a class B network that allows 65536 IP addresses. The Nginx container, called webcontainer, has the IP address 172.20.0.2, and, because it’s a bridge network, we can access that from the host, as we see in Figure 8.
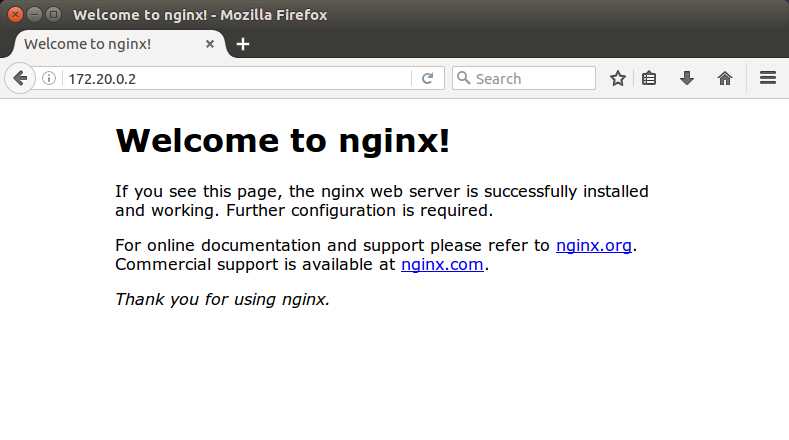
Figure 8: Browsing to the Container’s IP Address
Note: The bridge is between the container and the host. If you’re running on Linux you can access containers by their IP address. On Docker for Mac and Docker for Windows, remember the host is a Linux VM, so you can’t connect directly to the container IP address from your host machine.
Now we can start a second container in the same network, but we’ll run it interactively so that we can see how the network connections are set up with the Linux ip command, as in Code Listing 52.
Code Listing 52: Running a Second Container in the Network
$ docker container run -it --rm --network ch05 sixeyed/ubuntu-with-utils root@acda23507c84:/# ip -f inet address ... 16: eth0@if17: <BROADCAST,MULTICAST,UP,LOWER_UP> mtu 1500 qdisc noqueue state UP group default link-netnsid 0 inet 172.20.0.3/16 scope global eth0 |
This container has IP address 172.20.0.3, which means it’s in the same subnet as the Nginx container. Docker has a built-in DNS server, so containers on the same network can access each other by name as well as by IP address, as we can see with the dig and ping commands in Code Listing 53.
Code Listing 53: Querying the Docker Network
# dig webcontainer ... ;; ANSWER SECTION: webcontainer. 600 IN A 172.20.0.2 # ping webcontainer -c 2 PING webcontainer (172.20.0.2) 56(84) bytes of data. 64 bytes from webcontainer.ch05 (172.20.0.2): icmp_seq=1 ttl=64 time=0.086 ms 64 bytes from webcontainer.ch05 (172.20.0.2): icmp_seq=2 ttl=64 time=0.092 ms |
Note: Before Docker had a DNS server, you connected containers by using the --link flag when you ran them, and that created entries in the hosts file on the container so that you could refer to linked containers by name. That functionality is preserved for backwards compatibility, but it’s a basic mechanism and it’s no longer needed. If you’re following an old tutorial that uses --link, merely replace it with --network and your containers can communicate by name.
The DNS server in Docker makes application configuration easy in a multicontainer system because, in your applications, you simply refer to dependencies by their container name. If you have a database container called mysql, the connection string in your web app can always use mysql as the server name. You don’t need to switch connection strings for different environments—provided you orchestrate the same way in every environment, the landscape will always look the same to the apps.
When you make assumptions about server names in your system, orchestration becomes a key part of your delivery. Using Docker gives you a consistent set of packaged applications, but you don’t want to rely on a deployment document to ensure they get orchestrated correctly. For that, you can use Docker Compose.
Docker Compose
As you begin delivering more complex apps with more moving parts, the orchestration of your containers becomes more involved, and you will need to capture the dependencies so that you can deploy reliably and repeatedly. One option for doing so is Docker Compose, a separate client tool that lets you define your solution architecture in a YAML file, and then manage a whole set of containers with a single command.
Tip: Docker Compose comes bundled with Docker for Mac, Docker for Windows, and the Docker Toolbox. On Linux, it’s a separate install, so you’ll need to follow the instructions to install Docker Compose.
The Docker Compose syntax takes the arguments available in the docker container run command and structures them as YAML. You specify an image to run from, container names, ports to expose, volumes to map, and networks—all the major command-line options are supported by Compose. Code Listing 54 shows a full Docker Compose file that will orchestrate the two containers we started manually.
Code Listing 54: Docker Compose YAML File
version: '2' services: web: image: nginx:alpine util: image: sixeyed/ubuntu-with-utils container_name: util command: ping web |
The first line defines this as using version 2 of the Docker Compose file format. In Compose, you define containers to run as services, then you specify the image name and any other optional properties, such as the container name and command in this example.
By convention, Compose files are named docker-compose.yml. From the directory where the YAML file is saved, you can start all the services in the Compose file as containers by running the up command, as in Code Listing 55.
Code Listing 55: Starting Services with Docker Compose
$ docker-compose up -d |
As with the Docker CLI, we can specify -d to daemonize all the containers and keep them running in the background. The container service called util has a command specified in the Compose file that is a long-running command, which means both containers will stay running until we stop them.
Although we started the containers using Docker Compose, these are just normal Docker containers and we can work with them with the Docker CLI in the normal way. Code Listing 56 shows the container ls command listing all the running containers.
Code Listing 56: Containers Running from Docker Compose
$ docker container ls CONTAINER ID IMAGE COMMAND CREATED STATUS PORTS NAMES 420b4928a92d nginx:alpine "nginx -g 'daemon off" 2 minutes ago Up 2 minutes 0.0.0.0:80->80/tcp, 443/tcp sample01_web_1 7262c0b6367d sixeyed/ubuntu-with-utils "ping web" 2 minutes ago Up 2 minutes util |
The Nginx container has a name generated by Compose that uses the project name sample01, which is derived by combining the folder where the docker-compose.yml file is on my machine with the service name web and the instance of the container: sample01_web_1. The utility container has the fixed name util, as specified in the Compose file.
The utility container pings the Nginx container by the service name web, which is specified in the Compose file—not by the container name, which isn’t known until runtime. If we check the logs, we’ll see the Nginx container is responding to pings on the service name, as in Code Listing 57.
Code Listing 57: Checking Logs from a Container
$ docker container logs util PING web (172.21.0.3) 56(84) bytes of data. 64 bytes from sample01_web_1.sample01_default (172.21.0.3): icmp_seq=1 ttl=64 time=0.092 ms 64 bytes from sample01_web_1.sample01_default (172.21.0.3): icmp_seq=2 ttl=64 time=0.055 ms 64 bytes from sample01_web_1.sample01_default (172.21.0.3): icmp_seq=3 ttl=64 time=0.057 ms |
Note: Docker has different logging providers that can be used to direct the standard output and standard error streams to different destinations. If you don’t specify a provider, the default allows you to see the output from containers using the logs command.
The Nginx container has a generated name because Compose lets you scale up by adding more containers and because it needs to ensure the name is unique. We can add more Nginx containers with the scale option to the up command in Code Listing 58, which specifies the desired number of containers.
Code Listing 58: Scaling Services with Docker Compose
$ docker-compose up –d --scale web=5 Creating and starting sample01_web_2 ... done Creating and starting sample01_web_3 ... done Creating and starting sample01_web_4 ... done Creating and starting sample01_web_5 ... done |
If we now connect to the util container, we can see that the DNS server in Docker returns all five Nginx containers when you query it, as in Code Listing 59.
Code Listing 59: Querying the Docker DNS Server
$ docker container exec -it util bash root@b9594d7abca1:/# dig web ... ;; ANSWER SECTION: web. 600 IN A 172.21.0.5 web. 600 IN A 172.21.0.4 web. 600 IN A 172.21.0.6 web. 600 IN A 172.21.0.3 web. 600 IN A 172.21.0.7 |
Note: The DNS server in Docker actually supports load balancing, too, which means that if you repeat the dig command, the addresses in the response come back in a different order, which is a simple way of balancing load across the containers.
The IP addresses of the containers start with 172.21.0—a different range from the network we explicitly created earlier in the chapter. Docker Compose creates a different network for each project, each named after the directory in which the Compose file lives.
When I list my networks with the network ls command in Code Listing 60, I can see some default networks created by Docker, the ch05 network I created manually and the sample01_default network created by Docker Compose.
Code Listing 60: Listing Docker Networks
$ docker network ls NETWORK ID NAME DRIVER SCOPE ffe636469bc2 ch05 bridge local ef5358de1913 docker_default bridge local 5c600195c84b host host local e78c673dd3f9 none null local 30771928757e sample01_default bridge local |
You can administer all the containers in your Compose project with single commands. These are typically the Docker CLI commands transplanted to Docker Compose. In Code Listing 61, we stop all the containers, check that none are running, then start them again.
Code Listing 61: Stopping and Starting Containers with Compose
$ docker-compose stop Stopping sample01_web_5 ... done Stopping sample01_web_4 ... done Stopping sample01_web_2 ... done Stopping sample01_web_3 ... done Stopping sample01_web_1 ... done Stopping util ... done $ docker container ls CONTAINER ID IMAGE COMMAND CREATED STATUS PORTS NAMES $ docker-compose start Starting util ... done Starting web ... done |
Tip: Other commands, such as kill and rm, are available in Docker Compose, but it’s important to remember that Compose is a client-side tool. When you create services with Compose, Docker has no notion that they’re related (other than being in the same network). In order to manage the services as a single unit, you work in the directory on your client machine where the docker-compose.yml file lives.
With Docker Compose, you can orchestrate complex applications by linking containers together and running them inside a Docker network. Distributed solutions such as the example in Figure 9 can be captured at the infrastructure level in a Compose file.
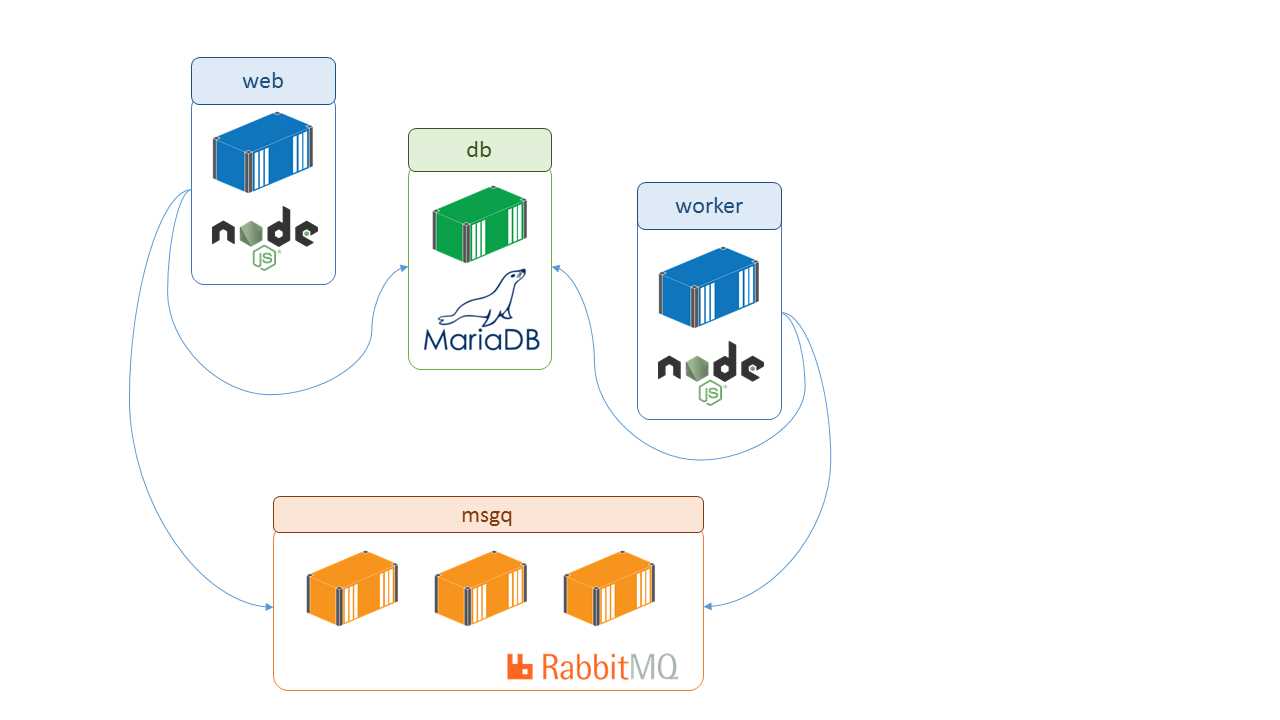
Figure 9: A Distributed System in Docker
Each component in the stack refers to its dependencies by name (msgq and db), and that will be consistent for every environment in which the containers are in the same network, even if they are running at different levels of scale (which means there’s no change to application configuration).
More advanced features exist than we can cover in a Succinctly title, but the key concept is that the network looks the same from the inside, so containers only need to know each other’s names. From the outside, the network might be a simple bridge network on a single host, such as a developer’s laptop or an overlay network across multiple servers in a datacenter—the application code and the container orchestration are the same.
Summary
Application containers are lightweight, portable units. Breaking a large system down into many small containers means you can scale components independently at runtime so that you can direct compute power where it will bring the most benefit. It also means different parts of your app can have different release cycles, which allows you to release high-value components more frequently and give value to the business more quickly.
Docker supports that with simple but powerful mechanisms for orchestrating multicontainer solutions. With Docker networking, you can set up an isolated network between a group of containers with built-in DNS so that containers can communicate with each other transparently by their names. That lets you run multiple distributed systems on a single set of infrastructure.
For cases in which you have a complex deployment with many containers, you can use Docker Compose to explicitly orchestrate the dependencies. With Compose, you define all your containers in a single place and you can manage an entire system as a single entity. Now that you know how to manage multiple containers with Docker, in the next chapter we’ll look at managing multiple Docker hosts in a cluster, using a Docker swarm.
- 1800+ high-performance UI components.
- Includes popular controls such as Grid, Chart, Scheduler, and more.
- 24x5 unlimited support by developers.