
Docker Succinctly®

CHAPTER 7
Docker on Linux, Windows, and ARM
Containers and kernels
When you run a Docker container on a Linux host, it runs in an isolated process boundary called a namespace. Inside the container, the app thinks it’s running on its own computer with no other processes, but in fact the boundary is only a logical boundary and there can be many other processes running on the same physical host.
You can see all the processes running inside and outside of your containers on the host machine, but in the container you’ll only see the processes within the namespace boundary. Figure 11 shows how that looks on a Linux machine running multiple Nginx containers.
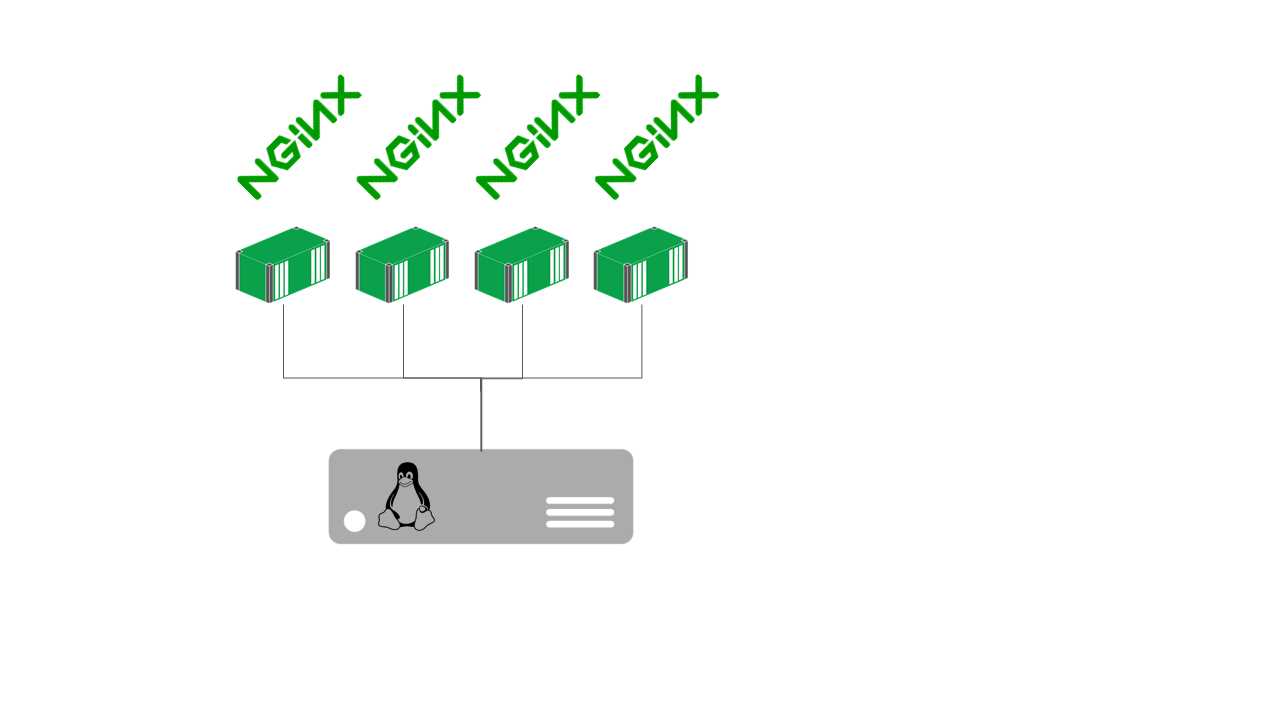
Figure 11: Multiple Containers Running Nginx
If you were to run the top command inside one of the containers, you would see only a single nginx process. But if you run top on the host, you’ll see four nginx processes and the dockerd process, which is the server part of the Docker Engine, along with any other processes you have running.
This is why Docker containers can run so efficiently—they use the underlying operating system kernel of the host machine so that processes inside the container are actually running on the host. For a host, running multiple containers is the same as running multiple processes (unlike virtual machines, for which each VM has its own kernel and a hypervisor running on the host in order to translate between the virtual kernel and the real kernel).
That is why you can’t run Linux containers on Windows or run Windows containers on Linux. A container using Ubuntu as its base image needs to run on a Linux machine so that when the container launches an executable, the host is capable of running it. Linux executables aren’t compatible with Windows, which means you can’t run an Ubuntu-based container on Windows. In this chapter, we’ll look at how Docker runs on different operating systems and see how you can mix architectures.
Docker on Linux
Linux is the native operating system for Docker. Linux has long had the technology for running containers, but Docker brought the concept of packaging up images and running them as containers, which made it simple to take advantage of the underlying Linux features. When you’re running Linux-based containers, you use a server-grade Linux distribution for your hosts, and Docker might be the only software you install. Everything else you’d want to run on your server would run as a container in Docker.
Docker is available in the package repositories for the major Linux distributions, and the only requirement is that you have a reasonably recent version of the Linux kernel running on your host. At the time of writing, the minimum Linux kernel is 3.10, which is an entire major version behind the current release, which means Docker doesn’t demand an up-to-date operating system version.
The quickest way to install Docker on Linux is to run the helper script from get.docker.com in Code Listing 74.
Code Listing 74: Installing Docker on Linux
$ curl -sSL http://get.docker.com | sh |
Doing this will install Docker and the CLI on your machine, and you can run containers and create or join a swarm using the commands we’ve seen so far. The Docker package doesn’t install Docker Compose, but that’s a client-side tool that you’d normally have running on a separate machine.
Tip: It’s important that you install the correct version of Docker. The version included with your Linux distribution is not likely to be the latest. If you don’t care to run a shell script from the Internet, the Docker Store website has detailed instructions for all the supported Linux distros.
You can administer a Docker host remotely, and all the clients are compatible with the Engine so that you can run the Docker command line from a Windows or Mac machine to work with containers on a remote Linux host.
If you use systemd to run Docker as a service on Linux, which is the default init system with Ubuntu, you get a lot of information from the status output. Code Listing 75 shows the output from a Docker Engine that isn’t currently running any containers.
Code Listing 75: Checking the Status of the Docker Daemon
$ sudo service docker status docker.service - Docker Application Container Engine Loaded: loaded (/lib/systemd/system/docker.service; enabled; vendor preset: enabled) Active: active (running) since Sun 2016-08-21 09:10:21 BST; 6h ago Docs: https://docs.docker.com Main PID: 3091 (dockerd) Tasks: 41 Memory: 1.6G CPU: 2min 35.083s CGroup: /system.slice/docker.service ├─3091 /usr/bin/dockerd -H fd:// └─3175 docker-containerd -l unix:///var/run/docker/libcontainerd/docker-containerd.sock --shim docker-containerd- |
Each running container will be listed in the CGroup section—the control groups Docker is using. You don’t need to know the details of kernel namespaces and control groups in order to use Docker successfully, but it is useful to be aware of how the runtime structures affect security.
A note on security
Docker takes a lot of the pain away from building, sharing, and running software systems, but it doesn’t achieve this by taking security shortcuts. The Docker daemon runs with root privilege on Linux, and, in the early days of Docker, users expressed concern that this was a dangerous attack vector—could a vulnerable application be compromised and gain access to other containers on the host?
Docker worked with the Center for Internet Security to address those concerns and to build a comprehensive set of recommendations in a benchmark document. These are publicly available for different versions of Docker, such as the CIS Docker 1.12.0 Benchmark.
Successive releases of Docker have increased security. You can now run containers in a user namespace without root privileges, and you can build your images to have the processes inside containers running as nonroot users. The Docker documentation has a useful section on Docker Security that covers the technical elements of securing the container environment.
Tip: There are features of Docker that actually increase the overall security of your systems. The Docker Bench tool runs as a container and scans your Linux host for vulnerabilities. Docker Security Scanning is an optional feature on the Docker Hub that scans images in your repositories and reports on known vulnerabilities for the software inside your images.
Docker on Windows
Windows Server 2016 and Windows 10 have native support for containers and Docker. There are different ways to run containers on Windows: either as Windows Containers, which share the operating system kernel and run in a similar way to Linux containers, or as Hyper-V containers, which can use the same images as Windows Containers but run in a very thin hypervisor layer so that each container has its own kernel.
You can’t run Linux-based containers on Windows, but Windows Containers are powered by Docker, which means you can package applications into Docker image binaries and run them in Windows using the same Docker command-line tool. In order for containers to run on Windows, they need to be based from a Windows image, and Microsoft has base images available on the Docker Hub.
The Hub has two base images for Windows containers: microsoft/windowsservercore and microsoft/nanoserver. Windows Server Core is a full version of Windows Server that has all the standard Windows Server features except the UI. With Server Core, you can install software from MSIs and run the full .NET Framework, which means you can use it as a base image to containerize an existing Windows application.
Nano Server is a minimal installation of Windows that follows the approach of Linux base images on the Hub. Nano Server has a limited feature set—you can’t run MSIs or the .NET Framework, and you can only use PowerShell to administer it. That means the image weighs in at around 350 MB instead of 3 GB for Server Core, and it has a much smaller attack surface.
Windows Containers are a new addition to the Docker ecosystem, but Windows uses the same Docker platform, so it’s an established technology. You can build a simple image from Windows Nano Server using the Dockerfile in Code Listing 76.
Code Listing 76: A Dockerfile for a Windows Container Image
FROM microsoft/nanoserver CMD ["powershell", "Write-Host 'Hello from Windows Nano Server!'"] |
Note: Remember that when you build an image from a Dockerfile, Docker creates temporary containers to run the instructions. Since the base image here is a Windows container, you can only build this image from a Windows machine. If you’re using Docker for Windows, be sure to switch to the Windows Containers option.
When the image is built, you can run it in the normal way. I’ve built and pushed an image from this Dockerfile onto the Hub so that you can run it with the command in Code Listing 77.
Code Listing 77: Running a Windows Container
> docker container run sixeyed/nanoserver-helloworld Hello from Windows Nano Server! |
Note: Again, this is a Windows-based container. You can’t run it if your host is a Mac or a Linux machine, or even if you’re using Windows with Docker running in a Linux VM. You can use Windows containers directly with Docker for Windows and Docker on Windows Server 2016.
These are standard Docker containers that you can manage in the normal way so that docker container ls will list the running containers and docker image ls will show you all the images in your local cache. The Nano Server base image is a good starting point for new apps when you don’t need to install heavy software and can benefit from the reduced footprint.
The Windows Server Core image doesn’t easily fit with the philosophy of having lightweight portable containers because you can easily end up with a 5 GB image once you’ve packaged your app. But it’s a great opportunity to containerize existing Windows apps without having to rewrite them so that you can move existing workloads off their own servers and into a Docker swarm.
Docker on ARM
You can also run Docker on low-cost, low-power computing devices based on the Advanced RISC Machine (ARM) CPU architecture, such as the Raspberry Pi or Pine64. ARM devices tend to be well supported with Linux operating systems, but unfortunately you can’t run normal Linux-based Docker images on ARM devices. The Linux kernel for a container may be the same as the kernel on the ARM device, but the binary image was probably compiled for the x86/x64 processor instruction set, which is not compatible with ARM.
In order to run Docker containers on ARM, the container must have been compiled for the ARM chipset, which in practice means building the image from a Dockerfile on your ARM device. Once the image is built, you can ship it in the usual way, including pushing it to the Docker Hub (and there are many ARM-compatible images on the Hub). Currently, ARM images are not easy to identify because you can’t search the Hub by chipset or operating system.
The Raspberry Pi is a good ARM device to get started with because the setup script on get.docker.com has support for Raspbian, the native Linux distribution for the Pi. So, in order to install the Docker command line and Docker engine, simply use the same command for other Linux distributions, as in Code Listing 78.
Code Listing 78: Installing Docker on the Raspberry Pi
$ curl -sSL get.docker.com | sh |
This is good for Raspberry Pi 2, 3, and Zero models—so you can get Docker running on a $5 computer! There are ARM base images on the Docker Hub, which means you can containerize any application that runs on ARM. And because popular platforms such as Java, Go, and NodeJS have ARM support, you can build Docker images for those apps. The new .NET Core platform from Microsoft has ARM support on the roadmap for the next release.
The Dockerfile in Code Listing 79 can be used to build the obligatory Hello World app in an ARM-compatible Docker image based on the resin/rpi-raspbian image on the Hub.
Code Listing 79: Dockerfile for an ARM Image
FROM resin/rpi-raspbian:jessie CMD ["echo", "Hello World from the Pi!"] |
You can build and run that image with the Docker CLI as usual, but as with Windows containers, you must run the commands on the correct architecture. In this case, you need to build the image and run containers on the Pi itself, as in Code Listing 80.
Code Listing 80: Building Images and Running Containers on ARM
pi@raspberrypi:~ $ docker build -t sixeyed/armhf-helloworld . Sending build context to Docker daemon 9.728 kB Step 1 : FROM resin/rpi-raspbian:jessie ---> e353bbe6de96 Step 2 : CMD echo Hello World from the Pi! ---> Running in 41038ed95981 ---> cc950743d17a Removing intermediate container 41038ed95981 Successfully built cc950743d17a pi@raspberrypi:~ $ docker run sixeyed/armhf-helloworld Hello World from the Pi! |
There are a number of ARM-based images on the Docker Hub. The armhf account has repositories for Node and Redis running on ARM, but they are flagged as experimental. The number of ARM-compatible images on the Hub is small at the moment, and building your own images can be time-consuming on an ARM device, but once you have an image you can run containers from it in the normal way.
Docker doesn’t have full feature parity on ARM, but you can join multiple devices together in a swarm. Interestingly, the swarm supports heterogeneous hosts, which means you can build a hybrid swarm of ARM, x64, Linux, and Windows hosts.
Hybrid Docker swarms
You can’t mix containers for different OS kernels and CPU architectures on a single Docker host, but you can build a swarm with hosts from multiple architectures and operating systems, and you can run different types of containers on the swarm. Figure 12 shows a sample architecture for a hybrid swarm.
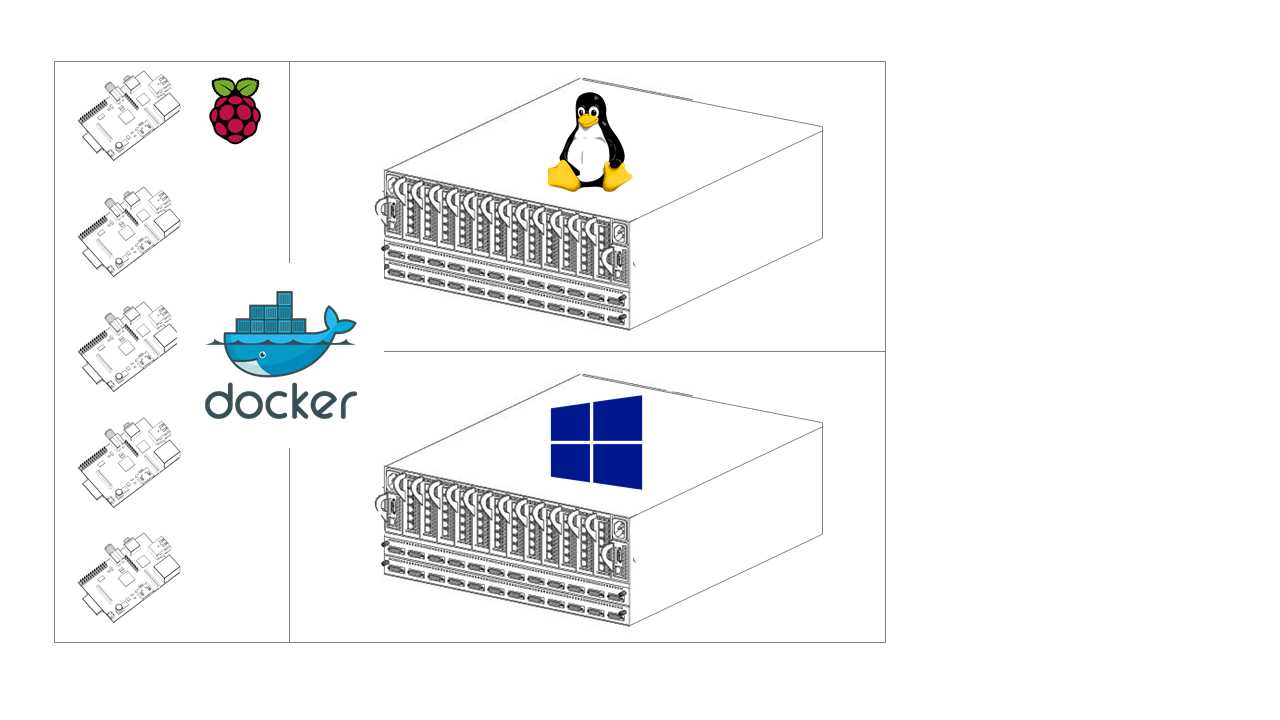
Figure 12: A (Very) Hybrid Docker Swarm
This scenario is not quite as extreme as it looks. Provided you have a fast enough network connection between the hosts, this swarm is highly functional and gives you a huge amount of flexibility. You can run an existing ASP.NET app in Windows Server Core containers on the Windows nodes, front them with a caching proxy in Nginx running on the Linux nodes, and use the ARM nodes for noncritical workloads, such as collecting metrics from the other containers and running a performance dashboard.
You create a hybrid swarm in the same way as a normal swarm, starting with a manager and joining new nodes. But in order to make sure containers run only on the correct nodes, you need to give Docker some extra information. You can add arbitrary labels to Docker hosts—for example, you can add flags like cpu=armhf or os=linux and os=windows to the hosts.
In Code Listing 81, I have created a hybrid swarm with an x64/Linux node as the manager and a Raspberry Pi as the worker. I use the update command with the --label-add option to label the Pi with a custom cpu=armhf label.
Code Listing 81: Labeling Swarm Nodes
$ docker node ls ID HOSTNAME STATUS AVAILABILITY MANAGER STATUS 0bvd2x0lh4e5kbpzpydvev02r * sc-ub-brix Ready Active Leader 3he5xk2ve5fewk4j0pmwhqril raspberrypi Ready Active $ docker node update --label-add cpu=armhf raspberrypi raspberrypi |
Services can be scheduled with constraints to tell Docker that they have special host requirements. Node labels can be used in constraints so that we can run three replicas of the x64-based Nginx container with the command in Code Listing 82 (which excludes nodes with the cpu=armhf label).
Code Listing 82: Creating a Service with a Node Label Constraint
$ docker service create --name website --constraint 'node.labels.cpu != armhf' --replicas 3 nginx:alpine dqtfwk7zmxe44r1ztrh2k116m |
When the scheduler selects nodes, it will exclude any that have a label with the key cpu and the value armhf. In this case, that only leaves the manager node, and as we see in Code Listing 83, all three containers are running on the manager.
Code Listing 83: Listing Service Instances
$ docker service ps website ID NAME IMAGE NODE DESIRED STATE CURRENT STATE ERROR 7z9a5k5vaepdqer9eyi7izg16 website.1 nginx:alpine sc-ub-brix Running Running 6 seconds ago el30vk6euevq7swx1e9fw4axe website.2 nginx:alpine sc-ub-brix Running Running 5 seconds ago 5g2p0f9d8i28jqfh01of1hft0 website.3 nginx:alpine sc-ub-brix Running Running 6 seconds ago |
Docker supports two kind of labels: node labels that were introduced with swarm mode for scheduling constraints, and engine labels for backwards compatibility on older hosts. In order to set the Docker Engine labels, you need to amend the environment configuration on the host, which will differ for each operating system. Node labels can be administered on the manager, which means they are a better approach.
Note: In order to span systems across hybrid swarms, you need to create an overlay network and start the services with the --network option. Different platforms have different networking stacks, but as of Docker 17.06 you can network containers across hybrid swarms.
Summary
We’ve looked at how Docker containers work on different operating systems and CPU architectures. The main takeaway is that you can’t mix and match—images based on Windows can run only on Windows hosts, images based on Linux can run only on Linux hosts, and images compiled for x64 can run only on x64 hosts.
With Docker swarm mode, you can have nodes running on different architectures and operating systems, which lets you run a single cluster capable of hosting Linux, Windows, and even ARM applications with a single management interface. That’s a particularly important option when you’re paying for compute. If you want to run Dockerized Windows apps in the cloud, you can have Windows VMs as worker nodes while using cheaper Linux VMs for the manager nodes.
Running cloud solutions on Docker is particularly attractive because you get a consistent packaging and deployment model that you can use on any cloud, which means you can avoid being locked into a particular cloud platform. Next, we’ll look at Docker in the cloud.
- 1800+ high-performance UI components.
- Includes popular controls such as Grid, Chart, Scheduler, and more.
- 24x5 unlimited support by developers.