
Docker Succinctly®

CHAPTER 4
Data Storage in Docker
Containers and their data
Docker uses a layered filesystem for containers called the Union File System. When you run a container from an image, all the layers going into the image are mounted in the container as read-only parts of the filesystem. Next, a read-write layer is created on top for this instance of the container. You can change the data inside your container, but this will not change the image itself. If you create a file in a running container and run a second container from the same image, the new container won’t have the file you created in the first container.
That restriction guarantees that every container you run from an image will start with exactly the same state because the only way to change an image is to explicitly create a new one. In Docker, if you want to persist data in your container and have it available the next time you run a container from that image, or if you want to share it with other containers or your host machine, you do it with volumes.
Volumes are like virtual disk drives inside the container. When you write to them, you’re actually writing to a permanent location on the host machine’s disk (or another storage platform), but inside the container it will look just like a local file path. Volumes are owned by one container, but they can be shared with other containers. In this chapter, we’ll see how Docker volumes work and what you can do with them.
Images, containers, and volumes
When you run a container, volumes can be added to it or they can be configured in the Dockerfile so that they’re part of the image—the same as explicitly specifying ports to be made available with the EXPOSE instruction. The VOLUME instruction specifies a data volume with a named path that you can use as a file location in the container. Code Listing 32 shows a simple Dockerfile with a single data volume with one file created in it.
Code Listing 32: A Dockerfile with a Volume Instruction
FROM ubuntu:16.04 RUN mkdir /v1 && touch /v1/file1.es.txt VOLUME /v1 |
Note: touch is a Linux command that creates a new, empty file or updates the timestamp on an existing file. It’s a useful utility that Windows doesn’t have in the command shell or in PowerShell.
We can build that image and run an interactive container from it in order to see what happens when we write data inside a container. Code Listing 33 runs a container from that image, which I built with the tag dockersuccinctly/ubuntu-with-volume. The container runs interactively (with the -it options), and the Docker command also uses the --rm option, which will remove the container once it exits.
Code Listing 33: Running a Container with a Volume
$ docker container run -it --rm dockersuccinctly/ubuntu-with-volume |
Now, we can write some data in our running container. This is an Ubuntu container, and we can write to the usual paths—/ is the filesystem root, and /v1 is the name of the volume we specified in the Dockerfile. Code Listing 34 shows a new file being written to the volume.
Code Listing 34: Creating a New File in a Volume
root@bf780f3e8a15:/# touch /v1/file2.es.txt |
As long as that container is running, both the files in the volume exist and can be used inside the container. Code Listing 35 shows the output of searching for all the .es.txt files on the filesystem, and we can see two files are there.
Code Listing 35: Finding Files in Volumes
root@bf780f3e8a15:/# find / -iname '*.es.txt' /v1/file2.es.txt /v1/file1.es.txt |
Now, if we exit the container, what will happen to the data? The container is removed because we ran it with the --rm flag, but the files in the volume are in a location on the host, which raises the question: can they still be used? In Code Listing 36, I run a second container from the same image and repeat the find command.
Code Listing 36: Checking the Volume in a New Container
$ docker container run -it --rm dockersuccinctly/ubuntu-with-volume root@9dd1e7d81018:/# find / -iname '*.es.txt' /v1/file1.es.txt |
Because the new container isn’t sharing the volume from the first container, only the original file from the image exists. It has its own data volume on the host. The file from the image was copied into the volume for the new container, but any changes this container makes won’t change the image. The only way to add data into a volume that all containers will see is by creating the files in the image using the Dockerfile.
Note: The position of the VOLUME instruction in the Dockerfile is important. If you try to work with files in a volume after the VOLUME instruction, the work will be done in a temporary container during the build process, and because the volume is container-specific, the changes won’t be committed to the image. Instead, you should set up the data on the filesystem first, so that it’s part of the image, then expose the volume.
Figure 7 shows how data volumes compare with the filesystem layers in an image and how a running container makes use of both, together with its own, dedicated read-write layer.
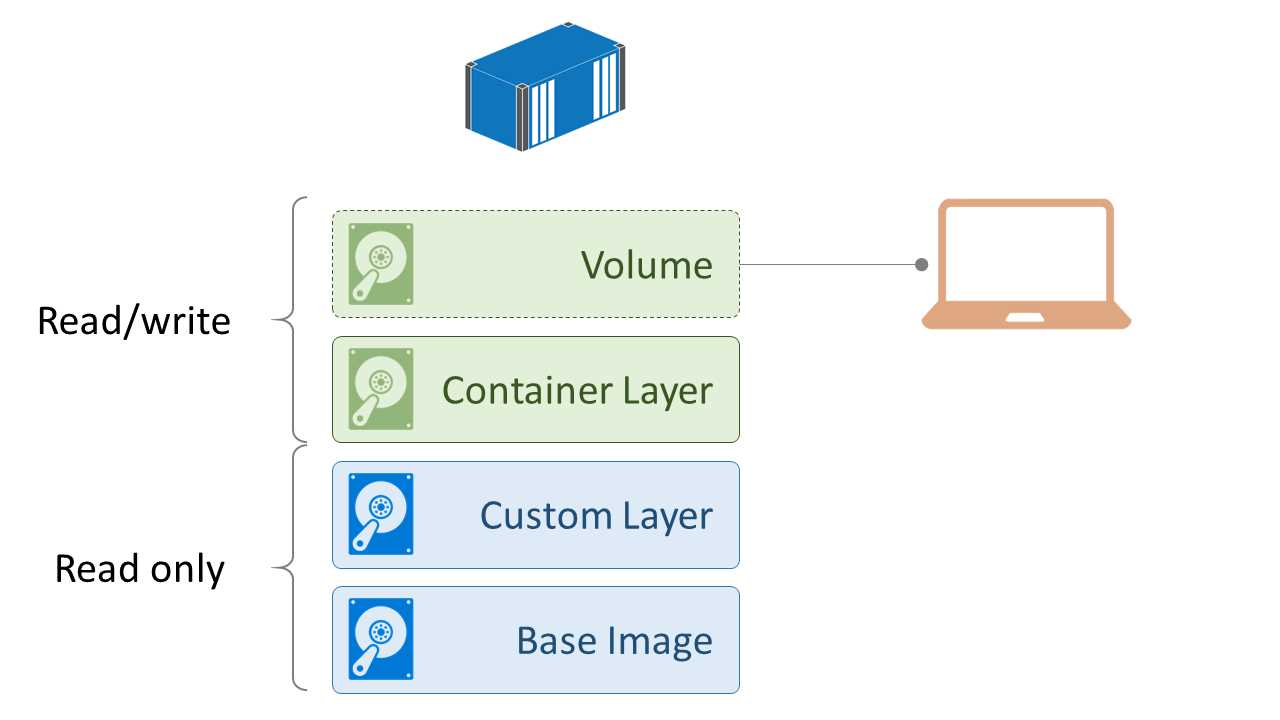
Figure 7: Layers in the Union File System
The setup is different when you map an image volume to a location on the host.
Mounting into data volumes
If you want to look at the data inside a container, you typically must attach to it or execute a command to run inside it. With data volumes, when you run a container, you can mount the volume from a specified path on the host, which means you have a shared folder between the host and any containers using the same mounted volume.
You can mount a volume using an option in the container run command similar to publishing a port—you specify the path on the host and the name of the volume to map. Code Listing 37 creates a folder in my home directory, then runs a container from the previous image but mounts the v1 container from the local directory on the host with the -v option.
Code Listing 37: Mounting a Volume from the Host
$ mkdir ~/v1 $ docker container run -it --rm -v ~/v1:/v1 dockersuccinctly/ubuntu-with-volume |
This action results in different behavior. When a data volume is mounted from the host, files from the image do not get copied into the container volume when it starts because this is a shared location and copying files could overwrite data. So, in this new container we won’t have any data in the volume, as Code Listing 38 shows.
Code Listing 38: Listing the Contents of a Mounted Volume
root@1f5bf6d15d52:/# ls -l /v1 total 0 |
When we create a file, however, it will be available to the container and to the host because the data will persist in a known location when the container is removed. In Code Listing 39, we add a new file to the volume and leave the container.
Code Listing 39: Writing Data in a Mounted Volume
root@1f5bf6d15d52:/# touch /v1/mappedfile1.es.txt root@1f5bf6d15d52:/# ls -l /v1 total 8 -rw-r--r-- 1 root root 0 Aug 20 18:42 mappedfile1.es.txt root@1f5bf6d15d52:/# exit |
Now we have the file on the host, which means that if we start a new container with the same data volume mount, we will see the file from the first container, as in Code Listing 40.
Code Listing 40: Running a New Container with a Mounted Volume
$ docker container run -it --rm -v ~/v1:/v1 dockersuccinctly/ubuntu-with-volume root@642cebc0e1be:/# ls -l /v1 total 8 -rw-r--r-- 1 root root 0 Aug 20 18:42 mappedfile1.es.txt |
The original file from the image has still not been copied in, but the file from the previous container is available even though that container has been removed.
Tip: It’s good to be clear on the different ways of using Docker volumes. Many images on the Hub use volumes for variable data, such as configuration files, or for permanent state, such as database files. The Nginx image is a good example—it has a volume defined for website content, and if you mount the volume from a local directory containing your website files, you can run your site in an Nginx container directly from the official image without having to build your own image.
Mounting a local directory into a container enables many scenarios, but mounting is limited if you need to move your container to a different host—the data it needs will no longer be available on the new host. For those scenarios, Docker supports shared storage engines as the source for volume mounts through the volume plugin architecture. You can choose a volume plugin that matches your architecture and mount volumes from a shared location available from any host.
For cloud deployments, there are plugins that let you share storage using the platform’s services—for example, Azure File Storage in Azure or Persistent Disks in Google Compute. Those options are useful when you have clusters of hosts running in a Docker swarm, which we’ll look at in Chapter 6, Clustering Hosts with Docker Swarm.
Sharing data volumes
Data volumes exist outside of a container, which means any data written to them persists even when the container isn’t running or has been removed. That also means a container’s volumes can be shared between containers from the same image or different images, which is useful for scenarios such as backing up databases. You might have a database running in a long-running container and run a task container to back up the data files, sharing the volume from the database container.
Tip: You may find documentation that recommends using a data-only container that runs a container from a lightweight image, such as BusyBox with a data volume. In order to make use of this as a data container, stop the container immediately so that it doesn’t use any compute—use it only for sharing the volume to other containers. This was common with earlier versions of Docker, before host volume mounting was introduced, but now it isn’t needed.
We can demonstrate sharing volumes for the backup scenario with the official MongoDB image by using the command in Code Listing 41 to run a Mongo database in a background container.
Code Listing 41: Running MongoDB in a Container
$ docker container run -d --name mongo mongo |
The Mongo image stores database files in a volume named /data/db that we can access in a separate container by running it with the --volumes-from option, which shares the volumes from the named container in the new container. In Code Listing 42, we run an interactive container with access to the database’s volumes and list the Mongo data directory contents.
Code Listing 42: Viewing Mongo Data from Another Container
$ docker container run -it --volumes-from mongo ubuntu root@c1bec125113a:/# ls -l /data/db total 136 -rw-r--r-- 1 999 999 46 Aug 20 20:04 WiredTiger -rw-r--r-- 1 999 999 21 Aug 20 20:04 WiredTiger.lock -rw-r--r-- 1 999 999 915 Aug 20 20:06 WiredTiger.turtle -rw-r--r-- 1 999 999 40960 Aug 20 20:06 WiredTiger.wt -rw-r--r-- 1 999 999 4096 Aug 20 20:04 WiredTigerLAS.wt -rw-r--r-- 1 999 999 16384 Aug 20 20:05 _mdb_catalog.wt -rw-r--r-- 1 999 999 16384 Aug 20 20:05 collection-0--6297223593488391649.wt drwxr-xr-x 2 999 999 4096 Aug 20 20:06 diagnostic.data -rw-r--r-- 1 999 999 16384 Aug 20 20:05 index-1--6297223593488391649.wt drwxr-xr-x 2 999 999 4096 Aug 20 20:04 journal -rw-r--r-- 1 999 999 2 Aug 20 20:04 mongod.lock -rw-r--r-- 1 999 999 16384 Aug 20 20:06 sizeStorer.wt -rw-r--r-- 1 999 999 95 Aug 20 20:04 storage.bson |
In the new container, the data volume from the Mongo container has the same path—/data/db. The new container can see the files created by Mongo in order to physically store the databases, which means you can simply use tar to back up all of them to a single archive. This is obviously not a robust backup strategy for a production database, but it is a simple approach that can be useful for testing or development, or to back up and restore the known state.
The volume for this container is stored on the host machine, but because it’s not using a mount source, we don’t know where the data is physically stored. The docker container inspect command gives us that information along with a lot of extra details about the container. Code Listing 43 shows an extract of the output that focuses on the Mounts section, which lists the volumes in use by the container.
Code Listing 43: Inspecting Volume Mounts
$ docker container inspect mongo ... "Mounts": [ { "Name": "bb05dc88f914ee0129efc68cc1221659a279cb26de0c9742712bdcd6faac464e", "Source": "/var/lib/docker/volumes/bb05dc88f914ee0129efc68cc1221659a279cb26de0c9742712bdcd6faac464e/_data", "Destination": "/data/db", "Driver": "local", "Mode": "", "RW": true, "Propagation": "" } ... |
The key information here is the RW flag, which tells us this is a read-write volume (Docker also allows containers to run with read-only volumes), and the Source, which tells us where the data is actually stored on the host. Code Listing 44 shows that we can view the content of the volume source on the host machine too, provided we have permission to access it.
Code Listing 44: Listing Volume Contents from the Host
$ sudo ls -l /var/lib/docker/volumes/bb05dc88f914ee0129efc68cc1221659a279cb26de0c9742712bdcd6faac464e/_data total 120 drwxr-xr-x 2 999 docker 4096 Aug 20 21:40 diagnostic.data -rw-r--r-- 1 999 docker 16384 Aug 20 21:05 index-1--6297223593488391649.wt -rw-r--r-- 1 999 docker 16384 Aug 20 21:05 collection-0--6297223593488391649.wt drwxr-xr-x 2 999 docker 4096 Aug 20 21:04 journal ... |
This is the physical storage location for the files on the host. Containers can see this data in the volume thanks to the virtual filesystem mounting the data into the container. The container doesn’t get a copy of the files—it uses the originals directly. If you’re running Linux containers on Docker for Mac or Docker for Windows, remember the “host” is really a Linux VM, so you won’t see the files on your physical machine.
Note: From the host, and from containers that share the data volume, file permissions are preserved from the original container. In this case, all the data files are writable from outside the Mongo container, which means that an external process can modify or delete data and potentially corrupt the database. If you need to read data in another container, you can use the :ro flag to make the target volume read-only, e.g., --volumes-from mongo:ro. Checking the contents of the volume on the host is sometimes useful for tracing issues, but in general you shouldn’t poke around in /var/lib/docker, which is where the Docker Engine keeps its data.
Removing containers, data volumes, and images
Containers end when the process inside them finishes or when they are externally ended with the docker container kill or docker container stop commands. But the container isn’t removed—it’s just stopped. The docker container ls command won’t show the container unless you add the --all flag, which will list all containers, including the stopped ones.
If you view Docker as a host for short-lived task containers, this might seem surprising, but there is a consistent approach for all types of containers. A background service container might be stopped and restarted, and while it is stopped you’d expect the container to exist with all its data. For single-task and interactive containers, it’s good practice to use the --rm flag when you start the container so that Docker will automatically remove the container when it ends.
To explicitly remove containers, use the docker container rm command and specify containers by their ID or name, as in Code Listing 45.
Code Listing 45: Stopping and Removing a Container
$ docker container stop mongo mongo $ docker container rm mongo mongo |
Running containers are not deleted when you run the rm command, which means you can chain rm with docker container ls to remove all stopped containers, as in Code Listing 46.
Code Listing 46: Removing All Stopped Containers
$ docker container rm $(docker container ls -a -q) c28b88ef8354 c1bec125113a c960a3f90043 ... |
Note: This is Linux syntax, but on Windows machines you can use the exact same syntax in PowerShell.
You should also be aware that when you remove a container that has a data volume, the data volume is not automatically removed. In order to remove the data volume along with the container, you need to explicitly state it with the -v option: docker container rm -v {container}.
We’ve stopped the Mongo database container and removed it, but we didn’t use the -v flag, so the data volume with all the database files continues to exist as a directory on the host machine. This is called a dangling volume because there’s no container available and it’s simply using up space on your host drive. With the Docker CLI you can list all the dangling volumes and chain that command with volume rm to remove all the dangling volumes, as in Code Listing 47.
Code Listing 47: Listing and Removing Dangling Volumes
$ docker volume ls -qf dangling=true 06d3a6e04d0dfc6034a5c589ac4d5f1ae2a55079052c9b7370c7f060d3e39f5a 09f6df5ecb28f92127d06f2ff3a8724f018e82e0c9bbbc4eb4e28917bd4d8542 0d322921340a086be82c413ac047c841d834a1592aac1266f5c4caf0cb644d44 ... $ docker volume rm $(docker volume ls -qf dangling=true) 06d3a6e04d0dfc6034a5c589ac4d5f1ae2a55079052c9b7370c7f060d3e39f5a 09f6df5ecb28f92127d06f2ff3a8724f018e82e0c9bbbc4eb4e28917bd4d8542 0d322921340a086be82c413ac047c841d834a1592aac1266f5c4caf0cb644d44 ... |
In development and test environments, it’s easy to find yourself with a large number of stopped containers and dangling volumes, so it’s good practice to put these commands in a cleanup script that you run regularly. The machines on which you regularly build images or pull images to try out can end up with a large image cache. Images are never automatically removed by Docker—they must always be explicitly deleted with the docker image rm command.
As with volumes, the Docker CLI includes the concept of dangling images—Docker images that are in the cache but have no containers based off them. You can combine a list of dangling images with the image rm command in order to remove unused images and reclaim a lot of disk space, as in Code Listing 48.
Code Listing 48: Listing and Deleting Dangling Images
$ docker image rm $(docker image ls -f "dangling=true" -q) Deleted: sha256:9417bb0f80a5c5eeb72e9aa8fd1a43dc13ce322cf49b1640a3c39f0f994a8b9b Deleted: sha256:b445166061334c8c206e1d7be26cab455e022f781dce1f916f195d2292b18df2 Deleted: sha256:f4b91f407b83bd8bc0c20063fdadab06af1f2d6c6de7a3fd6bf6c2f55d8928ca ... |
Note: The CLI also has the docker system prune command, which you can use to remove all unused containers, volumes, and images.
Summary
We’ve explored storage mechanisms in Docker and looked at data volumes and the different ways volumes can be mounted and shared. We’ve seen that you can provide access to data in containers by mounting volumes from paths on the host or on a storage platform using a volume plugin. Alternatively, you can explicitly share the volumes from one container with other containers, allowing many containers to access the same data.
Volumes and containers persist even when the container has stopped running, and this can clog up your disk. We saw some useful commands for cleaning up volumes, containers, and images. You can run a system prune on a schedule that ensures your environments will stay clean.
If you share volumes between containers, you must be mindful that many processes can attempt to access the same files and end up overwriting or corrupting data. In order to prevent that, data volumes can be shared with read-only access that supports scenarios such as creating backups or indexing data without the risk of modifying it. Docker also has functionality for connecting containers at a higher level so that they can share state without sharing data. We will look at orchestrating with Docker in the next chapter.
- 1800+ high-performance UI components.
- Includes popular controls such as Grid, Chart, Scheduler, and more.
- 24x5 unlimited support by developers.