
Direct3D Succinctly®

CHAPTER 9
User Input
Processing user input is important for games. In the past there was a component included with DirectX called DirectInput, but this is no longer recommended. As a rule of thumb, try to create user inputs with well established design methodologies. Use Windows controls where possible or controls that have the same functionality. Users are generally familiar with the way Windows works. Its user interface was not developed by a single person in a short amount of time. They were designed and developed by possibly thousands of people over the years, and the current state of operating system (OS) controls is very reliable, flexible, and user friendly.
When designing an interface, we often want a gamer to be able to play the game with absolutely no instruction. They should simply know how to play just by looking at the game. Sometimes this is not possible or desirable, but usually this is what a user interface should aim for.
Control Types
There are several different methods users commonly use to interact with computers. Keyboards, computer mice, touch screens, and game controllers are the most common. In this chapter, we will examine processing all of these except for the game controller.
From our point of view, the mouse and the touchscreen will be the same input method. There are many differences between the two input methods. The mouse has several buttons and the touchscreen has other metrics such as how hard the pointer is being depressed. I will refer to both of these methods as the pointer.
It is important to know that your games should fully support both a keyboard and mouse or touch screen input methods. If applications do not fully support both of these user controls, Microsoft may not allow the application to be uploaded to the Windows Store. The mouse control and touchscreen can be handled in almost the same way, and throughout this chapter we will refer to both simply as the pointer.
Keyboard
Normally in video games we are interested in knowing if a key on the keyboard is down or up. This is different from a word processing application where the keystroke is important. When a key is depressed, a key press event is raised. The key press is repeated over and over as long as the key remains pressed. This means that if we have a word processor open and we hold the “a” key down, the first “a” will appear immediately, then after a short period many more will appear in rapid succession. The repeat delay is settable from the Windows control panel. This is not a desirable method for controlling video games; the delay between the initial key press event and the repeated ones makes reading key press events impractical for controlling video games.
Instead of key press events, we read key down events and key up events. The simplest method for recording which keys are down is to create an array of boolean values, one for each key on the keyboard. This array is the key state array, or the state of each of the keys on the keyboard. Initially, every element in the array is set to false, meaning all the keys are up. When the user depresses a key, the corresponding array element is set to true. When the user releases a key, the corresponding array element is set to false. We can read the key state of any particular key from our update method and respond to the keys the user has depressed.
The first thing to do is add a class with the key state array. Add two files, Keyboard.h and Keyboard.cpp. The code for these new files is presented in the two following code tables.
// Keyboard.h #pragma once // This class records the keystates class Keyboard { private: bool m_keystates[256]; public: // Public constructor Keyboard(); // Set all keys to up void Reset(); // Register keydown event void KeyDown(Windows::System::VirtualKey key);
// Register keyup event void KeyUp(Windows::System::VirtualKey key);
// Query a keystate bool IsKeyDown(Windows::System::VirtualKey key); }; |
// Keyboard.cpp #include "pch.h" #include "Keyboard.h" Keyboard::Keyboard(){ Reset(); } void Keyboard::Reset(){ for(int i = 0; i < 256; i++) m_keystates[i] = false; } void Keyboard::KeyDown(Windows::System::VirtualKey key){ m_keystates[(unsigned char) key] = true; } void Keyboard::KeyUp(Windows::System::VirtualKey key){ m_keystates[(unsigned char) key] = false; } bool Keyboard::IsKeyDown(Windows::System::VirtualKey key){ return m_keystates[(unsigned char) key]; } |
The class is fairly simple; it consists of a bool array called m_keystates and several getters and setters for when the keys are pressed and released.
To add a reference to the Keyboard.h file to the SimpleTextRenderer.h file, see the following code table.
// SimpleTextRenderer.h #pragma once #include "DirectXBase.h" #include "Model.h" #include "VertexShader.h" #include "PixelShader.h" #include "ModelReader.h" #include "Texture.h" #include "Keyboard.h" // This class renders simple text with a colored background. |
Add the definitions for KeyUp and KeyDown member methods to the SimpleTextRenderer, and a keyboard member variable called m_keyboard to the class as well. These changes are highlighted in the following code table. When a key is pressed or released on the keyboard, we will route it to the KeyUp and KeyDown methods so the SimpleTextRenderer can respond to the user input.
// Method for updating time-dependent objects. void Update(float timeTotal, float timeDelta); // Keyboard methods: void KeyDown(Windows::System::VirtualKey key); void KeyUp(Windows::System::VirtualKey key); private: Model *m_model; Microsoft::WRL::ComPtr<ID3D11Buffer> m_constantBufferGPU; ModelViewProjectionConstantBuffer m_constantBufferCPU; Texture m_texture; ID3D11SamplerState *m_samplerState; // Shaders VertexShader m_vertexShader; PixelShader m_pixelShader; // Keyboard member variable Keyboard m_keyboard; }; |
Next, we need to record when a key is pressed or released. This can be done by attaching events to the DirectXPage class. Open the DirectXPage.xaml.h file and add method prototypes to capture this event. These changes are highlighted in the following code table.
void OnOrientationChanged(Platform::Object^ sender); void OnDisplayContentsInvalidated(Platform::Object^ sender); void OnRendering(Object^ sender, Object^ args); // Keyboard events void OnKeyDown(Object^ sender, Windows::UI::Xaml::Input::KeyRoutedEventArgs^ e); void OnKeyUp(Object^ sender, Windows::UI::Xaml::Input::KeyRoutedEventArgs^ e); Windows::Foundation::EventRegistrationToken m_eventToken; |
Add the body of these events to the DirectXPage.xaml.cpp file. These events route the key presses to the m_renderer member variable we just created. These changes are presented in the following code table. I have added these event handlers to the bottom of the DirectXPage.xaml.cpp file.
void DirectXPage::OnRendering(Object^ sender, Object^ args) { m_timer->Update(); m_renderer->Update(m_timer->Total, m_timer->Delta); m_renderer->Render(); m_renderer->Present(); } void DirectXPage::OnKeyDown(Object^ sender, Windows::UI::Xaml::Input::KeyRoutedEventArgs^ e) { m_renderer->KeyDown(e->Key); } void DirectXPage::OnKeyUp(Object^ sender, Windows::UI::Xaml::Input::KeyRoutedEventArgs^ e) { m_renderer->KeyUp(e->Key ); } |
Attach the events in the DirectXPage.xaml.cpp file in the constructor. The following code table illustrates these changes.
m_eventToken = CompositionTarget::Rendering::add(ref new EventHandler<Object^>(this, &DirectXPage::OnRendering)); m_timer = ref new BasicTimer(); // Attach the keyboard events this->KeyUp += ref new KeyEventHandler(this, &DirectXPage::OnKeyUp); this->KeyDown += ref new KeyEventHandler(this, &DirectXPage::OnKeyDown); } |
The body of the methods (KeyDown and KeyUp) in the SimpleTextRenderer.cpp file is very simple, it just routes the keys to the m_keyboard member variable. The code for these functions is highlighted in the following code table. I have placed these functions at the end of the SimpleTextRenderer.cpp file, after the Render method.
HRESULT hr = m_d2dContext->EndDraw(); if (hr != D2DERR_RECREATE_TARGET) { DX::ThrowIfFailed(hr); } } void SimpleTextRenderer::KeyDown(Windows::System::VirtualKey key) { m_keyboard.KeyDown(key); } void SimpleTextRenderer::KeyUp(Windows::System::VirtualKey key) { m_keyboard.KeyUp(key); } |
You should be able to run the application at this point. The keys will not do anything yet, but the application is reading and routing all of the key up and down events through the m_keyboard variable.
Mouse Touchscreen Pointer
Many mobile devices have a touchscreen and desktop computers have a mouse. From our point of view, these input methods will be the same. We can program touchscreen or mouse controls using the standard Windows XAML controls. In this section, we will add a directional pad (dpad) for up, down, left, and right. We will move the spaceship in the next chapter. For now, we will just capture the controls.
Double-click on the DirectXPage.XAML and add four Ellipse controls to the XAML page (see Figure 9.1). These will be our dpad; it does not matter where you add the ellipses or how big they are, since we will change these settings in the XAML code view.
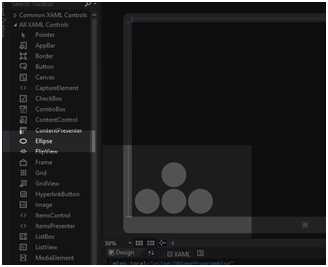
Figure 9.1: Adding Ellipses for a DPad
Note: I have used the Ellipse control rather than XAML buttons for our DPad. XAML buttons have a lot of code already written in the background. For instance, they have functionality to handle the pointer being pressed and released. These events are handled automatically and they will not be passed on to our custom event handlers. It is easy to capture pointer presses and releases with the Ellipse controls.
Now that we have added the ellipses, the settings can be changed in the XAML code view. These changes are highlighted in the following code table.
<SwapChainBackgroundPanel x:Name="SwapChainPanel" PointerMoved="OnPointerMoved" PointerReleased="OnPointerReleased"> <Ellipse Fill="#FFF4F4F5" HorizontalAlignment="Left" Height="100" Margin="115,0,0,10" Stroke="Black" VerticalAlignment="Bottom" Width="100" Opacity="0.25" PointerPressed="OnDownButtonDown" PointerEntered="OnDownButtonPointerEntered" PointerReleased="OnDownButtonUp" PointerExited="OnDownButtonUp"/> <Ellipse Fill="#FFF4F4F5" HorizontalAlignment="Left" Height="100" Margin="220,0,0,10" Stroke="Black" VerticalAlignment="Bottom" Width="100" Opacity="0.25" PointerPressed="OnRightButtonDown" PointerEntered="OnRightButtonPointerEntered" PointerReleased="OnRightButtonUp" PointerExited="OnRightButtonUp"/> <Ellipse Fill="#FFF4F4F5" HorizontalAlignment="Left" Height="100" Margin="115,0,0,115" Stroke="Black" VerticalAlignment="Bottom" Width="100" Opacity="0.25" PointerPressed="OnUpButtonDown" PointerEntered="OnUpButtonPointerEntered" PointerReleased="OnUpButtonUp" PointerExited="OnUpButtonUp"/> <Ellipse Fill="#FFF4F4F5" HorizontalAlignment="Left" Height="100" Margin="10,0,0,10" Stroke="Black" VerticalAlignment="Bottom" Width="100" Opacity="0.25" PointerPressed="OnLeftButtonDown" PointerEntered="OnLeftButtonPointerEntered" PointerReleased="OnLeftButtonUp" PointerExited="OnLeftButtonUp"/> </SwapChainBackgroundPanel> |
This XAML code specifies that the ellipses are to be anchored to the lower left corner of the screen, which is the most common position for a dpad on touchscreens. They are circular with a diameter of 100 pixels. They are almost transparent; this is so they do not obscure the playfield.
The events I have captured are PointerPressed and PointerReleased. If you are programming for mouse, the other two events I have captured, PointerEntered and PointerExited, do not make much sense. I have captured these events so that if the user holds down the pointer with a touchscreen and slides their finger to another ellipse, the PointerPressed event will not fire. This is no good for touchscreen. The other side of this coin is, if the mouse cursor is not pressed but enters or exits the ellipses, the PointerEntered and PointerExited events should not fire. I have captured the events and distinguished between the pointer types in the event handlers. I have routed the PointerExited event through the same handler as PointerReleased, as they do exactly the same thing. To create the event handlers, right-click the method’s name in the XAML code and select Navigate to Event Handler from the context menu. Visual Studio will write the event handler and take us to it in the code (see Figure 8.2).
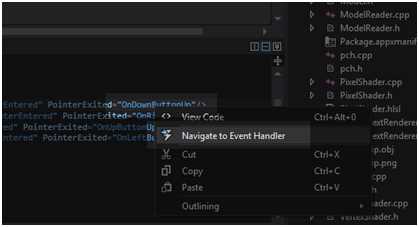
Figure 8.2: Adding Event Handlers
Next, we will fill in the bodies for the event handlers. The changes to the DirectXPage.xaml.cpp file are highlighted in the following code table.
The above methods send KeyUp and KeyDown signals to our Keyboard class. Note the test for the PointerDeviceType; this distinguishes between mouse and touchscreen. It is actually very cumbersome to control an on screen dpad with the mouse, but being able to distinguish the input type may be useful, so I have kept it in the code.
At this point, you should be able to run the application. Once again, it will look exactly as before, only now we can cause KeyUp and KeyDown events with a keyboard, mouse, or a touch screen.
- 1800+ high-performance UI components.
- Includes popular controls such as Grid, Chart, Scheduler, and more.
- 24x5 unlimited support by developers.