
Direct3D Succinctly®

CHAPTER 8
Lighting
Light is very complicated, like the texture of our model. In 3-D graphics programming, we use techniques to emulate light without actually calculating the countless light rays that bounce around in the real world. In this chapter, we will examine some simple but effective techniques for lighting our models.
The lighting equations in this chapter are based on Chapter 5 of The CG Tutorial, which is available online from the NVidia website: http://http.developer.nvidia.com/CgTutorial/cg_tutorial_chapter05.html
Normals
Before we look at lighting, we need to look at normals. A normal is a vector that is perpendicular to another vector or perpendicular to a surface. The image in Figure 8.1 depicts a cube with the normals rendered as arrows. The cube has eight vectors, one of which is not visible in the image (the lower far left vector). These vectors collectively describe the six faces or surfaces of the cube, only three of which are visible. The white arrows are vector normal; there is one for every vector in the cube, and they point in the direction of the corners from the center of the cube. The black arrows are surface normal; they represent the direction that each of the cube’s faces is pointing.
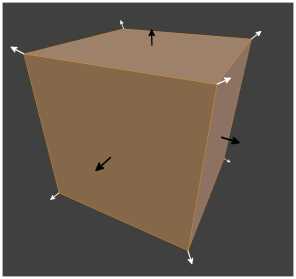
Figure 8.1: Cube with Vector and Surface Normals
Reading Normals
Before we start programming lighting, we should read the normals from the object file into our Model. Presently, these are being ignored by the ModelReader class. This involves changing the Vertex structure to include the vector normals we read from the file. Open the Model.h file and add a float3 to the vertex structure that will hold the vertex normal. This change is highlighted in the following code table.
// Definition of our vertex types struct Vertex { DirectX::XMFLOAT3 position; DirectX::XMFLOAT3 normal; DirectX::XMFLOAT2 uv; }; |
Next, the VertexShader class’s D3D11_INPUT_ELEMENT_DESC must be changed to include the new normal. Open the VertexShader.cpp file and add the normal to the description. This change is highlighted in the following code table.
In the previous code table, I have placed the normals between the POSITION and TEXCOORD. The 24 in the TEXCOORD’s specifications must be changed as well; it was previously 12.
Next we can change the Model class to load the normals from file, just as we did for the vertex positions and texture coordinates. Open the ModelReader.cpp file and add code to read the normals in the ReadModel method. These changes are highlighted in the following code table.
Model* ModelReader::ReadModel(ID3D11Device* device, char* filename) { // Read the file int filesize = 0; char* filedata = ReadFile(filename, filesize); // Parse the data into vertices and indices int startPos = 0; std::string line; // Vectors for vertex positions std::vector<float> vertices; std::vector<int> vertexIndices; // Vectors for texture coordinates std::vector<float> textureCoords; std::vector<int> textureIndices; // Vectors for normals std::vector<float> normals; std::vector<int> normalIndices; int index; // The index within the line we're reading while(startPos < filesize) { line = ReadLine(filedata, filesize, startPos); if(line.data()[0] == 'v' && line.data()[1] == ' ') { index = 2; // Add to vertex buffer vertices.push_back(ReadFloat(line, index)); // Read X vertices.push_back(ReadFloat(line, index)); // Read Y vertices.push_back(ReadFloat(line, index)); // Read Z // If there's a "W" it will be ignored } else if(line.data()[0] == 'f' && line.data()[1] == ' ') { index = 2; // Add triangle to index buffer for(int i = 0; i < 3; i++) { // Read position of vertex vertexIndices.push_back(ReadInt(line, index)); // Read the texture coordinate textureIndices.push_back(ReadInt(line, index));
// Ignore the normals //ReadInt(line, index ); // Read the normal indices normalIndices.push_back(ReadInt(line, index)); } } else if(line.data()[0]=='v'&& line.data()[1] == 't' && line.data()[2] == ' ') { index = 3; // Add to texture textureCoords.push_back(ReadFloat(line, index)); // Read U textureCoords.push_back(ReadFloat(line, index)); // Read V } else if(line.data()[0]=='v' && line.data()[1] == 'n' && line.data()[2] == ' ') { index = 3; // Add to normals normals.push_back(ReadFloat(line, index)); // Read X normals.push_back(ReadFloat(line, index)); // Read Y normals.push_back(ReadFloat(line, index)); // Read Z } } // Deallocate the file data delete[] filedata; // Deallocate the file data // Subtract one from the vertex indices to change from base 1 // indexing to base 0: for(int i = 0; i < (int) vertexIndices.size(); i++) { vertexIndices[i]--; textureIndices[i]--; normalIndices[i]--; }
// Create a collection of Vertex structures from the faces std::vector<Vertex> verts; int j = vertexIndices.size(); int qq = vertices.size(); for(int i = 0; i < (int) vertexIndices.size(); i++) { Vertex v;
// Create a vertex from the referenced positions v.position = XMFLOAT3( vertices[vertexIndices[i]*3+0], vertices[vertexIndices[i]*3+1], vertices[vertexIndices[i]*3+2]); // Set the vertex's normals v.normal = XMFLOAT3( normals[normalIndices[i]*3+0], normals[normalIndices[i]*3+1], normals[normalIndices[i]*3+2]); // Set the vertex's texture coordinates v.uv = XMFLOAT2( textureCoords[textureIndices[i]*2+0], 1.0f-textureCoords[textureIndices[i]*2+1] // Negate V ); verts.push_back(v); // Push to the verts vector } // Create a an array from the verts vector. // While we're running through the array reverse // the winding order of the vertices. Vertex* vertexArray = new Vertex[verts.size()]; for(int i = 0; i < (int) verts.size(); i+=3) { vertexArray[i] = verts[i+1]; vertexArray[i+1] = verts[i]; vertexArray[i+2] = verts[i+2]; } // Construct the model Model* model = new Model(device, vertexArray, verts.size()); // Clear the vectors vertices.clear(); vertexIndices.clear(); verts.clear(); textureCoords.clear(); textureIndices.clear(); normalIndices.clear(); normals.clear(); // Delete the array/s delete[] vertexArray; return model; // Return the model } |
Now we can change the vertex specification in both the HLSL files for our shaders. Open the VertexShader.hlsl file and add normals to both the VertexShaderInput and the VertexShaderOutput structures. I have passed the normals unchanged to the pixel shader in the code presented in the following code table.
// VertexShader.hlsl // The GPU version of the constant buffer cbuffer ModelViewProjectionConstantBuffer : register(b0) { matrix model; matrix view; matrix projection; }; // The input vertices struct VertexShaderInput { float3 position : POSITION0; float3 normal : NORMAL0; float2 tex : TEXCOORD0; }; // The output vertices as the pixel shader will get them struct VertexShaderOutput { float4 position : SV_POSITION0; float3 normal : NORMAL0; float2 tex : TEXCOORD0; }; // This is the main entry point to the shader: VertexShaderOutput main(VertexShaderInput input) { VertexShaderOutput output; float4 pos = float4(input.position, 1.0f); // Use constant buffer matrices to position the vertices: pos = mul(pos, model); // Position the model in the world pos = mul(pos, view); // Position the world with respect to a camera pos = mul(pos, projection);// Project the vertices output.position = pos; // Pass the texture coordinates unchanged to pixel shader output.tex = input.tex; // Pass the normals unchanged to the pixel shader output.normal = input.normal; return output; } |
Change the structure in the PixelShader.hlsl file as well. The altered code for the pixel shader is presented as the following code table.
// PixelShader.hlsl Texture2D shaderTexture; // This is the texture SamplerState samplerState; // Input is exactly the same as // vertex shader output! struct PixelShaderInput { float4 pos : SV_POSITION0; float3 normal : NORMAL0; float2 tex : TEXCOORD0; }; // Main entry point to the shader float4 main(PixelShaderInput input) : SV_TARGET { float4 textureColor = shaderTexture.Sample(samplerState, input.tex); // Return the color unchanged return textureColor; } |
At this point, you should be able to run the application and it will appear the same as before, only now we have the vertex normals being passed to the pixel shader.
Emissive Lighting
We will add several simple lighting techniques together; this will give us some flexibility. The first type of lighting we will implement will seem like a big step backwards, since it will remove the texture from our model. Emissive lighting is the glow that an object has itself. In this simple model, our emissive lighting will not light other objects in the scene. Emissive lighting needs only a color. Open the PixelShader.hlsl file and alter the main method. The following code table highlights these changes.
// Main entry point to the shader float4 main(PixelShaderInput input) : SV_TARGET { //float4 textureColor = // shaderTexture.Sample(samplerState, input.tex); // Return the color unchanged // return textureColor; float4 emissive = float4(0.2f, 0.2f, 0.2f, 1.0f); float4 finalColor = emissive; finalColor = normalize(finalColor); return finalColor; } |
In the previous code table, we have said that all pixels in the model are dark grey, (0.2f, 0.2f, 0.2f, 1.0f). This means that even without any lighting at all, our model is glowing a dim grey color. The line I have highlighted beginning with float4 finalColor is fairly pointless at present, but we will add more lights to it as we create them. Also notice the call to normalize, the RGBA values in our color should each be from 0.0f, to 1.0f.
Ambient Lighting
The next type of lighting we will add is called ambient lighting. When objects are not directly lit by a light source in the real world, they are often still visible because of light rays are bouncing off other objects. For instance, if you look under a desk in a well lit room, you will clearly see the underside despite the fact that the light source is not apparently shining under the desk. In reality, ambient lighting is extremely complicated. When programming we can summarize the effect by giving our model an ambient reflection, which is the amount of ambient light the material of our model reflects, and by giving the ambient light in our scene a color. The following code table highlights these changes, and I have also removed the lines commented out in the previous code table.
// Main entry point to the shader float4 main(PixelShaderInput input) : SV_TARGET { float4 emissive = float4(0.2f, 0.2f, 0.2f, 1.0f);
float materialReflection = 1.0f; float4 ambientLightColor = float4(0.1f, 0.1f, 0.1f, 1.0f); float4 ambient = ambientLightColor * materialReflection;
float4 finalColor = emissive + ambient; finalColor = normalize(finalColor); return finalColor; } |
In the previous code table, I have set the materialReflection to 100% and the ambientLightColor to a dark grey (0.1f, 0.1f, 0.1f, 1.0f). The two values (materialReflection and ambientLightColor) are multiplied together to calculate the ambient component in our light equation, which is then added to the emissive component to form the final color.
Diffuse Lighting
Diffuse lighting is the light that hits our material and bounces off equally in all directions. It requires a light source with a position and color, a material color, and the normal of the surface. It does not account for the highlight, reflection, or shine of a material, only the general color of it. Diffuse lighting is useful for matte materials which do not have a glossy finish: unpolished wood, carpet, and plaster, for instance.
The values we read from our texture file are not necessarily exactly the same colors as the material when it is lit, since shading must be applied to indicate the lighting. If green light shines on our model, it will look more green; likewise, a red light will make the material look more red. The point is that the values in our texture are the colors that should appear when white light is shining directly at the material.
The following code table highlights the changes to the pixel shader’s main method to read the texture, as well as add our lighting effects.
// Main entry point to the shader float4 main(PixelShaderInput input) : SV_TARGET { float4 emissive = float4(0.1f, 0.1f, 0.1f, 1.0f);
float materialReflection = 1.0f; float4 ambientLightColor = float4(0.1f, 0.1f, 0.1f, 1.0f); float4 ambient = ambientLightColor * materialReflection;
float diffuseIntensity = 1.0f; float4 diffuseLightColor = float4(1.0f, 1.0f, 1.0f, 1.0f); float4 diffuseLightDirection = float4(1.0f, -1.0f, 1.0f, 1.0f); float4 materialColor = shaderTexture.Sample(samplerState, input.tex); float4 diffuse = diffuseIntensity * diffuseLightColor * saturate(dot(-diffuseLightDirection, input.normal)); diffuse = diffuse * materialColor; float4 finalColor = emissive + ambient + diffuse; finalColor = normalize(finalColor); return finalColor; } |
When running the application, you should see the spaceship again, only now it has a simple diffuse lighting shading effect (Figure 8.2).
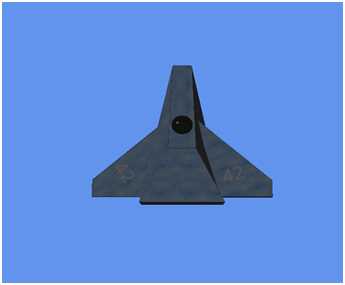
Figure 8.2: Spaceship with Diffuse Lighting
Note: I have hard coded the variables for the lights. It is much more common to place these into a cbuffer so the CPU can update and change the values. It is common to group items together into different cbuffers based on how often they are accessed. For instance, you might have perobject, perframe, pergame cbuffers which hold data that must be updated per object in the game, per frame, or just once respectively. I have used a single cbuffer because what we are doing is not processor intensive.
The basis of the diffuse lighting equation presented above is fairly straightforward; if the normal of the face is facing the light, the surface is depicted as being the color from the texture. If the normal of the face is not facing the diffuse light source, then the surface is rendered as the emissive and ambient colors.
The equation and code for the above diffuse lighting was adapted from the RasterTek Tutorial 6, available online from http://www.rastertek.com/dx11tut06.html.
- 1800+ high-performance UI components.
- Includes popular controls such as Grid, Chart, Scheduler, and more.
- 24x5 unlimited support by developers.