
Deno Succinctly®

CHAPTER 1
Introducing Deno
What is Deno, and why should I care?
Deno is a new, secure runtime for JavaScript. It was invented by Ryan Dahl. Does that name sound familiar? It should! Dahl is the creator of the incredibly successful Node. Node (also called Node.js) was released in 2009 as a way of writing server applications in JavaScript, thereby enabling developers to write both front- and back-end code in the same programming language. It was immediately successful and continues to be incredibly popular.

Figure 1: Deno is pronounced "Dean-oh" (to rhyme with “chino”) and not "Dino" (as in “dinosaur”), even though its mascot is this rather cute dinosaur!
So, what is Deno, apart from an anagram of Node? After over a decade of Node, Dahl took time to reflect on his creation and consider things that he would have done better, if he had known back in 2009 what he knows now. In that decade, web development itself also moved on, and better technologies became available to support some of the things that Node was designed to do. The result of those reflections was Deno—a new way of writing server-side applications in JavaScript that is like Node but improves upon it in several ways.
These are some of the ways in which Deno improves on Node:
- Is secure by default. Deno doesn’t allow programs to access your file system, network, or environment unless you explicitly give that program permission to do so.
- Supports TypeScript out of the box. Of course, you can write Node applications in TypeScript too, but you need to install extra packages to do so—and keep them up to date.
- Ships as a single executable file.
- Includes built-in tools. Includes tools such as a dependency inspector (deno info) and a code formatter (deno fmt).
- Includes standard modules. Deno has a set of audited standard modules that are guaranteed to work.
That’s what developers notice when they use Deno. Under the hood, there are significant architectural changes that make Deno an entirely different beast than Node. But I think it’s still safe to say that if you know Node, you’ll find it easy to get up and running in Deno. In fact, I’d go further and say that you are likely to find the whole experience liberating! That’s the purpose of this book: to give you insight into what Deno is, how it works, and why its future looks so promising.
When someone with as much cachet as Ryan Dahl has the humility to say of his creation “Yes, it was good, but it could be better,” it’s hard to ignore! Deno is still in its early days, and it is arguably not quite ready for mainstream use. However, I’m excited about the possibilities for Deno, and I hope that after reading this book, you will be too.
The Deno runtime and the V8 engine
As we’ve already established, Deno is a secure runtime for JavaScript. Node is also a JavaScript runtime. Both are built on the V8 engine. So, what is this V8 engine? Well, before we look at V8 specifically, let’s discuss what an engine is.
An engine takes our source code and compiles it into instructions that can be understood and processed by the machine that it is running on. Initially, all JavaScript code was intended to be run within a web browser. Every browser has an engine, although that engine varies depending on the browser you use. That’s why you can fire up the developer tools in any browser and start writing JavaScript straight away.
V8 is just one such engine, specifically the one that drives the Google Chrome web browser. It’s a highly optimized engine written in C++ that, like all engines, understands how to turn source code into machine-readable instructions.
However, the purpose of technologies like Deno and Node is to let you run code independently of the web browser. So, the Deno and Node runtimes have their own instances of the V8 engine, and you can think of those runtimes as a kind of “wrapper” around this V8 engine. Without a runtime, your machine doesn’t understand what JavaScript is, or how to run it.
Equipped with its own version of the V8 engine, the Deno runtime can turn your JavaScript into machine code. But it also provides extra tools and functionality to make your life as a developer easier. For example, it gives you the ability to write your code in TypeScript. The V8 engine doesn’t understand TypeScript, but Deno can take your TypeScript code, convert it into JavaScript, and then hand that to the V8 engine for compilation.
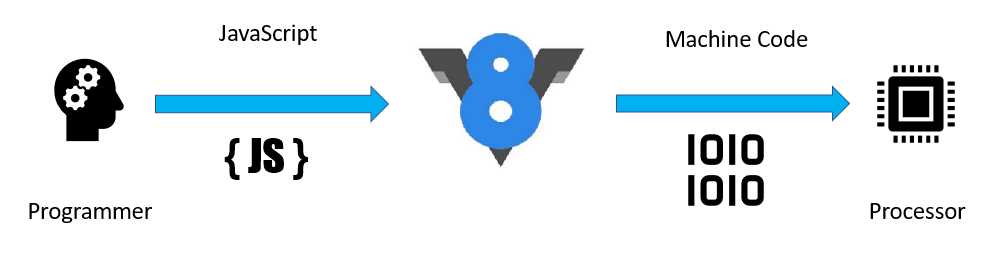
Figure 2: The V8 engine
Architecture and internals
The main building blocks of Deno are Rust, Tokio, and V8:
- Rust is a modern systems programming language developed by Mozilla, with a focus on high performance and safe concurrency. Rust shares a similar syntax with C++, but has memory safety features that don't rely on garbage collection. The initial choice for Deno was the Go programming language, but issues with garbage collection forced a switch to Rust.
- Tokio is an "event-driven, non-blocking I/O platform for writing asynchronous applications with the Rust programming language. At a high level, it provides a few major components: Tools for working with asynchronous tasks, including synchronization primitives and channels and timeouts, delays, and intervals." (Description taken from Tokio documentation.)
- V8, as we have already learned, is Google's open-source JavaScript engine, written in C++, and which features in the Chrome web browser.
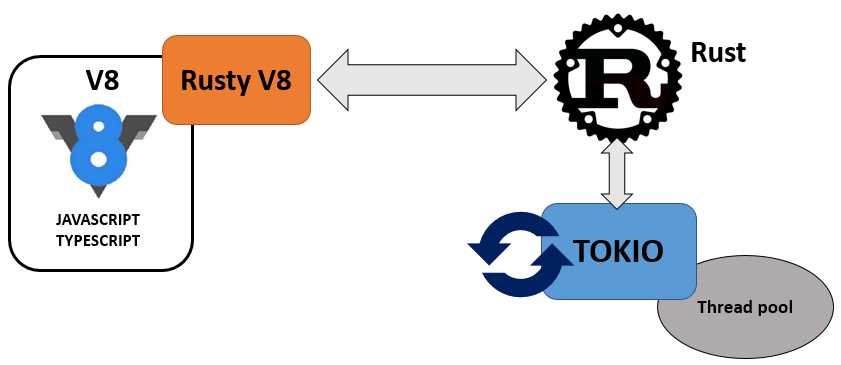
Figure 3: The building blocks of Deno
You can consider programs written in TypeScript or JavaScript as being Deno’s front end. If you create a TypeScript (.ts) file and submit it to Deno, then Deno will first compile it to JavaScript and then submit it to V8. If you give it a JavaScript (.js) file, it will skip the compilation step. Anything you do in TypeScript or JavaScript is considered “unprivileged,” in that it doesn’t have access to the network, file system, or anything else outside of Deno’s sandbox, so it is secure by default.
Anything V8 needs to do outside of this unprivileged environment needs to be submitted to Deno’s Rust back end. For example, if you want to access files, send emails, create servers, set timeouts, and so on, all that fun stuff needs to be handled by Rust. The communication between the unprivileged side (JavaScript/TypeScript) and the privileged side (Rust) is managed by a set of JavaScript bindings for Rust called Rusty_v8.
JavaScript is a single-threaded application, which is fine for a single browser instance, but totally inadequate for server applications that need to respond to requests from multiple clients simultaneously. For that we need asynchronous I/O running in an event loop.
The event loop:
- Is an endless loop that waits for tasks, executes them, and then sleeps until it receives more tasks.
- Executes tasks from the event queue starting from the oldest first, but only when the call stack is empty—that is, there is no ongoing task.
- Uses callbacks and promises to signify the completion status of the task.
In Deno, this event loop is provided by Tokio.
At an extremely high level, that’s Deno. We don’t need to dwell too much on the internals here. There are plenty of in-depth articles available online if you want to geek out about some of the architectural decisions that went into creating Deno. I hope, however, that this has given you some idea of what’s going on behind the scenes.
Installing Deno
The deno executable is just a single binary with no external dependencies, and therefore installation is a breeze.
Windows
Probably the easiest way to install Deno on Windows is by using a package manager such as Chocolatey:
Code Listing 1
choco install deno |
You can also install it from the command line in PowerShell. Be sure to run the shell with Administrator privileges:
Code Listing 2
Note these code approaches install the latest version of Deno. If you want to install a specific version (for example, version 1.0.0), you need to do the following:
Code Listing 3
$v="1.0.0"; iwr https://deno.land/x/install/install.ps1 -useb | iex |
macOS/Linux
If you are on a Mac and have Homebrew installed, you can install the latest version of Deno with the following command:
Code Listing 4
brew install deno |
You should also be able to do something similar with your package manager on Linux, the command for which will vary depending on the version you are running.
You can also install it using curl:
Code Listing 5
curl -fsSL https://deno.land/x/install/install.sh | sh |
To install a specific version, use the -s argument:
Code Listing 6
curl -fsSL https://deno.land/x/install/install.sh | sh -s v1.0.0 |
Verifying the installation
Once you have installed Deno, check that everything is okay by running:
Code Listing 7
deno --version |
This command should display the version number of Deno, and of V8 and TypeScript. If it does, you’re good to go! If not, please review the installation instructions in the Deno manual.
Deno also gives you a REPL (Read Evaluate Print Loop) that you can use to execute commands interactively. Start the REPL by executing deno, and test it with a simple console.log statement:
Code Listing 8
$ deno Deno 1.5.3 exit using ctrl+d or close() > console.log("Hello from Deno!") Hello from Deno! undefined > |
Finally, you’ll want to fine-tune your development environment. This involves setting environment variables, enabling autocomplete for your shell, and getting your chosen IDE or editor to recognize Deno code. Because these steps vary depending on your OS and the tools you use, I’ll refer you to the Deno manual.
Upgrading Deno
To upgrade your installation to a specific version of Deno, run the following, where 1.5.9 is the version you want to upgrade to:
Code Listing 9
If you just want to upgrade to the latest version, run:
Code Listing 10
$ deno upgrade |
Getting help
If you forget the URL for the docs, how to start the REPL, which command-line options are available, or anything else for that matter, run deno help:
Code Listing 11
$ deno help deno 1.5.8 A secure JavaScript and TypeScript runtime Docs: https://deno.land/manual Modules: https://deno.land/std/ https://deno.land/x/ Bugs: https://github.com/denoland/deno/issues To start the REPL: deno To execute a script: deno run https://deno.land/std/examples/welcome.ts To evaluate code in the shell: deno eval "console.log(30933 + 404)" USAGE: deno [OPTIONS] [SUBCOMMAND] OPTIONS: -h, --help Prints help information -L, --log-level <log-level> Set log level [possible values: debug, info] -q, --quiet Suppress diagnostic output -V, --version Prints version information … |
Tip: As well as deno help and the Deno manual, another great place to get help is the community Discord group.
Now that you have your Deno development environment all set up, it’s time to write a little test app.
Your first app
Let’s first create the traditional “Hello Word” example, and then we’ll extend it to run as a server application.
Running Deno code
Create a directory for the code you’ll write in this book and, within that directory, create a file called HelloDeno.ts. Note the .ts extension, which tells Deno that this is a TypeScript file. Deno has first-class support for TypeScript, and all its standard library modules (which we’ll talk about in the next chapter) are written in TypeScript. As you’ve seen, Deno can handle JavaScript files too, but in this book, we’re going to take advantage of the strong typing available in TypeScript.
Tip: If you’re not familiar with TypeScript, I can thoroughly recommend TypeScript Succinctly, which you can download for free.
In HelloDeno.ts, write the following code:
Code Listing 12
console.log("Hello world ... from Deno!"); |
Then execute your program using deno run:
Code Listing 13
$ deno run HelloDeno.ts Check file: .../HelloDeno.ts Hello world ... from Deno! |
The Check file step is Deno compiling your TypeScript into vanilla JavaScript. If you supply your code as a JavaScript file (with the .js extension), Deno omits this step:
Code Listing 14
Creating a simple server application
Let’s now make this first example a bit more “Deno-ish” by rewriting it as a server application. We’ll spin up a server, let it listen for incoming requests and have our app respond with some JSON that contains our Hello world … from Deno! message.
Create a new file called server.ts that contains the following code:
Code Listing 15
import { serve } from "https://deno.land/std/http/server.ts"; const s = serve({ port: 3000 }); console.log("Listening on port 3000"); for await (const req of s) { req.respond({ body: JSON.stringify({ msg: "Hello world ... from Deno!" }) }); } |
There are a few things there that might look unfamiliar. First, the import of the serve package from a URL instead of a module installed locally—that’s one of the key differences between Deno and what you might be used to with Node. We’ll talk about module dependencies in the next chapter.
The other is the use of the await command without any async. What’s going on there? That’s another feature of Deno: top-level await.
Note: We’ll have more to say about top-level await in Chapter 3.
Let’s run it:
Code Listing 16
$ deno run HelloDeno.ts Download https://deno.land/[email protected]/http/server.ts Download https://deno.land/[email protected]/encoding/utf8.ts Download https://deno.land/[email protected]/io/bufio.ts Download https://deno.land/[email protected]/_util/assert.ts Download https://deno.land/[email protected]/async/mod.ts Download https://deno.land/[email protected]/http/_io.ts Download https://deno.land/[email protected]/textproto/mod.ts Download https://deno.land/[email protected]/http/http_status.ts Download https://deno.land/[email protected]/async/deferred.ts Download https://deno.land/[email protected]/async/delay.ts Download https://deno.land/[email protected]/async/mux_async_iterator.ts Download https://deno.land/[email protected]/async/pool.ts Download https://deno.land/[email protected]/bytes/mod.ts error: Uncaught PermissionDenied: network access to "0.0.0.0:3000", run again with the --allow-net flag at Object.jsonOpSync (core.js:247:13) at opListen (deno:cli/rt/30_net.js:32:17) at Object.listen (deno:cli/rt/30_net.js:207:17) at serve (server.ts:287:25) |
Deno first downloads all the dependencies that the server package requires, compiles the TypeScript into JavaScript—and then it fails with a PermissionDenied error. Oh dear.
Remember what we said earlier in this chapter about Deno being “secure by default?” This is what’s going on here. Anything you write in TypeScript or JavaScript is considered “unprivileged” code. It runs in a sandbox with no access either to your file system or the network unless you explicitly grant it permission. To get your program to run, you must give it network access with the --allow-net flag:
Code Listing 17
$ deno run --allow-net server.ts Listening on port 3000 |
If you then visit http://localhost:3000 in your browser, you should see a JSON object containing our message:
Code Listing 18
{"msg":"Hello world ... from Deno!"} |
Congratulations! You have written your first Deno program and on the way, you learned a little bit about the rationale behind Deno. You can find the source code for this chapter here.
In the next chapter, we’ll dig into some Deno specifics and try to address the differences between Deno and Node.
- 1800+ high-performance UI components.
- Includes popular controls such as Grid, Chart, Scheduler, and more.
- 24x5 unlimited support by developers.