
Deno Succinctly®

CHAPTER 4
Code a Static Site Generator
Hopefully, you’re feeling all fired up after building your first real Deno application! Let’s continue our exploration of Deno by building something a little more complex.
In this chapter, we’re going to build a bare-bones static site generator for blogging with. If you’re not familiar with the term, static site generators are all the rage nowadays. They’re something of a reaction against bloated content management systems in general (and WordPress in particular) that rely upon storing website content in a database and rendering it on the fly when users visit a page. With a static site generator, all the content is served as plain HTML. When you update the site, the site generator recreates the HTML with your latest additions and changes. The result is a site that’s super fast and easy to migrate from one host to another.
Our simple static site generator will enable us to write our blog posts in Markdown, and then convert them into individual HTML files. Along with the Markdown, we’ll also be able to provide metadata about each post, including things like the title, date, author, and so on. We’ll then create a home page that links to each of those posts.
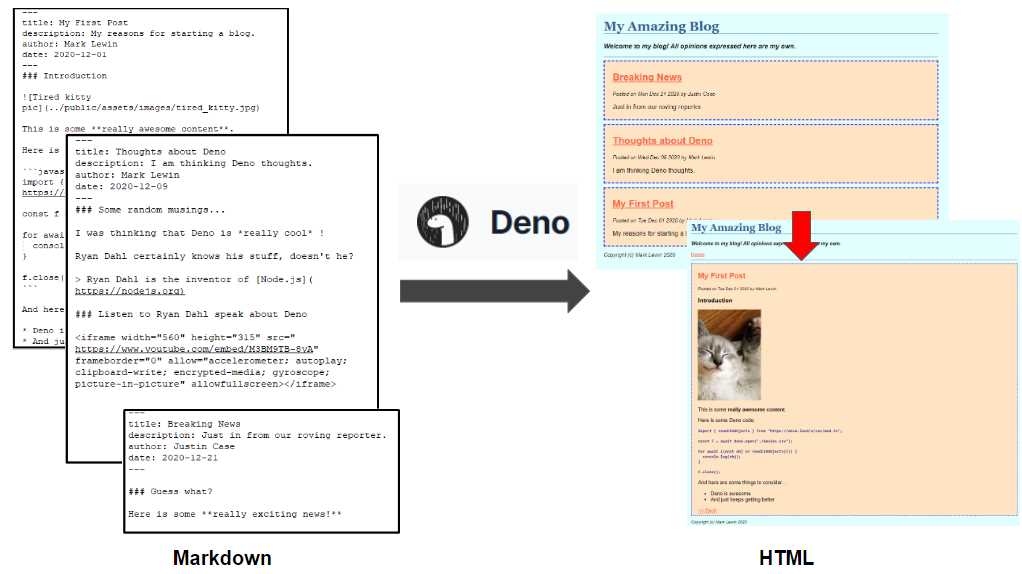
Figure 8: Static site generator
On our journey, we’ll learn about some interesting and useful Deno modules. Let’s get started!
Configuring the application
To be useful to an end user, our application needs to be configurable. In our “alpha” version, the only things we’ll enable the user to configure are:
- The name of the blog.
- A description of the blog.
- Copyright information.
- The location of the source Markdown files.
- The location of the destination HTML files.
But because my goal for this exercise is to create something you could use as the basis of something much more sophisticated, we’ll make it easy to add more configuration options in the future.
A common practice for configuring applications is to include the configuration options in a “dot env” file, .env. Because of this, you might reasonably expect that there’s a Deno module somewhere that can read this type of file and do something sensible with the contents. And you’d be right! It’s called dotenv, and it’s an almost identical port from the Node module of the same name. dotenv is a zero-dependency module that loads environment variables from a .env file—either into Deno’s process environment, or a named object variable of your choice.
Let’s build a project and get the configuration bit working first. Create a directory called static-site-gen with the following contents:
- A directory called content that contains our Markdown content ready for publishing as HTML.
- A directory called public that contains the HTML files generated from the Markdown files in the content directory.
- A directory under public called assets:
- Two subfolders within assets: images (for images) and styles (for the site CSS).
- A directory called views to store the template files we will use to render HTML.
- A .env file for configuration settings (the GitHub repository for this project contains a file called example.env you can adapt).
- A mod.ts file to contain our application code.

Figure 9: The static-site-gen project directory
Then, configure .env with the POSTS_DIR and PUBLISH_DIR settings as shown, but with whatever else you want to include to personalize your blog:
Code Listing 50
|
SUMMARY=Welcome to my blog! All opinions expressed here are my own. COPYRIGHT=Copyright (c) Mark Lewin 2021 POSTS_DIR=./content/ PUBLISH_DIR=./public/ |
In mod.ts, write the following code:
Code Listing 51
Run it, ensuring that you enable the --allow-read and --allow-env options:
Code Listing 52
$ deno run --allow-read --allow-env mod.ts My Amazing Blog Copyright (c) Mark Lewin 2021 Welcome to my blog! All opinions expressed here are my own. ./content/ ./public/ |
The settings in .env are read into Deno’s environment variables (Deno.env) and displayed in the console. Note how we use the Deno.env.get() method to read values from Deno’s environment variables.
You might be wondering what other environment variables Deno is using. Let’s find out! We can assign Deno.env to a variable and log its contents to the console:
Code Listing 53
import "https://deno.land/x/dotenv/load.ts"; const env = Deno.env.toObject(); console.log(env); |
There are too many to list here, but note how our settings are included in there (in no particular order):
Code Listing 54
{ CommonProgramW6432: "C:\\Program Files\\Common Files", SYSTEMROOT: "C:\\WINDOWS", USERPROFILE: "C:\\Users\\mplew", COMPUTERNAME: "DESKTOP-JETHKMM", SSH_ASKPASS: "C:/Program Files/Git/mingw64/libexec/git-core/git-gui--askpass", EXEPATH: "C:\\Program Files\\Git", PUBLISH_DIR: "./public/", "CommonProgramFiles(x86)": "C:\\Program Files (x86)\\Common Files", PROCESSOR_ARCHITECTURE: "AMD64", _: "C:/Users/mplew/.deno/bin/deno", MSYSTEM: "MINGW64", NUMBER_OF_PROCESSORS: "4", POSTS_DIR: "./content/", ... LANG: "en_GB.UTF-8" } |
Tip: The Deno.env object also has set() and delete() methods that let you change the values of those environment variables. Although you probably won't use those methods regularly, they can be useful for debugging.
There is another way to use dotenv, which, to my mind, is a little cleaner than trying to access Deno’s environment variables, and that is to import the configuration using the config() function:
Code Listing 55
import { config } from "https://deno.land/x/dotenv/mod.ts"; console.log(config()); |
Note: With this approach we need to import the config() function from the mod.ts file, instead of importing load.ts, which we used for autoloading .env.
When we run that, the config() function returns an object representing the contents of the .env file:
Code Listing 56
$ deno run --allow-read --allow-env mod.ts Check file:///../static-site-gen/mod.ts { BLOG: "My Amazing Blog", SUMMARY: "Welcome to my blog! All opinions expressed here are my own.", COPYRIGHT: "Copyright (c) Mark Lewin 2021", POSTS_DIR: "./content/", PUBLISH_DIR: "./public/" } |
To make our code cleaner, we can use object destructuring to refer to those configuration variables in our code directly by name instead of as object properties:
Code Listing 57
import { config } from "https://deno.land/x/dotenv/mod.ts"; const { BLOG, SUMMARY, COPYRIGHT, POSTS_DIR, PUBLISH_DIR } = config(); console.log(`BLOG: ${BLOG}`); console.log(`SUMMARY: ${SUMMARY}`); console.log(`COPYRIGHT: ${COPYRIGHT}`); console.log(`POSTS_DIR: ${POSTS_DIR}`); console.log(`PUBLISH_DIR: ${PUBLISH_DIR}`); |
When you run it, you see that those settings are now directly available to you:
Code Listing 58
$ deno run --allow-read mod.ts Check file:///../static-site-gen/mod.ts BLOG: My Amazing Blog SUMMARY: Welcome to my blog! All opinions expressed here are my own. COPYRIGHT: Copyright (c) Mark Lewin 2021 POSTS_DIR: ./content/ PUBLISH_DIR: ./public/ |
Note: Another benefit of not loading these settings into Deno.env is that we can avoid having to specify the --load-env flag when running the program.
Creating the input files
As I said earlier, we want to be able to write our site content in Markdown and have our program convert it into HTML. We also want to be able to include some metadata in each file that will include a title, description, and date for each post that will be ignored by the HTML renderer.
Many other static site generators use YAML (Yet Another Markup Language) for this metadata, and we’ll do the same. Here are the three sample posts I will be using in this chapter:
Code Listing 59
post1.md
--- title: My First Post description: My reasons for starting a blog. author: Mark Lewin date: 2020-12-01 --- ### Introduction  This is some **really awesome content**. Here is some Deno code: ```javascript import { readCSVObjects } from "https://deno.land/x/csv/mod.ts"; const f = await Deno.open("./movies.csv"); for await (const obj of readCSVObjects(f)) { console.log(obj); } f.close(); ``` And here are some things to consider.... * Deno is awesome * And just keeps getting better |
In this first post, you can see that I’m including an image file called tired_kitty.jpg. In your PUBLISH_DIR (public in this example) you should have a folder called assets, and a subfolder within assets called images. Place any images that you want to include in your posts in there.
In my second post, I’m going to embed a YouTube video of one of Ryan Dahl’s talks:
Code Listing 60
post2.md
--- title: Thoughts about Deno description: I am thinking Deno thoughts. author: Mark Lewin date: 2020-12-09 --- ### Some random musings... I was thinking that Deno is *really cool* ! Ryan Dahl certainly knows his stuff, doesn't he? > Ryan Dahl is the inventor of [Node.js](https://nodejs.org) ### Listen to Ryan Dahl speak about Deno <iframe width="560" height="315" src="https://www.youtube.com/embed/M3BM9TB-8yA" frameborder="0" allow="accelerometer; autoplay; clipboard-write; encrypted-media; gyroscope; picture-in-picture" allowfullscreen></iframe> |
And I’ll include a third post, just so that we have a good selection of posts to show off:
Code Listing 61
post3.md
--- title: Breaking News description: Just in from our roving reporter. author: Justin Case date: 2020-12-21 --- ### Guess what? Here is some **really exciting news!** |
Reading the input files
Now that we have some Markdown content to render, the first thing we need to figure out is how to read in those files from the POSTS_DIR and write them to the PUBLISH_DIR. Reading and writing files is a common use case, and as we have already seen from our URL shortener example, there are functions in the Deno runtime API that can help us.
Let’s start by writing some code that will simply read the files from POSTS_DIR and write them back out, unchanged, to PUBLISH_DIR. We’ll worry about converting from Markdown to HTML in a later step.
Code Listing 62
import { config } from "https://deno.land/x/dotenv/mod.ts"; const { BLOG, SUMMARY, COPYRIGHT, POSTS_DIR, PUBLISH_DIR } = config(); async function generatePosts() { const decoder = new TextDecoder("utf-8"); // Read in the files from the POSTS_DIR for await (const file of Deno.readDir(POSTS_DIR)) { const markdown = decoder.decode(await Deno.readFile(POSTS_DIR + file.name)); console.log(`Read ${POSTS_DIR}${file.name}`); // Write the file to the PUBLISH_DIR Deno.writeTextFile(PUBLISH_DIR + file.name, markdown); console.log(`Wrote ${PUBLISH_DIR}${file.name}`); } } await generatePosts(); |
Here we have defined a function called generatePosts() that uses the Deno core function Deno.readDir() to read each file from POSTS_DIR (using Deno.readFile()) and write it to PUBLISH_DIR (using Deno.writeTextFile()). The Deno.readFile() function reads in the file as an array of bytes, so we need to use a TextDecoder to decode it.
If we run it and examine the contents of PUBLISH_DIR, we should see our unaltered Markdown files in there:
Code Listing 63
$ deno run --allow-read --allow-write mod.ts Check file:///../static-site-gen/mod.ts Read ./content/post1.md Wrote ./public/post1.md Read ./content/post2.md Wrote ./public/post2.md Read ./content/post3.md Wrote ./public/post3.md $ ls ./public/ assets/ post1.md post2.md post3.md |
Parsing the post metadata
Great, but so far, we’re not doing anything with our Markdown files—we’re just copying them from one location to another. We want to convert them to HTML.
To do this, we’re going to use a third-party Deno module called, appropriately enough, markdown. It is a port of a popular Node package called marked.
The trouble is that these files aren’t just Markdown: they also have some metadata (often called “front matter”) that we need to deal with. As a first step towards doing something useful with this metadata, we will parse it to get the title of the post, and use this as the basis of the file name for the rendered HTML.
Luckily, markdown can do this for us!
Let’s import the markdown module and use its parse() method on the contents of the input Markdown files and see what it returns:
Code Listing 64
import { config } from "https://deno.land/x/dotenv/mod.ts"; import { Marked } from "https://deno.land/x/markdown/mod.ts"; const { BLOG, SUMMARY, COPYRIGHT, POSTS_DIR, PUBLISH_DIR } = config(); async function generatePosts() { const decoder = new TextDecoder("utf-8"); // Read in the files from the POSTS_DIR for await (const file of Deno.readDir(POSTS_DIR)) { const markdown = decoder.decode(await Deno.readFile(POSTS_DIR + file.name)); const markup = Marked.parse(markdown); console.log(`Read ${POSTS_DIR}${file.name}`); console.log(markup); // Write the file to the PUBLISH_DIR Deno.writeTextFile(PUBLISH_DIR + file.name, markdown); console.log(`Wrote ${PUBLISH_DIR}${file.name}`); } } await generatePosts(); |
When we run this, we can see that it gives us an object with two properties: content, which is the rendered HTML, and meta, which contains our front matter in a nested object:
Code Listing 65
$ deno run --allow-read --allow-write mod.ts Check file:///../static-site-gen/mod.ts Read ./content/post1.md { content: '<h3 id="introduction">Introduction</h3>\n<p><img src="../public/assets/images/tired_kitty.jpg" alt="T...', meta: { title: "My First Post", description: "My reasons for starting a blog.", author: "Mark Lewin", date: 2020-12-01T00:00:00.000Z } } Wrote ./public/post1.md ... |
Let’s write that rendered HTML in markup.content to an HTML file named after the title of the blog post (using the meta.title property). All we’ll do is turn the title into lowercase and replace any spaces with hyphens.
For example: “My First Post” will become my-first-post.html.
Code Listing 66
Let’s run it!
Code Listing 67
$ deno run --allow-read --allow-write mod.ts Check file:///../static-site-gen/mod.ts Read ./content/post1.md Wrote ./public/my-first-post.html Read ./content/post2.md Wrote ./public/thoughts-about-deno.html Read ./content/post3.md Wrote ./public/breaking-news.html |
Check the contents of each .html file and ensure that they look like HTML. If they do, open them in your browser.
Here is my-first-post.html, which was created from post1.md:
Code Listing 68
And when I open it in a browser:

Figure 10: The rendered HTML page
You can go ahead and delete any .md files in PUBLISH_DIR—you’re now writing real HTML!
We now have a way to convert our Markdown to HTML. But the results aren’t pretty—yet.
Using templates
If you look at the HTML that’s being rendered, you’ll notice that it’s just an HTML fragment and not a full webpage. We should do something about that. Also, it would be nice if we could assign classes to some of the HTML tags so that we can style them using CSS. We could do that in the Markdown, but it’s not ideal: we would have to repeat the styling information in every blog post. It would also remove the main benefit of writing our blog posts in Markdown: a nice, simple format that anyone can learn without much effort.
By far the best way to do this is in our application. And the easiest way to achieve it is by using a template engine. A template engine enables you to use static template files in your application. At runtime, the template engine replaces variables in a template file with actual values and transforms the template into an HTML file. It’s a great way of keeping your application logic separate from the presentation, which makes applications much easier to maintain.
There are many such engines: Handlebars, Mustache, EJS, and Pug are all extremely popular. Deno has a fair selection too, including ports of these, but we’re going to use one called Eta (which apparently means “tiny” in Esperanto). Eta claims to be a “lightweight and blazing-fast embedded JS templating engine that works inside Node, Deno, and the browser. Created by the developers of Squirrelly, it's written in TypeScript and emphasizes phenomenal performance, configurability, and low bundle size.”
The essence of Eta (and other template engines) is that it enables you to programmatically apply data to a template, and then render it as HTML:
Code Listing 69
<!-- views/template.eta --> My name is <%= it.name %> <!-- include other template files as "partials" --> <%~ includeFile('./footer') %> <!-- views/footer.eta --> <footer>This is the footer!</footer> // mod.ts import { renderFile, configure } from "https://deno.land/x/[email protected]/mod.ts" const viewPath = `${Deno.cwd()}/views/` configure({ // This tells Eta to look for templates // In the /views directory views: viewPath }) // Eta assumes the .eta extension if you don't specify an extension // You could also write renderFile("template.eta"), // renderFile("/template"), etc. let templateResult = await renderFile("./template", { name: "Mark" }) console.log(templateResult) /* My name is Mark <footer>This is the footer!</footer> */ |
Eta also supports conditionals (which we won’t be using) and loops (which we will use a bit later when we create our home page).
Tip: You can find out more about Eta here.
Let’s create a template, which we will apply to each of our blog posts as part of the rendering process. Create the post.eta file in the views folder:
Code Listing 70
<!DOCTYPE html> <html lang="en"> <head> <meta charset="UTF-8" /> <meta name="viewport" content="width=device-width, initial-scale=1.0" /> <link rel="stylesheet" href="assets/styles/style.css"> <title><%= it.title | it.blog %></title> </head> <body> <header> <h1><%= it.blog %></h1> <p class="slug"><%= it.summary %></p> <a href="index.html">Home</a> <hr /> </header> <article> <h2><%= it.title %></h2> <p class="smalltext">Posted on <%= it.date.toDateString() %> by <%= it.author %></p> <div><%~ it.content %></div> <a href="index.html"><< Back</a> </article> <footer> <p class="smalltext"><%= it.copyright %></p> </footer> </body> </html> |
Everything prefixed by it in the template is a variable placeholder that we must supply to the template in our program code. They are enclosed by <%= it.[variable] %> or
<%~ it.[variable] %> tags, which have different behaviors:
- <%= %> are interpolation tags. You just place the value you want to output between them, and they are automatically escaped if necessary.
- <%~ %> are known as raw interpolation tags. They output unescaped values, which is useful when injecting HTML into the template.
Having created our post template, let’s consider how to populate it. We do that by calling renderFile() and passing the template file we want to render (the .eta extension is optional) and an object containing the variables that the template requires:
Code Listing 71
let templateResult = await renderFile("./template", { blog: "My Amazing Blog" }); |
Let’s import the eta module and write some code to first tell Deno where to find our template (in the views folder), and then populate it with the values we retrieved from Marked.parse():
Code Listing 72
import { config } from "https://deno.land/x/dotenv/mod.ts"; import { Marked } from "https://deno.land/x/markdown/mod.ts"; import { configure, renderFile } from "https://deno.land/x/eta/mod.ts"; const { BLOG, SUMMARY, COPYRIGHT, POSTS_DIR, PUBLISH_DIR } = config(); const viewPath = `${Deno.cwd()}/views/`; // Configure ETA configure({ views: viewPath, }); async function generatePosts() { const decoder = new TextDecoder("utf-8"); // Read in the files from the POSTS_DIR for await (const file of Deno.readDir(POSTS_DIR)) { const markdown = decoder.decode(await Deno.readFile(POSTS_DIR + file.name)); const markup = Marked.parse(markdown); console.log(`Read ${POSTS_DIR}${file.name}`); // Determine the file name from the metadata const newPostFileName = markup.meta.title.toLowerCase().replace(/ /g, "-") + ".html"; let templateResult = await renderFile( "./post", { blog: BLOG, title: markup.meta.title, date: markup.meta.date, author: markup.meta.author, summary: SUMMARY, copyright: COPYRIGHT, content: markup.content, }, ); // Write the file to the PUBLISH_DIR await Deno.writeTextFile( PUBLISH_DIR + newPostFileName, templateResult, ); console.log(`Wrote ${PUBLISH_DIR}${newPostFileName}`); } } await generatePosts(); |
Note that at the time of writing, not all Deno features are production-ready, and Deno protects us from those features by default. This is the case for the eta module, so you’ll need to run it using the --unstable command-line flag:
Code Listing 73
$ deno run --allow-read --allow-write --unstable mod.ts Check file:///../static-site-gen/mod.ts Read ./content/post1.md Wrote ./public/my-first-post.html Read ./content/post2.md Wrote ./public/thoughts-about-deno.html Read ./content/post3.md Wrote ./public/breaking-news.html |
When you examine the generated HTML files, you should see that they are now full webpages with some classes applied to certain elements that we can use to style them. We’ll get to that in a bit!
Code Listing 74
<!DOCTYPE html> <html lang="en"> <head> <meta charset="UTF-8" /> <meta name="viewport" content="width=device-width, initial-scale=1.0" /> <link rel="stylesheet" href="assets/styles/style.css"> <title>0</title> </head> <body> <header> <h1>My Amazing Blog</h1> <p class="slug">Welcome to my blog! All opinions expressed here are my own.</p> <a href="index.html">Home</a> <hr /> </header> <article> <h2>Breaking News</h2> <p class="smalltext">Posted on Mon Dec 21 2020 by Justin Case</p> <div><h3 id="guess-what-">Guess what?</h3> <p>Here is some <strong>really exciting news!</strong></p> </div> <a href="index.html"><< Back</a> </article> <footer> <p class="smalltext">Copyright (c) Mark Lewin 2021</p> </footer> </body> </html> |
Creating the home page
So now we have several individual HTML files, each containing a blog post. We now want to create a central home page where we can link to each post, ordering the posts so that the most recent one is listed first.
We’ll use another template for the home page. Create index.eta in the views directory and populate it as shown:
Code Listing 75
<!DOCTYPE html> <html lang="en"> <head> <meta charset="UTF-8" /> <meta name="viewport" content="width=device-width, initial-scale=1.0" /> <link rel="stylesheet" href="assets/styles/style.css"> <title><%= it.blog %></title> </head> <body> <header> <h1><%= it.blog %></h1> <p class="slug"><%= it.summary %></p> <hr /> </header> <div> <% it.posts.forEach((post)=>{ %> <div class="post"> <h2><a href="<%= post.url %>"><%= post.title %></a></h2> <p class="smalltext">Posted on <%= post.date.toDateString() %> by <%= post.author %></p> <p><%= post.description %></p> </div> <% }) %> </div> <footer> <p class="smalltext"><%= it.copyright %></p> </footer> </body> </html> |
You can see that in addition to the settings in .env, which apply to the whole site, we also want to populate variables with metadata from the individual posts. We also need to know the URL of each blog post so that we can link to it from the home page. To achieve this, we’re going to have to accumulate that information as we process each post.
Create a type called PostDetails with the metadata that we want to store for each post, and a collection called posts to store them in:
Code Listing 76
Run your program and ensure that the posts collection is being populated correctly:
Code Listing 77
Now that we have all the information we require to render the home page, we need to write the code to do it. We’ll create a separate function for this called generateHomepage(). In that function we will sort the posts by date (most recent first), render the template, and then write it to an index.html file in our PUBLISH_DIR:
Code Listing 78
async function generateHomepage() { // Sort posts by date: most recent posts first posts.sort((a, b) => { return (b.date.getTime() - a.date.getTime()); }); let templateResult = await renderFile( "./index", { blog: BLOG, summary: SUMMARY, copyright: COPYRIGHT, posts: posts, }, ); // Write the file to the PUBLISH_DIR await Deno.writeTextFile( PUBLISH_DIR + "index.html", templateResult, ); } await generatePosts(); generateHomepage(); |
Running this should produce an index.html file that contains links to the individual blog posts:

Figure 11: The site home page
The only thing left to do now is to style our site. In the public/assets/styles directory, create a file called style.css with the following stylesheet:
Code Listing 79
body { font-family: Helvetica, Arial, sans-serif; width:50%; margin: 0 auto; background-color: lightcyan; } h1 { color: #375e97; font-family: Georgia, 'Times New Roman', Times, serif; border-bottom: 1px solid #375e97; } h2 { color: #fb6542; } .slug { color: #0c0707; font-weight: bold; font-style: italic; } code { color: darkblue; font-weight: bolder; } .post { border: 2px dashed blue; padding: 5px 20px; margin-bottom: 10px; background-color: bisque; } article { border: 2px dashed blue; padding: 5px 20px; background-color: bisque; } blockquote { background-color: lemonchiffon; border: 2px solid #fb6542;; padding: 5px; margin-left: 0%; } .smalltext { font-style: italic; font-size: small; } a:link, a:visited { color: #fb6542; } a:hover { text-decoration: none; } |
Now we have the beginnings of a blog worthy of the name!

Figure 12: The styled home page
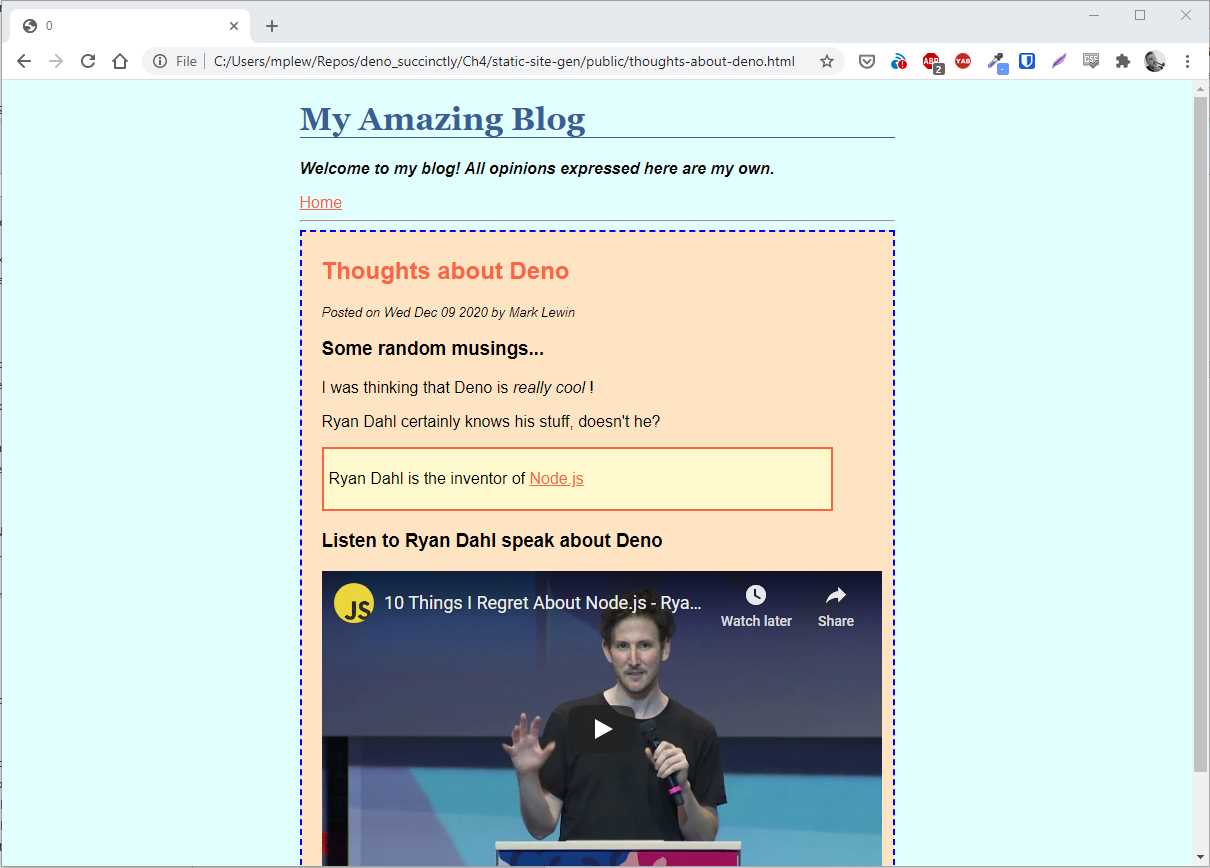
Figure 13: A styled post
Summary
In this chapter you built a bare-bones static site generator. It’s very usable but rather limited in features, so hopefully you’ll feel inclined to expand on it! Other than restyling the thing (design was never my strong suit), you could consider adding extra pages (such as an About and Contact page), implementing post categories, having a featured post, or just about anything else you’ve seen in other static site generators like Jekyll or Hugo.
As well as continuing to practice writing and running Deno programs, you also learned about three particularly useful modules: env for configuration, and markdown and eta for page templating.
You can find the source code for this project here.
- 1800+ high-performance UI components.
- Includes popular controls such as Grid, Chart, Scheduler, and more.
- 24x5 unlimited support by developers.