
Deno Succinctly®

CHAPTER 5
Build a RESTful API
One of the primary reasons for Node’s swift rise to prominence in the last decade is its suitability for developing APIs. As more than one IT journalist noted during that time, if Marc Andreessen of Netscape had been commenting on the software landscape in recent years, then his famous observation that “software is eating the world” would have been revised to “APIs are eating the world.”
Indeed, APIs are everywhere. And any language or framework that can make it easier for developers to create good APIs is always going to be a hit. Node delivered on this very well, with its non-blocking architecture allowing it to serve many concurrent requests at great speed and scale nicely. Because Deno has inherited all the good things about Node (and hopefully discarded some of the sketchier bits), you can rest assured that Deno is (or at least will be) a very solid choice for API development.
Deno API frameworks
Technically, you could probably create your API without using a framework. However, the role of a framework is to harness the core language’s ability to do things like interact with the file system and accept network requests while abstracting away some of the complexity involved in coding them. It can also extend the core language features with additional capabilities.
In the Node world, the most popular framework for creating APIs is undoubtedly Express. Express calls itself a “fast, un-opinionated, minimalist framework for Node.” This framework doesn’t offer a lot of enhancements, giving you the bare minimum of features and focusing mainly on performance. However, it does enable you to create extensive middleware chains that intercept requests before they reach your handlers to perform additional processing. We’ll talk more about middleware later.
Developed by the same team behind Express, Koa attempts to do things better in much the same way as Deno in an attempt to “fix” Node. It takes advantage of some of the new ES6 language features that weren’t around when Express was conceived to ditch callbacks in favor of function generators and async/await and to generally create a much nicer programming experience.
In Deno, Koa has become Oak (see what they did there?), and is probably the most popular framework for developing APIs right now. For that reason, it’s the one that we’ll use to build our API in this chapter.
However, there is another contender that is gaining popularity, and that is Drash. Unlike most of the frameworks available for Deno, it’s not just a direct port of a Node framework. Instead, Drash wants to do things differently and, in my opinion, it’s worth keeping an eye on.
Tip: You can find out more about Drash here.
One of the nicest things about Drash is that you can use it to create either APIs or web applications, and it gives you the appropriate generator script to scaffold your project:
Code Listing 80
$ deno run --allow-read --allow-write --allow-run --allow-net https://deno.land/x/drash/create_app.ts --api |
This creates the following structure for your project:
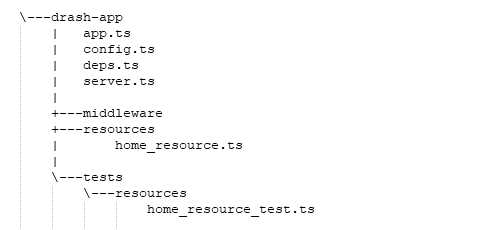
Figure 14: The Drash project skeleton
Drash creates boilerplate code to help you get started. It encourages you to use object-oriented techniques to create your application. For instance, by looking at the autogenerated home_resource.ts in the resources folder, you can see how you can extend Drash.Http.Resource to start building out your API’s endpoints:
Code Listing 81
import { Drash } from "../deps.ts"; export default class HomeResource extends Drash.Http.Resource { static paths = ["/"]; public GET() { this.response.body = { message: "GET request received!" }; return this.response; } public POST() { this.response.body = { message: "POST method not implemented." }; return this.response; } public DELETE() { this.response.body = { message: "DELETE method not implemented." }; return this.response; } public PUT() { this.response.body = { message: "PUT method not implemented." }; return this.response; } } |
It’s a nice little framework and well worth looking into.
The Dinosaur API
In case you haven’t noticed already, Deno is full of dinosaurs. As well as the project logo, many of its third-party modules are named after dinosaur themes.
Let’s play along by creating a Dinosaur API. This will be a simple CRUD (create, read, update, and delete) API that will enable us to view and manage a collection of dinosaur information by making HTTP calls to REST endpoints.
To build this, we’re going to use the following:
- Oak: The Deno version of Koa, to create our routes and handlers.
- MongoDB: To store our collection of dinosaurs.
- mongo: A database driver for MongoDB.
- dotenv: Our old friend from Chapter 4, which will keep our database credentials private in a .env file.
We’ll start off by building the endpoints and getting them to talk to our database. Then we’ll talk about middleware and write some that will log all API requests and provide error handling for missing endpoints.
Let’s go!
Creating the server
We will start by creating the server that will accept incoming requests and create an initial handler for the root endpoint.
Create a new directory called dinosaur-api and a file within it called server.ts. In server.ts, write the following code:
Code Listing 82
import { Application, Router } from "https://deno.land/x/oak/mod.ts"; const app = new Application(); const router = new Router(); app.use(router.routes()); app.use(router.allowedMethods()); router .get("/", (ctx) => { ctx.response.body = { message: "Welcome to the Dinosaur API" }; ctx.response.status = 200; }); app.listen({ port: 3000 }); console.log("Server is running...."); |
The Application class in Oak is a wrapper around Deno's built-in http package. It has two methods: .use() and .listen().
The .use() method adds what's known as a middleware function. Middleware functions have access to the request object (from an incoming HTTP request) and the response object (the response that your server sends to that request). Middleware functions are usually chained together, and any middleware function can also access any subsequent middleware functions in the chain.
We'll create our own middleware functions later in this chapter and learn a bit more about them then, but for now, just appreciate that they can intercept the request and response objects to add extra functionality to your server.
In this code, we're adding two pieces of middleware using functions on the Router object. The first (router.routes()) returns middleware that will do all the route (or endpoint) processing that we have defined. The second (router.allowedMethods()) returns middleware that instructs the server to only allow HTTP requests using the methods (GET, POST, etc.) that we have defined for each route.
We then define those routes. Here we have a handler for a GET request on our root endpoint (that is, our server host without any path denoting a specific resource). It is passed a RouterContext object called ctx, which contains the request and response objects. Our route handler is merely returning a response object to any client that requests this route, which consists of the status code for the request (200 OK) and some JSON with a welcome message.
Having set up the middleware and defined the route, we then instruct our server to start listening for incoming requests using the app.listen() method.
Run the program:
Code Listing 83
$ deno run --allow-net server.ts Check file:///C:/Users/mplew/Repos/deno_succinctly/dinosaur-api/server.ts Server is running.... |
And visit http://localhost:3000 in your browser. You should see the following:

Figure 15: Your first route
Testing your API using Postman
For a simple API request like the one you just made, a browser will do. However, when you want to submit more sophisticated requests with more parameters and, especially, those in the body of a request, then you will want to test them with a dedicated client.
You could use a command-line HTTP client like curl for this, but I’m going to suggest that you use a free graphical tool called Postman. It enables you to easily create HTTP requests, view the responses, and save them in collections so that you can reuse them.
Download and install Postman here. Run it and click the Add Collection link to create a new collection. Call it Dinosaur API and click the Create button:

Figure 16: Creating a collection in Postman
Click the plus symbol to create a new request:

Figure 17: Creating a new request
In the tab that appears, select GET from the drop-down menu and type http://localhost:3000:

Figure 18: The request HTTP method and endpoint
Ensure that your server is still running. If it is not, restart it:
Code Listing 84
$ deno run --allow-net server.ts Check file:///C:/Users/mplew/Repos/deno_succinctly/dinosaur-api/server.ts Server is running.... |
Then, click Send in Postman to submit your request. In the response area at the bottom of the tab, you should see the response from your API (in the JSON tab):

Figure 19: The response body in Postman
Note the status (200 OK) and timing information.
Save your request by clicking the Save button. Give it a name (such as Root) and save it in the Dinosaur API collection. You can now re-run this request at any time.
Structuring the application
As soon as you start to build anything non-trivial, it makes sense to consider the organization of your code so that it’s easy to extend and maintain.
Let’s do that by creating a couple new code files and moving some of the logic in our server.ts file into them.
Managing dependencies
One immediate side effect of splitting our code into several different files is that we need to ensure that each file is importing the correct modules. This can be a real pain.
So far, we’ve just been grabbing the latest version of each module, like this:
Code Listing 85
import { Application, Router } from "https://deno.land/x/oak/mod.ts"; |
That’s okay while we’re in development, but in production you’ll likely want to refer to specific versions of modules so that you can guarantee that your code works:
Code Listing 86
import { Application, Router } from "https://deno.land/x/[email protected]/mod.ts"; |
But what happens if you’re using that module widely across your application? It means that you need to change every code file that refers to it. If you get it wrong, you might have different parts of your application using different versions of a module. If you’re relying on a feature in one version that another doesn’t have, then your application could be unpredictable.
One way to avoid this is to have all your dependencies in a single file. The TypeScript convention for this is to use a file called deps.ts. Essentially, you export all your dependencies from deps.ts, and then you import any modules you need in your code from deps.ts.
Create a new deps.ts file in the root of your application. In it, export the oak module:
Code Listing 87
Then, in server.ts, import oak from deps.ts:
Code Listing 88
// server.ts import { Application, Router } from "./deps.ts"; |
Run the server and ensure that everything still works as before. As we add more dependencies to our application, we will include them in deps.ts.
Refactoring the codebase
Okay, calling it a “codebase” at this stage might be stretching it, but let’s see if we can come up with a good structure for the application we’re building.
Let’s leave the server.ts file responsible only for what its name suggests: setting up and running the server, and providing the initial entry point for our application. It’s going to need access to our defined routes though, so we’ll import those from routes.ts, which we’ll create shortly.
Code Listing 89
// server.ts import { Application } from "./deps.ts"; import router from "./routes.ts"; const app = new Application(); app.use(router.routes()); app.use(router.allowedMethods()); app.listen({ port: 3000 }); console.log("Server is running...."); |
We’ll store all our routes in routes.ts and create a handler function for each route to keep this file simple, so we can see immediately which routes our API supports. Of course, we’ll need to import the handlers here too:
Code Listing 90
// routes.ts import { Router } from "./deps.ts"; import { showWelcome } from "./handlers.ts"; const router = new Router(); router .get("/", showWelcome); export { router }; |
We’ll keep our route handlers in handlers.ts:
// handlers.ts import { RouterContext } from "./deps.ts"; const showWelcome = async (ctx: RouterContext) => { ctx.response.body = { message: "Welcome to the Dinosaur API" }; ctx.response.status = 200; }; export { showWelcome }; |
Of course, we need access to that RouterContext type so that we can process the request and response. It wasn’t a problem when this code was in server.ts because we were importing Oak’s Application object, and the RouterContext type came with it. We could export the entire Application module here, but that’s overkill, so let’s just use deps.ts to export the type:
Code Listing 91
//deps.ts export { Application, Router } from "https://deno.land/x/oak/mod.ts"; export type { RouterContext } from "https://deno.land/x/oak/mod.ts"; |
That will do for now. If we expanded our application, we could further refine our project by assigning code files to subfolders, but this is a good basis for what we want to achieve now.
Setting up the database
We’re going to need somewhere to store our dinosaurs! (It will have to be somewhere pretty big.) Let’s use MongoDB.
MongoDB is a document-oriented "NoSQL" database, which is great for storing and retrieving large amounts of data at high speed. Unlike traditional databases that use tables and rows, MongoDB stores data in collections and documents. A document is just a set of key/value pairs that you can think of as a record in relational database terminology. A collection contains sets of documents, and is the functional equivalent of a table.
To make things simpler, rather than downloading, installing, and configuring MongoDB on our local machine, we’ll be using MongoDB Atlas, a cloud-based instance of MongoDB.
Register for a MongoDB Atlas account here, or sign in if you already have one:

Figure 20: MongoDB Atlas
Create an organization (think of it as a kind of namespace) and a project. I’ve called mine Mark’s Org and Dinosaur API, respectively:

Figure 21: Creating an organization
Click to create the free shared cluster tier, and click Create a cluster:

Figure 22: Select “Shared Clusters”
Select a cloud provider (AWS, Google Cloud, or Azure). It doesn’t really matter which one you choose. Select a region close to you and click Create Cluster:

Figure 23: Selecting a cloud provider
MongoDB Atlas then builds your cluster, which will enable you to host your databases in the cloud. This step can take a few minutes:

Figure 24: Waiting for the cluster to build
Select Database Access in the left-hand menu and click Add New Database User:

Figure 25: Creating a new user
Select Password Authentication, create a new user called admin, and autogenerate a secure password, which you should copy somewhere—you’ll need it in a bit. Ensure that the admin user has the Read and write to any database privilege. Then click Create User.

Figure 26: Assigning user privileges
Now you need to add your IP address to an allow list so that your application will be able to connect to the cluster. Select Network Access in the left-hand menu and click Add IP Address:

Figure 27: Adding your IP address to the allow list
During development, we’ll allow access from anywhere. Click Allow Access From Anywhere and this will enter 0.0.0.0/0 in the Access List Entry field. Click Confirm.

Figure 28: Allowing access from anywhere during development
Click Clusters in the left-hand menu to return to your cluster and then click Connect:

Figure 29: Connecting a cluster
Select Connect your application:

Figure 30: Select “Connect your application”
In the Connect to Cluster dialog, leave the driver and version as the default Node.js version and click Copy to copy the connection string. Paste it somewhere safe, along with the password you created earlier.

Figure 31: Copying the connection string
Storing the database credentials
Now that you’ve set up your MongoDB cluster, you need to get your application talking to it. Since we’ll be storing the authentication details for the database in our application, we’re going to use the dotenv module to store them in a configuration file and read them in at runtime.
Create a file called .env in the root of your application and enter the following:
Code Listing 92
DB=dinopedia DB_USER=admin DB_PASSWORD=T1WMgkpXX2gT9rBf |
Add the dotenv module to deps.ts:
Code Listing 93
//deps.ts export { Application, Router } from "https://deno.land/x/oak/mod.ts"; export type { RouterContext } from "https://deno.land/x/oak/mod.ts"; export { config } from "https://deno.land/x/dotenv/mod.ts"; |
Create a new file called db.ts for all your database code and import the configuration settings from .env:
Code Listing 94
// db.ts import { config } from "./deps.ts"; const { DB, DB_USER, DB_PASSWORD } = config(); |
Creating the schema
While MongoDB is a schema-less database, we want to ensure that our API is consistent when reading documents from or writing documents to our collection. To do that, we’re going to define an interface to represent a dinosaur document. Create a file called schema.ts and define the DinosaurSchema interface:
Code Listing 95
// schema.ts interface DinosaurSchema { _id: { $oid: string }; name: string; epoch: string; habitat: string; } export default DinosaurSchema; |
As you can see, of all the fascinating traits of dinosaurs, we’re only interested in three in our API: the name, the age (or “epoch”) in which they lived, and whereabouts in the world they are known to have stomped around. The other field, the _id object, is an internal unique identifier that MongoDB requires.
Import the DinosaurSchema into db.ts:
Code Listing 96
// db.ts import { config } from "./deps.ts"; import DinosaurSchema from "./schema.ts"; const { DB, DB_USER, DB_PASSWORD } = config(); |
Connecting to the database
To connect to the database, we’re going to need a driver. We’ll use the deno_mongo driver, specifically the MongoClient class, which you should export from deps.ts:
Code Listing 97
//deps.ts export { Application, Router } from "https://deno.land/x/oak/mod.ts"; export type { RouterContext } from "https://deno.land/x/oak/mod.ts"; export { config } from "https://deno.land/x/dotenv/mod.ts"; export { MongoClient } from "https://deno.land/x/mongo/mod.ts"; |
Import it into db.ts and write the code to connect to the database, using the credentials in .env.
Code Listing 98
|
import { config } from "./deps.ts"; import DinosaurSchema from "./schema.ts"; import { MongoClient } from "./deps.ts"; const { DB, DB_USER, DB_PASSWORD } = config(); const connectStr = `mongodb+srv://${DB_USER}:${DB_PASSWORD}@cluster0.fmukv.mongodb.net/${DB}?retryWrites=true&w=majority`; const client = new MongoClient(); client.connectWithUri(connectStr); const db = client.database(DB); const dinosaurCollection = db.collection<DinosaurSchema>("dinosaurs"); export { db, dinosaurCollection }; |
Note how we’re using the connection string you copied when you configured the connection to your MongoDB cluster. We’re basically replacing the user, password, and database names in the string with the settings in .env.
We create a connection to Mongo, switch to the dinopedia database (again, from .env), and create a collection called dinosaurs. Neither of these yet exist, but accessing them in this way creates them the first time we execute this code. Subsequent executions will use the existing database and collection.
Finally, we export references to the database and collection because we want to create some new routes whose handlers will interact with the database.
Listing all the dinosaurs
We’re now going to create a route that lists all the dinosaurs in the collection. The route will be accessible via a GET request to the following URL:
http://localhost/dinosaurs
First, add the route to the routes.ts file:
Code Listing 99
// routes.ts import { Router } from "./deps.ts"; import { getDinosaurs, showWelcome } from "./handlers.ts"; const router = new Router(); router .get("/", showWelcome) .get("/dinosaurs", getDinosaurs); export { router }; |
Then we need to add the getDinosaurs() handler for this route to handlers.ts. To interact with the dinosaur collection, we need to first import it from db.ts:
Code Listing 100
// handlers.ts import { RouterContext } from "./deps.ts"; import { dinosaurCollection } from "./db.ts"; ... const getDinosaurs = async (ctx: RouterContext) => { const dinosaurs = await dinosaurCollection.find(); ctx.response.body = dinosaurs; ctx.response.status = 200; }; export { getDinosaurs, showWelcome }; |
In this handler, we’re using the find() method on the collection with no arguments to return all the documents in the collection. We send the results back in the response body with a 200 OK HTTP status code.
Let’s try this out. First, run the server:
Code Listing 101
Wow. Look at all those arguments. Especially that --unstable flag. That’s because, at the time of writing, there is code that the MongoDB driver uses that hasn’t yet been certified as stable by Deno. You must specify --unstable to run it.
Tip: Supplying all those permissions every time you execute your program can be a real pain. So, during development, you can grant all permissions to your Deno program by executing it with the -A flag. (You still need to specify --unstable where required, however.) For example: deno run -A --unstable mod.ts.
Also, note how the Deno driver has installed a plugin. You can find it in your project directory in the .deno_plugins folder. Don’t expect to be able to view the contents, however, because it’s a binary file:

Figure 32: The MongoDB plugin DLL
Now that your server is running, create a new request in Postman. It should be a GET request to the http://localhost:3000/dinosaurs endpoint. Save it as Get all dinosaurs in your Dinosaur API collection:
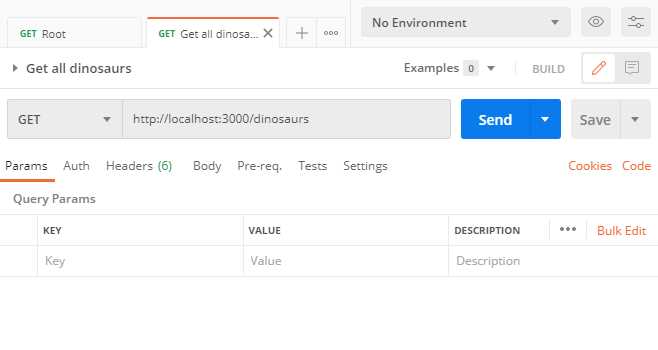
Figure 33: Retrieving all dinosaurs
Click Send and look at the response:

Figure 34: No dinosaurs!
If all goes well, you should see an empty array ([]). That’s because our dinosaur collection is empty!
Tip: If you see an ECONNREFUSED error, your server probably is not running. Run the server and try the request again.
Now that we’ve got our application talking to the database, we need to figure out how to add some dinosaurs!
Adding dinosaurs
Users will be able to add a new dinosaur to the collection by making a POST request to http://localhost/dinosaurs and including the dinosaur details in the body of the request.
Let’s create a route and a handler for this.
First, in routes.ts:
Code Listing 102
// routes.ts import { Router } from "./deps.ts"; import { addDinosaur, getDinosaurs, showWelcome } from "./handlers.ts"; const router = new Router(); router .get("/", showWelcome) .get("/dinosaurs", getDinosaurs) .post("/dinosaurs", addDinosaur); export { router }; |
And then create the addDinosaur() handler in handlers.ts:
// handlers.ts import { RouterContext } from "./deps.ts"; import { dinosaurCollection } from "./db.ts"; ... const addDinosaur = async (ctx: RouterContext) => { if (!ctx.request.hasBody) { ctx.response.body = { message: "No data" }; ctx.response.status = 400; return; } const { name, epoch, habitat } = await ctx.request.body().value; const result = await dinosaurCollection.insertOne({ name, epoch, habitat, }); ctx.response.status = 201; ctx.response.body = { message: `Added dinosaur with ID: ${result.$oid}` }; }; export { addDinosaur, getDinosaurs, showWelcome }; |
This uses the insertOne() method on the collection to take the fields in the request and add them to a new document in the collection. First, we check if there is any request body. If not, we return a 400 Bad Request error and exit the handler.
Otherwise, we return a 201 Created status in the response, together with the ID of the document that is autogenerated by MongoDB.
Try this out by running the server and creating a new POST request in Postman called Add dinosaur. The endpoint is http://localhost:3000/dinosaurs.
Click the Body link and select raw and JSON from the drop-down lists. Add your dinosaur JSON to the editor pane:

Figure 35: Adding a dinosaur
Save your request as Add dinosaur, ensure that your server is running, and then click Send. If all goes according to plan, you should receive the ID of the new document:
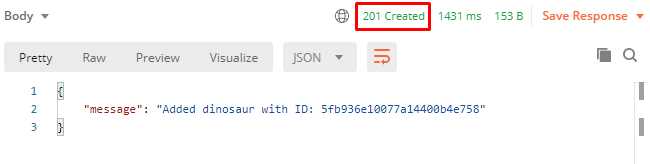
Figure 36: Successfully adding a dinosaur
Still in Postman, open your Get all dinosaurs request and click Send. The newly created dinosaur appears in the response:

Figure 37: The new dinosaur appears in the response
If you want to add a few more dinosaurs, then here are some more you can try:
Code Listing 103
{ "name": "Omeisaurus", "epoch": "Mid Jurassic", "habitat": "China" } { "name": "Talarurus", "epoch": "Late Cretaceous", "habitat": "Mongolia" } { "name": "Velociraptor", "epoch": "Late Cretaceous", "habitat": "Mongolia" } { "name": "Kotasaurus", "epoch": "Early Jurassic", "habitat": "India" } { "name": "Becklespinax", "epoch": "Early Cretaceous", "habitat": "England" } |
Tip: To find out more about these dinosaurs and discover many others, visit the UK Natural History Museum’s Dino Directory.
Finding a specific dinosaur
We can now add a dinosaur and list all the dinosaurs in the collection. Let’s add a path to retrieve a specific dinosaur by the ID that MongoDB generated for it.
This will be another GET request, this time to the following URL: http://localhost/dinosaurs/<ID>.
First, add the route, with a handler called getDinosaur(). This route will include a path parameter for the ID portion of the URL, which we denote by prefixing it with a colon: http://localhost/dinosaurs/:id.
Code Listing 104
// routes.ts import { Router } from "./deps.ts"; import { addDinosaur, getDinosaur, getDinosaurs, showWelcome, } from "./handlers.ts"; const router = new Router(); router .get("/", showWelcome) .get("/dinosaurs", getDinosaurs) .get("/dinosaurs/:id", getDinosaur) .post("/dinosaurs", addDinosaur); export { router }; |
And then code the route handler, getDinosaur():
Code Listing 105
// handlers.ts import { RouterContext } from "./deps.ts"; import { dinosaurCollection } from "./db.ts"; ... const getDinosaur = async (ctx: RouterContext) => { const id = ctx.params.id; const dinosaur = await dinosaurCollection.findOne({ _id: { $oid: `${id}`, }, }); if (!dinosaur) { ctx.response.body = { message: "Dinosaur not found" }; ctx.response.status = 404; return; } ctx.response.body = dinosaur; ctx.response.status = 200; }; export { addDinosaur, getDinosaur, getDinosaurs, showWelcome }; |
This handler uses the collection’s findOne() method to find a specific document based on the path parameter supplied in the request. The findOne() method expects the JSON element that you are searching for. In this case it’s the _id object that MongoDB uses to uniquely identify documents.
If no such document exists, it returns a 404 Not Found error. Otherwise, it returns the document itself.
Test it by creating a new GET request to http://localhost:3000/dinosaurs/<id>, using the ID of one of the dinosaurs in your collection (which you can find by submitting the “List all dinosaurs” request). Save this request as Find dinosaur in Postman. When you send it, the response should include the document you requested:
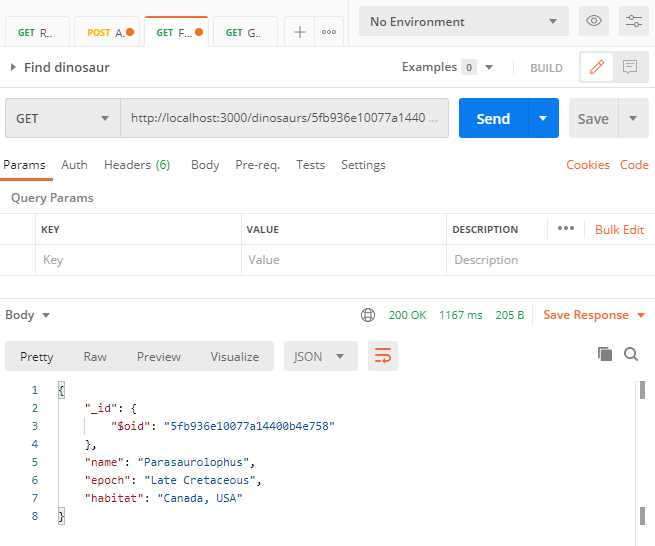
Figure 38: Finding a dinosaur
Editing a dinosaur
Maybe some new research has come to light and we want to update the details of a dinosaur. Let’s add an endpoint for that. It will be similar to the one to retrieve a specific dinosaur, in that we’ll specify the ID in the path. However, this time we will make it a PUT request and include the changes that we want to make in the body of the request.
Define the new route in routes.ts:
Code Listing 106
// routes.ts import { Router } from "./deps.ts"; import { addDinosaur, getDinosaur, getDinosaurs, showWelcome, updateDinosaur, } from "./handlers.ts"; const router = new Router(); router .get("/", showWelcome) .get("/dinosaurs", getDinosaurs) .get("/dinosaurs/:id", getDinosaur) .put("/dinosaurs/:id", updateDinosaur) .post("/dinosaurs", addDinosaur); export { router }; |
Then, code the route handler updateDinosaur() in handlers.ts:
// handlers.ts import { RouterContext } from "./deps.ts"; import { dinosaurCollection } from "./db.ts"; ... const updateDinosaur = async (ctx: RouterContext) => { const id = ctx.params.id; if (!ctx.request.hasBody) { ctx.response.body = { message: "No data" }; ctx.response.status = 400; return; } const { name, epoch, habitat } = await ctx.request.body().value; const { modifiedCount } = await dinosaurCollection.updateOne({ _id: { $oid: `${id}`, }, }, { $set: { name, epoch, habitat } }); if (!modifiedCount) { ctx.response.body = { message: "Dinosaur not found" }; ctx.response.status = 404; return; } ctx.response.body = { message: "Dinosaur updated" }; ctx.response.status = 200; }; export { addDinosaur, getDinosaur, getDinosaurs, showWelcome, updateDinosaur }; |
First, we check for a request body. If there is none, then we return a 400 error code indicating no data found.
Then we use the updateOne() method on the collection to provide the _id of the document we want to update in the first parameter and an object representing the changes we want to make to the document in the second parameter.
Note the addition of the $set property in the second object. The default behavior of MongoDB is just to overwrite the existing document with whatever we include here. So, if we only want to change the habitat, and only provide a value for that property, then MongoDB will believe that we want to keep habitat and discard the other fields. Clearly that is not what we want to do in this example, and we don’t want to have to retrieve the current field values just to write them back out to the database. The $set basically tells Mongo that if any of the properties are unchanged, they should still be included in the updated document.
The updateOne() method returns a count of the number of documents that it modified. We can use this as an indicator of whether the operation is successful or not, and return the appropriate response.
Try it out by creating a new PUT request called Update dinosaur in Postman. Supply the ID of an existing dinosaur in the collection and the modification that you want to make in the request body. For example:
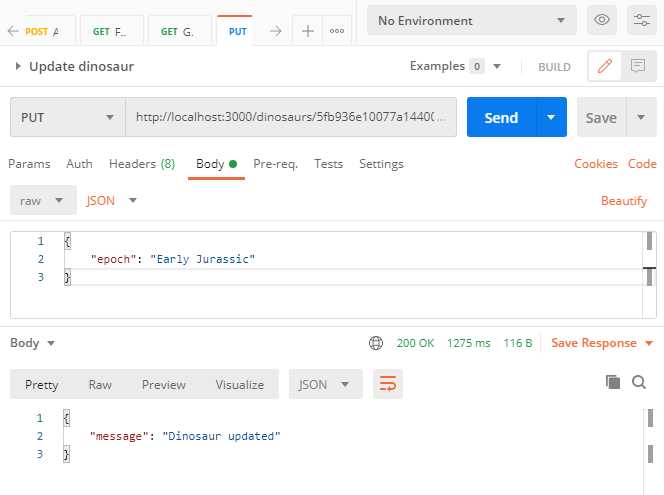
Figure 39: Editing a dinosaur
Use the Find dinosaur request to locate the dinosaur and verify that it applied your updates:
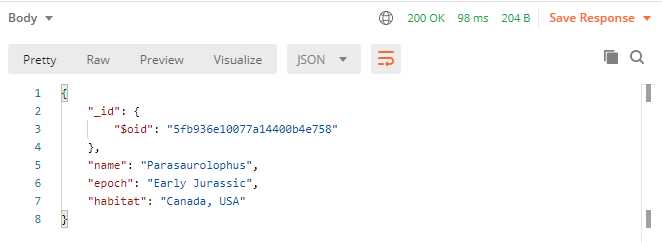
Figure 40: Verifying your edits
Deleting a dinosaur
There is just one more operation to implement before we can truly call our API a CRUD API, and that’s the ability to delete a dinosaur. We’ll do this via a DELETE request, passing the ID of the document we want to delete as a path parameter.
Define the route in routes.ts:
Code Listing 107
// routes.ts import { Router } from "./deps.ts"; import { addDinosaur, deleteDinosaur, getDinosaur, getDinosaurs, showWelcome, updateDinosaur, } from "./handlers.ts"; const router = new Router(); router .get("/", showWelcome) .get("/dinosaurs", getDinosaurs) .get("/dinosaurs/:id", getDinosaur) .put("/dinosaurs/:id", updateDinosaur) .post("/dinosaurs", addDinosaur) .delete("/dinosaurs/:id", deleteDinosaur); export { router }; |
Then code the deleteDinosaur() route handler in handlers.ts:
Code Listing 108
// handlers.ts import { RouterContext } from "./deps.ts"; import { dinosaurCollection } from "./db.ts"; ... const deleteDinosaur = async (ctx: RouterContext) => { const id = ctx.params.id; const deleteCount = await dinosaurCollection.deleteOne({ _id: { $oid: `${id}`, }, }); if (!deleteCount) { ctx.response.body = { message: "Dinosaur not found" }; ctx.response.status = 404; return; } ctx.response.body = { message: "Dinosaur deleted" }; ctx.response.status = 200; }; export { addDinosaur, deleteDinosaur, getDinosaur, getDinosaurs, showWelcome, updateDinosaur, }; |
The deleteDinosaur() handler uses deleteOne() on the collection and works in a similar way to findOne(), except that instead of returning the document, it deletes it! And then it returns a count of the records deleted, which we can check to see if the operation was successful.
Create a new Postman request called Delete dinosaur that uses a DELETE request and points to resource http://localhost:3000/dinosaurs/<id>. Test it using your least favorite dinosaur and ensure that sucker is not only extinct, but never existed in the first place!
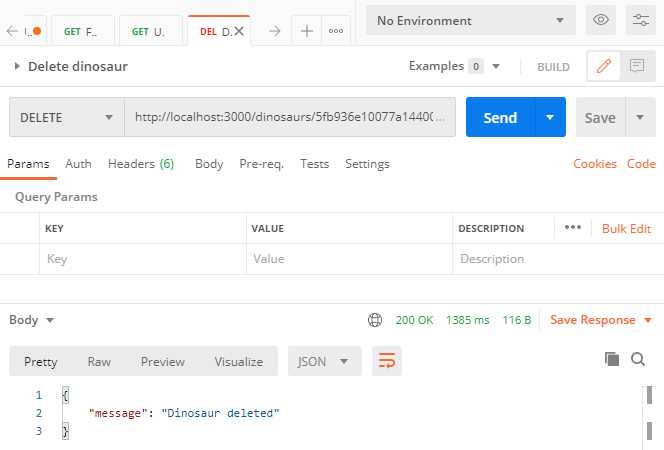
Figure 41: Deleting a dinosaur
Adding extra functionality with middleware
Let’s talk a bit about middleware.
If you were building this API using Deno's standard library http module, you would have to write a single request handler for your entire application. A framework like Oak lets you write multiple request handlers for different routes so that you can give them all specific jobs, like authenticating a user, or reading dinosaur details in from a database.
In your vanilla Deno http application, your request handler has just one object representing the incoming request, and one representing the response that you will send back to the client. But in an Oak application, these objects are fed into an array where each element is a function. This array of functions is known as the middleware stack, and it allows us to intercept these objects and do useful things with them. For example, once a user has logged in, you can fetch their profile information from the database and store it in the request object as request.user.
In short, middleware functions let you write code to perform further processing on each request, or on each request for a specific route, and manipulate these request and response objects.
Middleware functions have three standard parameters: request, response, and a next() function that can call the next middleware function in the stack. You add each function to the stack by using the Application object’s use() function in the order that you want them to execute.
Each function is called in turn and makes whatever changes are required to the request and response objects, and passes them on to the next function in the chain by calling next(). The last function in the stack sends the response back to the browser.
Tip: It's important to remember to call next() (unless it's the last function in the chain), or your request will hang and ultimately time out.
Let's add two middleware functions to our API.
Route not found middleware
First, we'll create a middleware function that returns a HTTP 400 Not Found error if someone tries to access an endpoint that doesn't exist.
Create a directory called middleware and, inside it, a file called notFound.ts. In notFound.ts, write the following code:
Code Listing 109
// notFound.ts export default ({ response }: { response: any }) => { response.status = 404; response.body = { message: "Endpoint not found.", }; }; |
Place this after your existing calls to app.use() in server.ts. (Yes, you’re already using middleware in your application!)
So your application first invokes any matching routes (app.use(router.routes())), retrieves the collection of HTTP verbs (GET, POST, etc.) that are permitted by the routes and sends them to the browser (app.use(router.allowedMethods())), and then calls your notfound function:
Code Listing 110
// server.ts import { Application } from "./deps.ts"; import { router } from "./routes.ts"; import notFound from "./middleware/notFound.ts"; const app = new Application(); app.use(router.routes()); app.use(router.allowedMethods()); app.use(notFound); app.listen({ port: 3000 }); console.log("Server is running...."); |
If the route is found, the route’s handler will have already returned the response, so your notfound middleware will never be executed. There’s no need to call next(), because it’s the last middleware function in the stack.
Test it by creating a request in Postman to a non-existent route. You should receive the following response:

Figure 42: Testing your 404 middleware
Request logging middleware
Now we will write some more middleware that logs request data, including timings. We’ll just dump the results to the console, but obviously we could also write this information to a file or a database. We’ll invest some effort in making it look attractive though, with the aid of the colors module.
First, import colors in deps.ts:
Code Listing 111
//deps.ts export { Application, Router } from "https://deno.land/x/oak/mod.ts"; export type { RouterContext } from "https://deno.land/x/oak/mod.ts"; export { config } from "https://deno.land/x/dotenv/mod.ts"; export { MongoClient } from "https://deno.land/x/mongo/mod.ts"; export { bgBlue, bgGreen, bgRed, cyan, green, white, } from "https://deno.land/std/fmt/colors.ts"; |
Create another file in your middleware folder called logging.ts, and enter the following code:
Code Listing 112
// logging.ts import { bgBlue, bgGreen, bgRed, cyan, green, white } from "../deps.ts"; const X_RESPONSE_TIME: string = "X-Response-Time"; export default { logger: async ( { response, request }: { response: any; request: any }, next: Function, ) => { await next(); const responseTime = response.headers.get(X_RESPONSE_TIME); let statusText = ""; if (response.status == 200 || response.status == 201) { statusText = `${bgGreen(white(String(response.status)))}`; } else { statusText = `${bgRed(white(String(response.status)))}`; } console.log( `${statusText} | ${green(request.method)} ${ cyan(request.url.pathname) } -- ${bgBlue(white(String(responseTime)))}`, ); }, responseTime: async ( { response }: { response: any }, next: Function, ) => { const start = Date.now(); await next(); const msec: number = Date.now() - start; response.headers.set(X_RESPONSE_TIME, `${msec}ms`); }, }; |
There are actually two middleware functions in this module: logger() and responseTime(), which you need to add to the stack in server.ts:
Code Listing 113
// server.ts import { Application } from "./deps.ts"; import { router } from "./routes.ts"; import notFound from "./middleware/notFound.ts"; import logging from "./middleware/logging.ts"; const app = new Application(); app.use(logging.logger); app.use(logging.responseTime); app.use(router.routes()); app.use(router.allowedMethods()); app.use(notFound); app.listen({ port: 3000 }); console.log("Server is running...."); |
Tip: Be careful about the order of the middleware functions here. The logger() and responseTime() functions must run before the route handlers are invoked.
The logger() function executes first. The code immediately hits await next(), which passes control to the responseTime() function as the next middleware function in the stack.
In responseTime(), it records the current time and jumps to the next piece of middleware, which is the route handler for whatever API endpoint the client is accessing. Having executed the code in the handler, the flow of execution returns to responseTime() and again records the time now that the route handler has done its work. It calculates the difference between the two timestamps and injects this information into the request using a header called X-RESPONSE-TIME. It then returns control to logger(), which then formats the information and logs it to the console:

Figure 43: Testing your logging middleware
Summary
Well done! You built a working CRUD API with some nice extra features.
Along the way, you learned about:
- Structuring a Deno project, including managing external dependencies.
- The Oak framework, Deno’s implementation of Node’s Koa.
- Storing data in and retrieving data from MongoDB.
- Middleware—what it is, and how to write your own.
...and hopefully a bit more about dinosaurs!
You can find the source code for this project here.
- 1800+ high-performance UI components.
- Includes popular controls such as Grid, Chart, Scheduler, and more.
- 24x5 unlimited support by developers.