
Delphi Succinctly®

CHAPTER 2
Your First Application
I hope you are now looking forward to creating your first project with Delphi. We could skip a “Hello World” demo, but why not follow tradition?
Creating a New Project
To start, we’ll create a Windows desktop application from scratch. To do that, move the mouse pointer to the main menu, point to the [File|New] item and select VCL Forms Application.
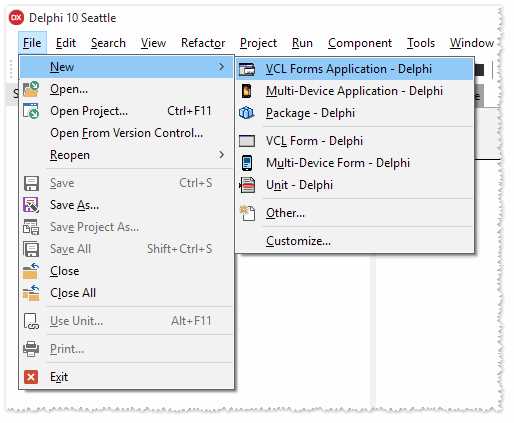
Figure 2: Delphi Main Menu
Delphi will create the new project and prepare the environment to start working.
When you create a new project, Delphi automatically inserts a new empty form (known as the Main Form) into the project and opens so you can begin designing the UI of your application.
You are free to delete the project or add new forms to it later. For now, we will try some basic operations, and explore the details in the next chapters.
Adding Controls
From the Tool Palette window, expand the “Standard” category by clicking the plus (+) sign, then click the TEdit control and drag it to your form, drop it on the empty window area. Next, repeat the procedure selecting the TButton control.
If you want to change the text on the button you just added, left-click the control you placed inside the Form and point to the Object Inspector window. Scroll through the grid to find the Caption property and click on it to enter new text, replacing the default value (Button1) with a new label. Press Enter or click elsewhere outside the Object Inspector panel to complete the change.

Figure 3: Button Properties
You can do the same to clear the contents of the textbox TEdit: select the control and change the property Text to an empty value.
If you want to move a control, you can click and move it around by holding the left mouse button down, or use the blue dots to change its size. Our final Main Form should look like this:
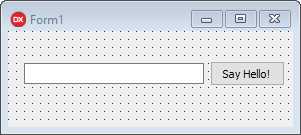
Figure 4: “Hello World” Form
Responding to Events
If you double-click the TButton control, Delphi will switch to the Code Editor and create a routine that handles the event raised when the user clicks the button. Delphi takes care of writing lot of the boilerplate code, leaving the specific implementation up to you.
Suppose we want to say “hello” when the user inserts his (or her) name and clicks the button. You could write something like the following:
Code Listing 1: Hello World
procedure TForm1.Button1Click(Sender: TObject); begin end; |
Don’t pay too much attention to the syntax—we’ll spend a full chapter on Object Pascal.
Run Your Application
To run the application, select [Run|Run Without Debugging] (or press CTRL+F9) and Delphi will start building your project.
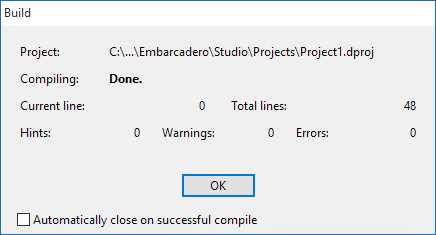
Figure 5: Build Progress Window
If no errors are detected during the building process, Delphi launches the application executable file (which has the “.exe” extension on Windows).
Note: Delphi is a native compiled language, so it always creates an executable file when you need to run your application and see if it works as you expect. You can’t avoid that. You can only choose to run the program without debugging so Delphi does not attach to the process once the build is completed and both processes continue to live separately.
If you followed all the steps correctly, the Main Form should appear and you should see the following message when you enter your name and click the button.

Figure 6: “Hello World” Running
The message box invoked by calling the ShowMessage function is a modal dialog. This means the execution will not proceed until you close the window by clicking OK or the close button at the upper right corner.
Note: The application keeps running as long as the Main Form is visible on the screen. You can minimize it or move it around on your desktop, and when you close it, the application terminates.
Congratulations, you have just created your first Delphi program!
Deploy Your Application
When you run or build the project, Delphi produces a native application.
The Visual Component Library (VCL) we have used to create our “Hello World” application targets the Windows platform, and the compiler for this platform actually writes an executable (.exe) program file.
The term “native” means that your program contains machine code that can be executed by the target CPU and OS without the need for runtimes and virtual machines.
An installer or a packaging tool is not required to deploy your program: you can simply copy the executable file to the destination machine and launch it.
Tip: Sometimes your application may need to use external files, resources or databases; in these cases, I recommend using an installer tool to ensure that all required files are copied to the destination machine. This lets the user customize the process, like the program target directory, the choice of optional components, the help manual, and samples. If you want a simple, easy-to-use tool, look at Inno Setup (which, by the way, was built with Delphi!)
Summary
Here we have only scratched the surface of what you can achieve with Delphi, and I think you can already get a clear idea of how much the Rapid Application Development (RAD) approach speeds up the development process.
Using Delphi, you can focus exclusively on the key parts of your application, such as the user interface and the business logic, without concentrating too much on the internal mechanisms.
I know this example may seem overly simple, but the next chapters will illustrate how to use Delphi to make applications that are far more complex. Before that, we should familiarize ourselves with the tools available in the IDE.
- 1800+ high-performance UI components.
- Includes popular controls such as Grid, Chart, Scheduler, and more.
- 24x5 unlimited support by developers.