
Delphi Succinctly®

CHAPTER 7
Cross-Platform Development with FireMonkey
FireMonkey is the name of the library that makes it possible to create cross-platform applications in Delphi, but it is effectively much more than that.
Actually, FireMonkey (abbreviated FMX) is a rather new framework born to develop next generation business applications and:
- It is a graphics library, since the elements that make up the user interface are vectors and leans to the GPU.
- It is native, because its code is compiled directly into the executable file and doesn’t requires any runtime to work.
- It is multi-platform, because applications created with it can be compiled for different operating systems, such as Windows, Mac OSX, Android, and iOS.
- It is abstract, meaning that it is not merely a wrapper of the APIs exposed by targeted platforms.
- It comes with source code, unlike other competitor libraries with similar features, like Windows Presentation Framework (WPF), Silverlight, and Flex.
FMX also provides an abstraction layer for features such as windows, menus, dialogs, controls, timers, and sensors.
You can use FireMonkey to create 2D (or HD) applications and 3D applications, providing access to specific objects of a powerful vector graphics engine, supporting advanced capabilities like anti-aliasing in realtime, resolution independence, alpha blending, solid and gradient fills, brushes, pens, graphical effects, animation and transformations.
FMX facilitates the construction of complex user interfaces thanks to an extensive range of ready-to-use primitive objects and visual controls (shapes, buttons, text boxes, list and combo boxes, etc.) that you can compose by putting each one inside the others.
Like the VCL, FireMonkey embraces Unicode and supports skinning, theming, and the most popular image formats (JPEG, PNG, TIFF and GIF). However, it is incompatible with the VCL, since the latter is tied and coupled with the Windows native API, while RTL is the cross platform foundation of both FMX and VCL.
Creating a Multi-Device Application
Multi-Device Applications are how Delphi lets you build single-source cross-platform projects that target different devices (desktops, tablets and smartphones) and operating systems (Windows, Mac OS, Android and iOS) using the FireMonkey library.
In the rest of the paragraph, we will build a sample shopping list application.
To create a new Multi-Device Application, select [File|New|Multi-Device Application] from the Delphi main menu. This opens a wizard dialog that allows you to select an application type to use as a starting point. You can choose from the following:
- Blank Application, to start a new empty HD (2D) raw project.
- 3D Application, to start with a 3D Form ready to host tridimensional objects.
- Header/Footer, to start with a 2D Form with top and bottom toolbars.
- Header/Footer with navigation, which is similar to the previous template but includes a page control.
- Master-Detail, to start a 2D project that uses the TMultiView control and supports switching between a list of items and the details of the selected item.
- Tabbed, to start a 2D project with tabs and the gesture support to switch between them.
- Tabbed with Navigation, which is similar to the previous template but adds navigational buttons to move to the next and previous tabs.

Figure 31: Multi-Device Application Templates
For our sample application, select the Blank Application template and click OK.
As with VCL Forms Applications, Delphi will create a default main empty form.
Displaying a List
Now we need to add a visual control to show our shopping list items. You should already be familiar with the Tool Palette. Locate the TListView component from the Standard page and drag it to your empty form. Move to the Object Inspector and set its name to ShoppingListView.
The TListView control can be used to display a list of items of any kind once the appearance has been configured. Items can be added through code at runtime or by binding the ListView to a data source.
Once you have added the control to the form, set the Align property to Client to make the control fill up the available client space. Then enable the SearchVisible property and a little search box will appear on the top of the list control. This will allow the user to enter a string to filter the contents displayed in the ListView.
Tip: TListView supports a “pull to refresh” feature. To enable it, set the PullToRefresh property to True and handle the OnPullRefresh event to implement your custom response to the gesture (i.e. reloading the updated items).
Defining a Data Source
Now that we have set up our list of items, we should bind it to a data source to see something inside our control and test how the application works.
It would be nice to have some auto-generated sample data and bind the TListView control to it. The TPrototypeBindSource component from the LiveBindings page can help you with this.
Add the TPrototypeBindSource to the main form and name it ShoppingBindSource.
Now it is time to add some fields. Right-click the component and select Add Field… to insert a new field in the virtual table of data produced by the component. The Add Field dialog will pop up.

Figure 32: PrototypeBindingSource New Field
Browse the fields available in the Field Data list to get an idea of how many type of fields you can prototype data for, including colors and bitmap images.
Select the field associated to the LoremIpsum: ftString generator and click OK to add it. Then, set the Name property of the field to Title.
Using LiveBindings
LiveBindings is a technology available for both the VCL and FireMonkey frameworks.
It is based on binding expressions that link object properties together. For example, you can bind the Checked property of a toggle switch button to the Enabled property of any visual control to enable or disable it depending on the state of the button, without writing a single line of code.
Note: The VCL includes a special family of standard visual controls called “Data Controls” that supports data binding, while FireMonkey relies on LiveBindings for that.
You can access LiveBindings features through the set of components available in the LiveBindings page of the Tool Palette, but a better way to access them is through the LiveBindings Designer. You can open it selecting the [View|LiveBindings Designer] item from the main menu.
Drag the Title field from the TPrototypeBindingSource element to the Item.Text field of the TListView element.

Figure 33: LiveBindings Designer
This will tell the control to use the Title property value of each prototype record as the text of each list item. You should already see a preview in the Form Designer and inside the Multi-Device Preview panel.

Figure 34: Multi-Device Preview
Accessing Data Using FireDAC
The TPrototypeBindingSource component—as the name implies—is good when you build a prototype of your application, but sooner or later you will have to use a real database to store your data if you want to release your product to the market.
FireDAC is a cross-platform data access library that provides a set of components and drivers for a wide range of database systems and formats, including:
- Microsoft SQL Server.
- MySQL.
- Oracle.
- SQLite.
- MongoDB.
- PostgreSQL.
- IBM DB2.
- InterBase (a database server from Embarcadero).
- FireBird (an open-source database born from a fork of InterBase).
- SQL Anywhere.
- Informix.
- Access.
FireDAC supports SQLite and InterBase (ToGo edition) for both Android and iOS, while it requires native client libraries for the other databases on client platforms.
Since we want to build a mobile application, we are using SQLite for the sake of simplicity and large availability.
The first step is creating a connection to the database. Select the TFDConnection component from the FireDAC page of the Tool Palette, then double-click the component to open the FireDAC Connection Editor.
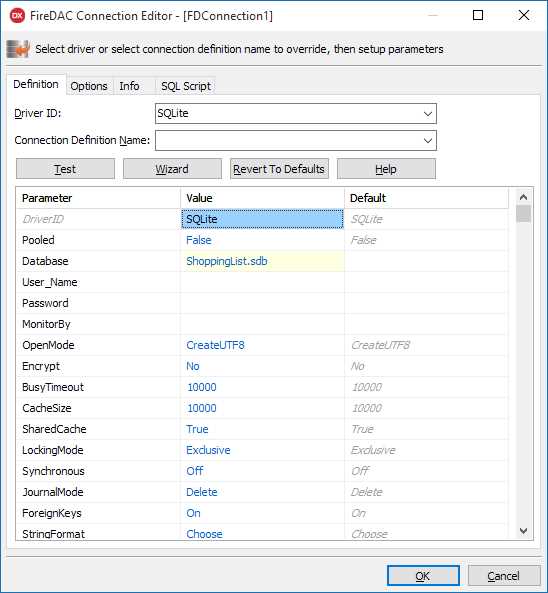
Figure 35: FireDAC Connection Editor
Select SQLite from the Driver ID list and enter the path “ShoppingList.sdb” in the Database field. Set the LockingMode parameter to Normal, allowing more than a connection to the database. Select OK to confirm the connection parameters. Remember to disable the login prompt, setting the LoginPrompt property to False from the Object Inspector.
To open the connection, set the Connected property to True. Don’t worry if the database file does not exist; the component will create it for you automatically.
Now that we have a connection to our database, we can execute SQL queries on it using the TFDQuery component. You can even execute SQL statements live at design time.
Drop a TFDQuery component on your form and insert the following statement in the SQL property.
Code Listing 51: CREATE TABLE SQL Statement
CREATE TABLE IF NOT EXISTS ShoppingItem (Title TEXT NOT NULL) |
Right-click the query component and select the Execute menu item to execute the statement immediately.
Now it’s time to connect our TListView to the ShoppingItem table of the sample SQLite database.
The LiveBindings Designer can help again. Click the LiveBindings Wizard button to open a special wizard that creates instances of required binding components through a step-by-step guided process.

Figure 36: LiveBindings Wizard
After clicking the LiveBindings Wizard:
- Select Create Data Source as the Binding Task to execute and click Next.
- Select FireDAC as the Data Source and click Next.
- Select Query as the Command Type, then enter SELECT * FROM ShoppingItem as the Command Text and click Test Command to check if the SQL statement is right. If everything is OK, then click Next.
- Click Finish to end the wizard.
If everything has been done correctly, the wizard will add to your form:
- A TFDQuery component that is able to execute the SQL command entered before against the database.
- A TBindSourceDB component that makes the data retrieved by using the query available to LiveBindings and hence to the TListView control.
The only thing left to do is linking the data source to the TListView control. To perform this operation, call the LiveBindings Wizard again and:
- Select Link a control with a field as the Binding Task to execute and click Next.
- Select Existing Control and click the TListView instance in the list since it is the Control the data source must be linked to, then click Next.
- Select the TBindSourceDB component as the Data Source that must be linked to the previously selected control, then click Next.
- Select Title as the field name and click Next again.
- Click Finish to end the wizard.
Note: The wizard might ask you to delete an existing link. This happens because our TListView is already linked to the TPrototypeBindSource component, and only one link is allowed to bind the control to any data source.
Adding Commands
To complete our sample application, we should add some command buttons to allow the user add new items to the list or delete existing ones.
Select the TToolBar control from the Standard page of the Tool Palette and drop it on the main form. We’ll add a couple of buttons and a title label to it.
Drag a TButton control from the Standard page and configure it through the Object Inspector to act as a command to add a new item to the shopping list, setting:
- The Align property to Left.
- The Name property to AddButton.
- The StyleLookup property to addtoolbutton.
Add another TButton to the TToolBar control. This will delete the currently selected item, and set:
- The Align property to Right.
- The Name property to DeleteButton.
- The StyleLookup property to deleteitembutton.
Tip: FireMonkey comes with a set of predefined styles you can assign to controls through the StyleLookup property.
At the end, add a TLabel control to the toolbar to act as a title bar and set:
- The Align property to Client.
- The Name property to TitleLabel.
- The StyleLookup property to toollabel.
- The Text property to Shopping List.
Responding to User Actions
We are done with the user interface design. You must add the code that responds to user actions.
Suppose you want to add a new item to the list and save the data into the table we have previously created. You will need to execute an INSERT command in order to do that.
Add a TFDQuery component to your form, name it InsertQuery and set the SQL property to the following statement.
Code Listing 52: INSERT SQL Statement
INSERT INTO ShoppingItem (Title) VALUES (:Title) |
When you write SQL statements using FireDAC, you can use the colon (:) character to represent parameters. You must remember to assign a value to parameters before executing the SQL statement.
Select the TFDQuery component and click the ellipsis button beside the Params property in the Object Inspector to open the Collection Editor. Select the Title parameter to configure its properties. Because we will pass a text string to this parameter—the title for a new shopping list item—set the DataType property to ftString before executing the INSERT query.
Add the following private method to the main form class.
Code Listing 53: Input Query Event Handler
procedure TMainForm.OnInputQueryClose(const AResult: TModalResult; var Title: string; begin Title := string.Empty; if AResult <> mrOk then Exit; Title := AValues[0]; try if (Title.Trim <> '') then begin InsertQuery.ParamByName('Title').AsString := Title; InsertQuery.ExecSQL(); SelectQuery.Close(); SelectQuery.Open; DeleteButton.Visible := ShoppingListView.Selected <> nil; end; except on e: Exception do begin ShowMessage(e.Message); end; end; end; |
When asked to insert the title of the new item, this piece of code will handle the response to the user input.
Double-click the AddButton control to create a handler method for its default event, OnClick, and insert the following code.
Code Listing 54: Add Button Click Event Handler
procedure TMainForm.AddButtonClick(Sender: TObject); var Values: array[0..0] of string; begin Values[0] := String.Empty; InputQuery('Enter New Item', ['Name'], Values, end; |
This will display an input text box to let the user enter the title for a new item. If the user confirms the operation, the callback method OnInputQueryClose will be called and add the item to the list by executing the INSERT statement wrapped into the TFDQuery component.
In order to delete an item from the list, the first step is to add a new TFDQuery component. This is similar to the previous instance, but replaces the INSERT command with DELETE.
Code Listing 55: DELETE SQL Statement
DELETE FROM ShoppingItem WHERE Title = :Title |
Then you must handle the event that is raised when the user clicks Delete.
Code Listing 56: Delete Button Click Event Handler
procedure TMainForm.DeleteButtonClick(Sender: TObject); var Title: String; begin Title := TListViewItem(ShoppingListView.Selected).Text; try DeleteQuery.ParamByName('Title').AsString := Title; DeleteQuery.ExecSQL(); SelectQuery.Close; SelectQuery.Open; DeleteButton.Visible := ShoppingListView.Selected <> nil; except on e: Exception do begin ShowMessage(e.Message); end; end; end; |
You should avoid displaying the Delete button when no items are selected from the list. To ensure that, just add the following event handler when the user clicks on the TListView control and you are done.
Code Listing 57: ListView Click Event Handler
procedure TMainForm.ShoppingListViewClick(Sender: TObject); begin DeleteButton.Visible := ShoppingListView.Selected <> nil; end; |
Running the Application
While you are developing your Multi-Device Application, you can always run it on your Windows desktop to test if it works as expected. The Delphi compiler for the Windows platform is fast and lets you quickly see your result.
If you want to see how the application behaves in a mobile platform, you should install an emulator or deploy your app to a physical device, connecting an Android device to your Windows machine or installing and running the app on an iOS device connected through a Mac OS machine.
The official documentation provides the procedure for setting up your Android device and iOS device.
Suppose you have an Android device. To run the application on your mobile device, you should connect the device to the USB port, enable the USB debugging feature on the device, and install the Windows device driver.
If you have done everything right, you should see your Android device listed in the Project Manager window, under the Target folder of the Android target platform.

Figure 37: Android Target Platform
With the Android device selected, select [Run|Run Without Debugging] to start the build process. Deploy the app on your Android device, installing and running it. Select [Run|Run] to run the application while attaching the debugger to the process and perform a controlled execution.
Summary
In this final chapter, we have seen how you can build cross-platform application from a single source code using Delphi.
Unified desktop and mobile development is possible thanks to FireMonkey, a new generation graphic library that makes possible to build complex user interfaces while it takes care of the differences in terms of styles and behavior.
LiveBindings technology comes to help connecting controls to other components, and vice versa, and is the core foundation of data binding in FireMonkey where it let you create bindings to connect data from a data source to your visual controls, without writing any code.
The task of accessing data is delegated to FireDAC, a high performance data access library that provides many components to connect to a wide range of databases.
This chapter ends our journey inside the marvelous world of Delphi and Object Pascal development, but keep in mind that there are lots of additional features that we did not cover that still add a priceless value to the product. These include Windows 10 support, Gesture Management, Beacon and Bluetooth support, App Tethering, App Analytics, Enterprise Mobility Services (EMS), and many other technologies and libraries.
- 1800+ high-performance UI components.
- Includes popular controls such as Grid, Chart, Scheduler, and more.
- 24x5 unlimited support by developers.