
Custom Blazor Oqtane Modules Succinctly®

CHAPTER 7
Creating Help Desk Tickets
In this chapter, we will create a page that will allow a user to create new help desk tickets. We will also allow a user to add additional details to an existing help desk ticket.
Services layer
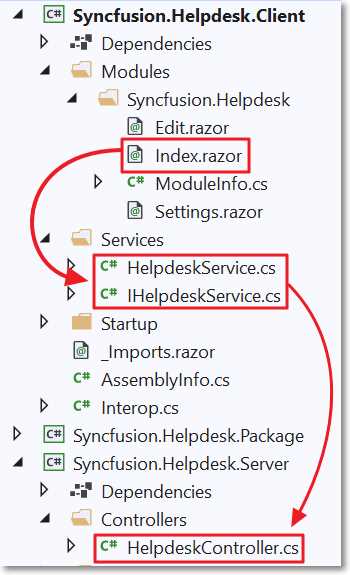
Figure 66: Services Layer
The code we will create will communicate with code in the Server project through the services layer. We will implement this layer by modifying the code in the Services folder in the Client project.
The first step is to define the interface for our service methods. Replace all the code in the IHelpdeskService.cs file with the following code.
Code Listing 35: IHelpdeskService.cs
using System.Collections.Generic; using System.Threading.Tasks; using Syncfusion.Helpdesk.Models; namespace Syncfusion.Helpdesk.Services { public interface IHelpdeskService { Task<List<SyncfusionHelpDeskTickets>> GetSyncfusionHelpDeskTicketsByUserAsync( int ModuleId, string username); Task<SyncfusionHelpDeskTickets> GetSyncfusionHelpDeskTicketByUserAsync( int HelpDeskTicketId, int ModuleId, string username); Task<SyncfusionHelpDeskTickets> AddSyncfusionHelpDeskTicketsAsync( SyncfusionHelpDeskTickets SyncfusionHelpDeskTickets); Task<SyncfusionHelpDeskTickets> UpdateSyncfusionHelpDeskTicketsAsync( SyncfusionHelpDeskTickets SyncfusionHelpDeskTickets); } } |
We will now implement the service methods defined in the interface we just created. Replace all the code in the HelpdeskService.cs file with the following code.
Code Listing 36: HelpdeskService.cs
using System.Collections.Generic; using System.Linq; using System.Net.Http; using System.Threading.Tasks; using Oqtane.Modules; using Oqtane.Services; using Oqtane.Shared; using Syncfusion.Helpdesk.Models; namespace Syncfusion.Helpdesk.Services { public class HelpdeskService : ServiceBase, IHelpdeskService, IService { private readonly SiteState _siteState; public HelpdeskService( HttpClient http, SiteState siteState) : base(http) { _siteState = siteState; } private string Apiurl => CreateApiUrl(_siteState.Alias, "Helpdesk"); } } |
Add the following method to allow help desk tickets related to the current Module instance to be retrieved. Notice that this method, and all other methods we will add, use the Oqtane framework helper method, CreateAuthorizationPolicyUrl, that properly formats the request to add the ModuleId.
Oqtane security will not allow the server-side method to be invoked if the user does not have proper security, as defined in the Authorize policy that decorates the method, for the current module instance.
Code Listing 37: GetSyncfusionHelpDeskTicketsByUserAsync
public async Task<List<SyncfusionHelpDeskTickets>> GetSyncfusionHelpDeskTicketsByUserAsync( int ModuleId, string username) { return await GetJsonAsync<List<SyncfusionHelpDeskTickets>>( CreateAuthorizationPolicyUrl( $"{Apiurl}?username={username}", ModuleId)); } |
Add the following method to allow a help desk ticket to be retrieved.
Code Listing 38: GetSyncfusionHelpDeskTicketByUserAsync
public async Task<SyncfusionHelpDeskTickets> GetSyncfusionHelpDeskTicketByUserAsync( int HelpDeskTicketId, int ModuleId, string username) { return await GetJsonAsync<SyncfusionHelpDeskTickets>( CreateAuthorizationPolicyUrl( $"{Apiurl}/{HelpDeskTicketId}?&username={username}", ModuleId)); } |
Add the code for the following method to allow a help desk ticket to be created.
Code Listing 39: AddSyncfusionHelpDeskTicketsAsync
public async Task<SyncfusionHelpDeskTickets> AddSyncfusionHelpDeskTicketsAsync( SyncfusionHelpDeskTickets SyncfusionHelpDeskTickets) { return await PostJsonAsync<SyncfusionHelpDeskTickets>( CreateAuthorizationPolicyUrl($"{Apiurl}", SyncfusionHelpDeskTickets.ModuleId), SyncfusionHelpDeskTickets); } |
The next method we implement will allow a help desk ticket to be updated.
Code Listing 40: UpdateSyncfusionHelpDeskTicketsAsync
public async Task<SyncfusionHelpDeskTickets> UpdateSyncfusionHelpDeskTicketsAsync( SyncfusionHelpDeskTickets objSyncfusionHelpDeskTicket) { return await PostJsonAsync( CreateAuthorizationPolicyUrl( $"{Apiurl}/{objSyncfusionHelpDeskTicket.HelpDeskTicketId}", objSyncfusionHelpDeskTicket.ModuleId), objSyncfusionHelpDeskTicket); } |
Forms and validation
Blazor provides a method for you to create forms with validation to collect data.
Forms
Blazor provides an EditForm control that allows us to validate a form using data annotations. These data annotations are defined in the SyncfusionHelpDeskTickets class (in the Shared project) and will be specified in the Model property of the EditForm control (to be implemented in code covered later).
Validation
The EditForm control defines a method to handle OnValidSubmit. This method is triggered only when the data in the form satisfies all the validation rules defined by the data annotations. Any validation errors are displayed using the DataAnnotationsValidator and the ValidationSummary control.
Syncfusion Blazor controls
We will also employ the following Syncfusion controls in our form:
- SfTextBox: Allows us to gather data from the user and later display existing data.
- SfDatePicker: Allows the user to enter a date value and later display an existing date value.
- SfComboBox: Presents a list of predefined values (in our example, a list of ticket status values) that allows the user to choose a single value. Later, we will use this control to also display an existing selected value.
- SfGrid: Displays data in a tabular form. Allows sorting, reordering of columns, and the ability to trigger edits of data rows. It will be used to display existing help desk tickets.
- SfTab: Allows functionality to be divided into individual tabs. This control will contain the form to create tickets on one tab, and the sfGrid to display existing tickets on another tab.
- SfDialog: The Dialog control is used to display information and accept user input. It can be displayed as a modal control that requires the user to interact with it before continuing to use any other part of the application. It will be used to display the form to edit a help desk ticket and to display confirmation boxes.
Note: For full details on using the Syncfusion controls, see the Syncfusion Blazor documentation.
EditTicket control
We will construct an EditTicket control that will be placed inside a dialog and displayed when a user wants to edit a help desk ticket (to add additional details). We do this to allow this control to be reused in the Edit.razor page (covered in the following chapter).
In the Client project, create a new control called EditTicket.razor using the following code.
Note that the control takes a SelectedTicket parameter. The values updated or added in the EditTicket.razor control will be passed back to the parent Razor control that invokes it. That control will save the values.
Code Listing 41: EditTicket.razor
@using System.Security.Claims; @using Syncfusion.Blazor.DropDowns @using Syncfusion.Helpdesk.Models @code { [Parameter] public SyncfusionHelpDeskTickets SelectedTicket { get; set; } [Parameter] public bool isAdmin { get; set; } string NewHelpDeskTicketDetailText = ""; } |
Add the following code to the markup section of the EditTicket control.
The EditTicket control allows the user to select the Ticket Status from a dropdown menu and the Ticket Date from a calendar control, as well as to edit the Ticket Description using a text box control.
Also note that the Ticket Date and Ticket Description are only enabled if the isAdmin flag is set.
Code Listing 42: EditTicket Markup
<div> <SfComboBox TValue="string" TItem="SyncfusionHelpDeskStatus" PopupHeight="230px" Placeholder="Ticket Status" FloatLabelType="@FloatLabelType.Always" @bind-Value="@SelectedTicket.TicketStatus" DataSource="@SyncfusionHelpDeskStatus.Statuses"> <ComboBoxEvents TValue="string" TItem="SyncfusionHelpDeskStatus"> </ComboBoxEvents> <ComboBoxFieldSettings Text="Text" Value="ID"> </ComboBoxFieldSettings> </SfComboBox> </div> <div> <SfDatePicker ID="TicketDate" Enabled="isAdmin" Placeholder="Ticket Date" FloatLabelType="@FloatLabelType.Always" @bind-Value="@SelectedTicket.TicketDate" Max="DateTime.Now" ShowClearButton="false"> </SfDatePicker> </div> <div> <SfTextBox Enabled="isAdmin" Placeholder="Ticket Description" FloatLabelType="@FloatLabelType.Always" @bind-Value="@SelectedTicket.TicketDescription"> </SfTextBox> </div> |
The EditTicket control allows the user to add ticket details.
Add the following code to the markup to support this functionality.
Code Listing 43: EditTicket Details
@if (SelectedTicket.SyncfusionHelpDeskTicketDetails != null) { @if (SelectedTicket.SyncfusionHelpDeskTicketDetails.Count() > 0) { <table class="table"> <thead> <tr> <th>Date</th> <th>Description</th> </tr> </thead> <tbody> @foreach (var TicketDetail in SelectedTicket.SyncfusionHelpDeskTicketDetails) { <tr> <td> @TicketDetail.TicketDetailDate.ToShortDateString() </td> <td> @TicketDetail.TicketDescription </td> </tr> } </tbody> </table> } <SfTextBox Placeholder="NewHelp Desk Ticket Detail" @bind-Value="@NewHelpDeskTicketDetailText"> </SfTextBox> <SfButton CssClass="e-small e-success" @onclick="AddHelpDeskTicketDetail"> Add </SfButton> } |
Finally, add the following method to the @code section of the control to add any details entered to the SyncfusionHelpDeskTicketDetails collection.
Code Listing 44: AddHelpDeskTicketDetail
private void AddHelpDeskTicketDetail() { // Create New HelpDeskTicketDetails record. SyncfusionHelpDeskTicketDetails NewHelpDeskTicketDetail = new SyncfusionHelpDeskTicketDetails(); NewHelpDeskTicketDetail.HelpDeskTicketId = SelectedTicket.HelpDeskTicketId; NewHelpDeskTicketDetail.TicketDetailDate = DateTime.Now; NewHelpDeskTicketDetail.TicketDescription = NewHelpDeskTicketDetailText; // Add to collection. SelectedTicket.SyncfusionHelpDeskTicketDetails .Add(NewHelpDeskTicketDetail); // Clear the Text Box. NewHelpDeskTicketDetailText = ""; } |
Index control
The Index control is the first control that will load when a user accesses the module.
Replace all the code in the Index.razor control with the following code that adds the required import and using statements, properties and variables, and the markup that will display the tab control, with New Help Desk Ticket and Existing Tickets tabs.
Code Listing 45: Index.razor
@using Syncfusion.Helpdesk.Services @using Syncfusion.Helpdesk.Models @using Syncfusion.Blazor.Buttons @using Microsoft.AspNetCore.Components.Authorization @using Syncfusion.Helpdesk.Client.Modules.Syncfusion_Helpdesk @namespace Syncfusion.Helpdesk @inherits ModuleBase @inject AuthenticationStateProvider AuthenticationStateProvider @inject IHelpdeskService HelpDeskService @inject NavigationManager NavigationManager <br /> <br /> @if (isAuthenticated) { <div id="target" style="height: 500px;" class="col-lg-12 control-section"> <div class="e-sample-resize-container"> <SfTab CssClass="default-tab"> <TabItems> <TabItem> <ChildContent> <TabHeader Text="New Help Desk Ticket" IconCss="far fa-edit"> </TabHeader> </ChildContent> <ContentTemplate> <br /><br /> </ContentTemplate> </TabItem> <TabItem> <ChildContent> <TabHeader Text="Existing Tickets" IconCss="fa fa-inbox"> </TabHeader> </ChildContent> <ContentTemplate> <br /><br /> </ContentTemplate> </TabItem> </TabItems> </SfTab> </div> </div> } else { <b>You must be logged in to submit a Ticket</b> } @code { public override List<Resource> Resources => new List<Resource>() { new Resource { ResourceType = ResourceType.Stylesheet, Url = ModulePath() + "Module.css" }, new Resource { ResourceType = ResourceType.Script, Url = ModulePath() + "Module.js" } }; public string Content = "Submit"; private Dictionary<string, object> submit = new Dictionary<string, object>() { { "type", "submit"} }; // Global property for the Help Desk Ticket. SyncfusionHelpDeskTickets objHelpDeskTicket = new SyncfusionHelpDeskTickets() { TicketDate = new DateTime( DateTime.Now.Year, DateTime.Now.Month, DateTime.Now.Day), TicketStatus = "New" }; // Global property for the selected Help Desk Ticket. private SyncfusionHelpDeskTickets SelectedTicket = new SyncfusionHelpDeskTickets(); SfGrid<SyncfusionHelpDeskTickets> gridObj; public List<SyncfusionHelpDeskTickets> colHelpDeskTickets { get; set; } AuthenticationState authState; bool isAuthenticated = false; string Status = ""; // EXISTING HELP DESK TICKETS public bool EditDialogVisibility { get; set; } = false; } |
New Help Desk Ticket tab
To allow a user to create a new help desk ticket, add the following markup to the ContentTemplate section of the New Help Desk Ticket tab.
Code Listing 46: New Help Desk Ticket
<EditForm ID="new-form" Model="@objHelpDeskTicket" OnValidSubmit="@HandleValidSubmit"> <DataAnnotationsValidator></DataAnnotationsValidator> <div> <SfComboBox TValue="string" TItem="SyncfusionHelpDeskStatus" PopupHeight="230px" Placeholder="Ticket Status" FloatLabelType="@FloatLabelType.Always" @bind-Value="@objHelpDeskTicket.TicketStatus" DataSource="@SyncfusionHelpDeskStatus.Statuses"> <ComboBoxEvents TValue="string" TItem="SyncfusionHelpDeskStatus"> </ComboBoxEvents> <ComboBoxFieldSettings Text="Text" Value="ID"> </ComboBoxFieldSettings> </SfComboBox> </div> <div> <SfDatePicker ID="TicketDateInput" Placeholder="Ticket Date" FloatLabelType="@FloatLabelType.Always" @bind-Value="@objHelpDeskTicket.TicketDate" Max="DateTime.Now" ShowClearButton="false"></SfDatePicker> <ValidationMessage For="@(() => objHelpDeskTicket.TicketDate)" /> </div> <div> <SfTextBox Placeholder="Ticket Description" FloatLabelType="@FloatLabelType.Always" @bind-Value="@objHelpDeskTicket.TicketDescription"> </SfTextBox> <ValidationMessage For="@(() => objHelpDeskTicket.TicketDescription)" /> </div> <br /> <SfButton Content="@Content" HtmlAttributes="@submit"></SfButton> <br /><br /><b>@Status</b> </EditForm> |
When the user submits data in the form that passes validation, the HandleValidSubmit method is called.
Add the following to the code section to implement that method.
Code Listing 47: HandleValidSubmit
public async Task HandleValidSubmit(EditContext context) { try { Status = ""; // Save the new Help Desk Ticket. SyncfusionHelpDeskTickets HelpDesk = new SyncfusionHelpDeskTickets(); HelpDesk.ModuleId = ModuleState.ModuleId; HelpDesk.TicketStatus = objHelpDeskTicket.TicketStatus; HelpDesk.TicketDate = Convert.ToDateTime(objHelpDeskTicket.TicketDate); HelpDesk.TicketDescription = objHelpDeskTicket.TicketDescription; HelpDesk.CreatedBy = authState.User.Identity.Name; HelpDesk.CreatedOn = DateTime.Now; HelpDesk.ModifiedBy = authState.User.Identity.Name; HelpDesk.ModifiedOn = DateTime.Now; HelpDesk.SyncfusionHelpDeskTicketDetails = new List<SyncfusionHelpDeskTicketDetails>(); HelpDesk = await HelpDeskService.AddSyncfusionHelpDeskTicketsAsync(HelpDesk); await logger.LogInformation("HelpDesk Added {HelpDesk}", HelpDesk); Status = "Saved!"; // Clear the form. ResetForm(); // Refresh Tickets. await RefreshTickets(); } catch (Exception ex) { Status = ex.Message; } } |
HandleValidSubmit requires a ResetForm method to restore the form values to their defaults and a RefreshTickets method that will update the Existing Tickets (to be implemented later).
Add the following to implement those methods.
Code Listing 48: ResetForm and RefreshTickets
public void ResetForm() { objHelpDeskTicket = new SyncfusionHelpDeskTickets() { TicketDate = new DateTime( DateTime.Now.Year, DateTime.Now.Month, DateTime.Now.Day), TicketStatus = "New" }; } public async Task RefreshTickets() { var Tickets = await HelpDeskService.GetSyncfusionHelpDeskTicketsByUserAsync( ModuleState.ModuleId, authState.User.Identity.Name); colHelpDeskTickets = Tickets.OrderByDescending(x => x.HelpDeskTicketId).ToList(); } |
Existing Tickets tab
To allow a user to view and update their existing help desk tickets, add the following markup to the ContentTemplate section of the Existing Tickets tab.
This adds the Syncfusion DataGrid control, which will display the tickets.
Code Listing 49: Existing Tickets Tab
<div> <div> <SfGrid ID="Grid" @ref="gridObj" DataSource="@colHelpDeskTickets" AllowPaging="true" AllowSorting="true" AllowResizing="true" AllowReordering="true"> <GridPageSettings PageSize="5"></GridPageSettings> <GridEvents CommandClicked="OnCommandClicked" TValue="SyncfusionHelpDeskTickets"> </GridEvents> <GridColumns> <GridColumn HeaderText="" TextAlign="TextAlign.Left" Width="50"> <GridCommandColumns> <GridCommandColumn Type=CommandButtonType.Edit ButtonOption= "@(new CommandButtonOptions() { Content = "Edit" })"> </GridCommandColumn> </GridCommandColumns> </GridColumn> <GridColumn IsPrimaryKey="true" Field=@nameof(SyncfusionHelpDeskTickets.HelpDeskTicketId) HeaderText="ID #" TextAlign="@TextAlign.Left" Width="70"> </GridColumn> <GridColumn Field=@nameof(SyncfusionHelpDeskTickets.TicketStatus) HeaderText="Status" TextAlign="@TextAlign.Left" Width="80"> </GridColumn> <GridColumn Field=@nameof(SyncfusionHelpDeskTickets.TicketDate) HeaderText="Date" TextAlign="@TextAlign.Left" Format="d" Type="ColumnType.Date" Width="80"> </GridColumn> <GridColumn Field=@nameof(SyncfusionHelpDeskTickets.TicketDescription) HeaderText="Description" TextAlign="@TextAlign.Left" Width="150"> </GridColumn> </GridColumns> </SfGrid> </div> </div> |
The Existing Tickets data grid contains an Edit button that opens the selected ticket in a Syncfusion Dialog control. This control will display the selected ticket in the EditTicket.razor control (added earlier).
Add the following markup code to support this functionality.
Code Listing 50: Edit Ticket Dialog
<SfDialog Target="#target" Width="500px" Height="500px" IsModal="true" ShowCloseIcon="true" @bind-Visible="EditDialogVisibility"> <DialogTemplates> <Header> EDIT TICKET # @SelectedTicket.HelpDeskTicketId</Header> <Content> <EditTicket SelectedTicket="@SelectedTicket" isAdmin="false" /> </Content> <FooterTemplate> <div class="button-container"> <button type="submit" class="e-btn e-normal e-primary" @onclick="SaveTicket"> Save </button> </div> </FooterTemplate> </DialogTemplates> </SfDialog> |
Add the following method to the code section that opens the dialog when a help desk ticket is selected in the Existing Tickets data grid.
Code Listing 51: OnCommandClicked
public async void OnCommandClicked( CommandClickEventArgs<SyncfusionHelpDeskTickets> args) { if (args.CommandColumn.ButtonOption.Content == "Edit") { // Get the selected Help Desk Ticket. var HelpDeskTicket = (SyncfusionHelpDeskTickets)args.RowData; SelectedTicket = await HelpDeskService.GetSyncfusionHelpDeskTicketByUserAsync( HelpDeskTicket.HelpDeskTicketId, ModuleState.ModuleId, authState.User.Identity.Name); // Open the Edit dialog. this.EditDialogVisibility = true; StateHasChanged(); } } |
Add the SaveTicket method that will be called when a user clicks the Submit button on the Dialog control.
Code Listing 52: SaveTicket
public async Task SaveTicket() { // Update the selected Help Desk Ticket. await HelpDeskService.UpdateSyncfusionHelpDeskTicketsAsync(SelectedTicket); // Update the Status of the Ticket in the collection. var TicketToUpdate = colHelpDeskTickets.Where( x => x.HelpDeskTicketId == SelectedTicket.HelpDeskTicketId).FirstOrDefault(); TicketToUpdate.TicketStatus = SelectedTicket.TicketStatus; // Close the Edit dialog. this.EditDialogVisibility = false; // Refresh the SfGrid // so the changes to the selected // Help Desk Ticket are reflected. gridObj.Refresh(); } |
Finally, add the following method that will be invoked when the Index.razor control loads.
Code Listing 53: OnInitializedAsync
protected override async Task OnInitializedAsync() { try { // Get user. authState = await AuthenticationStateProvider.GetAuthenticationStateAsync(); if (authState.User.Identity.IsAuthenticated) { isAuthenticated = true; await RefreshTickets(); } } catch (Exception ex) { await logger.LogError( ex, "Error Loading HelpDesk {Error}", ex.Message); AddModuleMessage("Error Loading HelpDesk", MessageType.Error); } } |
Remove all the code from Edit.Razor (for now)
The methods in the service layer have changes, so the code in the Edit.Razor control will no longer build. So we can test out the code in the Index.razor control, remove all the code from Edit.razor.
Test creating new tickets
Rebuild the Syncfusion.Helpdesk solution. It should build without errors.
In the instance of Visual Studio that contains the Oqtane solution, restart using the Start Without Debugging option.
Log in as the host account.
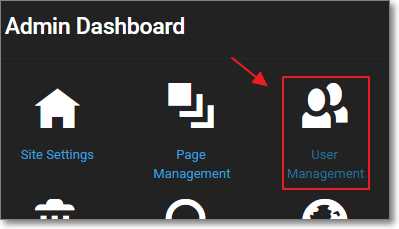
Figure 67: Create New User
Select the gear icon to open the Control Panel and click the button to navigate to the Admin Dashboard. Select User Management > Add User and create a new user who is not in the administrator role.
Log out and log back in as the new user.
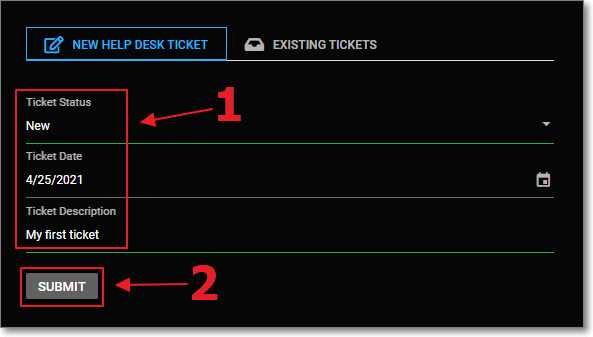
Figure 68: New Ticket
Enter details for a new help desk ticket and click Submit.
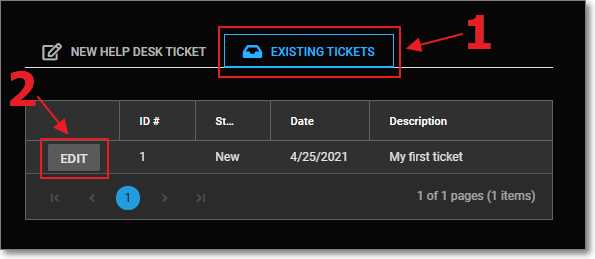
Figure 69: Existing Tickets
You can click the Existing Tickets tab to see the ticket and open it by clicking the Edit button next to the record in the data grid.
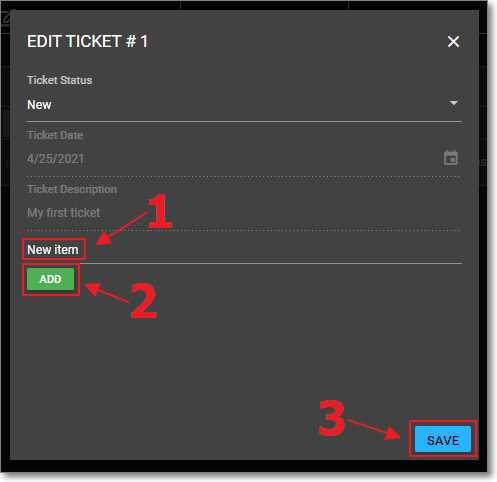
Figure 70: Add New Details
The ticket will open in the Edit Ticket control.
You can add additional details. Click Save to save the changes.
- 80+ high performance Blazor components.
- Lightweight and user friendly.
- Stunning Built-in themes with customization.