
CUDA Succinctly®

CHAPTER 5
Porting from C++
We examined some very simple uses of the device in the previous chapter. They are not practical examples, and the host would probably perform the calculations of all the previously cited kernels much faster than the device. In this chapter, we will introduce a problem that is better suited to a device using CUDA (and parallel processing in general) than any general purpose CPU would be.
C++ Host Version
One of the most common reasons one might be interested in CUDA is to optimize an algorithm that has already been written for the host in C++. In this chapter, we will examine porting a simple C++ algorithm to CUDA to see if the device can offer any performance improvements over the original host version. We will write a direct port from standard C++ code straight into CUDA-based code.
The algorithm works on an array of 3-D points and, for each point, finds the nearest neighbor from the other points in the list. The host code (Listing 5.1) finds each nearest neighbor by traversing the array as many times as there are points.
Note: There are well-known data structures that can dramatically improve the number of comparisons involved with solving the nearest neighbor problem. An implementation using k-d trees will greatly reduce the number of comparisons.
|
#include <iostream> #include <ctime> #include <cuda_runtime.h> // For float3 structure #include "FindClosestCPU.h" using namespace std; int main() { // Number of points const int count = 10000; // Arrays of points int *indexOfClosest = new int[count]; float3 *points = new float3[count]; // Create a list of random points for(int i = 0; i < count; i++) { points[i].x = (float)((rand()%10000) - 5000); points[i].y = (float)((rand()%10000) - 5000); points[i].z = (float)((rand()%10000) - 5000); } // This variable is used to keep track of the fastest time so far long fastest = 1000000; // Run the algorithm 10 times for(int q = 0; q < 10; q++) { long startTime = clock();
// Run the algorithm FindClosestCPU(points, indexOfClosest, count);
long finishTime = clock();
cout<<q<<" "<<(finishTime - startTime)<<endl; // If that run was faster, update the fastest time so far if((finishTime - startTime) < fastest) fastest = (finishTime - startTime); } // Print out the fastest time cout<<"Fastest time: "<<fastest<<endl; // Print the final results to the screen cout<<"Final results:"<<endl; for(int i = 0; i < 10; i++) cout<<i<<"."<<indexOfClosest[i]<<endl;
// Deallocate RAM delete[] indexOfClosest; delete[] points; return 0; } |
Listing 5.1: Front end, main.cu
Listing 5.1 is the front end to the algorithm. It is a small C++ program that creates a list of 10,000 random 3-D points. It then runs the FindClosestCPU function which finds the nearest neighbors to each point. The FindClosestCPU function is defined in Listing 5.2, FindClosestCPU.h. To add the new header to your project, right-click the project’s name in the Solution Explorer panel, and click Add > New Item in the context menu.
Note: In the host code (Listing 5.2) and the device code, we are not actually computing the distance between points. The real distance between points would require an additional square root function. In this example, we do not need the actual distance; we only need to find the nearest point; therefore, the square root function has been omitted.
|
#pragma once #include <cuda_runtime.h> // For float3 structure // FindClosestCPU host function void FindClosestCPU(float3* points, int* indices, int count) { if(count <= 1) return; // If there are no points return // Loop through every point for(int curPoint = 0; curPoint < count; curPoint++) { // Assume the nearest distance is very far float distToClosest = 3.40282e38f;
// Run through all the points again for(int i = 0; i < count; i++) { // Do not check distance to the same point if(i == curPoint) continue;
// Find distance from points[curPoint] to points[i] float dist = ((points[curPoint].x - points[i].x) * (points[curPoint].x - points[i].x) + (points[curPoint].y - points[i].y) * (points[curPoint].y - points[i].y) + (points[curPoint].z - points[i].z) * (points[curPoint].z - points[i].z));
// Is dist nearer than the closest so far? if(dist < distToClosest) { // Update the distance of the nearest point found so far distToClosest = dist;
// Update index of this thread's nearest neighbor so far indices[curPoint] = i; } } } } |
Listing 5.2: FindClosestCPU.h
Listing 5.2 shows a simple method for finding the nearest neighbors. The CPU begins with the first point in the list and assumes the closest point to be a distance of 3.40282e38f away. This is around the maximum possible value for a float in C++. It steps through the array, checking the distance to each of the other points. Each time a point is found closer than the current smallest distance, the smallest distance is updated and the index of the point is recorded. By the time the CPU has traversed the entire array, it has found the index of the point nearest to the first (points[0]). It then repeats the process for the second point, then for the third, and so on until it has found the nearest neighbor to every point in the list.
Upon building and running the program, you should see a series of outputs similar to Figure 5.1. The first lines of the output show the amount of time (in milliseconds) that it took the CPU to run the FindClosestCPU algorithm.

Figure 5.1: Output
The fastest time the host ran the algorithm is reported in Figure 5.1 as 181 milliseconds. When we port to CUDA, it is this time which we hope to improve. The first 10 results are printed to the screen. The results in Figure 5.1 show that the nearest point to point[0] was found to be point[1982], the nearest point to point[1] was point[8115].
Tip: Use the host’s results to check the device results. When porting host code to CUDA, it is a very good idea to check the results that the device is finding against the results that the original host code finds. Host code ported to CUDA is useless if the device gives incorrect results. Sometimes (especially without using a debugger) it is very difficult to know that the device’s results are correct just by looking at the kernel’s code.
UDA Version
C++ code can be ported in many different ways. One of the initial questions is, “How can the problem be broken into separate threads?” There is very often more than one way to do this. Our current problem is multiple nearest neighbor searches. A natural way to break this particular problem into threads is to assign a single point to each thread we may have available which, ultimately, will run on its own individual kernel. Each thread in this case will be responsible for finding the nearest neighbor of its own point.
The host code employed a nested for loop; by assigning an individual thread each to a different point, we will remove one of these loops (the outer loop) and replace it with our concurrent CUDA threads.
The FindClosestGPU.h in Listing 5.3 contains the prototype for the device version of the algorithm; FindClosestGPU is a CUDA kernel.
|
#pragma once #include <cuda_runtime.h> __global__ void FindClosestGPU(float3* points, int* indices, int count); |
Listing 5.3: FindClosestGPU.h
The FindClosestGPU.cu in Listing 5.4 contains the CUDA kernel FindClosestGPU which performs the nearest neighbor searches. To add this file to your project, right-click the project’s name in the Solution Explorer and click Add > New Item in the context menu. This is a very basic and direct port of the original FindClosestCPU function to CUDA. The outer for loop from the original code is replaced by multiple threads, but other than this, the two functions are identical.
|
#include <cuda.h> #include <cuda_runtime.h> #include <device_launch_parameters.h> #include "FindClosestGPU.h" // Not required! // FindClosestGPU kernel __global__ void FindClosestGPU(float3* points, int* indices, int count) { if(count <= 1) return; // If there are no points return // Calculate unique thread idx int idx = threadIdx.x + blockIdx.x * blockDim.x; // If the calculated thread idx is within the bounds of the array if(idx < count) { // Assume the nearest distance is very far float distanceToClosest = 3.40282e38f;
// Run through all the points for(int i = 0; i < count; i++) { // Do not check distance to this thread's point if(i == idx) continue;
// Find distance from this thread's point to another point float dist = (points[idx].x - points[i].x) * (points[idx].x - points[i].x) + (points[idx].y - points[i].y) * (points[idx].y - points[i].y) + (points[idx].z - points[i].z) * (points[idx].z - points[i].z);
// Is distance nearer than the closest so far? if(dist < distanceToClosest) { // Update the distance of the nearest point found so far distanceToClosest = dist;
// Update index of this thread's nearest neighbor so far indices[idx] = i; } } } } |
Listing 5.4: FindClosestGPU.cu
Next, we need to alter the C++ front end (main.cu) to call the new CUDA version of the algorithm instead of the original C++ one. This involves copying the array of points to the device’s global memory (d_points) and allocating space for the device to store the indices (d_indexOfClosest). The altered version of the main.cu file is presented in Listing 5.5.
Note: The following program requires more data and execution time than the previous programs. CUDA is low-level programming and it can cause your device or driver to reset. It can also cause the Blue Screen of Death, which results in the whole system resetting. When programming CUDA, it is advisable that you close any unnecessary applications and save your work in other applications before debugging a CUDA app.
|
#include <iostream> #include <ctime> #include <cuda.h> // #include "FindClosestCPU.h" #include "FindClosestGPU.h" using namespace std; int main() { // Number of points const int count = 10000; // Arrays of points int *indexOfClosest = new int[count]; float3 *points = new float3[count]; float3* d_points; // GPU version int* d_indexOfClosest; // Create a list of random points for(int i = 0; i < count; i++) { points[i].x = (float)((rand()%10000) - 5000); points[i].y = (float)((rand()%10000) - 5000); points[i].z = (float)((rand()%10000) - 5000); } // Copy the points to the device and malloc space for results cudaMalloc(&d_points, sizeof(float3) * count); cudaMemcpy(d_points, points, sizeof(float3) * count, cudaMemcpyHostToDevice); cudaMalloc(&d_indexOfClosest, sizeof(int) * count); // This variable is used to keep track of the fastest time so far long fastest = 1000000; // Run the algorithm 10 times for(int q = 0; q < 10; q++) { long startTime = clock();
// Run the algorithm FindClosestGPU<<<(count / 64)+1, 64, 64 * sizeof(float4)>>> (d_points, d_indexOfClosest, count);
// Copy the results back to the host cudaMemcpy(indexOfClosest, d_indexOfClosest, sizeof(int) * count, cudaMemcpyDeviceToHost);
long finishTime = clock();
cout<<q<<" "<<(finishTime - startTime)<<endl; // If that run was faster, update the fastest time so far if((finishTime - startTime) < fastest) fastest = (finishTime - startTime); } // Print out the fastest time cout<<"Fastest time: "<<fastest<<endl; // Print the final results to the screen cout<<"Final results:"<<endl; for(int i = 0; i < 10; i++) cout<<i<<"."<<indexOfClosest[i]<<endl;
// Deallocate ram delete[] indexOfClosest; delete[] points; cudaFree(d_points); cudaFree(d_indexOfClosest); // Dispose of the CUDA context and write device performance counters cudaDeviceReset(); return 0; } |
Listing 5.5: Updated main.cu
Upon executing the modified application, we can see a vast improvement in performance. The actual increase in performance is completely dependent upon the power of the CPU as compared to the GPU in the machine running the kernel. Figure 5.2 shows the output from a machine with an Intel i7 2600 CPU and an NVIDIA GT 430 GPU.
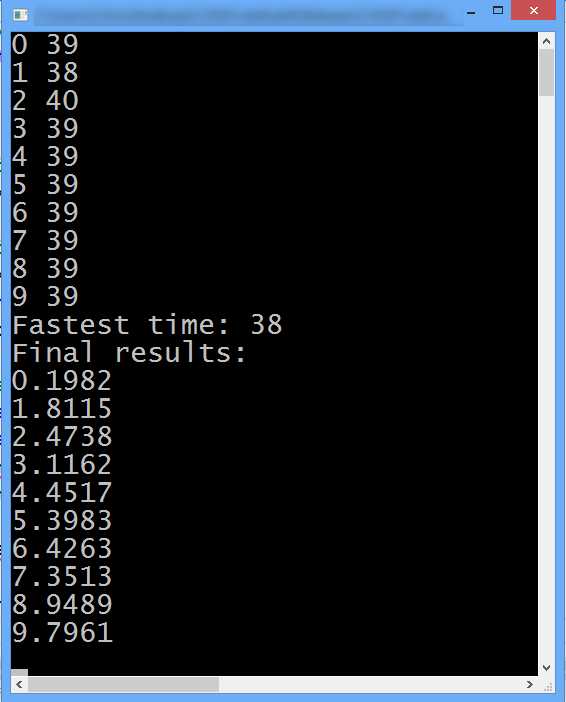
Figure 5.2: Output from FindClosestGPU Kernel
The output in Figure 5.2 shows that the device kernel was able to perform the nearest neighbor searches with a minimum time of 38 milliseconds. Remembering that the host took around 181 milliseconds (Figure 5.1), the performance gain from this naïve port to CUDA is almost a 5x speed increase (the device only took about 21 percent of the time the host required). The design principle behind the port to CUDA was very simple: one of the nested for loops from the serial code was replaced by concurrent threads. This type of optimization would be extremely difficult to perform on the host version of the algorithm without using multithreading and the x86 SIMD instruction set, or without hand coding some assembly language. This type of performance gain is not just a simple speed increase but a major reduction in the amount of work needed. All of these techniques would require more effort than the simple CUDA port presented if you were not making use of the GPU on the device. In Chapter 7, we will revisit this problem and increase the gap in performance between the device and host even further.
Tips and Tricks
Compile for 64-bit Hardware
Sometimes small changes in the project or program can provide better performance. To achieve the times in the previous example (Figure 5.2), the project was set to 64 bits. 64-bit machines (CPUs and GPUs) can often perform slightly faster when they run native 64-bit code rather than 32-bit.
Allow an Epsilon between Host and Device Results
When checking the output from the device against a host output which is known to be correct, bear in mind the rounding errors. This is applicable when the algorithms deal with floating point data types. There is often going to be a slight difference between the device and the host output; a small margin of error might be allowed (often called epsilon).
Use Release Mode and Compiler Optimization
When testing for performance, it is often best to use optimizations since the compiler (both NVCC and Microsoft C++ compiler) can give an excellent increase in speed automatically. The project (Listing 5.5) was compiled in release mode, with all optimizations turned on for both the host and device in order to produce the output shown in Figures 5.1 and 5.2.

Figure 5.3: Setting Code Generation
The Device > Code Generation option was set to match the hardware in this machine (for the output in Figure 5.2). To set the Code Generation property, open the Project Properties and click CUDA C/C++ in the left panel, and then click Device. Find the Code Generation setting in the right panel and select appropriate values for the compute capability (the compute_xx setting) and sm version (sm here is not streaming multiprocessor! The next paragraph explains what it is).
When NVCC compiles a CUDA C/C++ file, it converts it into a quasi-assembly language called PTX. PTX is not actually the hardware’s assembly language but it closely resembles it. The PTX code is then compiled to a real device’s machine code. The compute setting is the PTX version to compile to, and the sm setting is the real machine (that is, the compute capability of the real hardware). If you are targeting more than one machine, it is best to use compute and sm values which match the lowest hardware you intend for your application. You can include more than one specification in the code generation by separating each by semicolons (for example, compute_10,sm_10;compute_20,sm_20).
For a complete list of NVIDIA’s cards and their compute capabilities (these are the valid values for sm) visit the NVIDIA website at https://developer.nvidia.com/cuda-gpus.
The value supplied for the compute setting can be selected from the following bulleted list based on the required capabilities and the sm setting. Keep in mind that the first digits of the compute and sm values should match (i.e. compute_20,sm_10 is an incompatible code generation request).
- compute_10: Original, least features
- compute_11: Atomic global memory operations
- compute_12: Atomic shared memory operations
- compute_13: Doubles (64-bit floats)
- compute_20: Fermi hardware
- compute_30: Kepler hardware
The information in this section was taken from the NVCC manual available online at http://docs.nvidia.com/cuda/cuda-compiler-driver-nvcc/index.html.
- 1800+ high-performance UI components.
- Includes popular controls such as Grid, Chart, Scheduler, and more.
- 24x5 unlimited support by developers.