
CUDA Succinctly®

CHAPTER 4
First Kernels
Adding Two Integers
The project described in Listing 2.1 of Chapter 2 will serve as the template for later projects. All of the code I present in this book should be placed in .cu files as described previously (unless otherwise specified). These files should be placed in a project which links to the CUDA libraries and appropriate CUDA headers as shown in Chapter 2.
Our first kernel will add two integers together on the device and return the resulting sum to the host.
Tip: Type the code into your IDE instead of using copy and paste, especially for these early examples. Copying and pasting code may paste some characters that are not what the compiler expects.
|
#include <cuda.h> using namespace std; __global__ void AddInts(int* a, int *b) { a[0]+=b[0]; } int main() { int a, b; // Host copies int *d_a, *d_b; // Device copies // Read some integers from the user cout<<"Input a number? "; cin>>a; cout<<"And another? "; cin>>b; // Allocate RAM on the device if(cudaMalloc(&d_a, sizeof(float)) != CUDA_SUCCESS) { cout<<"There was a problem allocating memory on the GPU"<<endl; cudaFree(d_a); cudaDeviceReset(); return 0; } if(cudaMalloc(&d_b, sizeof(float)) != CUDA_SUCCESS) { cout<<"There was a problem allocating memory on the GPU"<<endl; cudaFree(d_a); cudaFree(d_b); cudaDeviceReset(); return 0; } // Copy host values to device cudaMemcpy(d_a, &a, sizeof(float), cudaMemcpyHostToDevice); cudaMemcpy(d_b, &b, sizeof(float), cudaMemcpyHostToDevice); // Run kernel AddInts<<<1, 1>>>(d_a, d_b); // Copy results back to host cudaMemcpy(&a, d_a, sizeof(float), cudaMemcpyDeviceToHost); cout<<"The GPU addition results in "<<a<<endl; // Free device memory cudaFree(d_a); cudaFree(d_b); // Reset device and write performance indicators cudaDeviceReset(); return 0; } |
Listing 4.1: Adding Integers
Listing 4.1 requests two integers from the user using std::cout and std::cin. It copies them to the device and adds them together using a CUDA kernel. The result of the addition is copied from device memory back to system memory and displayed to the user.
Tip: The console window opens and closes too quickly to read the results. To prevent the window from closing, you can place a breakpoint on the return 0; statement at the end of the main function. When a program is debugged, Visual Studio will pause execution when it reaches the breakpoint on this line and it will give the programmer time to view the output console.
Function Qualifiers
Functions can be designed to execute on the host, the device, or both. CUDA provides several function qualifiers which are placed at the start of the function declaration and describe the hardware on which the function is meant to be executed.
- __global__ Functions marked as __global__ are callable from the host but they run on the device. They are CUDA kernels that the host calls. They cannot be recursive, cannot have variable parameter lists, and they must return void.
- __host__ Functions marked as __host__ are called and executed by the host. These are perfectly normal C++ functions. __host__ is the default and, if a function has no qualifiers at all (such as main in Listing 4.1), it is assumed to be a normal C++ host function.
- __device__ Functions marked as device are called and executed on the device. They are often helper functions for kernels. __device__ functions cannot be called from the host. They can only be called from kernels or other device functions.
- __host__ __device__ Functions marked as both __host__ and __device__ will be callable from the host or the device. This qualifier actually results in two functions being compiled: one for the host and the other for the device. The host version is a perfectly normal C++ function and is not able to alter the device’s memory. Likewise, the device version of the function is a __device__ function and is not able to alter any host variables. This qualifier is used to define helper functions that both the host and the device might call.
CUDA API Memory Functions and cudaError_t
CUDA API functions return a cudaError_t which indicates if the call was successful. You can check the return value of a CUDA API function against CUDA_SUCCESS to determine if a function executed properly. There are many cudaError_t values the CUDA API can return. For a full list, see the cuda.h header.
cudaError_t cudaMalloc((void**) devPtr, size_t size);
cudaMalloc allocates global memory on the device. The first parameter is the address of a pointer to the allocated memory. If the call is successful, this pointer will be initialized to point to the newly allocated memory on the device. The second parameter is the size, in bytes, to allocate to the requested memory area.
cudaError_t cudaFree(void* devPtr);
This function frees memory previously allocated on the device. Memory should always be freed on the device when it is no longer needed. The first parameter is the pointer previously allocated in a cudaMalloc call; each call to free should always be matched by a preceding call to Malloc.
cudaError_t cudaDeviceReset();
This function cleans up allocated memory and resets the state of the device. This function is similar to the garbage collector in .NET applications: it tidies things up. But unlike the garbage collector, the programmer must call this function explicitly. Once reset, the device can be returned to its initialized state by calling any CUDA API function. Calling this function also causes all the performance counters to be written by the device. If you are planning to profile a kernel, or your CUDA code in general, then you should always make sure you call this function before your program shuts down. This ensures the data is written correctly to the performance counters for the profiler to use.
cudaError_t cudaMemcpy(void* dest, void* src, size_t size, cudaMemcpyKind direction);
This function copies memory from the src pointer (source) to the dest pointer (destination). The size parameter is the size, in bytes, of the data to be copied. The final parameter specifies the direction of the copy. The direction can be any one of the following:
- cudaMemcpyHostToHost
- cudaMemcpyHostToDevice
- cudaMemcpyDeviceToHost
- cudaMemcpyDeviceToDevice
The pointers supplied as dest and src must agree with the direction selected. For example, using cudaMemcpyHostToDevice, the src pointer is a host pointer and the dest pointer is a device pointer.
Copying Data to and from the GPU
The next example illustrates copying a block of data from the device to the host and using the CUDA API function cudaMemset to zero the array. The cudaMemcpy function copies data over the PCI bus to and from the device’s global memory. In the following example, the GPU is used to clear an array of floating point values to 0.0f.
|
#include <cuda.h> using namespace std; int main() { float values[100]; // CPU copy of an array float* d_Values; // Pointer to device copy of values // Print the initial values to screen for(int i = 0; i < 100; i++) cout<<values[i]<<" "; // These will initially be random garbage // Allocate RAM on the GPU the same size as the values if(cudaMalloc(&d_Values, sizeof(float) * 100) != CUDA_SUCCESS) { cout<<"There was a problem allocating ram on the GPU"<<endl; return 0; } // Set the GPU ram to 0, floats with all bits as 0 in IEEE are = 0.0f if(cudaMemset(d_Values, 0, sizeof(float) * 100) != CUDA_SUCCESS) { cout<<"There was a problem setting the values to 0"<<endl; } else { // Copy this array of 0s to the CPU's array of values if(cudaMemcpy(values, d_Values, sizeof(float) * 100, cudaMemcpyDeviceToHost) != CUDA_SUCCESS) { cout<<"There was a problem copying the data from the GPU"<<endl; } } // Free the GPU's array cudaFree(d_Values); // Print out the CPU's array to make sure they have all been set to 0.0f for(int i = 0; i < 100; i++) cout<<values[i]<<" "; cudaDeviceReset(); return 0; } |
Listing 4.2: cudaMemset
The new API function in Listing 4.2 is cudaMemset:
cudaError_t cudaMemset(void* devPtr, int value, size_t size);
This function can be used to set the elements of an array to some initial value. The first operand is a device pointer to the data to be set. The second operand is the value to which you wish to set each byte in the allocated memory, and the final operand is the size, in bytes, of the memory area to set. The function sets the allocated memory to a byte-sized value, meaning its usefulness for setting things such as floating point or integer values is quite limited—unless you are initializing everything to 0.
There are several steps involved in clearing an array to 0 using the CUDA API. First, there must be host and device copies of the same data. The host copy is called values[] in Listing 4.3 and the device copy is called d_Values. Data is allocated on the device to be the same size as it is on the host. It is then set to 0 with a call to cudaMemset and then the device memory is copied over the PCI bus back to the host, again using the cudaMemcpy function.
Although Listing 4.3 illustrates a very basic use of the device (it would be far more practical to simply zero the array with the host), the steps involved (i.e. copying data back and forth over the PCI bus with cudaMemcpy) are very common in CUDA programming. Also very common is the use of multiple pointers to point to host and device copies of the same data. Host pointers do not point to sensible areas of the device and vice versa.
Vector Addition Kernel
The next example illustrates adding two floating point vectors together.
|
#include <ctime> #include <cuda.h> using namespace std; __global__ void AddVectors(float* a, float* b, int count) { int idx = threadIdx.x + blockIdx.x * blockDim.x; if(idx < count) { a[idx] += b[idx]; } } int main() { // Number of items in the arrays const int count = 100; // CPU arrays float a[count], b[count]; // Device pointers float* d_a, *d_b; // Set the random seed for rand() srand(time(NULL)); // Set the initial values of the CPU arrays for(int i = 0; i < count; i++) { a[i] = (float)(rand() % 100); b[i] = (float)(rand() % 100); } // Allocate data on the device if(cudaMalloc(&d_a, sizeof(float) * count) != CUDA_SUCCESS) { cout<<"Memory could not be allocated on the device!"<<endl; cudaDeviceReset(); return 0; } if(cudaMalloc(&d_b, sizeof(float) * count) != CUDA_SUCCESS) { cout<<"Memory could not be allocated on the device!"<<endl; cudaFree(d_a); cudaDeviceReset(); return 0; } // Copy from host to device cudaMemcpy(d_a, &a, sizeof(float) * count, cudaMemcpyHostToDevice); cudaMemcpy(d_b, &b, sizeof(float) * count, cudaMemcpyHostToDevice); dim3 gridSize((count / 512) + 1); dim3 blockSize(512); AddVectors<<<gridSize, blockSize>>>(d_a, d_b, count); cudaMemcpy(&a, d_a, sizeof(float) * count, cudaMemcpyDeviceToHost); // Print out the results for(int i = 0; i < count; i++) cout<<"Result["<<i<<"]="<<a[i]<<endl; // Free resources cudaFree(d_a); cudaFree(d_b); cudaDeviceReset(); return 0; } |
Listing 4.3: Adding vectors
Listing 4.3 defines two floating point arrays on the host, a and b. It sets the values of the arrays to random integers using the srand and rand functions. It then copies the two arrays to the device pointers d_a and d_b and calls a kernel called AddVectors. The kernel adds the values from the b vector to the corresponding values in the a vector and stores the result in the a vector. This is then copied back to the host and printed to the screen. Note the use of the dim3 parameters in the launch configuration and the launch of many threads at once.
The kernel illustrates a very common pattern and a major difference between coding with CUDA and regular serial code. In serial code, the previous algorithm would be executed by a loop similar to that shown in Listing 4.4.
for(int i = 0; i < count; i++) { a[i] += b[i]; } |
Listing 4.4: Serial vector addition
The serial version of the algorithm uses a loop to iterate through the two arrays, adding a single element each iteration of the loop. The parallel version (as shown in the kernel from Listing 4.3) uses multiple threads in place of a loop.
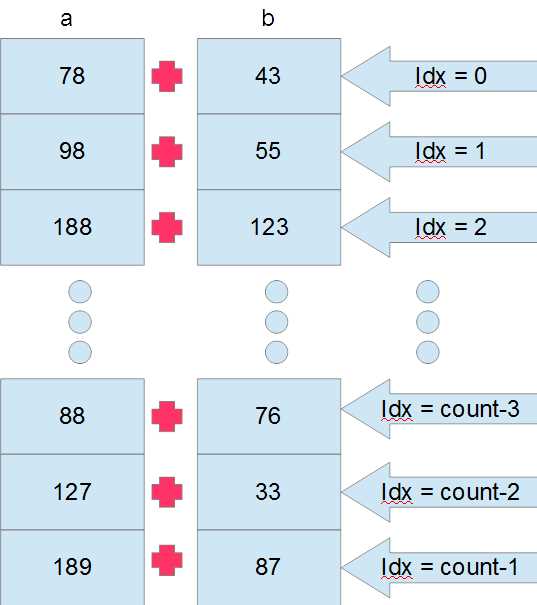
Figure 4.1: Parallel Vector Addition
Figure 4.1 illustrates how the vector addition takes place on the GPU. The vector arrays a and b (which are actually device pointers d_a and d_b passed to the kernel as parameters) are illustrated as a series of vertically stacked boxes, each containing a random value originally copied from the host. Each thread takes care of a single addition and all run at the same time (execution is only simultaneous in theory, some threads may actually be scheduled to execute after others. See the note that follows). The 20th thread adds together values a[20] and b[20], and the 13th thread adds a[13] and b[13]. There is no loop; each thread calculates a unique ID, called idx in Listing 4.3. The idx variable is used to index data elements from the array which are particular to the thread.
Note: The devices we are programming are massively parallel. The sheer number of parallel threads enables a GPU to outperform a CPU for many computations. But depending on the number of threads in the grid, the device will often schedule thread blocks to execute one after the other instead of simultaneously. The device does not have unlimited resources; it executes as many blocks as resources permit, and it schedules the remaining blocks for later execution as resources become available. Maximizing the number of simultaneous threads involves a metric called occupancy. We will examine how to view a kernel's occupancy with a profiler in Chapter 8.
Calculating a unique ID for each thread (like the idx variable in Listing 4.3) is very common. We often need to partition a problem into smaller subproblems so that each thread can tackle some tiny bit of the whole problem. It is common that threads each work on some unique unit of the problem, like the additions in Figure 4.1 where each thread performs a single addition. For example, observe the following line.
int idx = threadIdx.x + blockIdx.x * blockDim.x;
This line calculates a unique thread ID. The IDs are in sequence from 0 up to however many threads were launched, minus one. This calculation can be used whenever the grid and blocks have a single dimension. If you are working with multidimensional grids, blocks, or both, you will still need to account for the extra dimensions in the calculation.
Recursive Device Functions
Listing 4.5 shows a recursive device function to calculate an integer factorial.
Recursive device functions are not supported on compute capability 1.x devices. If you have such a device, the code in the following example will not work.
If, however, you have a compute capability 2.x or later device, the code will run fine; however, you will need to be sure that the code is being compiled for this compute capability.
The compute capability and SM settings are specified in the project’s properties. Under the CUDA C/C++ section called Device, you will see an option for Code Generation. Set this to match your device (e.g., compute_20,sm_20). I present further information on this in the Tips and Tricks section of Chapter 5, under the details on setting code generation options.
// Illustration of Factorial with recursive device function #include <iostream> #include <cuda.h> using namespace std; // Recursive device function __device__ int Factorial(int x) { if(x == 0) return 1; else return x * Factorial(x-1); } // Kernel __global__ void MyKernel(int* answer) { answer[0] = Factorial(answer[0]); } int main() { int i, answer, *d_i; // Read an int from user cout<<"Input a number: "; cin>>i; // Copy int to device cudaMalloc(&d_i, sizeof(int)); cudaMemcpy(d_i, &i, sizeof(int), cudaMemcpyHostToDevice); // Launch kernel MyKernel<<<1, 1>>>(d_i); // Copy answer back to host cudaMemcpy(&answer, d_i, sizeof(int), cudaMemcpyDeviceToHost); // Print out cout<<"The answer is "<<answer<<endl; cudaFree(d_i); return 0; } |
Listing 4.5: Recursive device functions
Listing 4.5 illustrates a simple recursive device function but it is very limited in the number the user can type. The Factorial function quickly overflows 32-bit integers. This leads to incorrect results for any user input greater than 12.
- 1800+ high-performance UI components.
- Includes popular controls such as Grid, Chart, Scheduler, and more.
- 24x5 unlimited support by developers.