
CUDA Succinctly®

CHAPTER 2
Creating a CUDA Project
Downloading the Tools
Visual Studio 2012 Express
Before starting any CUDA project, you need to ensure that you have a suitable IDE installed (this step can be skipped if you already have Visual Studio Express or Professional installed). Download and install Visual Studio 2012 Express. The code examples and screenshots in this book are all based on this IDE unless otherwise specified. The steps for creating a CUDA project for Visual Studio 2010 and 2013 are almost identical, and these IDEs should also be usable without any changes in my instructions. Visual Studio 2012 Express is available for download from the Microsoft website here, and Visual Studio 2013 Express is available for download here.
CUDA Toolkit
Before downloading and installing the CUDA toolkit, you should make sure your hardware is CUDA-enabled. CUDA is specific to systems running with NVIDIA graphics hardware. AMD graphics cards, Intel, or any other graphics hardware will not execute CUDA programs. In addition, only relatively modern NVIDIA graphics cards are CUDA-enabled. The GeForce 8 series cards from 2006 were the first generation of CUDA-enabled hardware. You can check if your hardware is on the following list of CUDA-enabled devices on the NVIDIA developer website here.
Once you are certain your hardware is CUDA-enabled, download and install the latest CUDA toolkit. You may like to register as an NVIDIA developer to receive news about the latest CUDA releases and CUDA-related events, and to get early access to upcoming CUDA releases. The toolkit is available from the NVIDIA developer website here.
Be sure to download the version of the toolkit that is appropriate for the environment in which you will be developing. The CUDA toolkit requires a download of around 1 GB in size so the download may take some time. The version I will be using is the Windows Desktop version for 64-bits. We will not be programming any 64-bit specific code, so the 32-bit version would also be fine. The toolkit comes with many code samples, developer drivers for the graphics card, as well as the libraries required to code CUDA. Be sure to install Visual Studio before installing the CUDA toolkit as it adds the CUDA features to the IDE.
Run the downloaded file in a manner suitable for the platform on which you have downloaded it and be sure to follow any instructions given to install the toolkit correctly.
Once you install the CUDA toolkit, I encourage you explore the installed folder. We will refer to this install folder and its libraries and headers many times while programming CUDA. If you do not change the install path during installation, the default folder that the toolkit installs to is as follows:
C:\Program Files\NVIDIA GPU Computing Toolkit\CUDA\v6.5
Where the C: is the main system drive and v6.5 is the version of the toolkit you installed.
Device Query
Before we begin a CUDA project, it is probably a good idea to get to know the hardware against which you will be programming. CUDA is low level; it is designed with very specific hardware in mind. Throughout the course of this book, many references are made to specific capabilities and metrics of the CUDA devices we will be programming. The CUDA toolkit installs a samples package containing a multitude of examples—one of which is called Device Query. This is a very handy application which prints interesting information about your installed hardware to a console window. Depending on the version of the CUDA toolkit you download, the DeviceQuery.exe program may be located in several different places. It is included as part of the CUDA samples, and you can find it by clicking the Samples icon in the NVIDIA program group and locating DeviceQuery.
The application can also be downloaded and installed separately from the NVIDIA website here.
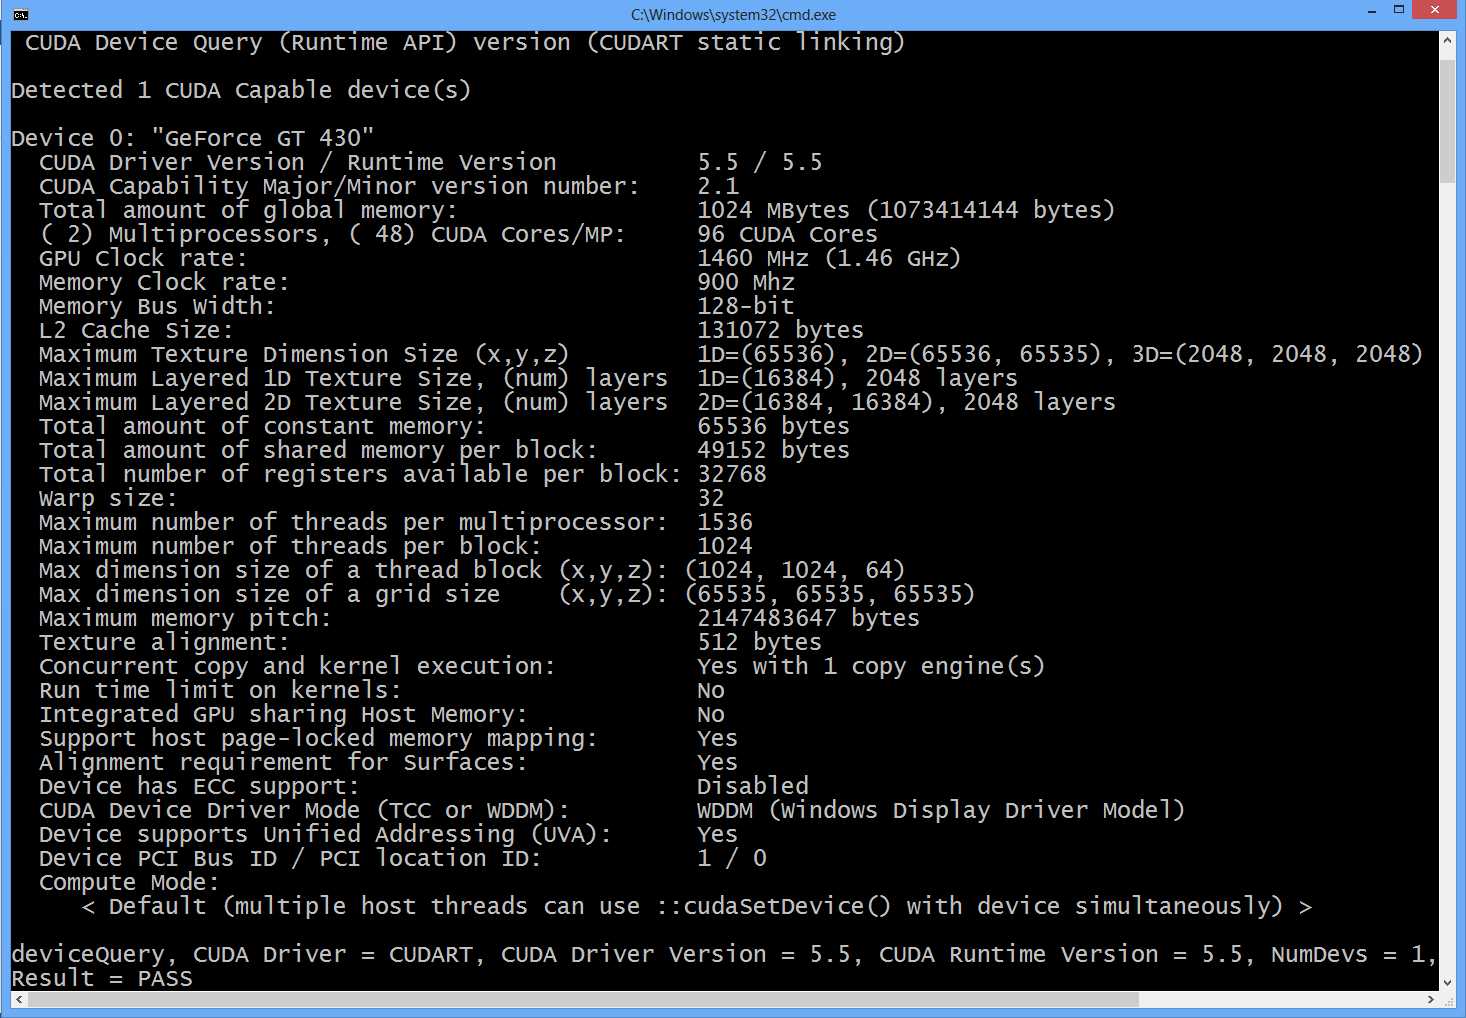
Figure 2.1: Device Query Output
Tip: You may find that when you run deviceQuery.exe, it opens and closes too quickly to read. Open the folder containing the deviceQuery.exe file in Windows Explorer. Hold down Shift and right-click a blank space in the folder. You should see an option to Open command window here in the context menu. Clicking this will open a command window in which you can type “deviceQuery.exe” to run the program, and the window will not close automatically.
Figure 2.1 is the output from Device Query for the device I used throughout this book. References to various metrics such as the maximum number of threads per streaming multiprocessor (SM) can be found for your hardware by examining the output from Device Query. Where I refer to a particular value from Device Query in the text, you should look up the values for your own hardware. If you open Device Query as described previously, you might want to keep it open and minimized while working through this book for reference.
Creating a CUDA Project
CUDA is initialized the first time a CUDA runtime function is called. The CUDA runtime is a collection of basic functions for memory management and other things. To call a CUDA runtime function, the project needs to include CUDA.h and link to the CUDA Runtime Library, CUDART.lib.
To create our first project, open a new solution in Visual Studio 2012 Express, choose C++ as the language, and use an empty project. Once the project is created, right-click on the project's name in the Solution Explorer and click Build Customizations as per Figure 2.2. If you are using Visual Studio 2013, the Build Customizations option is under the submenu labeled Build Dependencies.
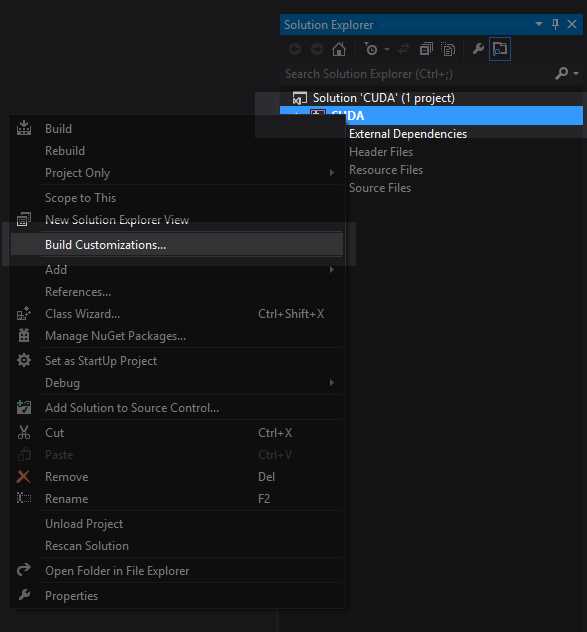
Figure 2.2: Build Customizations
This will open the Build Customizations window. Select the check box beside CUDA x.x (.targets, .props) as shown in Figure 2.3. Selecting this build customization will cause Visual Studio to use the CUDA toolset for files with a .cu extension, which are CUDA source files. CUDA kernels (functions designed for the GPU) are written in .cu files, but .cu files can contain regular C++ as well. Once you have selected the CUDA x.x(.targets, .props) build customization, click OK to save your changes.
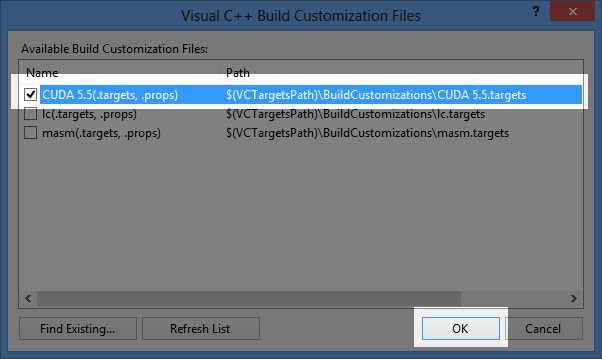
Figure 2.3: CUDA 5.5 (.targets, .props)
Next, we can add a CUDA source file to our project. Right-click on the project in the Solution Explorer, click Add, and then click New Item in the context menu as per Figure 2.4.
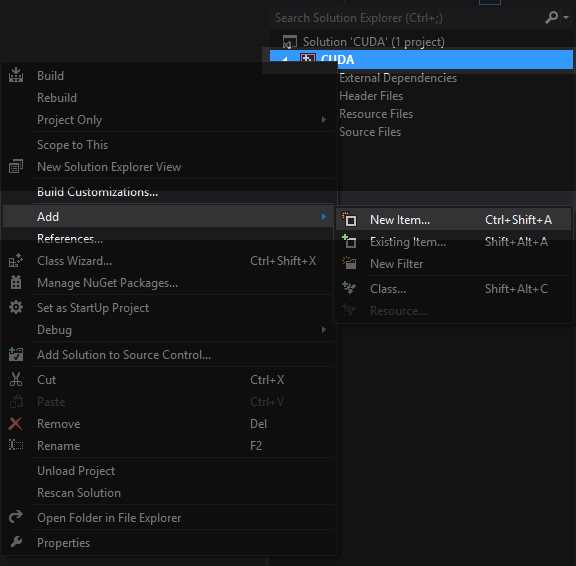
Figure 2.4: Adding a Code File
Click C++ File (.cpp) and name your file. I have called mine Main.cu as shown in Figure 2.5. The important thing is to give the file a .cu extension instead of the default .cpp. Because of the build customization setting, this code file will be sent to the NVIDIA CUDA C Compiler (NVCC).The NVCC compiler will compile all of the CUDA code and return the remaining C++ code to the Microsoft C++ compiler.

Figure 2.5: Adding a .cu File
Next, we need to ensure that Visual Studio is aware of the directory where the CUDA header files are located; this will likely be the same on your machine as it is on mine (depending on whether or not you changed the directory during installation). If you are using Visual Studio Professional, the paths may already be set up but it is always a good idea to check. Open the properties of the project by clicking Project in the menu bar and selecting Project Name Properties (where Project Name is the name of your project). Click VC++ Directories in the left panel and click the expand arrow beside the Include Directories entry in the right-hand panel. Click Edit in the menu that appears; this will allow you to specify paths which Visual Studio should search for headers, included with triangle braces (< and >). See Figure 2.6 for reference.
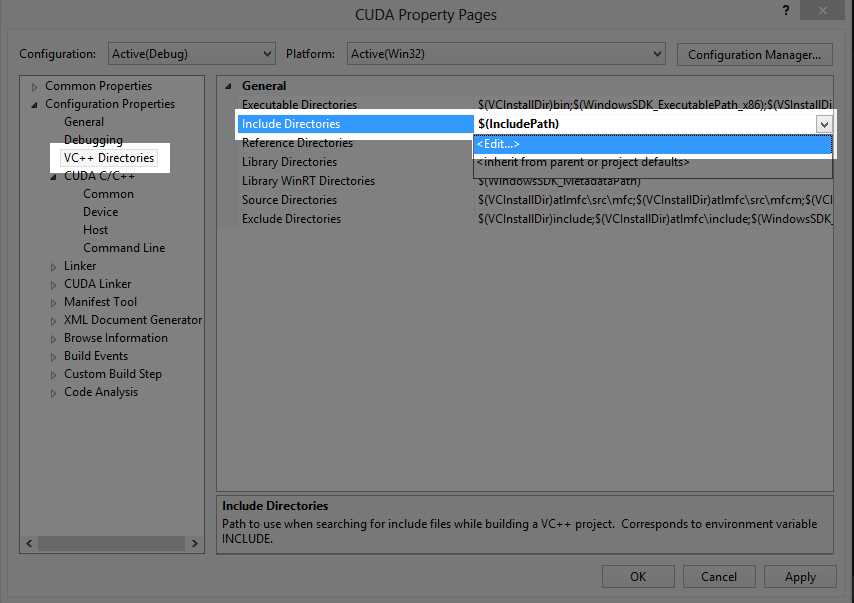
Figure 2.6: Properties for Including Directories
In the Include Directories dialog box, click the New Folder icon and locate the CUDA toolkit include folder on your computer. It will most likely be in a location similar to C:\Program Files\NVIDIA GPU Computing Toolkit\CUDA\v5.5\include as shown in Figure 2.7. When you click Select Folder, you will be presented with the box in Figure 2.8. Click OK once you have selected your folder.
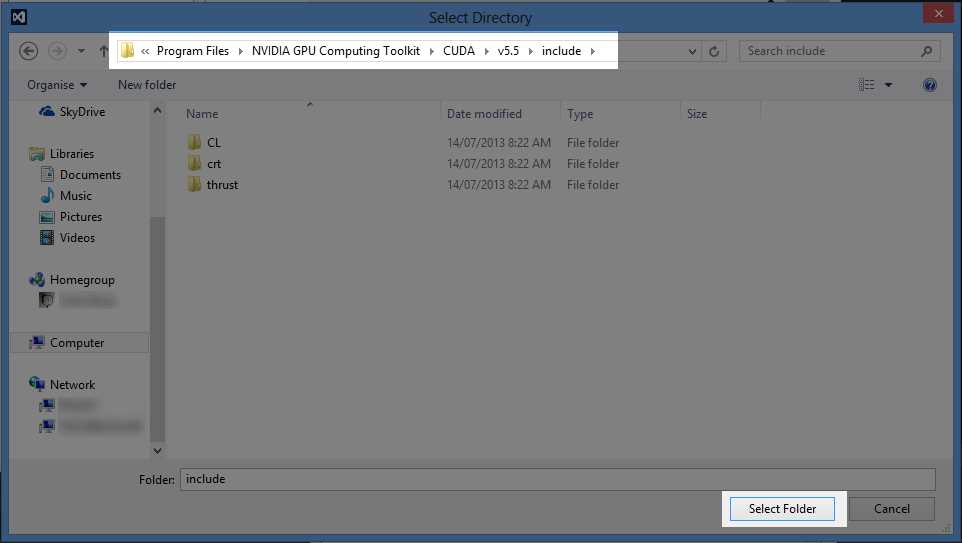
Figure 2.7: CUDA Toolkit include Directory
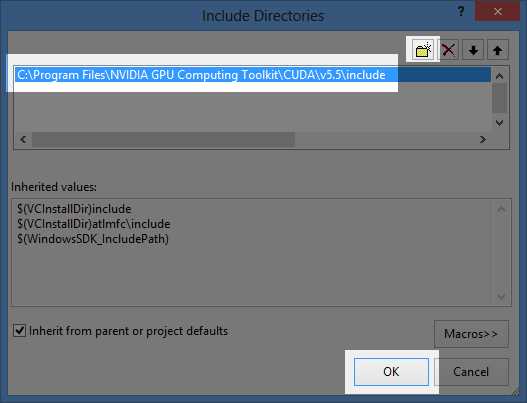
Figure 2.8: Click OK
Once this path is added, the CUDA include directory will be searched with the other standard include paths when Visual Studio locates headers included with the right-angle brackets (< and >).
Next, we need to specify where the CUDA library files are (that’s the static link “lib” libraries). You may not need to specify where the CUDA library folder is located, depending on whether or not the CUDA installer automatically registered the folder where the CUDA libraries are installed. Unless you have specified a different directory when installing the CUDA toolkit, the library files will most likely be located in a place similar to the headers. Select Library Directories, click the drop-down arrow on the right, and click Edit as per Figure 2.9.

Figure 2.9: Properties for Library Directories
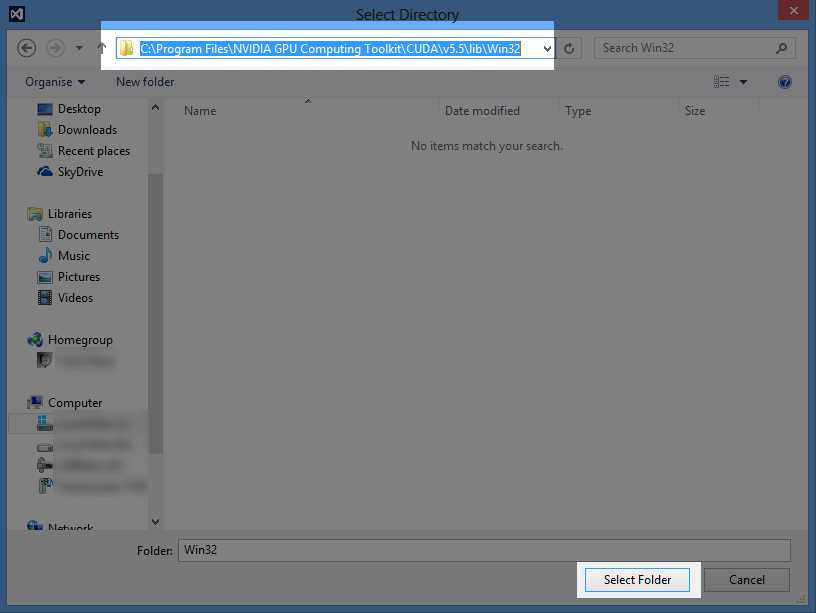
Figure 2.10: CUDA Library Directory
There are two library directories; one is for 32-bit projects and the other is for 64-bit projects. Select the one that is appropriate for your present solution platform. Remember, the CUDA version number and exact path may be different on your machine from the following examples.
C:\Program Files\NVIDIA GPU Computing Toolkit\CUDA\v5.5\lib\Win32
C:\Program Files\NVIDIA GPU Computing Toolkit\CUDA\v5.5\lib\x64
Once the library directory is added, we need to link to the CUDA runtime library: a file called CUDART.lib. Expand the Linker, and then select Input from the left panel of the Project Properties page. Type $(CUDAToolkitLibDir)\CUDART.lib; into the Additional Dependencies box. You can add the CUDART dependency to the beginning or to the end of the list but be careful not to delete all of the standard Windows library dependencies. Remember to click Apply to save these changes, and then click OK to close the box as per Figure 2.10. Later, when we link to other libraries, the steps are the same. For instance, to link to the curand.lib library, you would add $(CUDAToolkitLibDir)\CURAND.lib; to the additional dependencies.
Tip: You can actually just supply the name of the library if the path is already known to Visual Studio. For example, you can type CUDART.lib; instead of the longer $(CUDAToolkitLibDir)\CUDART.lib.
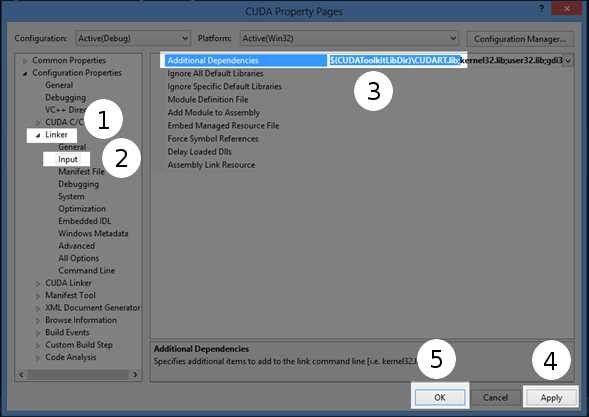
Figure 2.10: CUDA Runtime Library
Now that we have added the include path and the runtime library, we are ready to write some CUDA code. Initially, we can test that the Include directory and the link to CUDART.lib are working by writing the source code in Listing 2.1 into the .cu file we previously added to our project.
|
#include <cuda.h> // Main CUDA header using namespace std; int main() { cout<<"Hello CUDA!"<<endl; return 0; } |
Listing 2.1: Basic CUDA Program
Debug your project by pressing F5 or clicking Start Debugging in the Debug menu. Listing 2.1 does not do anything with CUDA, but if the project builds correctly, it is a good indication that everything is installed properly. The program will print the text “Hello CUDA!” to the screen.
Note: Each version of CUDA is designed to work with one or more specific versions of Visual Studio. Your platform toolset (Visual Studio version) may not be supported by CUDA. You can change the platform toolset in the project’s properties but only if you have other versions of Visual Studio installed. The platform toolset can be specified in the Configuration Properties | General page of the project properties. In the Platform option, you can see the versions of Visual Studio you have installed. To use other platform toolsets, you need to install different versions of Visual Studio. The code in this text was built with Visual Studio 2012 and the version of the platform toolset I used was v110.
Text Highlighting
It is very handy to have Visual Studio recognize that the .cu files are actually C++ source code files. This way, we get all the benefits of code highlighting and IntelliSense while we program. By default, Visual Studio Express is not aware that the code in these files is basically just C++ with a few CUDA extensions. Open the Visual Studio properties pages by clicking Tools and then selecting Options from the menu.
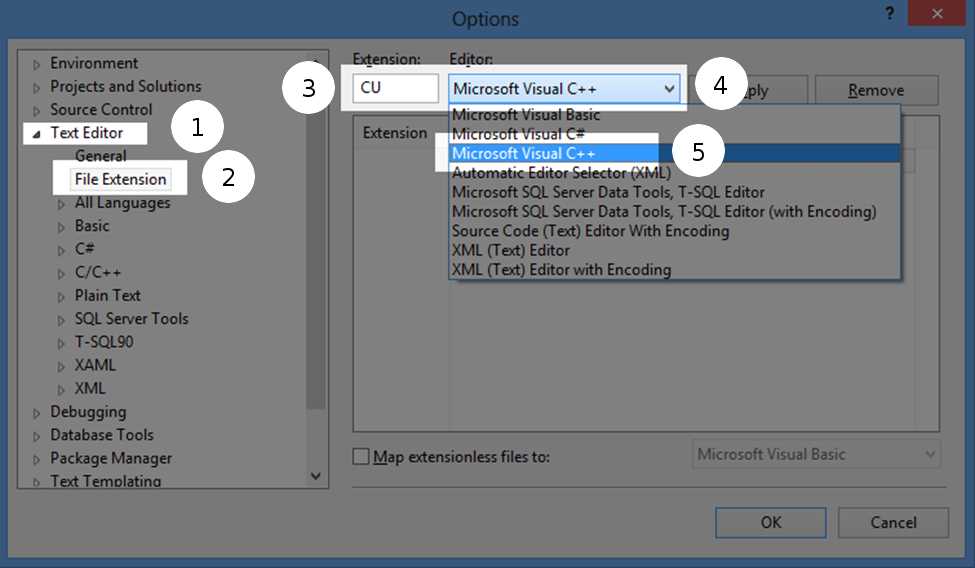
Figure 2.11: Syntax highlighting for .cu files
To enable C++ syntax highlighting and IntelliSense code suggestions for .cu files, click Text Editor and then File Extension in the panel on the left (see Figure 2.11). In the right panel, type “CU” into the Extension box. Select Microsoft Visual C++ from the Editor drop-down list, and then click Apply. These changes will be saved for future projects. Whenever a .cu file is added to a project, Visual Studio will always use C++ colors and IntelliSense.
You may notice that most of the CUDA keywords are underlined in red as if they were errors. Visual Studio treats the .cu files as regular C++ but does not understand the CUDA keywords. The CUDA keywords are understood by NVCC without any declaration. There are headers you can include that define the keywords and help Visual Studio recognize them in the same manner as regular code. The only necessary header for general CUDA C programming is the CUDA.h header. The following headers shown in Listing 2.2 may also be included (all are located in the same folder as cuda.h) as well as the #defines shown; this will enable kernel highlighting and prevent Visual Studio from underlining CUDA keywords as errors.
|
#define __CUDACC__ #include <iostream> #include <cuda.h> #include <device_launch_parameters.h> #include <cuda_runtime.h> #include <device_functions.h> |
Listing 2.2: Suggested Headers and Defines
Note: Programs can be built with or without these additional headers but Visual Studio reports all undefined symbols as errors. When a program has legitimate errors and fails to compile, the CUDA symbol errors can number in the hundreds. This makes it very difficult to know which errors reported by Visual Studio are real errors and which are undefined CUDA symbols. For this reason, it is usually better to include the headers in Listing 2.2 (or whatever headers define the keywords in your code) even though they are optional.
Timeout Detection and Recovery
Before we can compute intensive algorithms with the graphics card, we need to make sure the system will not assume the device has stalled. Usually during graphics processing, the device will compute a frame of graphics very quickly and respond to the operating system within 1/60 of a second (if it is running application at 60 frames per second). When using the device for general-purpose programming, we often expect computations to last for longer periods of time. A CUDA kernel may execute in a fraction of a second but, depending on the complexity of the computation, it might be expected to compute over a period of weeks.
The trouble is, when the device does not respond within two seconds, the operating system will assume the device has stalled while computing graphics. The operating system will reset the graphics driver, returning the user back to Windows or worse. At best, this will result in the user's screen turning off, the program crashing, and then the screen turning back on. But it can also result in the system resetting without safely shutting down any running applications.
We can change the amount of time the operating system allows the device by setting the TdrLevel and TdrDelay keys in the Windows Registry. The “Tdr” stands for timeout detection recovery. These registry keys are used to set the amount of time Windows will wait for the device to respond before it assumes it has stalled. They can also be used to turn off timeout detection altogether.
The program RegEdit.exe is used to alter the Windows Registry keys. To run RegEdit.exe, press and hold the Windows key and press R to open the Run dialog (the Windows key is in the lower left corner of your keyboard; it has an image of the Windows logo on it). Type “regedit” in the Open box as per Figure 2.12, and click OK. You may be prompted with the User Account Control box; if you are, click Yes to allow Registry Editor to make changes to the system. If you do not have administration rights to the system, you will need to contact your administrator before proceeding.
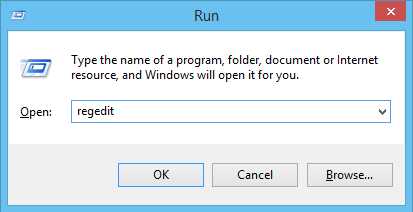
Figure 2.12: Windows Run Dialog
Warning: Be careful when using the RegEdit.exe program. The Windows Registry contains many keys that are important to the operation of the system. Save a backup of your registry before making changes by using the File > Export option or create a system restore point.
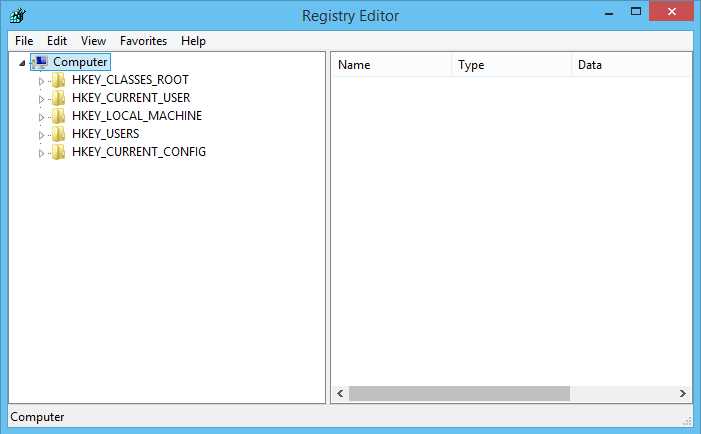
Figure 2.13: Registry Editor
When you open the Registry Editor application, you'll see a display similar to a regular file-browsing window as shown in Figure 2.13. We need to ensure two keys, TdrLevel and TdrDelay, exist in the graphics driver’s registry settings and have values suitable for our use.
The path to reach the graphics driver’s keys can be found at
HKEY_LOCAL_MACHINE\System\CurrentControlSet\Control\GraphicsDrivers
Click the HKEY_LOCAL_MACHINE folder in the left-hand panel, and then click the System sub-folder and continue in this manner until you find the GraphicsDrivers subfolder. Your screen should look similar to Figure 2.14.
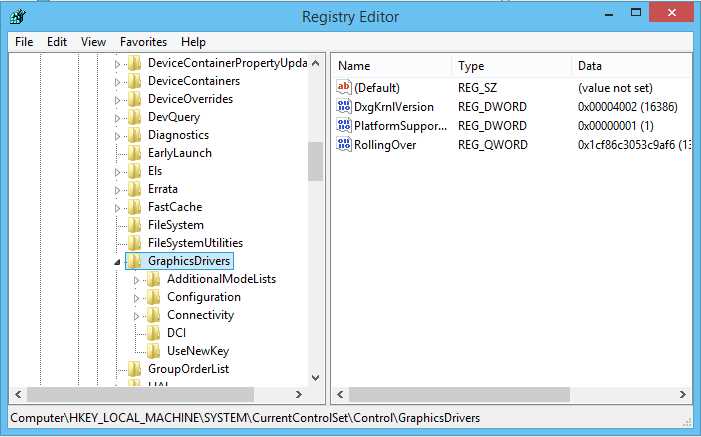
Figure 2.14: GraphicsDrivers Subfolder
You may have different keys in the GraphicsDrivers subfolder and you may already have the TdrLevel and TdrDelay keys. If these keys already exist, you can skip the next step (where we will create them) and jump to Figure 2.17 where we modify the keys.
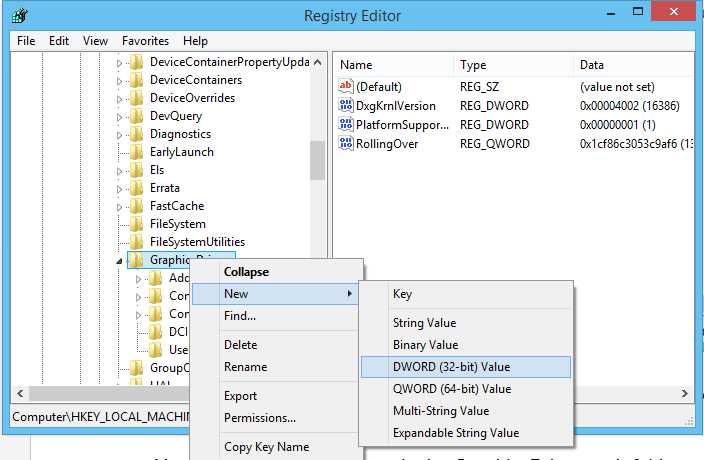
Figure 2.15: Adding a New Key
To add a new key to the registry, right-click the GraphicsDrivers folder in the left panel, click New and then select DWORD (32-bit) Value from the context menu. This will add a new key to the registry, which is a 32-bit integer. The key will initially be called New Value #1 or something similar. Rename the key TdrLevel by right-clicking it and selecting Rename from the context menu as per Figure 2.16.

Figure 2.16: Renaming a Variable
Add another 32-bit integer key called TdrDelay using the same steps. Once the keys are added, you can edit their values by right-clicking their name and selecting Modify from the context menu as per Figure 2.17.
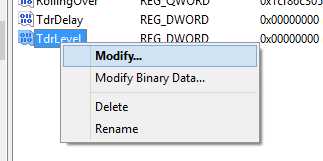
Figure 2.17: Modifying a Value
If the keys already exist, then all you need to do is modify the values. When you select Modify as shown in Figure 2.17, you will be presented with the Edit DWORD dialog (see Figure 2.18). You can then type a new value for the key in the Value data text box, selecting either hexadecimal or decimal as your base using the Base options.
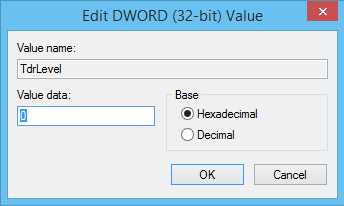
Figure 2.18: Editing a Value
For a complete description of all the settings for the TDR keys, visit the MSDN Dev Center at http://msdn.microsoft.com/en-us/library/windows/hardware/ff569918%28v=vs.85%29.aspx.
The TdrLevel key can be set to any of four values; we are only concerned with two of these:
- 0—Detection disabled. This is the most convenient for CUDA programming; it means that the system will never detect a timeout and reset the driver.
- 3—Recover on timeout. This is the default setting. The driver will reset if it takes longer to respond than the number of seconds specified in the TdrDelay key.
By default, the settings are 3 and 2 for TdrLevel and TdrDelay, respectively. This means that Windows will give the device two seconds and, if it does not respond, it will reset the driver. To allow more time (for instance, 60 seconds), set the TdrLevel variable to 3 and set the number of seconds (which is the value of the TdrDelay variable) to 60 (as per Figure 2.19).
![]()
Figure 2.19: Example TDR Variable Settings
Instead of allowing some amount of time before Windows should reset the driver, we can turn off timeout detection altogether by setting the TdrLevel key to 0. This means that no matter how long the device takes to respond, the driver will never be reset. This is the most convenient setting when you are CUDA programming—and it is the setting that I have used throughout this book.
- 1800+ high-performance UI components.
- Includes popular controls such as Grid, Chart, Scheduler, and more.
- 24x5 unlimited support by developers.